DROPS 79-27

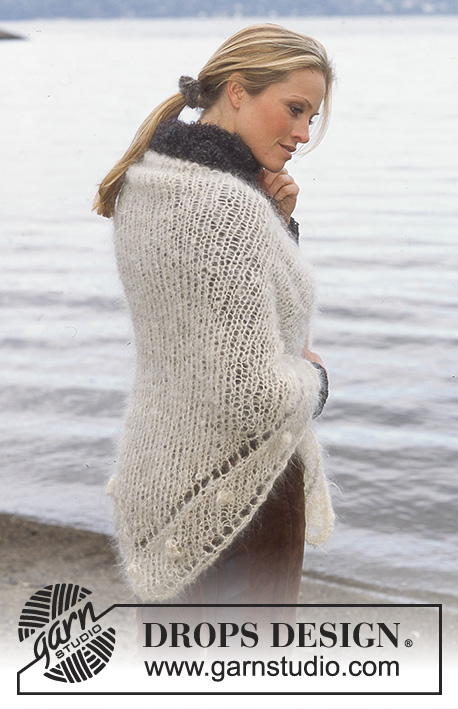
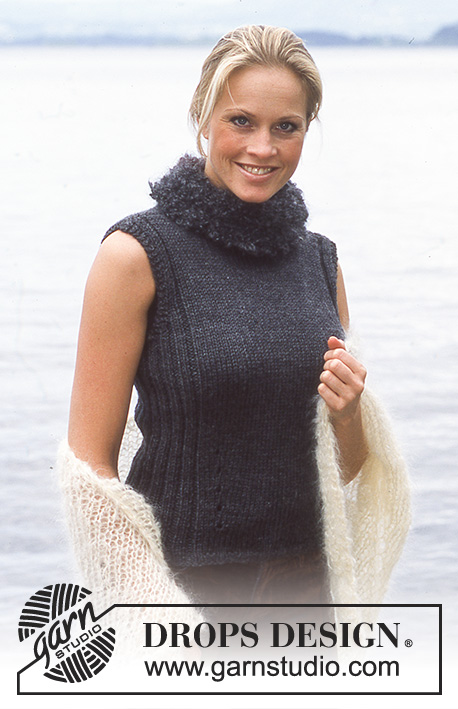
DROPS Pullover, hat and scarf in Ull-Flamé, Potholder in Ribbon, Cupwarmer and Pillow in Snow, and Hair scrunchy in Snow.

DROPS 79-27
Pullover:

Sizes: XS - S/M - M/L - XL - XXL
Finished measurements:
Bust: 88-96-108-116-128 cm [34 5/8" - 37.75" - 42.5" - 45 5/8" - 50 3/8"]
Hem: 80-86-100-106-120 cm [31.5" - 33 7/8" - 39 3/8" - 41.75" - 47.25"]

Materials: DROPS ULL-FLAMÉ,
(alternative SNOW from Garnstudio)
450-500-550-600-650 gr nr 22, red/beige
50 - 50 - 50 - 50 - 50 gr nr 01, natural

DROPS 10 mm [US 15] straight and circular needles, and 12 mm [US 17] straight needles, or sizes needed to obtain correct gauge.

-------------------------------------------------------

Alternative Yarn – See how to change yarns here
Yarn Groups A to F – Use the same pattern and change the yarn here
Yarn usage using an alternative yarn – Use our yarn converter here

-------------------------------------------------------

DROPS Super Sale

SAVE 30% on 6 cotton favorites!
Valid until 04.12.2024

Pattern instructions

NOTE: This pattern is written in American English. All measurements in charts are in cm. For conversion from inches to cm - click here. There are different terms for crocheting in American and British English. If this pattern includes crochet, click for "crochet terms" here. For this pattern in British English, please click here.
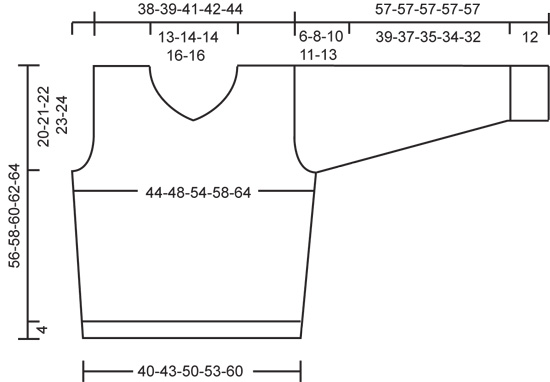
PULLOVER:

Gauge: 9 sts x 12 rows on larger needles in stockinette st = 10 x 10 cm.

Knitting tip: Use 2 balls at the same time and knit alternately 2 rows with each ball, to better mix up the thick and thin parts of the yarn.

Rib: * K 3, P 3 *, repeat from * - *.

Knitting tips (for V-neck): All decs are made from right side. Dec 1 st inside of 3 sts knit as follows from edge, as seen from the right side: K 1 (edge st knit in garter st), K 1 and P 1:
After 3 edge sts: Slip 1 as if to knit, K 1, psso.
Before 3 edge sts: K 2 tog

Front: Cast on 38-41-47-50-56 sts on smaller needles with red/beige. Knit rib as follows:
Row 1 (right side):
Sizes XS, XL and XXL: K1 (edge st knit in garter st), * K 3, P 3*, repeat from * - *, finish with K 1 (edge st knit in garter st).
Sizes S/M and M/L: K 1 (edge st knit in garter st), * K 3, P 3 *, repeat from * - *, finish with K 3 and K 1 (edge st knit in garter st).
Row 2 (wrong side):
Sizes XS, XL and XXL: K1 (edge st knit in garter st), * K 3, P 3*, repeat from * - *, finish with K 1 (edge st knit in garter st).
Sizes S/M and M/L: K 1 (edge st knit in garter st), * P 3, K 3 *, repeat from * - *, finish with P 3 and K 1 (edge st knit in garter st).
When the piece measures 4 cm, change to larger needles and stockinette st. When the piece measures 12 and 22 cm inc 1 st at each side = 42-45-51-54-60 sts. When the piece measures 36-37-38-39-40 cm bind off for armhole at each side every other row: 3 sts 1 time, 2 sts 0-0-1-1-2 times and 1 st 1-2-2-3-3 times = 34-35-37-38-40 sts. When the piece measures 42-44-46-48-50 cm divide at center front for the V-neck - in sizes S/M and M/L bind off the center st, in the other sizes divide without binding off a st. Put sts for one side on a holder and knit each side separately.
1st side: = 17-17-18-19-20 sts. Knit the 3 sts at neck edge as follows (as seen from the right side): K 1 (edge st knit in garter st), P 1, K 1. Dec 1 st for the neck every other row 6-6-6-7-7 times - see knitting tips = 11-11-12-12-13 sts remain on shoulder. Continue to knit the 3 sts at neck edge as before to finished measurements. Bind off when the piece measures 56-58-60-62-64 cm.
2nd side: Knit the same as 1st side, reversing all shaping.

Back: Cast on the same as the front. Knit the rib as follows:
Row 1 (right side):
Sizes XS, XL and XXL: knit the same as the front. Sizes S/M and M/L: K 1 (edge st knit in garter st), * P 3, K 3 *, repeat from * - *, finish with P 3 and K 1 (edge st knit in garter st).
Row 2 (wrong side):
Sizes XS, XL and XXL: knit the same as the front.
Sizes S/M and M/L: K 1 (edge st knit in garter st), * K 3, P 3 *, repeat from * - *, finish with K 3 and K 1 (edge st knit in garter st).
Bind off for armhole as on front. When the piece measures 54-56-58-60-62 cm bind off the center 10-11-11-12-12 sts for the neck. On the next row dec 1 st at each neck edge = 11-11-12-12-13 sts remain on each shoulder. Bind off when the piece measures 56-58-60-62-64 cm.

Sleeve: Cast on 26-26-26-32-32 sts on smaller needles with red/beige. Knit rib for 12 cm, keeping 1 edge st at each side in garter st. Change to larger needles and stockinette st. When the piece measures 14 cm inc 1 st at each side every 11-8-6-10-7 cm a total of 4-5-6-4-5 times = 34-36-38-40-42 sts. When sleeve measures 51-49-47-46-44 cm bind off for sleeve cap at each side every other row: 3 sts 1 time, 2 sts 1 time and 1 st 1-2-2-3-4 times, then bind off 2 sts at each side until the piece measures 57 cm. Bind off the remaining sts.

Assembly: Sew shoulder seams.
Collar: Pick up approx. 42-50 sts around the neck on smaller circular needles with red/beige, beginning at bottom of V-neck. Knit back and forth as follows: K 1 row from wrong side and then K 1 row knit right side, increasing evenly distributed to 77 or 83 sts (divisible by 6 + 5). Then knit rib, keeping 1 st in garter st and K 3 at each side at the center front - seen from the right side - alternately knit 1 row red/beige and 1 row natural over all sts - do not cut yarn after each row – instead scoot sts to the side of needle where the yarn is. When the collar measures 10 cm inc all P 3 (seen from the right side) to P 4 = 89 to 96 sts. When the collar measures 16 cm bind off in rib with red/beige. Lay right side of the collar over the left at bottom of V-neck and sew the garter st edge on right side to the picked-up edge on left side. Sew left side of the collar to picked-up edge on the right side of neck (on wrong side of work).
Sew in sleeves. Sew sleeve and side seams using edge sts as a seam allowance.


HAT:

Sizes: S/M - M/L

Materials: DROPS ULL-FLAMÉ,
(alternative SNOW from Garnstudio)
100-100 gr nr 01, natural

DROPS 10 mm [US 15] needles, or size needed to obtain correct gauge.

Gauge: 10 sts x 14 rows in stockinette st = 10 x 10 cm

Rib: * K 3, P 3 *, repeat from * - *.

Hat: Cast on 54-60 sts and knit 5 rows stockinette st (= rolled edge) - measure the work from here. Change to rib. When the piece measures 8-9 cm knit stockinette st to finished measurements, decreasing 4-5 sts evenly distributed on the first row = 50-55 sts. When hat measures 12 cm put 5 markers in work as follows: 1 st, 1 marker, * 10-11 sts, 1 marker *, repeat from * - * a total of 5 times, after last marker there are 9-10 sts.
Then dec 1 st every other row 8-9 times at each marker by knitting together the first 2 sts on the left side of markers = 10 sts remain. Cut yarn and pull through the remaining sts, fasten neatly. Hat measures approx. 23-24 cm.
Sew at center back.


SCARF:

Measurements: approx. 20 x 150 cm [7-7/8" x 59"]

Materials: DROPS ULL-FLAMÉ,
(alternative SNOW from Garnstudio)
150 gr nr 01, natural

DROPS 9 mm [US 13] needles, or size needed to obtain correct gauge.

Gauge: 8 sts in pattern = 10 cm wide

Pattern:
Row 1: knit.
Row 2: * K 1, yo *, repeat from * - *, end with K 1.
Row 3: Knit all K sts from previous row, letting yo drop (= long st).
Repeat rows 1 to 3.

Scarf: Loosely cast on 16 sts and knit Pattern - see instructions above. When scarf measures approx. 148 cm, knit 1 row over all sts and bind off.


CUPWARMER:

Materials: DROPS SNOW, from Garnstudop
50 gr nr 01, natural

DROPS 6 mm [US 10] needles, or size needed to obtain correct gauge.

2 DROPS wood buttons, nr 512

Gauge: 13 sts x 26 rows in garter st = 10 x 10 cm.

Cupwarmer: Measure the height of the cup, multiply that measurement by 1.3 = the number of sts to cast on. Measure around cup and add 4 cm, knit garter st until that length. Note: if the cup is larger at top that at bottom, knit 2 rows garter st over only half the sts when you have knit 1/3 the length, repeat short rows when you have knit 2/3 the length. When piece is the right length, make an opening for the handle by dividing piece at center of row.
Knit each side separately for approx. another 3 cm.
After 1 cm make a buttonhole (by knitting together the 2 center sts) and then make a yo (make 1 buttonhole on each side). Bind off. Sew 2 buttons approx. 1 cm from cast-on edge to match up with buttonholes.


POTHOLDER:

Measurements: approx. 16 x 16 cm [6.25" x 6.25"]

Materials: DROPS Ribbon
(alternative PARIS from Garnstudio)
50 gr nr 01, ivory
50 gr nr 02, natural

DROPS 4.5 mm [US 7] needles, or size needed to obtain correct gauge.

Gauge: 16 sts x 26 rows in garter st with 2 strands = 10 x 10 cm.

Potholder: Cast on 26 sts with 1 strand of each color. Knit garter st until the piece measures 15 cm. Cast on 10 new sts at one side for loop, knit 1 row over all sts and then bind off all sts. Sew loop end approx. 1 cm lower on side. Knit a second potholder.


Pillow case:

Measurements: 45 x 45 cm [17.75" x 17.75"]

The pillow case can be knit with 1 or 2 strands. If you knit with 1 strand follow the numbers shown before ( ), if you knit with 2 strands follow the numbers inside ( ).

Materials: DROPS SNOW from Garnstudio
350 (450) gr nr 01, natural

DROPS 9 mm [US 13] (12 mm [US 17]) needles, or size needed to obtain correct gauge.

5 DROPS wood buttons, nr 502

Gauge:
1 strand: 10 sts x 20 rows in garter st =10x10 cm
2 strands: 7 sts x 16 rows in garter st =10x10 cm

Pillow: Loosely cast on 43 (30) sts with 1 (2) strands Snow. Knit garter st. If you do not want an overlapping edge with buttonholes, bind off all sts when the piece measures 84 cm.
If you want an overlapping edge continue until the piece measures 98 cm then make 5 buttonholes evenly distributed on the row. 1 buttonhole = K 2 tog and make a yo. On the next row, twist and knit the yo so the buttonhole will not be too large. Knit 4 rows garter st after the buttonholes and then bind off.

Assembly:
Pillow without overlapping edge: Fold piece in half and sew side seams. Insert pillow, sew top seam and sew on 5 buttons as decoration 8 cm down from edge.
Pillow with overlapping edge: Fold the bottom 84 cm of pillow in half (overlapping edge = approx. 16 cm), sew side seams. Insert pillow. Fold overlapping edge over pillow and sew on buttons so that they match up with the buttonholes.


HAIR SCRUNCHY:

Sizes: One size

Materials: DROPS SNOW, from Garnstudio
50 gr in optional color

2 DROPS 4 mm double-pointed needles, or size needed to obtain correct gauge.

Gauge: 16 sts in stockinette st = 10 cm wide.

Hair scrunchy: Cast on 5 sts on 1 double-pointed needle. Knit 1 row, * slide sts to right side of needle without turning work, pull yarn tight on back side and knit 1 row from same side as previous row *, repeat from * - *. You are making an I-cord tube – be sure to pull the yarn tight across the back when starting a new row so that the tube will be consistent.
Bind off when tube measures 50 cm. Pull approx. 20 cm long piece of elastic through tube and knot ends together. Sew tube ends together with small sts.

Diagram

All measurements in charts are in cm.

diagram measurements

Each of our patterns has specific tutorial videos to help you.

Do you have a question? See a list of frequently asked questions (FAQ)

Knitting tension is what determines the final measurements of your work, and is usually measured per 10 x 10 cm. It is provided like so: number of stitches in width x number of rows in height - eg: 19 stitches x 26 rows = 10 x 10 cm.

The knitting tension is very individual; some people knit/crochet loosely while others work tightly. You adjust the knitting tension with the needle size, which is why the suggested needle size only serve as a guide! You need to adjust this (up or down) to ensure that YOUR knitting tension matches the knitting tension provided in the pattern. If you work with a different knitting tension than provided you will have a different yarn consumption, and your work will have different measurements than what the pattern suggests.

The knitting tension also determines which yarns can replace each other. As long as you achieve the same knitting tension you can replace one yarn with another.

See DROPS lesson: How to measure your tension/gauge

See DROPS video: How to make a gauge tension swatch

The required amount of yarn is provided in grams, eg: 450 g. To calculate how many balls you’ll need you first need to know how many grams are in 1 ball (25g, 50g or 100g). This information is available if you click on the individual yarn quality on our pages. Divide the amount required with the amount of each ball. For example, if each ball is 50g (the most common amount), the calculation will be as follows: 450 / 50 = 9 balls.

The important thing when changing from one yarn to another is that the knitting/crochet tension remains the same. This is so that the measurements of the finished piece will be the same as on the sketch provided. It is easier to achieve the same knitting tension using yarns from the same yarn group. It is also possible to work with multiple strands of a thinner yarn to achieve the knitting tension of a thicker one. Please try our yarn converter. We recommend you to always work a test swatch.

Please NOTE: when changing yarn the garment might have a different look and feel to the garment in the photo, due to individual properties and qualities of each yarn.

See DROPS lesson: Can I use a different yarn than the one mentioned in the pattern?

All our yarns are categorised into yarn groups (from A to F) according to thickness and knitting tension – group A contains the thinnest yarns and group F the thickest. This makes it easier for you to find alternative yarns to our patterns, should you wish to switch yarn. All yarns within the same group have a similar knitting tension and can easily replace each other. However, different yarn qualities have different structures and properties which will give the finished work a unique look and feel.

Click here for an overview of the yarns in each yarn group

At the top of all our patterns you’ll find a link to our yarn converter, which is a helpful tool should you wish to use a different yarn than suggested. By filling in the yarn quality you wish to replace, the amount (in your size) and number of strands, the converter will present good alternative yarns with the same knitting tension. Additionally it will tell you how much you’ll require in the new qualities and whether you’ll need to work with multiple strands. Most skeins are 50g (some are 25g or 100g).

If the pattern is worked with multiple colours, every colour will have to be converted separately. Similarly, if the pattern is worked with several strands of different yarns (for example 1 strand Alpaca and 1 strand Kid-Silk) you will have to find alternatives for each, individually.

Click here to see our yarn converter

Since different yarns have different qualities and textures we have chosen to keep the original yarn in our patterns. However, you can easily find options among our available qualities by using our yarn converter, or simply pick a yarn from the same yarn group.

It is possible that some retailers still have discontinued yarns in stock, or that someone has a few skeins at home that they would like to find patterns for.

The yarn converter will provide both alternative yarn as well as required amount in the new quality.

If you think it's hard to decide what size to make, it can be a good idea to measure a garment you own already and like the size of. Then you can pick the size by comparing those measures with the ones available in the pattern's size chart.

You'll find the size chart at the bottom of the pattern.

See DROPS lesson: How to read size chart

The needle size provided in the pattern serves only as a guide, the important thing is to follow the knitting tension. And since knitting tension is very individual, you will have to adjust the needle size to ensure that YOUR tension is the same as in the pattern – maybe you’ll have to adjust 1, or even 2 needle sizes, up or down to achieve the correct tension. For this, we recommend that you work test swatches.

Should you work with a different knitting tension than the one provided, the measurements of the finished garment might deviate from the measurement sketch.

See DROPS lesson: How to measure your tension/gauge

See DROPS video: How to make a gauge tension swatch

Working a garment top-down provides more flexibility and room for personal adjustment. For example it is easier to try the garment on while working, as well as making adjustments to length of yoke and shoulder caps.

The instructions are carefully explaining every step, in the correct order. Diagrams are adjusted to the knitting direction and are worked as usual.

The diagram depicts all rows/rounds, and every stitch seen from the right side. It is read from bottom to top, from right to left. 1 square = 1 stitch.

When working back and forth, every other row is worked from the right side and every other row is worked from the wrong side. When working from the wrong side, the diagram will have to be worked reversed: from left to right, knit stitches are purled, purl stitches are knit etc.

When working in the round every round is worked from the right side and the diagram are worked from right to left on all rounds.

See DROPS lesson: How to read knitting diagrams

The diagram depicts all rows/rounds, and every stitch seen from the right side. It is worked from bottom to top, from right to left.

When working back and forth every other row is worked from the right side: from right to left and every other row is worked from the wrong side: from left to right.

When working in the round, every row in the diagram are worked from the right side, from right to left.

When working a circular diagram you start in the middle and work your way outwards, counter clockwise, row by row.

The rows usually start with a given number of chain stitches (equivalent to the height of the following stitch), this will either be depicted in the diagram or explained in the pattern.

See DROPS lesson: How to read crochet diagrams

Instructions for working several diagrams after each other on the same row/round, will often be written like so: “work A.1, A.2, A.3 a total of 0-0-2-3-4 times". This means you work A.1 once, then A.2 is worked once, and A.3 is repeated (in width) the number of times provided for your size – in this case like so: S = 0 times, M = 0 times, L=2 times, XL= 3 times and XXL = 4 times.

The diagrams are worked as usual: begin with the first row in A.1, then work the first row in A.2 etc.

See DROPS lesson: How to read knitting diagrams

See DROPS lesson: How to read crochet diagrams

The total width of the garment (from wrist-to-wrist) will be larger in the larger sizes, despite the actual sleeves being shorter. The larger sizes have longer sleeve caps and wider shoulders, so there will be a good fit in all sizes.

The measurement sketch/schematic drawing provides information regarding the full length of the garment. If it’s a jumper or a jacket the length is measured from the highest point on the shoulder (usually closest to the neckline), and straight down to the bottom of the garment. It is NOT measured from the tip of shoulder. Similarly, the length of yoke is measured from the highest point on the shoulder and down to where yoke is split into body and sleeves.

See DROPS lesson: How to read a schematic drawing

Diagrams are often repeated on the round or in height. 1 repeat is the diagram the way it appears in the pattern. If it says to work 5 repeats of A.1 in the round, then you work A.1 a total of 5 times after/next to each other in the round. If it says to work 2 repeats of A.1 vertically/in height you work the entire diagram once, then begin again at the start and work the entire diagram one more time.

Chain stitches are slightly narrower than other stitches and to avoid working the cast-on edge too tight, we simply chain more stitches to begin with. The stitch count will be adjusted on the following row to fit the pattern and measurement sketch.

The rib edge is more elastic and will contract slightly compared to, for example, stocking stitch. By increasing before the rib edge, you avoid a visible difference in width between the rib edge and the rest of the body.

It’s very easy to cast off too tightly, and by making yarn overs while casting off (and simultaneously casting these off) you avoid a too tight cast off edge.

See DROPS video: How to bind off with yarn overs (yo)

To achieve an even increase (or decrease) you can increase on, for example: every 3rd and 4th row alternately, like so: work 2 rows and increase on the 3rd row, work 3 rows and increase on the 4th. Repeat this until the increase is complete.

See DROPS lesson: Increase or decrease 1 st on every 3rd and 4th row alternately

Should you prefer to work in the round instead of back and forth, you may of course adjust the pattern. You’ll need to add steeks mid-front (usually 5 stitches), and follow the instructions. When you would normally turn and work from the wrong side, simply work across the steek and continue in the round. At the end you’ll cut the piece open, pick up stitches to work bands, and cover the cut edges.

See DROPS video: How to knit steeks and cut open

Should you prefer to work back and forth instead of in the round, you may of course adjust the pattern so you work the pieces separately and then assemble them at the end. Divide the stitches for the body in 2, add 1 edge stitch in each side (for sewing) and work the front and back pieces separately.

See DROPS lesson: Can I adapt a pattern for circular needles into straight needles?

Pattern repeats can vary slightly in the different sizes, in order to get the correct proportions. If you’re not working the exact same size as the garment in the photo, yours might deviate slightly. This has been carefully developed and adjusted so that the complete impression of the garment is the same in all sizes.

Make sure to follow instructions and diagrams for your size!

If you have found a pattern you like which is available in women’s size it’s not very difficult to convert it to men’s size. The biggest difference will be the length of sleeves and body. Start working on the women size that you think would fit across the chest. The additional length will be worked right before you cast off for the armhole/sleeve cap. If the pattern is worked top-down you can add the length right after the armhole or before the first decrease on sleeve.

Regarding additional yarn amount, this will depend on how much length you add, but it is better with a skein too many than too few.

All yarns will have excess fibres (from production) that might come off as lint or shedding. Brushed yarns (ie hairier yarns) have more of these loose, excess fibres, causing more shedding.

Shedding also depends on what is worn under or over the garment, and whether this pulls at the yarn fibres. It’s therefore not possible to guarantee that there will be no shedding

Below are some tips on how to get the best result when working with hairier yarns:

1. When the garment is finished (before you wash it) shake it vigorously so the looser hairs come off. NOTE: do NOT use a lint roller, brush or any method that pulls at the yarn.

2. Place the garment in a plastic bag and put it in your freezer - the temperature will cause the fibres to become less attached to each other, and excess fibres will come off easier.

3. Leave in the freezer for a few hours before taking it out and shaking it again.

4. Wash the garment according to the instructions on the yarn label.

Pilling is a natural process that happens to even the most exclusive of fibers. It's a natural sign of wear and tear that is hard to avoid, and that is most visible in high friction areas of your garment like a sweater's arms and cuffs.

You can make your garment look as new by removing the pilling, using a fabric comb or a pill/lint remover.

Still can't find the answer you need? Then scroll down and leave your question so one of our experts can try to help you. This will be done normally within 5 to 10 working days.
In the meantime, you can read the questions and answers that others have left to this pattern or join the DROPS Workshop on Facebook to get help from fellow knitters/crocheters!

You might also like...

Post a comment to pattern DROPS 79-27

We would love to hear what you have to say about this pattern!

If you want to leave a question, please make sure you select the correct category in the form below, to speed up the answering process. Required fields are marked *.