
Popular categories
Looking for a yarn?


Comments / Questions (26)
![]() Im wrote:
Im wrote:
Haha thank you for the laugh, you didn't answer the question. The pattern and therefore the yarn needed is for three items, I only want to make one. You just ignored that. HaHa
12.12.2025 - 22:39
![]() Im wrote:
Im wrote:
I want to create just the poncho in XXL in snow yarn. So how do I figure out the needed amount? What if I want to felt it? Do I need more yarn? Thank You for any advice, it is appreciated:)
11.12.2025 - 19:43DROPS Design answered:
Hi Im, Drops Highlander is a discontinued yarn from yarn group E. Drops Snow is also from yarn group E so it can be used in this pattern, with the yarn amounts shown for Highlander. However, if you want to felt the poncho you will need more yarn and you will need to adjust the number of stitches and rows worked. You can do this but it means working felted swatches and working out the new numbers of stitches and rows (then working out the amount of yarn you need). This will be time consuming so we recommend working the poncho as described in the pattern, without felting. Regards, Drops team.
12.12.2025 - 06:38
![]() Kristin wrote:
Kristin wrote:
Kan jeg Tove ponchoen? Hvor mye må jeg evnt legge til av masker. Litt nybegynner og toving fungerer perfekt
18.12.2022 - 15:54DROPS Design answered:
Hej Kristin, du er nødt til at prøve dig frem, prøv eventuelt at tove en prøvelap og se hvor meget den krymper....
20.12.2022 - 08:41
![]() Heather Hess wrote:
Heather Hess wrote:
I am trying to get a pattern but I keep getting It's time to vote oerlaid on the pattern so i can't see it all - how can I get one of your patterns - I already voted twice! Heather Hess
10.01.2021 - 20:01DROPS Design answered:
Dear Mrs Hess, just close this small window "It's time to vote" by clicking on the small cross at the bottom corner on the right side. Happy knitting!
11.01.2021 - 10:04
![]() Evelyne Zrihen wrote:
Evelyne Zrihen wrote:
Bonjour, je ne suis pas sûre de bien comprendre le début : commencer et terminer par 1 m end ( m lis) et 3 m end ? merci pour vos éclaircissements, Eve
08.01.2021 - 18:10DROPS Design answered:
Bonjour Mme Zrihen, vous tricotez ainsi: 1 maille lis au point mousse, côtes *3 mailles endroit, 3 mailles envers*, répétez les côtes ainsi jusqu'à ce qu'il reste 4 mailles, terminez par 3 mailles endroit et 1 maille lis au point mousse. Bon tricot!
11.01.2021 - 07:12
![]() Ruth Rout wrote:
Ruth Rout wrote:
What yarn can I use instead of the discontinued Highlander yarn. I need something thick that is not itchy as I have Alopecia, and need a full bodied hat to give the impression I have hair under the hat.
22.12.2020 - 01:05DROPS Design answered:
Hi Ruth, Highlander was a yarn from group E. We have 2 other yarns in the same group (with the same thickness), Drops Snow and Drops Andes. If you would like an even thicker yarn there is another selection in Group F. You can find the different yarn groups if you click on Yarn at the top of the page and choose Yarn groups. Happy crafting!
22.12.2020 - 06:45
![]() Eve wrote:
Eve wrote:
Bonjour, j'aimerais réaliser ce poncho, mais j'aurais besoin de votre aide pour la quantité de laine dont j'ai besoin; j'aimerais le réaliser en taille M, sur un fond écru avec les motifs brun (donc en inversé par rapport au modèle proposé); j'aimerais que la laine soit grosse, au moins aiguilles 8 ou 9; Pouvez-vous me dire ce que je dois prendre comme quantité ? Merci bcp, Evelyne
23.11.2020 - 12:04DROPS Design answered:
Bonjour Eve, essayez notre convertisseur, vous pourrez voir ainsi les alternatives proposées ainsi que la quantité correspondante - retrouvez ici toutes les informations utiles sur les alternatives. Bon tricot!
23.11.2020 - 12:20
![]() Ragnhild Møgedal wrote:
Ragnhild Møgedal wrote:
Hei Vet dere om lengden på ponchoen er målt med eller uten frynser?
08.07.2020 - 22:12DROPS Design answered:
Hej Ragnhild. Det ska vara utan frynser ser det ut som. Mvh DROPS Design
09.07.2020 - 08:29
![]() Marie Couture wrote:
Marie Couture wrote:
Poncho Drops en Highlander. DROPS 79-1 Is there a collar? I don't see the explanation for the collar in the pattern but is seems to have one on the picture. Thank you for your help.
12.11.2017 - 20:51DROPS Design answered:
Dear Marie, what you see as a collar is actually explained in the pattern, which says " Knit rib back and forth on needles for 25 cm - start and end with K 1 (edge st) and K 3". It is not a separate collar, rather the body is starting with a straight funnel. I hope this helps. Happy Knitting!
12.11.2017 - 21:39
![]() Angela wrote:
Angela wrote:
What length circular needles are needed for this pattern? Since the circumference is almost 80", do I need an 80" circular needle? I've never seen any that long and am otherwise unsure how to do this project. Please advise.
21.01.2017 - 03:47DROPS Design answered:
Dear Angela, poncho is worked back and forth on circular needle on 2 parts sewn tog at the end. You can use a 80 cm circular needle (= approx. 31.5", not 80" needle). Happy knitting!
23.01.2017 - 09:32
|
||||||||||
DROPS 79-1 |
||||||||||
|
|
||||||||||
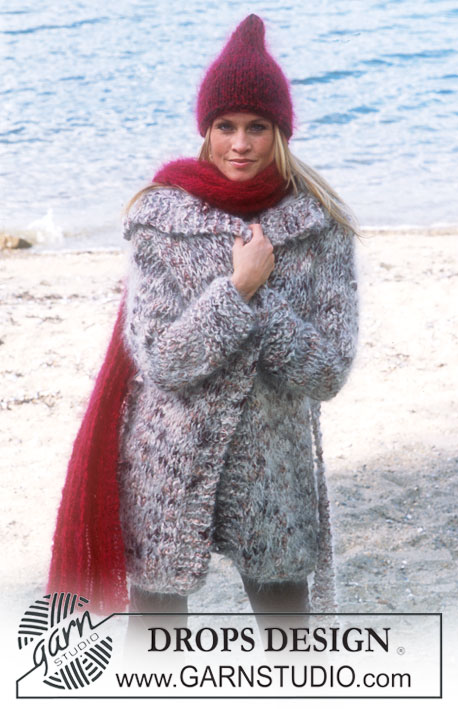
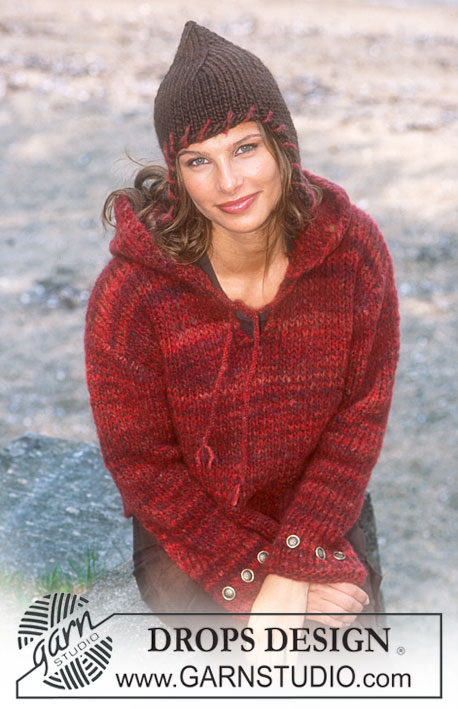
DROPS Poncho, Hat and Felted Purse
DROPS 79-1 |
||||||||||
|
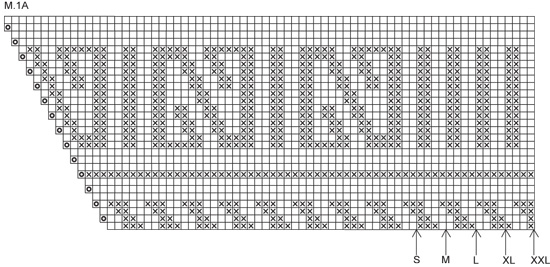
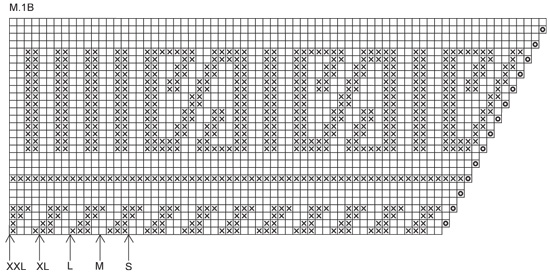
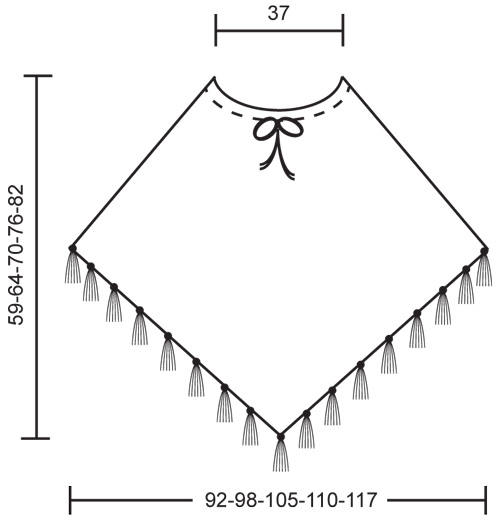
PONCHO: Gauge: 9 sts x 14 rows on larger needles in stockinette st = 10 x 10 cm. Rib: * K 3, P 3 *, repeat from * - *. Increasing tips: All increases are made from wrong side rows. Inc by making a yo at each side of center st. On the next row twist the yo when purling so that there will not be a hole. Pattern: See charts. The pattern is seen from the right side and is worked entirely in stockinette st, with yo. Arrows indicate the starting points for different sizes. Note: The poncho is knit from the collar down in 2 pieces and sewn together. Front: Cast on 29 sts on smaller circular needles with brown heather. Knit rib back and forth on needles for 25 cm - start and end with K 1 (edge st) and K 3. Change to larger circular needles and knit 1 row stockinette st, increasing 10 sts evenly distributed on the row = 39 sts. Knit the next row as follows: K 1 (edge st), * K 2 tog, yo *, repeat from * - *, finish with K 1 and K 1 (edge st). Put a marker in the center st, continue with stockinette st. Then inc 1 st at each side of center st every other row – see Increasing tips. When there are 87-95-103-111-119 sts on needles knit the next row as follows: K 1 (edge st), Pattern 1A – start at appropriate arrow on the chart (= 42-46-50-54-58 sts), 1 center st, Pattern 1B – start at appropriate arrow on the chart (= 42-46-50-54-58 sts) and K 1 (edge st). Continue pattern and inc every other row. When Pattern 1 is complete there are 115-123-131-139-147 sts. Knit 4 rows garter st – continue to inc every other row. Then bind off all sts. Note: at points knit 2 sts in 1 st at each side of center st at the same time as you bind off in order to keep the points from rolling.. The piece measures approx. 59-64-70-76-82 cm at center front from cast on row to point. Back: Cast on and knit the same as the front, but the collar ribbing should start and end with K 1 (edge st) and P 3. Assembly: Sew side seams using edge sts as a seam allowance. The top 15 cm of the collar should be sewn together on the right side so that the seam does not show when the collar folds out. Fringe tufts: Fasten 1 fringe tuft to lower edge at points of center front and center back and then fastens fringe tufts approx. 10 cm apart around lower edge of poncho. 1 fringe tuft = cut 10 strands 25 cm long of brown heather. Fold in half and pull loop through lower edge of poncho, pull ends through loop. Twisted cord: cut 2 strands 3 meters long in beige. Twist together until tight – fold in half and let twist up on itself, then make a knot at each end. Thread cord in holes around the neck - start at center front. Make 2 tufts with 8 strands 20 cm long in beige - see drawing on page 3 for how to attach. Attach 1 tuft to each end of cord. --------------------------------------------------------------------- HAT: Sizes: S/M - M/L Materials: DROPS HIGHLANDER 90% wool, 10% nylon/50 g./80 m./87 yards (alternative SNOW from Garnstudio) 100-100 gr nr 12,beige multicolor and use: DROPS VIVALDI from Garnstudio 50-50 gr nr 02, brown DROPS 8 mm [US 11] double-pointed needles, or size needed to obtain correct gauge. Gauge: 10 sts x 16 rows with 1 strand Highlander + 1 strand Vivaldi in stockinette st = 10 x 10 cm. Earflap: Cast on 3-4 sts with 1 strand Highlander + 1 strand Vivaldi. Knit garter st for 1 row then inc 1 st at each side on the next row and every 4 rows a total of 5 times = 13-14 sts - inc by making a yo inside of 1 st at each side. On the next row, twist the yo when knitting so that there will not be a hole. Knit garter st until the piece measures 8-9 cm, put sts on a st holder and knit a second earflap. Hat: Knit across one earflap on needles, cast on 8-9 new sts on needle (= back) and knit in the other earflap on the same needle = 34-37 sts. Continue in garter st, increasing 1 st at each side (on earflaps) every other row 2 times = 38-41 sts. Then cast on 12-14 new sts between earflaps for the front = 50-55 sts. Cut yarn and start at center back of hat – knit in the round on double-pointed needles – measure the work from here. Knit 14 rows garter st, then continue in stockinette st to finished measurements. When the piece measures 16 cm put 5 markers in work with 10-11 sts between each marker. Now dec on right side of all markers (by K 2 tog) every other row 9-10 times = 5 sts. Cut yarn, pull through the remaining sts and fasten tightly. Hat measures approx. 27-28 cm at center front. --------------------------------------------------------------------- PURSE: Finished measurements: Width: 24 cm [9.5"] Height: 33 cm [13"] Materials: DROPS HIGHLANDER 90% wool, 10% nylon/50 g./80 m./87 yards (alternative SNOW from Garnstudio) 200 gr nr 12, beige multicolor and use: DROPS VIVALDI from Garnstudio 50 gr nr 02, brown DROPS 8 mm [US 11] needles, or size needed to obtain correct gauge. Gauge: Before felting: 10 sts x 16 rows with 1 strand Highlander + 1 strand Vivaldi in stockinette st = 10 x 10 cm. After felting: approx. 15 sts x 24 rows = 10 x 10 cm. Purse: Cast on 40 sts with 1 strand Highlander + 1 strand Vivaldi. Knit 2 rows garter st, then knit stockinette st until the piece measures 110 cm, knit 2 rows garter st, bind off. Fold the purse in half and sew sides. Shoulder straps: Cut 15 strands of yarn 210 cm long of each yarn (= 30 strands). Make a knot at one end, divide into 3 bundles of 10 strands each and braid loosely, make a knot at other end. Sew ends at each side of the purse, approx. 5 cm from edge on the inside. Tassels: Make 2 tassels with 14 strands 60 cm long of each yarn (= 28 strands) - see illustration on page 3 of Drops 79. Sew one tassel to each lower edge corner of the purse. FELTING: The piece can be felted either in the washing machine or the tumble dryer – read description below. Remember: Subsequent washes are as for a normal wool garment. IN WASHING MACHINE: Washing machines will vary when felting. If the piece is not felted enough, it can be felted again. If it is felted too much, it can be stretched to the correct size while still wet. DO THE FOLLOWING: Lay the piece in the washing machine, using a programme of approx. 40 minutes (not a wool programme). Wash at 40 degrees C = 104 degrees F without pre-wash, detergent is optional. After washing, shape the piece while it is still wet. IN TUMBLE DRYER: Felting in a tumble dryer gives good control over the degree of felting. The tumble dryer can be opened during drying to check the size of the piece. If it is not felted enough it can be thoroughly wetted and felted again. If it is felted too much it can be stretched to the correct size while still wet. DO THE FOLLOWING: Lay the piece in water so it becomes completely wet, then place it in the tumble dryer and begin the drying process. Dry to the desired size, checking regularly. Fold the top 3 cm = 1¼" out to right side. |
||||||||||
Diagram explanations |
||||||||||
|
||||||||||
 |
||||||||||
 |
||||||||||
 |
||||||||||
Have you finished this pattern?Tag your pictures with #dropspattern or submit them to the #dropsfan gallery. Do you need help with this pattern?You'll find 20 tutorial videos, a Comments/Questions area and more by visiting the pattern on garnstudio.com. © 1982-2026 DROPS Design A/S. We reserve all rights. This document, including all its sub-sections, has copyrights. Read more about what you can do with our patterns at the bottom of each pattern on our site. |
||||||||||


With over 40 years in knitting and crochet design, DROPS Design offers one of the most extensive collections of free patterns on the internet - translated to 17 languages. As of today we count 325 catalogs and 12298 patterns - 12288 of which are translated into English (US/in).
We work hard to bring you the best knitting and crochet have to offer, inspiration and advice as well as great quality yarns at incredible prices! Would you like to use our patterns for other than personal use? You can read what you are allowed to do in the Copyright text at the bottom of all our patterns. Happy crafting!
Post a comment to pattern DROPS 79-1
We would love to hear what you have to say about this pattern!
If you want to leave a question, please make sure you select the correct category in the form below, to speed up the answering process. Required fields are marked *.