
Popular categories
Looking for a yarn?


Comments / Questions (25)
![]() Nicole wrote:
Nicole wrote:
Je fais le modèle XL devant gauche. 7 m côté milieu devant ? C'est le côté de la bordure mousse ? Vous dites 7 m, pourquoi ? 5 m plus 1 aug a 39 cm cela fait 6 m. ? Faut-il englober 1 m du point jersey pour faire 7 m ? Le rang raccourci, on ne le fait qu une seule fois ? Merci de me donner ces renseignements pour pouvoir continuer.
02.03.2026 - 13:59DROPS Design answered:
Bonjour Nicole, le milieu du devant = les mailles de la bordure devant; on en a 5 au début, puis on augmente 1 m = on a 6 m point mousse, et on tricote des rangs raccourcis sur les 7 mailles du devant en commençant sur l'envers, ainsi: tricotez 6 m point mousse + 1 m comme avant, tournez, tricotez ces 7 mailles comme avant sur l'endroit, tournez et tricotez toutes les mailles comme avant. Ces rangs raccourcis ne se font qu'une seule fois. Vous augmentez ensuite pour le col, vous diminuez en même temps pour l'encolure et vous formez l'emmanchure sur le côté. Bon tricot!
03.03.2026 - 08:54
![]() Susanne wrote:
Susanne wrote:
Ich beginne die Zunahmen für den Kragen und verstehe nicht, ob ich bei allen Zunahmen (10 × 1 M alle 2 Reihen und 4x 1 M alle 4 Reihen) verkürzte Reihen nur über die Blendenmaschen arbeiten soll oder nur bei den ersten beiden zuzunehmenden Maschen? Danke für die Klärung.
03.04.2025 - 23:23DROPS Design answered:
Liebe Susanne, die verkürzten Reihen für die Kragen-Maschen (= die 7 Maschen beidseitig) werden nur einmal beidseitig gestrickt, so nur nach der 1. Zunahme für den Kragen, dann stricken Sie weiter ohne weitere verkürzten Reihen, erst dann für den Kragen wenn die Schultermaschen abgekettet sind. Viel Spaß beim Stricken!
04.04.2025 - 08:59
![]() Aline Alphenaar wrote:
Aline Alphenaar wrote:
Klopt het dat de meerderingen voor de kraag van het linkervoorpand (10 plus 4x 1 st op de verkeerde kant van het breiwerk gemaakt worden, of vinden mindering voor de hals en meerdering voor de kraag in één en dezelfde naald aan de goede kant plaats?
07.01.2024 - 12:29DROPS Design answered:
Dag Aline,
Je meerdert voor de kraag door 2 steken in de een na laatste steek te breien. Op het linker voorpand is dit dus aan de goede kant en op het rechter voorpand is dit aan de verkeerde kant.
07.01.2024 - 14:15
![]() Fanny wrote:
Fanny wrote:
Bonjour, je termine le côté gauche de la veste . J'ai tricoté les 7 cm sur les 16 mailles comme il est indiqué dans les explications....je ne comprends pas ce que vous voulez dire par " et 14 cm sur le côté extérieur ". Pourriez-vous être plus précis car je suis perplexe !! Merci
17.02.2021 - 22:21DROPS Design answered:
Bonjour Fanny, vous tricotez les 16 mailles du col en rangs raccourcis, autrement dit, vous tricotez (2 rangs sur les 16 mailles , 2 rangs sur les 10 premières mailles côté extérieur) et répétez ces 4 rangs jusqu'à ce que le col mesure 7 cm côté épaule et 14 cm côté extérieur (vous avez tricoté 2 fois plus de rangs sur le côté extérieur du col). Bon tricot!
18.02.2021 - 09:21
![]() Jane wrote:
Jane wrote:
Bonjour Je suis en train de faire le col du devant droit de la veste - j'ai commencé par le droit-et me voilà arrivée à l'épineux problème des diminutions de l'encolure . En effet je ne comprends pas comment il faut procéder pour les réaliser ! Pourriez-vous m'éclairer à ce sujet ? Y a y-il une vidéo explicative ? Merci pour votre réponse .
29.12.2020 - 19:10DROPS Design answered:
Bonjour Jane, pour l'encolure du devant droit, vous diminuez après les mailles de bordure devant cf DIMINUTIONS pour l'encolure, autrement dit, tricotez comme avant les 5 mailles de bordure devant + celles augmentées pour le col et glissez 1 maille à l'endroit, 1 maille endroit, et passez la maille glissée par-dessus la maille tricotée. Bon tricot!
04.01.2021 - 11:54
![]() Helichryse wrote:
Helichryse wrote:
Bonjour Drops Pouvez -vous me dire où sont les explications du béret ? Merci
21.11.2020 - 17:19DROPS Design answered:
Bonjour Helichryse, bien volontiers, vous trouverez les explications du béret sous le modèle DROPS 80-2, après celles du pull. Bon crochet!
23.11.2020 - 08:39
![]() Linda Thomsen wrote:
Linda Thomsen wrote:
Hej. Der mangler en start * på mønstret på trøjen. Mvh Linda Thomsen
18.10.2020 - 15:19
![]() Lucie wrote:
Lucie wrote:
Ah enfin un modèle avec des aiguilles droites ! Très joli ....j'ai bien envie de le tricoter 😉
10.07.2020 - 13:05
![]() Esther wrote:
Esther wrote:
Hoe zit het bij de minderingen van de voorpanden? Schuiven de ribbel steken dan op? Of minder je voor de ribbel al?
14.12.2018 - 21:55DROPS Design answered:
Dag Esther,
Voor de minderingen van de halslijn (om een v-hals te creëren, minder je vlak naast de voorbiessteken. Deze voorbiessteken zijn in het begin 5 steken in ribbelsteken, maar omdat je tegelijkertijd aan het meerderen bent oor de kraag, worden dit er steeds meer.
18.12.2018 - 10:32
![]() PLAIRE wrote:
PLAIRE wrote:
Le démarrage du col me pose problème (modèle M) A 36cm augm 1 m sur la 2eme maille du début de la bordure mousse de 5 m soit 6 mailles avec l'augmentation et vous tricoter 2 rangs raccourcis au point mousse sur 7 mailles? Le col est bien la continuité de la bordure? merci de me préciser ce détail
21.08.2017 - 15:32DROPS Design answered:
Chere Plaire, le col est la continuite de la bordure. Vous travaillez exactement comme dans les explications: augmenter 1 m à 2 m de la bordure de devant, au rang suivant, tricoter 2 rangs au point mousse seulement sur les 7 m côté milieu devant (rangs raccourcis). et ensuite augmenter les mailles de la meme facon 10 fois tous les 2 rangs et 4 fois tous les 4 rangs (16 m augmentées pour le col). Bon tricot!
22.08.2017 - 19:44
|
||||||||||
DROPS 80-8 |
||||||||||
 |
 |
|||||||||
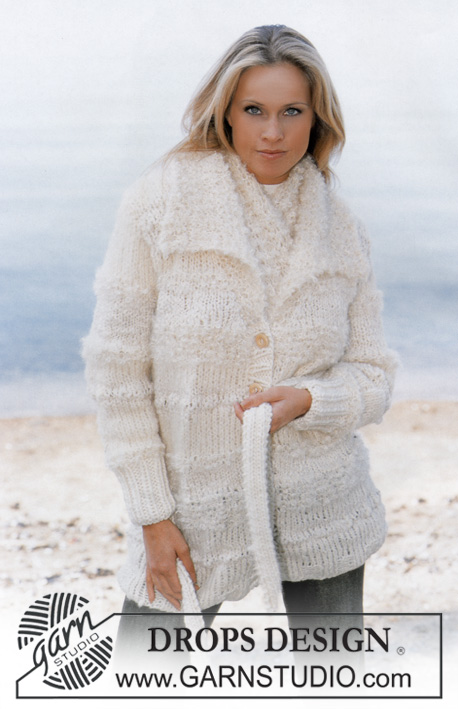
A set that includes: Cardigan, shawl, beret and purse
DROPS 80-8 |
||||||||||
|
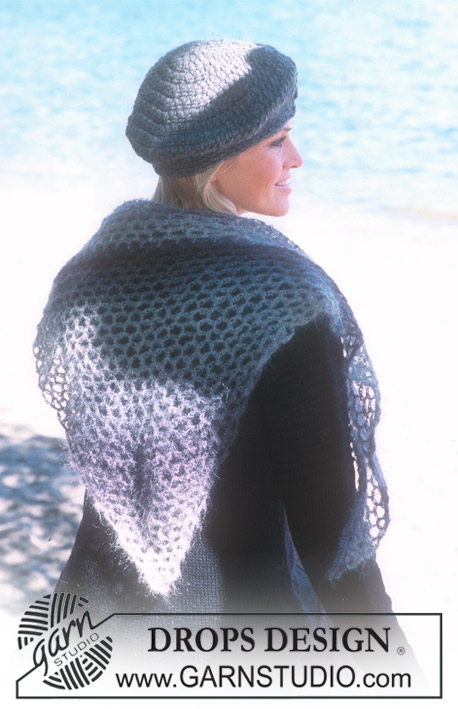
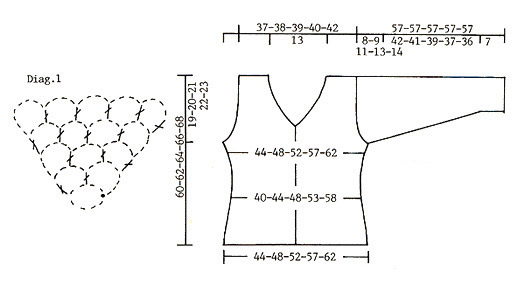
CARDIGAN: Gauge: 20 sts x 26 rows on larger needles in stockinette st = 10 x 10 cm Pattern (row 1 = wrong side): K 1 row (wrong side), K 1 row (right side row), P 1 row, and K 1 row, repeat these 4 rows. Increasing tips (for the collar): Inc by knitting 2 sts in the next to outermost st. Knitting tips (for neckband): All decs are made from right side. Dec 1 st inside of 5 buttonband sts + the increased sts of the collar, as follows: Before the buttonband/collar sts: K 2 tog. After the buttonband/collar sts: Slip 1 st as if to knit, K 1, psso. Back: Cast on 90-98-106-116-126 sts on smaller needles and knit 10 rows garter st. Change to larger needles and stockinette st. When the piece measures 5-6-7-8-9 cm dec 1 st at each side every 4 cm 4 times = 82-90-98-108-118 sts. When the piece measures 24-25-26-27-28 cm inc 1 st at each side every 4 cm a total of 4 times = 90-98-106-116-126 sts. When the piece measures 35 cm knit Pattern – see instructions above – over all sts to finished measurements. When the piece measures 41-42-43-44-45 cm bind off for armhole at each side every other row: 4 sts 1 time, 3 sts 0-1-1-2-2 times, 2 sts 1-1-2-2-4 times and 1 st 2-2-3-4-3 times = 74-76-78-80-84 sts. When the piece measures 58-60-62-64-66 cm bind off the center 22 sts for the neck. Then dec 1 st at each neck edge every other row 2 times = 24-25-26-27-29 sts remain on each shoulder. Bind off when the piece measures 60-62-64-66-68 cm. Left front: Cast on 50-54-58-63-68 sts on smaller needles and knit 10 rows garter st, change to larger needles and stockinette st, keeping 5 sts in garter st for buttonband. When the piece measures 5-6-7-8-9 cm dec and inc at the side as on back = 50-54-58-63-68 sts. Read the entire next section before knitting: When the piece measures 35 cm knit Pattern over all sts (continue to knit buttonbands in garter st) to finished measurements. Collar: When the piece measures 35-36-37-38-39 cm inc 2 sts inside of first button band st. On the next row, knit 2 rows garter st over only the outermost 7 sts at the center front (short rows). Then knit all sts – at the same time inc 1 st inside of outermost button band sts (see Increasing tips) every other row 10 times and then every 4 rows 4 times = 16 sts increased for collar - knit the increased sts in garter st. Neckband: When the piece measures 39-40-41-42-43 cm dec 1 st for neckband every other row 18 times – see knitting tips. Armhole: When the piece measures 41-42-43-44-45 cm bind off for armhole at the side as on back. After all armhole and neckband shaping is complete 40-41-42-43-45 sts remain. Continue until the piece measures 60-62-64-66-68 cm. Now bind off 24-25-26-27-29 sts on shoulder = 16 collar sts remain on needles. Collar: Continue in garter st on the collar stsas follows: * 2 rows garter st over all sts, 2 rows garter st over only the outermost 10 sts at the center front (short rows) *, repeat from * - * until the collar measures approx. 7 cm at inner edge and approx. 14 cm at outer edge. Put sts on a st holder. Right front: Cast on and knit the same as the left, reversing all shaping. Make buttonholes along buttonbands. (1 buttonhole = K tog the 3rd and 4th sts from center front and yo. On the next row twist and knit the yo so the buttonhole will not stretch out. Make buttonholes when the piece measures: Size S: 7, 14, 21, 28 and 35 cm. Size M: 8, 15, 22, 29 and 36 cm. Size L: 9, 16, 23, 30 and 37 cm. Size XL: 10, 17, 24, 31 and 38 cm. Size XXL: 11, 18, 25, 32 and 39 cm. Sleeve: Cast on 47-47-49-53-53 sts on smaller needles. Read the entire next section before knitting: Knit garter st for 7 cm, change to larger needles and stockinette st. After the garter st inc 1 st at each side every 3.5-3-25-2.5-2 cm a total of 12-14-15-15-17 times = 71-75-79-83-87 sts. When sleeve measures 38-36-34-32-30 cm knit Pattern – see instructions above – to finished measurements. When sleeve measures 49-48-46-44-43 cm bind off for sleeve cap at each side every other row: 4 sts 1 time, 3 sts 1 time, 2 sts 2 times and 1 st 3-4-6-7-11 times, then bind off 2 sts at each side until the piece measures 56 cm, then bind off 3 sts 1 time at each side. Bind off the remaining sts, the piece measures approx. 57 cm. Assembly: Sew shoulder seams. Sew the collar at center back with and sew the collar edge to back neckband. Sew in sleeves. Sew sleeve and side seams using edge sts as a seam allowance. Sew on buttons. SHAWL: Sizes: Width approx. 125 cm [48⅞"] Length at center back approx. 75 cm [29.5"] Materials: DROPS VIVALDI from Garnstudio 100 gr nr 11, blue-grey DROPS 4 mm [US F] crochet hook, or size needed to obtain correct gauge. Crochet gauge: 5 ch-loops wide and 7.5 ch-loops high = 10 x 10 cm. Pattern: See diagram. Shawl: Ch 8 and join into a ring with a sl st. Round 1: ch 8, 1 dc in ring, ch 4, 1 dc in the same ring – see diagram, turn the work. Round 2: ch 8, 1 dc in ring below, ch 4, 1 dc in the next ring below, ch 4, 1 dc in the same ring, turn the work. Round 3: ch 8, 1 dc in ring below, ch 4, 1 dc in the next ring, ch 4, 1 dc in the next ring, ch 4, 1 dc in the same ring, turn the work. Continue to inc in the same manner until there are approx. 55-56 rings across. BERET AND PURSE: Beret size: One size Purse measurement: Width: 24 cm [9.5"] Height: 30 cm [11.75"] Materials: DROPS SNOW from Garnstudio Beret: 100 gr nr 14, grey Purse: 200 gr nr 14, grey DROPS 7 mm [US K] crochet hook, or size needed to obtain correct gauge. Crochet gauge: 9 dc x 6 rows = 10 x 10 cm. Crochet tip: Replace the 1st dc of every row with ch 3. Beret: Ch 4 and join into a ring with a sl st. Round 1: Crochet 8 dc (read crochet tip) in ring, finish with 1 sl st in first dc. Round 2: Crochet 2 dc in each dc from Round 1 = 16 dc, finish with 1 sl st in first dc. Round 3: Crochet as follows: * 1 dc in dc from Round 2, 2 dc in the next dc *, repeat from * - * = 24 dc, finish with 1 sl st in first dc. Round 4: Crochet as follows: * 1 dc in dc from Round 3, 2 dc in the next dc *, repeat from * - * = 36 dc, finish with 1 sl st in first dc. Round 5: Crochet 1 dc in each dc from Round 4 and 2 dc in every 4th dc = 45 dc, finish with 1 sl st in first dc. Round 6: Crochet 1 dc in every dc from Round 5, and 2 dc in every 5th dc = 54 st, finish with 1 sl st in first dc. Round 7: Crochet 1 dc in every dc from Round 6, and 2 dc in every 6th dc = 63 dc, finish with 1 sl st in first dc. Round 8: Crochet 1 dc in every dc from Round 7, and 2 dc in every 7th dc = 72 dc, finish with 1 sl st in first dc. The work now measures approx. 25 cm in diameter. Round 9: Crochet 1 dc in every dc from Round 8. Now begin decreasing: Round 10: Crochet 1 dc in every dc from Round 9, skipping over every 6th dc = 60 dc, finish with 1 sl st in first dc. Round 11: Crochet 1 dc in every dc from Round 10, skipping over every 5th dc = 48 dc, finish with 1 sl st in first dc. Now crochet 3 rows with 1 sc in each dc from Round 11, cut yarn and fasten. Beret measures approx. 21 cm up to the top. Purse: The purse is crocheted flat, folded in half and sewn together at the side and bottom. Ch loosely 46 (incl. 3 for turning). Turn, crochet 1 dc in each ch = 43 dc (1st dc = 3 ch). Continue to crochet dc over all sts until piece measures approx. 29 cm, finish with 2 rows sc, cut yarn. Sew the purse at the side and bottom. Strap: Ch 7 (incl. 3 for turning). Turn, crochet 1 dc in each ch = 5 dc (1st dc = 3 ch). Crochet dc until strap measures approx. 55 cm, cut yarn. Crochet a second strap. Sew one strap at each side, approx. 2 cm in from edge. |
||||||||||
Diagram explanations |
||||||||||
|
||||||||||
 |
||||||||||
Have you finished this pattern?Tag your pictures with #dropspattern or submit them to the #dropsfan gallery. Do you need help with this pattern?You'll find 21 tutorial videos, a Comments/Questions area and more by visiting the pattern on garnstudio.com. © 1982-2026 DROPS Design A/S. We reserve all rights. This document, including all its sub-sections, has copyrights. Read more about what you can do with our patterns at the bottom of each pattern on our site. |
||||||||||


With over 40 years in knitting and crochet design, DROPS Design offers one of the most extensive collections of free patterns on the internet - translated to 17 languages. As of today we count 324 catalogs and 12290 patterns - 12280 of which are translated into English (US/in).
We work hard to bring you the best knitting and crochet have to offer, inspiration and advice as well as great quality yarns at incredible prices! Would you like to use our patterns for other than personal use? You can read what you are allowed to do in the Copyright text at the bottom of all our patterns. Happy crafting!
Post a comment to pattern DROPS 80-8
We would love to hear what you have to say about this pattern!
If you want to leave a question, please make sure you select the correct category in the form below, to speed up the answering process. Required fields are marked *.