
Popular categories
Looking for a yarn?


Comments / Questions (39)
![]() Emmi wrote:
Emmi wrote:
M-koko takakappale joka 2. kerros päätetään kummastakin päästä 2s kunnes työssä on jäljellä 64s? Eli 4 kerrosta ja nämä 8s on päätetty ja jatkan neulontaa normaalisti haluttuun pituutee ? Sekä tuo etukappaleen keskiedun uloimmat silmukat apupuikoille. Eli siis mikä on keskietu?
30.09.2025 - 21:59DROPS Design answered:
Kyllä, jatka neulomista ilman kavennuksia, kunnes työ on halutun pituinen. Keskietu on etukappaleen keskellä edessä oleva reuna, eli sivun vastakkainen reuna.
03.10.2025 - 18:03
![]() Mary wrote:
Mary wrote:
Bonjour, Combien de pelotes faut il pour réaliser cette veste en taille 40? Merci d'avance
28.12.2023 - 10:58DROPS Design answered:
Bonjour Mary, vous trouverez la quantité nécessaire pour chaque taille en haut de page; autrement dit, pour une taille S par ex il faut 750 g DROPS Alaska / 50 g la pelote = 15 pelotes DROPS Alaska (utilisez notre convertisseur si besoin); pour trouver votre taille, mesurez un vêtement similaire dont vous aimez la forme et comparez ces mesures à celles du schéma (voir cette leçon. Bon tricot!
02.01.2024 - 09:33
![]() Favre Véronique wrote:
Favre Véronique wrote:
Bonjour et merci pour ce modèle. J ai une question concernant l arrondi des manches. Je n ai que 2 mailles de rabattues pour le dos et 1 de chaque côté, donc je ne comprends pourquoi marquer autant l arrondi des manches? Serait ce mieux adapté des manches droites? Merci. Véronique
19.10.2022 - 06:16DROPS Design answered:
Bonjour Mme Favre, le calcul de l'arrondi des manches ne correspond pas systématiquement aux mailles rabattues pour l'emmanchure (c'est un peu plus technique). Pour que les manches tombent joliment comme sur la photo, le haut de la manche doit être de 7-8-9-11-13-15 cm comme indiqué dans le schéma; bon tricot!
19.10.2022 - 10:04
![]() Lilli Grinderslev wrote:
Lilli Grinderslev wrote:
Hvad mener i med at luk 5 masket af til knaphul
18.02.2022 - 18:11DROPS Design answered:
Hej Lilli, vi skriver: luk 5. (femte) maske af til knaphul :)
21.02.2022 - 15:39
![]() Emer wrote:
Emer wrote:
Hi, I'm just starting the hood and am a bit confused. Pattern says K 6 rows on all sts, is this 6 rows garter stitch. Do I continue M1 pattern towards the front of the hood. Thanks
14.09.2021 - 01:58DROPS Design answered:
Dear Emer, you will now knit the next 6 rows (= you will have a total of 3 ridges in garter stitch) increasing evenly on last row. Then you will continue with pattern M.1 and 7 stitches in garter stitch on each side. Happy knitting!
14.09.2021 - 07:58
![]() Giliola Gambetta wrote:
Giliola Gambetta wrote:
C'è la possibilità di avere lo schema del cardigan con i ferri dritti?
05.02.2021 - 16:48
![]() Chantal wrote:
Chantal wrote:
Je ne comprends pas bien la fin des devants (gauche et droit) : "Rabattre pour l'encolure tous les rangs en début de rang à partir de l'encolure : 2 fois 4 m =" Il donc rabattre dans la bordure ? Ni le schéma ni la photo ne permettent de comprendre ce détail.
29.11.2020 - 17:14DROPS Design answered:
Bonjour Chantal, les mailles de la bordure devant ont déjà été mises en attente à ce moment-là: quand l'ouvrage mesure 65 à 79 cm (cf taille), vous devez tricoter les 11-12-13 (cf taille) premières mailles sur l'envers (devant gauche) et les glisser en attente pour l'encolure, puis, au début de chaque rang sur l'envers vous rabattrez 4 mailles et ceci 2 fois (pour l'encolure vous aurez donc 11 à 13 m en attente + 8 m rabattues). Quand vous ferez la capuche, vous reprendrez les mailles en attente et relèverez les mailles dans les 8 m rabattues. Bon tricot!
30.11.2020 - 09:20
![]() Simone wrote:
Simone wrote:
Finally up to knitting the hood, I am having some trouble understanding the pattern from: continue in pattern on next row ..... when piece measures 38cm ... ? is this the measurement from where I picked up the stitchers at the neck and I am a bit lost about the 1 vertical pattern part? there is no diagram to help with the hood. Thanks
03.08.2020 - 10:59DROPS Design answered:
Dear Simone, piece is then measured from the stitches picked up for hood - pattern is worked over 2 rows (see B in M.1) "after a vertical pattern" to stop after a row with purl stitches worked from RS. Happy knitting!
03.08.2020 - 13:23
![]() Simone wrote:
Simone wrote:
Hello once again, I am making good but slow progress with this lovely 'Purpleberry jacket'. My question this time is at the underarm cast off 6 sts for armholes, do I put the LF and RF onto sts holders? therefore attaching a new working yarn to work the back piece? Thanks so much
08.06.2020 - 09:57DROPS Design answered:
Dear Simone, yes correct, you will now finish each piece separately, slip stitches of both front piece on a thread or on a stitch holder and join new yarn on back piece. Happy knitting!
08.06.2020 - 12:21
![]() Simone wrote:
Simone wrote:
Hello again, I am enjoying the pattern, after taking some time to understand. My question is about the dec 1 stitch at each side of markers - what type of dec are these ? K2tog or ?? Many thanks
30.04.2020 - 03:45DROPS Design answered:
Dear Simone, you can decrease on each side of both markers like this: work until 2 sts remain before marker, K2 tog, marker, slip 1 as if to K, K1, psso. Happy knitting!
30.04.2020 - 10:32
|
||||||||||||||||
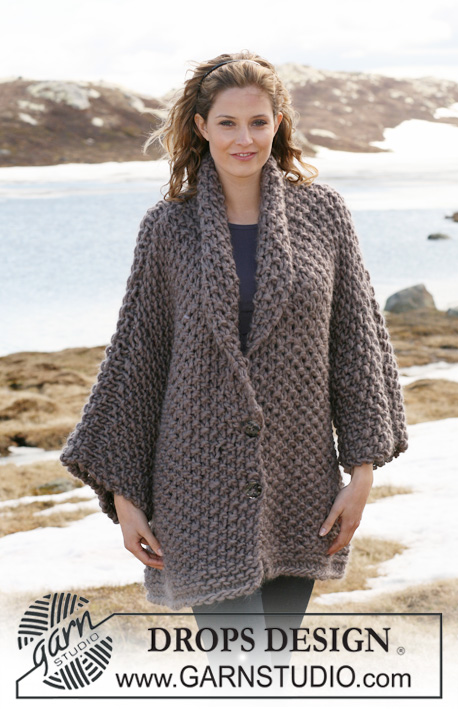
Hooded Blackberry Jacket#hoodedblackberryjacket |
||||||||||||||||
|
|
||||||||||||||||
Knitted DROPS jacket with hood and berry pattern in “Alaska”. Size S-XXXL.
DROPS 117-38 |
||||||||||||||||
|
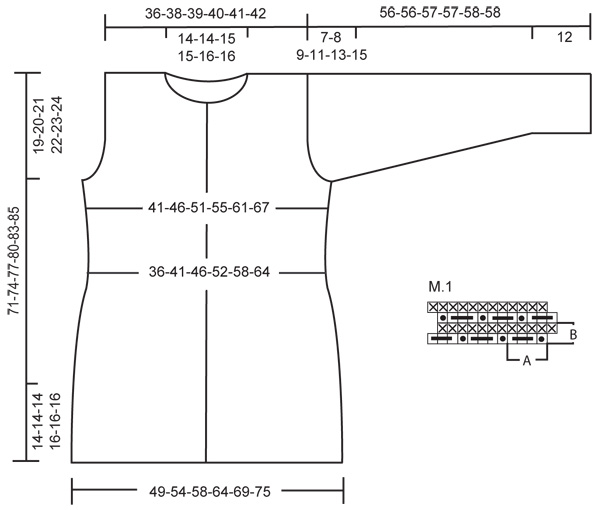
GARTER ST (back and forth on needle): K all rows. PATTERN: See diagram M.1. NOTE! First row in diagram = WS. BUTTONHOLES: Make buttonholes on right front band. 1 buttonhole = bind off 5th st from mid front and make 1 YO. Make buttonholes when piece measures: Size S: 15, 23, 31, 39, 47, 55, 63 cm / 6", 9", 12¼", 15¼", 18½", 24¾". Size M: 18, 26, 34, 42, 50, 58, 66 cm / 7", 10¼", 13⅜", 16½", 19¾", 22¾", 26". Size L: 15, 24, 33, 42, 51, 60, 69 cm / 6", 9½", 13", 16½", 20", 23⅝", 27⅛". Size XL: 16, 24, 32, 40, 48, 56, 64, 72 cm / 6¼", 9½", 12½", 15¾", 19", 22", 25¼", 28⅜". Size XXL: 19, 27, 35, 43, 51, 59, 67, 75 cm / 7½", 10⅝", 13¾", 17", 20", 23¼", 26½", 29½". Size XXXL: 21, 29, 37, 45, 53, 61, 69, 77 cm / 8¼", 11⅜", 14½", 17¾", 21", 24", 27", 30⅜". INCREASING TIP: Inc 1 st by making 1 YO. On next row work YO into back of loop to avoid a hole. -------------------------------------------------------- -------------------------------------------------------- JACKET: Worked back and forth on circular needle. Work the outermost st towards mid front each side with 2 threads throughout (to make the edge firmer). Cast on 182-198-210-230-250-270 sts on circular needle size 5 mm / US 8 with Alaska. K 5 rows and continue in PATTERN on next row from WS as follows - see above: 7 GARTER STS - see above - M.1 until 7 sts remain, 7 garter sts. The 7 garter sts towards mid front each side = front bands, worked in garter st throughout. Continue in pattern like this. When piece measures 14-14-14-16-16-16 cm / 5½"-5½"-5½"-6¼"-6¼"-6¼" - adjust to after 1 vertical pattern repeat – work next rows from WS as follows: 7 garter sts, M.1 on the next 16-16-20-20-24-24 sts, stockinette st on the next 136-152-156-176-188-208 sts, M.1 on the next 16-16-20-20-24-24 sts, finish with 7 garter st. Insert 2 markers in piece, 49-53-56-61-66-71 sts in from each side (back piece = 84-92-98-108-118-128 sts). Now continue in pattern like this. REMEMBER THE GAUGE! AT THE SAME TIME when piece measures 15-18-15-16-19-21 cm / 6"-7"-6"-6¼"-7½"-8¼" make BUTTONHOLES on right front band – see above! When piece measures 18 cm / 7" dec 1 sts each side of both markers, and repeat the dec on every 2-2-2-2.5-2.5-2.5 cm / ¾"-¾"-¾"-⅞"-⅞"-⅞" a total of 11-11-10-10-10-10 times = 138-154-170-190-210-230 sts. When piece measures 41-42-43-44-45-45 cm / 16⅛"-16½"-17"-17¼"-17¾"-17¾" inc 1 st each side of both markers – see INCREASING TIP! Repeat the inc on every 2.5-2.5-2.5-5-5-6 cm / ⅞"-⅞"-⅞"-2"-2"-2⅜" a total of 4-4-4-3-3-3 times = 154-170-186-202-222-242 sts. When piece measures 52-54-56-58-60-61 cm / 20½"-21¼"-22"-22¾"-23⅝"-24" bind off 6 sts each side for armhole (= 3 sts each side of marker) and complete each piece separately. BACK PIECE: = 64-72-80-88-98-108 sts. Bind off for armhole each side at the beg of every row: 2 sts 0-1-2-3-5-7 times and 1 st 1-2-3-4-4-4 times = 62-64-66-68-70-72 sts. When piece measures 69-72-75-78-81-83 cm / 27⅛"-28⅜"-29½"-30¾"-32"-32¾" bind off the middle 22-22-24-24-26-26 sts for neck and complete each shoulder separately. Bind off 1 st on neckline on next row = 19-20-20-21-21-22 sts left on shoulder. Bind off when piece measures 71-74-77-80-83-85 cm / 28"-29⅛"-30⅜"-31½"-32¾"-33½". LEFT FRONT PIECE: = 39-43-47-51-56-61 sts. Bind off for armhole at the side as described for back piece, AT THE SAME TIME continue in pattern as before. When piece measures 65-68-71-74-77-79 cm / 25½"-26¾"-28"-29⅛"-30⅜"-31" slip 11-11-12-12-13-13 sts towards mid front on a stitch holder for neck (sts now not fitting into M.1: P from RS, K from WS). Bind off to shape the neckline at the beg of every row from mid front: 4 sts 2 times = 19-20-20-21-21-22 sts left on shoulder. Bind off when piece measures 71-74-77-80-83-85 cm / 28"-29⅛"-30⅜"-31½"-32¾"-33½". RIGHT FRONT PIECE: Like left front piece, but mirrored. Remember buttonholes! SLEEVE: Worked back and forth on circular needle. Cast on 46-46-50-50-54-54 sts (includes 1 edge st each side) on circular needle size 5 mm / US 8 with Alaska. K 5 rows and continue in pattern on next row from WS as follows: 1 edge st, M.1 until 1 st remain, 1 edge st. Continue in pattern like this. When piece measures 12 cm / 4¾" - adjust to after 1 vertical pattern repeat – continue in stockinette st (first row = WS). When piece measures 14 cm / 5½" inc 1 st each side (inc inside edge st) and repeat the inc on every 5-3.5-3.5-3-2.5-2 cm / 2"-1¼"-1¼"-1⅛"-⅞"-¾" a total of 7-9-9-10-11-13 times = 60-64-68-70-76-80 sts. When piece measures 49-48-48-46-45-43 cm / 19¼"-19"-19"-18"-17¾"-17" (less for the larger sizes because of longer sleeve cap and wider shoulder) - bind off for sleeve cap each side at the beg of every row: 4 sts 1 time, 2 sts 2-3-3-3-3-3 times, 1 st 0-0-0-2-4-6 times, then 2 sts each side until piece measures 55-55-56-56-57-57 cm / 21⅝"-21⅝"-22"-22"-22½"-22½", now bind off 3 sts 1 time each side, and bind off remaining sts. Piece measures approx 56-56-57-57-58-58 cm / 22"-22"-22½"-22½"-22¾"-22¾" / X". HOOD: Sew shoulder seams. Hood is worked back and forth on needle. Pick up 74-74-76-76-78-78 sts round neckline (incl sts on stitch holder) on circular needle size 5 mm / US 8 with Alaska. K 6 rows on all sts, AT THE SAME TIME inc 16-16-18-18-20-20 sts evenly on last row = 90-90-94-94-98-98 sts. Continue in pattern on next row from WS as follows: 7 garter sts, M.1 until 7 sts remain, 7 garter sts. When piece measures 36-36-37-37-38-38 cm / 14¼"-14¼"-14½"-14½"-15"-15" - adjust to after 1 vertical pattern repeat – P 1 row on all sts and bind off. ASSEMBLY: Fold hood double and sew tog. Sew sleeve seams inside 1 edge st. Set in sleeves. Sew on buttons. |
||||||||||||||||
Diagram explanations |
||||||||||||||||
|
||||||||||||||||
 |
||||||||||||||||
Have you finished this pattern?Tag your pictures with #dropspattern #hoodedblackberryjacket or submit them to the #dropsfan gallery. Do you need help with this pattern?You'll find 21 tutorial videos, a Comments/Questions area and more by visiting the pattern on garnstudio.com. © 1982-2026 DROPS Design A/S. We reserve all rights. This document, including all its sub-sections, has copyrights. Read more about what you can do with our patterns at the bottom of each pattern on our site. |
||||||||||||||||


With over 40 years in knitting and crochet design, DROPS Design offers one of the most extensive collections of free patterns on the internet - translated to 17 languages. As of today we count 325 catalogs and 12298 patterns - 12288 of which are translated into English (US/in).
We work hard to bring you the best knitting and crochet have to offer, inspiration and advice as well as great quality yarns at incredible prices! Would you like to use our patterns for other than personal use? You can read what you are allowed to do in the Copyright text at the bottom of all our patterns. Happy crafting!
Post a comment to pattern DROPS 117-38
We would love to hear what you have to say about this pattern!
If you want to leave a question, please make sure you select the correct category in the form below, to speed up the answering process. Required fields are marked *.