
Popular categories
Looking for a yarn?


Comments / Questions (207)
![]() Alexia wrote:
Alexia wrote:
Buongiorno, ho un dubbio.. sono 3 pannelli ( davanti sinistro, davanti destro e dietro lavorati separatamente) + le maniche?
09.02.2026 - 13:27DROPS Design answered:
Buonasera Alexia, la prima parte è lavorata insieme, poi in parti separate. Buon lavoro!
09.02.2026 - 23:08
![]() Annie Pedersen wrote:
Annie Pedersen wrote:
Hvis man som jeg har en brystvidde på 109 cm hvilken str skal jeg så strikke ?
05.01.2026 - 21:45
![]() Françoise wrote:
Françoise wrote:
Bonjour . Je tricote le modèle Pearl of the fall Pour les augmentations du revers du devant gauche, je ne comprends: 41m +9 fois 1m augmention ça fait 50m . Il est indiqué 45m? Qu'elle est le nombre de m. Merci Merci
11.12.2025 - 15:59DROPS Design answered:
Bonjour Françoise, rappelez-vous de diminuer aussi pour l'emmanchure comme pour le dos, soit 2 x 2 m et 1 x 1 m, vous aurez ainsi: 41 m - 5 m pour l'emmanchure + 9 m pour le col = 45 mailles. Bon tricot!
12.12.2025 - 07:50
![]() Hannah wrote:
Hannah wrote:
Het achterpand onderdeel begrijp ik niet helemaal, kant ik 2 steken af en dat 5 keer ? En waar kant ik dan de 2 x 1 steek af ? Alvast bedankt
29.08.2025 - 16:19DROPS Design answered:
Dag Hannah,
Je kant inderdaad eerst 5 keer 2 steken af, dus steeds als je aan het begin van de naald bent kant je 2 steken af en dit doe je in totaal 5 keer. Daarna kant je nog 2 keer 1 steek af op dezelfde manier.
30.08.2025 - 11:02
![]() Hanan wrote:
Hanan wrote:
Bonjour Madame Je ne comprends pas les augmentations pour revers devant gauche
12.03.2025 - 13:51DROPS Design answered:
Bonjour Hanan, pour le revers du devant gauche, vous allez augmenter 1 maille à 2 mailles du bord comme indiqué sous AUGMENTATIONS, autrement dit, tricotez sur l'endroit jusqu'à ce qu'il reste 2 mailles, faites 2 jeté et tricotez les 2 dernières mailles. Tricotez 3 rangs comme avant (tricotez les augmentations au point de riz) et répétez ces 4 rangs le nombre de fois indiqué pour la taille. Bon tricot!
13.03.2025 - 14:54
![]() Hanan wrote:
Hanan wrote:
Bonjour madame pour faire les diminutions(À 8 cm de hauteur totale, diminuer 1 m de chaque côté de chaque marqueur et répéter ces diminutions à 15 cm de hauteur totale ) on fait les diminutions à chaque rang ou bien tous les 2 rangs et comment faire pour que les mailles restent envers et endroit au point de riz ?
03.02.2025 - 20:40DROPS Design answered:
Bonjour Mme Hanan, vous tricotez ces diminutions 2 fois seulement, la 1ère fois quand l'ouvrage mesure 8 cm et la 2ème fois quand l'ouvrage mesure 15 cm. Vous diminuez 4 mailles à chaque fois (1 maille de chaque côté de chacun des marqueurs) - pour que le point de riz tombe toujours juste, vous pouvez tricoter 3 mailles ensemble à l'endroit/à l'envers (en fonction de votre point de riz) à chaque marqueur, ainsi vous diminuez bien 4 mailles (1 pour chaque devant et 2 pour le dos), sans contrarier le point de riz. Bon tricot!
04.02.2025 - 09:01
![]() Weibel Christina wrote:
Weibel Christina wrote:
Dass beim Vorderteil nicht steht, wann die Knopflöcher eingearbeitet werden müssen, ist ein grober Fehler - ich musste weit zurückstricken... ansonsten relativ gut verständlich...
06.12.2024 - 11:09
![]() Katrina wrote:
Katrina wrote:
Добрый день! Пожалуйста, уточните, на размер M нужно набрать 148 петель. 148 -это с учетом кромочных? Или для кромочных нужно дополнительно набрать плюс 2 петли? Спасибо заранее!
06.11.2024 - 17:47DROPS Design answered:
Здравствуйте, не набирайте лишних петель, размер М, наберите всего 148 петель. Приятного вязания!
07.11.2024 - 08:43
![]() Katrina wrote:
Katrina wrote:
Добрый день! Извините, уточню свой предыдущий вопрос. Вяжу из пряжи Nepal данный жакет в одну нить. Как мне связать утолщенный боковой кромочный край в моем случае? Не понимаю, как мне сделать вторую нить?
04.11.2024 - 21:10DROPS Design answered:
Здравствуйте, вы можете связать 2 петли переднего края 2 нитями Непала (вместо 4 ниток Альпаки). Приятного вязания! (переведено онлайн-переводчиком).
05.11.2024 - 09:40
![]() Katrina wrote:
Katrina wrote:
Добрый день! Подскажите, пожалуйста, как в этом изделии связан кромочный боковой край?
04.11.2024 - 16:21
|
|
Pearl of the Fall#pearlofthefallcardigan |
|
|
|
|
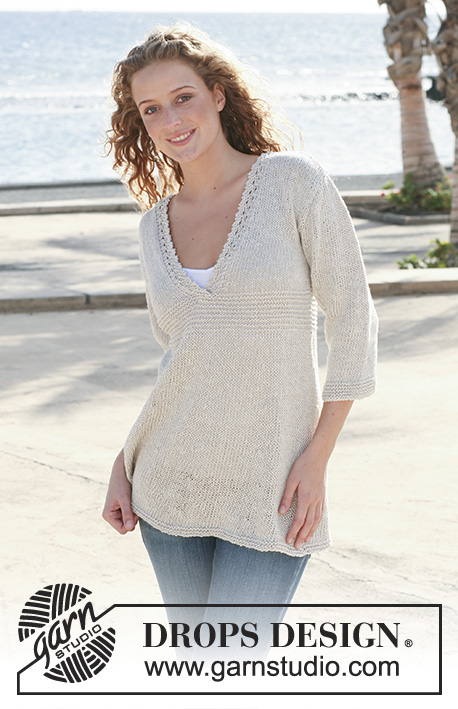
DROPS jacket in seed st in ”Alpaca” with collar. Size S - XXXL.
DROPS 112-4 |
|
|
GARTER ST (back and forth on needle): K all rows. GARTER ST (in the round): K 1 round, P 1 round. SEED ST: Row 1: * K1, P1 *, repeat from *-*. Row 2: K over P and P over K. Repeat 2nd row. INCREASING TIP: Inc 1 st by making 1 YO. On return row work YO into back of loop to avoid a hole. BUTTONHOLES: Make buttonholes on right front band. Buttonhole = bind off 3rd and 4th st from mid front and cast on 2 new sts on return row. Make buttonholes when piece measures: SIZE S: 24 and 32 cm / 9½" and 12½". SIZE M: 26 and 34 cm / 10¼" and 13⅜". SIZE L: 28 and 36 cm / 11" and 14¼". SIZE XL: 30 and 38 cm / 11¾" and 15". SIZE XXL: 32 and 40 cm / 12½" and 15¾". SIZE XXXL: 34 and 42 cm/13⅜" and 16½". -------------------------------------------------------- JACKET: Worked back and forth on circular needle from mid front. Cast on 136-148-160-176-196-216 sts on circular needle size 5.5 mm / US 9 with 1 thread of each color. Work 6 rows garter st – SEE ABOVE - AT THE SAME TIME work 2 sts each side in 2 threads of each color(= 4 threads) for a firmer edge. Insert 2 markers in piece, 37-40-43-47-52-57 sts in from each side (back piece = 62-68-74-82-92-102 sts). Continue in seed st – SEE ABOVE – on all sts (continue to work 2 sts each side in 4 threads until finished measurements). REMEMBER THE KNITTING GAUGE! When piece measures 8 cm / 3⅛" dec 1 st on each side of both markers and repeat the dec when piece measures 15 cm / 6" = 128-140-152-168-188-208 sts. Continue in seed st. When piece measures 22 cm / 8¾" inc 1 st on each side of both markers and repeat the inc on every 4-4-4.5-5-5.5-6 cm / 1½"-1½"-1¾"-2"-2¼"-2⅜" a total of 3 times = 140-152-164-180-200-220 sts. When piece measures 35-36-37-38-39-40 cm / 13¾"-14¼"-14½"-15"-15¼"-15¾" bind off 6 sts each side for armhole (= 3 sts on each side of both markers) and now complete each piece separately. BACK PIECE: = 58-64-70-78-88-98 sts. bind off to shape the armhole each side at the beg of every row: 2 sts 0-1-2-3-5-7 times and 1 st 0-0-1-2-2-2 times = 58-60-60-62-64-66 sts. When piece measures 54-56-58-60-62-64 cm / 21¼"-22"-22¾"-23⅝"-24⅜"-25¼" bind off the middle 12-14-16-18-18-20 sts for neck and bind off 1 st on neckline on next row = 22-22-21-21-22-22 sts left on each shoulder. Bind off when piece measures 56-58-60-62-64-66 cm / 22"-22¾"-23⅝"-24⅜"-25¼"-26". LEFT FRONT PIECE: = 35-38-41-45-50-55 sts. READ ALL OF THE FOLLOWING SECTION BEFORE CONTINUING! Bind off for armhole at the side as described for back piece. AT THE SAME TIME when piece measures 37-38-39-40-41-42 cm / 14½"-15"-15¼"-15¾"-16⅛"-16½’, inc 1 st for lapel inside 2 edge sts towards mid front on every 4th row – SEE INCREASING TIP – a total of 8-8-9-9-10-10 times (incorporate the inc sts in seed st as you go along) = 43-44-45-46-48-49 sts. When piece measures 47-49-51-53-55-57 cm / 18½"-19¼"-20"-21"-21⅝"-22½" work 2 rows garter st on 16-17-18-19-20-21 sts towards mid front with 4 threads and then bind off the same 16-17-18-19-20-21 sts on next row from RS = 27-27-27-27-28-28 sts left on row. Insert a marker. Continue in seed st, AT THE SAME TIME bind off to shape the neckline on every other row: 1 st 5-5-6-6-6-6 times = 22-22-21-21-22-22 sts left on shoulder. Bind off when piece measures 56-58-60-62-64-66 cm / 22"-22¾"-23⅝"-24⅜"-25¼"-26". RIGHT FRONT PIECE: Like left front piece, but mirrored. Remember BUTTONHOLES – see above. SLEEVE: Worked in the round on double pointed needles. Cast on 34-36-36-38-40-42 sts on double pointed needles size 5.5 mm / US 9 with 1 thread of each color. Insert a marker at beg of round (= mid under sleeve). Work 6 rounds garter st – SEE ABOVE – and continue in seed st. When piece measures 5 cm / 2" inc 1 st on each side of marker and repeat the inc on every 3-3-2.5-2.5-2-2 cm / 1⅛"-1⅛"-⅞"-⅞"-¾"-¾" a total of 13-14-16-16-17-18 times = 60-64-68-70-74-78 sts. Work inc sts in seed st. When piece measures 49-48-48-46-45-43 cm / 19¼"-19"-19"-18"-17¾"-17" (less on the larger sizes because of longer sleeve cap and wider shoulder) bind off 6 sts mid under arm (= 3 sts on each side of marker) and complete piece back and forth on needle. AT THE SAME TIME bind off to shape the sleeve cap each side at the beg of every row: 2 sts 3-3-3-2-1-0 times, 1 st 2-3-4-9-14-20 times, then 2 sts each side until piece measures 55-55-56-56-57-57 cm / 21⅝"-21⅝"-22"-22"-22½"-22½", now bind off 3 sts each side 1 time and bind off remaining sts on next row. Piece measures approx 56-56-57-57-58-58 cm / 22"-22"-22½"-22½"-22¾"-22¾". ASSEMBLY: Sew shoulder seams. Set in sleeves. COLLAR: Pick up between 46 and 56 sts (an even number) on needle size 5.5 mm / US 9 with 2 threads of each color(= 4 threads) from RS. Beg by marker on left front piece, continue round neckline on back piece and finish by marker on right front piece. Work seed st until collar measures 3 cm / 1⅛". Now insert a marker on each shoulder and a marker mid back and inc 1 st on each side of all 3 markers on next row, work inc sts in seed st. Continue until collar measures 14-14-15-16-16-17 cm / 5½"-5½"-6"-6¼"-6¼"-6¾" and bind off. Sew collar to lapel each side. Sew on buttons. |
|
 |
|
Have you finished this pattern?Tag your pictures with #dropspattern #pearlofthefallcardigan or submit them to the #dropsfan gallery. Do you need help with this pattern?You'll find 22 tutorial videos, a Comments/Questions area and more by visiting the pattern on garnstudio.com. © 1982-2026 DROPS Design A/S. We reserve all rights. This document, including all its sub-sections, has copyrights. Read more about what you can do with our patterns at the bottom of each pattern on our site. |


With over 40 years in knitting and crochet design, DROPS Design offers one of the most extensive collections of free patterns on the internet - translated to 17 languages. As of today we count 324 catalogs and 12272 patterns - 12262 of which are translated into English (US/in).
We work hard to bring you the best knitting and crochet have to offer, inspiration and advice as well as great quality yarns at incredible prices! Would you like to use our patterns for other than personal use? You can read what you are allowed to do in the Copyright text at the bottom of all our patterns. Happy crafting!
Post a comment to pattern DROPS 112-4
We would love to hear what you have to say about this pattern!
If you want to leave a question, please make sure you select the correct category in the form below, to speed up the answering process. Required fields are marked *.