
Popular categories
Looking for a yarn?


Comments / Questions (57)
![]() Yousra Mawazini wrote:
Yousra Mawazini wrote:
Quand vous dites des aiguilles no 2,5, est-ce que c'est 2.5mm ou bien 2,5 en mesure américaine?
18.09.2025 - 19:57DROPS Design answered:
Bonjour Mme Mawazini, il s'agit de 2,5 mm. Bon tricot!
18.09.2025 - 20:56
![]() Dorothee Wilms wrote:
Dorothee Wilms wrote:
Auch eine Frage zu der Erhöhung in der Hose: In Gr. 50/56 soll man die Wende-Geschichte 8x wiederholen. Heißt das, wenn ich 80 M auf der Nadel habe und ja zurück links gestrickt habe, dass ich dann nochmal wende (= 8 Wendungen) um wieder rechts zu stricken und dann eine Runde über alle Maschen stricke? Oder stricke ich die Runde über alle Maschen links?
10.09.2021 - 16:19DROPS Design answered:
Liebe Frau Wilms, die 8. Reihe/Wendung wird eine Rückreihe über 80 Maschen, nach dieser Reihe wenden Sie und stricken Sie bis hinten in der Mitte (Hin-Reihe), und jetzt 1 Runde über alle Maschen und gleichtzeitig nehmen Sie regelmäßig verteilt zu. und dann die Arbeit teilen und jedes Teil separat stricken. Viel Spaß beim stricken!
13.09.2021 - 08:12
![]() Angelique wrote:
Angelique wrote:
Hallo, ich verstehe das mit der Erhöhung bei der Hose nicht so ganz. Da steht 10M hin, Arbeit drehen, dann 20M zurück. Dann jedes mal 10M mehr. Heißt das dann als nächstes 20M hin und 30M zurück, dann weiter 30M und 40M zurück. Oder erhöht man immer nur die Hinreihe um 10M und strickt immer nur 20M zurück ?
27.08.2021 - 11:54DROPS Design answered:
Liebe Angelique, bei der 1. Reihe stricken Sie 10 M, wenden und 20 M stricken (= 10 M beidseitig von der Markierung in der Mitte Hinten), wenden und 30 M stricken, wenden und 40 M stricken (= je 20 M beidseitig von der Markierung in der Mitte hinten) und sow weiter stricken mit immer 10 M mehr am Ende jeder Hin- + jeder Rückreihe = 50 M Hin + 50 M Rück = 30 M beidseitig von der Markierung, usw. Kann das Ihnen helfen?
27.08.2021 - 12:00
![]() Ilona Autio wrote:
Ilona Autio wrote:
Jag tror det är ett fel i beskrivningen för hättan: "Lägg löst upp 89-93-106 (108-112) m på rundst nr 2,5 med Alpaca. Sticka 4 v rätst. Nästa v stickas så här från avigsidan. Det skall nog vara 3 v rätst istället för 4v, om det skall vara likadant som koftan, samt att man inte hamnar på fel sida med alla följande varv.
07.06.2020 - 11:32
![]() Janne wrote:
Janne wrote:
Vedr. Kysen Stadig i tvivl hvordan den skal sys sammen bagpå. Har I en video , der viser det? I skriver i opskriften, at sluttråden skal bruges til at sy midt bagpå, men jeg har jo 2 sider, der skal syes til noget?
12.09.2019 - 15:30DROPS Design answered:
Hej Janne, det er de 2 sider midt bagpå som skal syes sammen. Vi har desværre ingen video på denne kyse :)
12.09.2019 - 15:42
![]() Janne wrote:
Janne wrote:
Strikket kyse til denne opskrift, men svært med at sy den sammen bagtil. Indtagning ved de 6 mærker: er det på hver retpind eller hver anden? Hvordan skal sammensyningen være ?
12.09.2019 - 08:13DROPS Design answered:
Hej Janne, indtagningen ved mærkerne sker på hver pind fra retsiden og altså på hver 2.pind. God fornøjelse!
12.09.2019 - 13:28
![]() Beate Hüttig wrote:
Beate Hüttig wrote:
Hallo, Wie werden die 12 Rest-Maschen der Mütze zusammengestrickt? 2x.seht da? "x je 6 Maschen? aber wie wird es gemacht?
22.07.2019 - 17:12DROPS Design answered:
Liebe Frau Hüttig, die restlichen Maschen stricken Sie paarweise rechts zusammen, d.h. stets 2 Maschen rechts zusammenstricken, sodass noch 6 Maschen übrig bleiben. Die entsprechende Stelle wurde nun in der Anleitung etwas eindeutiger formuliert. :-)
22.07.2019 - 23:03
![]() Beate Hüttig wrote:
Beate Hüttig wrote:
Ich verstehe die Anleitung der Mütze ab Ende M2 nicht. Können Sie es bitte genauer erklären? Die Maschen sind auf Rundstricknadel. Es wird ja abgenommen? Dazu wäre ein Video hilfreich.
22.07.2019 - 14:20DROPS Design answered:
Liebe Frau Hüttig, die Anleitung wurde etwas umformuliert, hoffentlich ist es nun deutlicher. Gutes Gelingen weiterhin!
22.07.2019 - 23:09
![]() Beate Hüttig wrote:
Beate Hüttig wrote:
Ich verstehe den Tunnel an der Mütze nicht.Was heisst 1 M re auf links und 1 M re auf rechts stricken?
21.07.2019 - 23:15DROPS Design answered:
Liebe Frau Hüttig, die Anleitung wurde an dieser Stelle sprachlich überarbeitet. Es bedeutet: 1 Rück-Reihe rechts und 1 Hin-Reihe rechts. Viel Spaß beim Weiterarbeiten!
22.07.2019 - 07:41
![]() Beate Hüttig wrote:
Beate Hüttig wrote:
Wie kann ich Die Anleitung verkleinern? Nach Probe wird sie viel zu gross. Ich habe nun mit weniger Maschen gestrickt -34 m weniger. Wie muss ich die Abnahmen An Arm und Ärmel anpassen? MfG Beate
13.07.2019 - 10:44DROPS Design answered:
Liebe Frau Hüttig, hier lesen Sie mehr über Maschenprobe, am besten die Nadelgröße anpassen, damit die Maschenprobe stimmt, so bekommen Sie auch die richtigen Massen wie in der Skizze. Viel Spaß beim stricken!
15.07.2019 - 11:52
|
||||||||||||||||||||||
Roly Poly#rolypolyset |
||||||||||||||||||||||
 |
 |
|||||||||||||||||||||
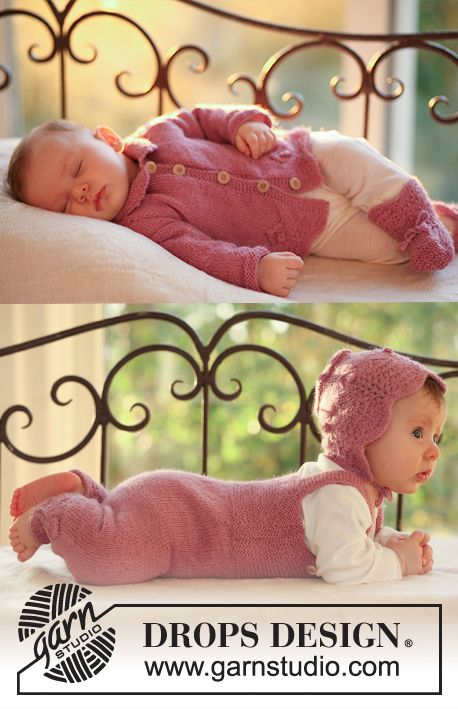
Set of baby jacket, jumpsuit, bonnet hat and socks in DROPS Alpaca
DROPS Baby 18-14 |
||||||||||||||||||||||
|
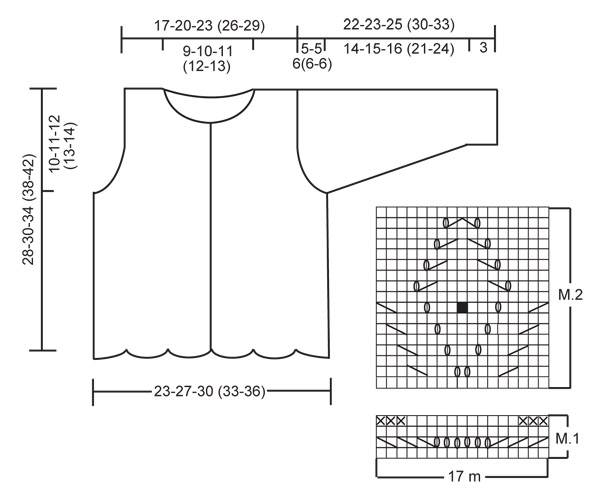
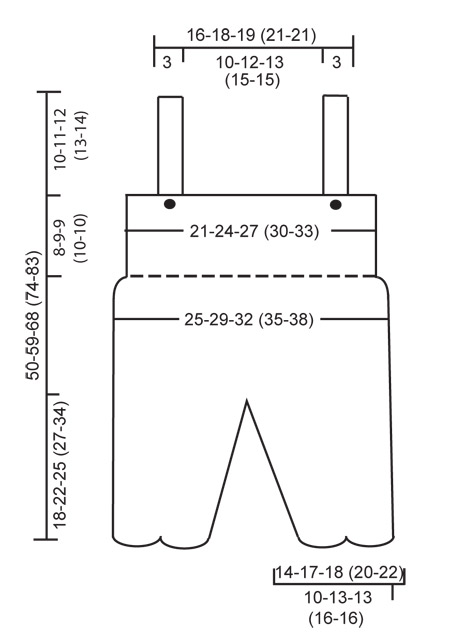
GARTER ST (in the round): K 1 round, P 1 round. GARTER ST (back and forth on needle): K all rows. PATTERN: See diagram M.1 and M.2 – the diagrams show the pattern from the RS. BUTTONHOLES: Make buttonholes on right front band. 1 buttonhole = bind off 3rd and 4th st from mid front and cast on 2 new sts on return row. Make buttonholes when piece measures: SIZE 1/3 months: 4, 9, 14 and 19 cm [1½", 3½", 5½", 7½"] SIZE 6/9 months: 4, 10, 15 and 21 cm [1½", 4", 6", 8¼"] SIZE 12/18 months: 4, 9, 14, 19 and 24 cm [1½", 3½", 5½", 7½", 9½"] SIZE 2 years: 4, 10, 16, 22 and 28 cm [1½", 4", 6¼", 8¾", 11"] SIZE 3/4 years: 5, 12, 18, 25 and 31 cm [2", 4 ¾", 7", 9¾", 12¼"] NOTE: the last buttonhole is made on neckline. DECREASING TIP (applies to jumpsuit): Dec on each side of marker mid front and mid back. When 3 sts remain before marker K2 tog, K2 (marker sits between these 2 sts), slip 1 st as if to K, K1, psso. -------------------------------------------------------------------------------------------------------------------------------------------- JACKET: BODY PIECE: Worked back and forth on circular needle from mid front. LOOSELY cast on 131-148-165 (182-199) sts (includes 5 front band sts each side towards mid front) on circular needle size 2.5 mm [US 1] with Alpaca. K 3 rows (first row = RS). Work next row as follows from WS: 5 front band sts in garter st – SEE ABOVE - 1 stockinette st, 7-8-9 (10-11) repeats of M.1 across the row, 1 stockinette st, 5 front band sts in garter st. Work 3-3-4 (4-5) vertical repeats of M.1 like this, AT THE SAME TIME when piece measures 4 cm [1½"] make buttonhole on right front band – SEE ABOVE. Now continue in M.2 with 1 stockinette st and 5 garter sts each side. After M.2 piece measures approx 8-8-9 (9-10) cm [3⅛"-3⅛"-3½" (3½"-4")]. Now complete piece in stockinette st with 5 garter sts each side. REMEMBER THE KNITTING GAUGE! When piece measures 18-19-22 (25-28) cm [7"-7½"-8¾" (9¾"-11")] work next row as follows from RS: 32-36-41 (45-49) sts = right front piece, bind off 6 sts for armhole, 55-64-71 (80-89) sts = back piece, bind off 6 sts for armhole, 32-36-41 (45-49) sts = left front piece. Now complete each piece separately. LEFT FRONT PIECE: = 32-36-41 (45-49) sts. Bind off to shape the armhole at the beg of every row from the side: 2 sts 1 time and 1 st 4-4-4 (4-5) times = 26-30-35 (39-42) sts. When piece measures 24-26-29 (33-37) cm [9½"-10¼"-11⅜" (13"-14½")] slip 9-10-13 (14-14) sts towards mid front on a stitch holder for neck and bind off to shape the neckline at the beg of every row from mid front: 2 sts 2 times and 1 st 3 times = 10-13-15 (18-21) sts left on shoulder. Bind off when piece measures 28-30-34 (38-42) cm [11"-11¾"-13⅜" (15"-16½")]. RIGHT FRONT PIECE: Like left front piece, but mirrored – remember buttonholes! BACK PIECE: = 55-64-71 (80-89) sts. Bind off for armholes each side as described for front piece = 43-52-59 (68-75) sts. When piece measures 27-29-33 (37-41) cm [10⅝"-11⅜"-13" (14½"-16⅛")] bind off the middle 19-22-25 (28-29) sts for neck and complete each side separately. Bind off 2 sts on neckline on next row = 10-13-15 (18-21) sts left on shoulder. Bind off when piece measures 28-30-34 (38-42) cm [11"-11¾"-13⅜" (15"-16½")]. SLEEVE: Worked in the round on double pointed needles. Cast on 36-38-42 (44-46) sts on double pointed needles size 2.5 mm [US 1] with Alpaca. Work 8 rows garter st – SEE ABOVE – and continue in stockinette st. Insert a marker at beg of round = mid under arm. When piece measures 3 cm [1⅛"] inc 1 st on each side of marker and repeat the inc on every 6-5-5 (6-6) round a total of 8-10-10 (12-13) times = 52-58-62 (68-72) sts. When piece measures 17-18-19 (24-27) cm [6¾"-7"-7½" (9½"-10⅝")] bind off 6 sts mid under arm and complete piece back and forth on needle. Bind off to shape the sleeve cap each side at the beg of every row: 2 sts 2 times and 1 st 3-3-4 (4-4) times, then 2 sts each side until piece measures 21-22-24 (29-32) cm [8¼"-8¾"-9½" (11⅜"-12½")], now bind off 3 sts each side 1 time and bind off remaining sts. Piece measures approx 22-23-25 (30-33) cm [8¾"-9"-9¾" (11¾"-13")]. ASSEMBLY: Sew shoulder seams and set in sleeves. NECKLINE AND COLLAR: Pick up approx 65 to 85 sts round neckline on small circular needle size 2.5 mm [US 1] (includes sts on stitch holders at front) and work garter st back and forth on needle from mid front. AT THE SAME TIME after 2 rows make 1 buttonhole in line with the others on front band. Work another 2 rows and now adjust no of sts evenly to 75-80-85 (90-95). Continue in garter st. When collar measures 4-4-5 (5-6) cm [1½"-1½"-2" (2"-2⅜")] dec at the beg of every row each side: 1 st 3 times and 2 sts 1 times, bind off remaining sts. Sew on buttons. ----------------------------------------------------------- JUMPSUIT: Worked from bottom of legs towards the top, in the round on double pointed and circular needle. LEG: LOOSELY cast on 51-68-68 (85-85) sts with Alpaca on double pointed needles size 2.5 mm [US 1] and work 4 rows garter st – SEE ABOVE. Work 3-3-4 (4-5) vertical repeats of M.1 and then continue in M.2. After M.2 piece measures approx 8-8-9 (9-10) cm [3⅛"-3⅛"-3½" (3½"-4")]. Insert a marker at beg of round (= inside of leg), and continue in stockinette st. Now inc 1 st on each side of marker on every 2-4-4 (6-6) round a total of 12-9-13 (10-14) times = 75-86-94 (105-113) sts. AT THE SAME TIME when piece measures 16-20-23 (25-32) cm [6¼"-8"-9" (9¾"-12½")] continue back and forth on needle from marker (to make it easier to slip both legs on the same circular needle afterwards) and cast on 1 new st each side for seam. When piece measures 18-22-25 (27-34) cm [7"-8¾"-9¾" (10⅝"-13⅜")] bind off 1 st each side and put piece aside. Knit the other leg. BODY PIECE: Slip legs on the same circular needle size 2.5 mm [US 1] = 150-172-188 (210-226) sts. Insert 1 marker mid front and 1 marker mid back and continue in stockinette st in the round. AT THE SAME TIME dec 1 st on each side of both markers – SEE DECREASING TIP - on every other round a total of 5-6-6 (7-7) times = 130-148-164 (182-198) sts. When piece measures 32-39-47 (51-59) cm [12½"-15¼"-18½" (20"-23¼")] work shortened rows mid back as follows (to make pants wider at the back) – beg by marker: work 10 sts, turn piece, work 20 sts (slip the first st as if to K to avoid a hole), turn piece. Continue like this working another 10 sts before each turn another 8-10-12 (14-16) times. Now work 1 round on all sts, AT THE SAME TIME dec 20-22-24 (26-26) sts evenly = 110-126-140 (156-172) sts. Now divide piece at the sides and complete front and back pieces separately. Slip the 55-63-70 (78-86) sts on back piece on a stitch holder. FRONT PIECE: = 55-63-70 (78-86) sts. Work garter st back and forth on needle. When piece in garter st measures 6-7-7 (8-8) cm [2⅜"-2¾"-2¾" (3⅛"-3⅛")] make 2 buttonholes as follows: work 9-11-13 (15-18) sts, bind off 2 sts, work 33-37-40 (44-46) sts, bind off 2 sts, work 9-11-13 (15-18) sts. On return row cast on 2 new sts over bind off sts. Continue in garter st until piece in garter st measures 8-9-9 (10-10) cm [3⅛"-3½"-3½" (4"-4")] (piece measures a total of 40-48-56 (61-69) cm [15¾"-19"-22" (24"-27⅛")]) and bind off. BACK PIECE: = 55-63-70 (78-86) sts. Work 8-9-9 (10-10) cm [3⅛"-3½"-3½" (4"-4")] garter st and then work next row as follows: bind off 6-8-10 (12-15) sts, work 8 sts, bind off 27-31-34 (38-40) sts, work 8 sts and bind off 6-8-10 (12-15) sts. Continue for braces on the 8 sts each side. Work garter st back and forth on needle until braces measures 22-24-26 (28-30) cm [8¾"-9½"-10¼" (11"-11¾")], bind off. ASSEMBLY: Sew legs tog at the top inside 1 edge st. Sew side seams, in outer loops of sts to avoid a chunky seam. Sew buttons on braces. ---------------------------------------------------------- BONNET: Worked back and forth on circular needle. LOOSELY cast on 89-93-106 (108-112) sts on circular needle size 2.5 mm [US 1] with Alpaca. Work 4 rows garter st and work next row as follows from WS: 1 edge st in garter st, 1-3-1 (2-4) stockinette sts, M.1 on the next 85-85-102 (102-102) sts, 1-3-1 (2-4) stockinette sts and 1 edge st in garter st. Work 5-6-7 (8-9) vertical repeats of M.1 like this and then continue in M.2 with 1 edge st and 1-3-1 (2-4) stockinette sts each side. After M.2 piece measures approx 10-11-12 (13-14) cm [4"-4⅜"-4¾" (5⅛"-5½")]. Now continue in stockinette st on all sts with 1 garter st each side, AT THE SAME TIME adjust no of sts to 88-94-102 (108-114) on first row. When piece measures 12-13-14 (15-16) cm [4¾"-5⅛"-5½" (6"-6¼")] bind off 5-5-6 (6-6) sts each side (i.e. bind off at the beg of the next 2 rows) = 78-84-90 (96-102) sts. Insert 6 markers in piece from RS as follows: First marker after 1 st and the next 5 markers with 13-14-15 (16-17) sts between each = 12-13-14 (15-16) sts left after the last marker. Now continue in garter st, AT THE SAME TIME K2 tog after each marker on every row from RS until there are 12 sts left on row. K2 tog across the row, cut thread, pull it through remaining sts and use thread-end to sew bonnet tog mid back – sew in outer loops of sts to avoid a chunky seam. (also sew tog the 5-5-6 (6-6) stockinette sts bind off each side). CASING: Pick up approx 68 to 84 sts (divisible by 4) inside 1 edge st along bottom edge of bonnet on circular needle size 2.5 mm [US 1] with Alpaca. K 1 row from WS, K 1 row from RS and continue as follows from WS: K2, * P2 tog, 1 YO, P2 *, repeat from *-* until 2 sts remain, K these. Now K 4 rows on all sts, bind off. TIE STRINGS: Cut 3 threads measuring approx 200 cm [2.2 yds] each, twist them hard, fold them double and let them twist again. Tie a knot each end and thread string through casing. ---------------------------------------------------------- SOCKS: Worked in the round on double pointed needles. LOOSELY cast on 51-51-51 (51-68) sts on double pointed needles size 2.5 mm [US 1] with Alpaca. Work 4 rows garter st – SEE ABOVE – and then work 3-4-4 (5-5) vertical repeats of M.1. When piece measures approx 4-5-5 (6-6) cm [1½"-2"-2" (2⅜"-2⅜")] work 1 round stockinette st, AT THE SAME TIME adjust no of sts to 40-44-48 (52-56). Work 2 cm [¾"] rib, K1/P1, and work next round as follows: * K2 tog, 1 YO *, repeat from *-* (= casing). On next round slip the first 15-17-18 (20-21) sts on a stitch holder, keep the next 10-10-12 (12-14) sts on needle and slip the last 15-17-18 (20-21) sts on a stitch holder. Work 3.5-4-5 (6-7) cm [1¼"-1½"-2" (2⅜"-2¾")] garter st back and forth on needle (= upper foot). Now pick up 9-11-13 (15-18) sts on each side of upper foot and slip sts from stitch holders back on needle = 58-66-74 (82-92) sts. Work garter st back and forth on needle from mid back, AT THE SAME TIME after 2-2.5-3 (3.5-4) cm [¾"-⅞"-1⅛" (1¼"-1½")] dec as follows: K2 tog at the beg and at the end of row and K2 tog on each side of the 2 middle sts. Repeat the dec on every other row until piece in garter st measures 3-4-5 (5-6) cm [1⅛"-1½"-2" (2"-2⅜")]. Bind off and sew sock tog under foot up to casing mid back – sew in outer loops of sts to avoid a chunky seam. TIE STRINGS: Cut 3 threads measuring approx 100 cm [1.1 yds] each, twist the hard, fold them double and let them twist again. Tie a knot each end and thread string through casing on sock. |
||||||||||||||||||||||
Diagram explanations |
||||||||||||||||||||||
|
||||||||||||||||||||||
 |
||||||||||||||||||||||
 |
||||||||||||||||||||||
Have you finished this pattern?Tag your pictures with #dropspattern #rolypolyset or submit them to the #dropsfan gallery. Do you need help with this pattern?You'll find 27 tutorial videos, a Comments/Questions area and more by visiting the pattern on garnstudio.com. © 1982-2026 DROPS Design A/S. We reserve all rights. This document, including all its sub-sections, has copyrights. Read more about what you can do with our patterns at the bottom of each pattern on our site. |
||||||||||||||||||||||


With over 40 years in knitting and crochet design, DROPS Design offers one of the most extensive collections of free patterns on the internet - translated to 17 languages. As of today we count 325 catalogs and 12298 patterns - 12288 of which are translated into English (US/in).
We work hard to bring you the best knitting and crochet have to offer, inspiration and advice as well as great quality yarns at incredible prices! Would you like to use our patterns for other than personal use? You can read what you are allowed to do in the Copyright text at the bottom of all our patterns. Happy crafting!
Post a comment to pattern DROPS Baby 18-14
We would love to hear what you have to say about this pattern!
If you want to leave a question, please make sure you select the correct category in the form below, to speed up the answering process. Required fields are marked *.