
Popular categories
Looking for a yarn?


Comments / Questions (50)
![]() Franca wrote:
Franca wrote:
Hi! I'm knitting this jacket and I'm working on the assembly, but I'm quite confused about the last decreases on the sleeves. It says in the last round to dec 5 on each side of the MT, so 10 in total and I did that, but now the assembly doesn't make sense for me. In the instruction video they have casted off a few st on the sleeve, so it lines up with the casted off stitches from the body. Was I supposed to CO instead of dec on the last row of the sleeve?
28.03.2025 - 12:46DROPS Design answered:
Dear Franca, correct you should rather cast off these 5 stitches on each side of marker. Happy knitting!
28.03.2025 - 13:41
![]() Franca wrote:
Franca wrote:
Hi! I'm knitting this jacket and I'm working on the assembly, but I'm quite confused about the last decreases on the sleeves. It says in the last round to dec 5 on each side of the MT, so 10 in total and I did that, but now the assembly doesn't make sense for me. In the instruction video they have casted off a few st on the sleeve, so it lines up with the casted off stitches from the body. Was I supposed to CO instead of dec on the last row of the sleeve?
28.03.2025 - 12:45
![]() T-B Handberg wrote:
T-B Handberg wrote:
Jeg strikker i XL og får ikke masketallene til å stemme når jeg skal starte på mønsterstrikk. En skal ha 5stolpemasker,7glattstrikk,M1,14r,M1,14r, 6 r og så er en ved merketråden sier mønsteret. Aberet er bare at det fortsatt er 10 masker igjen til merketråden.... Ergo blir det også feil på den andre siden..... Kan dere rette opp i dette mønsteret snarest?
30.01.2020 - 02:00DROPS Design answered:
Hej, du sætter mærketråden efter 52 masker. Og strikker i Str XL: 5 stolpem, 7 m glstrikk, M.1, 14 m glstrikk, M.1, 14 m glstrikk, M.1 og 6 glstrikk, merketråden sitter her = 52 masker. God fornøjelse!
11.02.2020 - 08:59
![]() Wendy-Lynne wrote:
Wendy-Lynne wrote:
I am knitting Large size. Page 3, Paragraph 2, 2nd line - it states that I am to “dec. 1 st on each side of both MT on every 1 and 1/8th”. I did the decrease on Row 3 of my counted row of M.1’s , that equals one stitch on either side of the MT for a total of 4 decreased, 1 each on the two side and two on the back, for a total of 174 stitches on my needle. When I get to Row 11 on the M.1, the K2 YO comes at the MT, so what am I to do? Please help.
23.01.2019 - 20:45DROPS Design answered:
Dear Mrs Lynne, you can add a marker before and after each M.1 so that you will be sure to work the stitches in M.1 always on the right place, and they will that way not be displaced when decreasing. In size L after 1st decrease you will have: 5 front band sts, 7 sts in stocking st, M1, 14 sts stocking st, M.1, 16 sts stocking (after 1st dec = 46 sts before 1st marker) (side) 16 sts stocking st (after 1st dec) etc.. Happy knitting!
24.01.2019 - 09:49
![]() Wendy-Lynne wrote:
Wendy-Lynne wrote:
I am now on Row 11 of M.1. There are 174 sts. on the needle as I did the 1sr decrease on Row 9 (2nd dec. will be 1 1/8 inches). What am I supposed to do? I knitted as follows: 5; 7; M.1; 14 M.1; there are 16 stitches and at that point is my Marker Tnread, but I am supposed to knot 16 (if, in fact we are decreasing), then an M.1 and then 14; M.1; (3 times) and so forth, but these eyelets don’t match up???? Help please!
22.01.2019 - 23:41DROPS Design answered:
Dear Mrs Lynne, you should still have 14 sts stocking st between M.1, since the decreases are done on the side, the eyelet in M.1 should be lined up all the way. On the sides, depending on your size and the number of decreases done you will have 2 sts less after 1st dec, 4 sts less after 3rd dec and so on. so if you got before 16 sts stocking st, side, 16 sts stocking st, after first dec there are 15 sts stocking st, side, 15 sts stocking st. Happy knitting!
23.01.2019 - 09:44
![]() Wendy-Lynne wrote:
Wendy-Lynne wrote:
In the Drops pattern 107-9 it refers to M.1. Am I to follow the pattern chart M.1 or am I to make a stitch each time this is referred to? Thanks.
20.01.2019 - 01:43DROPS Design answered:
Dear Weny-Lynne, the chart is made up from three stitches (K2TOG and a YO), you have to knit (-) every time patter M.1 is mentioned. Happy Knitting!
20.01.2019 - 09:14
![]() Barbara Dares wrote:
Barbara Dares wrote:
I am making the sweater in a size Small. How many rows are plain knit/purl when the pattern row is the one where you M1. It doesn't say in the pattern, but looking at the picture, there are at least 5-6 rows plain purl/knit between the M1 rows.... thanks Barbara
31.12.2018 - 05:23DROPS Design answered:
Dear Mrs Dares, when workinjg M.1 you work the first eyelet row on 3rd row, then on 11th row. When M.1 has been worked one time in height, repeat M.1 from row 1 = 7 rows between each eyelet row. Happy knitting!
02.01.2019 - 11:00
![]() Wendy-Lynne MacKinnon wrote:
Wendy-Lynne MacKinnon wrote:
Looking at the diagrams. please tell me what the solid dark bars are (looks like they are connecting the stitches).
31.10.2018 - 18:19DROPS Design answered:
Dear Wendy-Lynne, you find it between stitch explanations above the schema - see "K2tog" and "slip 1 st as if to K, K1, psso". Happy knitting!
31.10.2018 - 20:35
![]() Andrea wrote:
Andrea wrote:
I am at the beginning of the pattern just after the ribbing and with the description given that says( 5 stitches for band then7 stocking stitches,M1,14stocking stitches, M 1,14stocking st. for the side. I always have 2 more stitches left at side before I start for the back part. What am I doing wrong. It says. 44 stitches for the side. Thank u for you help
08.07.2018 - 01:53DROPS Design answered:
Dear Andrea, in size M you have a first marker after the first 44 sts. Work first front piece as follows: 5 garter sts, 7 stockinette sts, M.1 (= 2 sts), 14 stockinette sts, M.1, 14 stockinette sts (side) = 5+7+2+14+2+14=44 sts, maybe you forget to work M.1 one time? Happy knitting!
09.07.2018 - 09:24
![]() Cettolin Bernadette wrote:
Cettolin Bernadette wrote:
Je voudrai savoir s il était possible de réaliser ce modèle 107-9 avec la laine kid Silk
25.02.2018 - 19:45DROPS Design answered:
Bonjour Mme Cettolin, vous pouvez tout à fait utiliser Kid-silk pour ce modèle, à la place de Cotton Viscose ou d'Alpaca. Vous trouverez ici plus d'infos sur les alternatives. Bon tricot!
26.02.2018 - 09:56
|
||||||||||||||||
DROPS 107-9 |
||||||||||||||||
|
|
||||||||||||||||
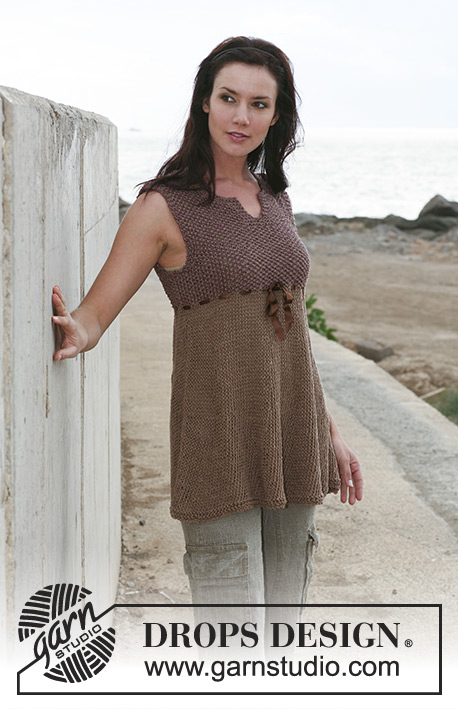
DROPS jacket with lace pattern and round yoke in “Cotton Viscose” and “Alpaca”. Size S – XXXL Size S – XXXL
DROPS 107-9 |
||||||||||||||||
|
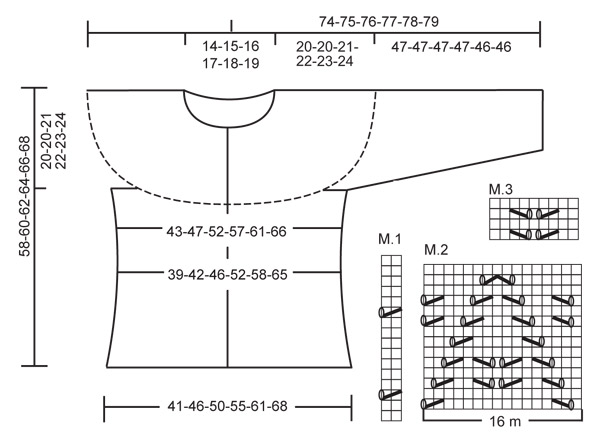
Pattern: See diagram M.1 to M.3. The diagram shows the pattern from the RS. Garter st, back and forth on needle: K all rows. Garter st, in the round: K 1 round, P 1 round. Decreasing tip: Dec K4 to K2 as follows: slip1 st as if to K, K1, psso, K2 tog. Buttonholes: Make buttonholes on right front band. 1 buttonhole = bind off third st from mid front, cast on 1 new st on return row. Make buttonholes when piece measures: Size S: 10, 17, 25, 32, 39, 47, 54 cm [4",6¾",9¾",12½",15¼",18½",21¼"]. Size M: 10, 18, 25, 33, 41, 48, 56 cm [4",7",9¾",13",16⅛",19",22"]. Size L: 10, 18, 26, 34, 42, 50, 58 cm [4",7",10¼",13⅜",16½",19¾",22¾"]. Size XL: 10, 17, 24, 31, 39, 46, 53, 60 cm [4",6¾",9½",12¼",15¼",18",21",23⅝"]. Size XXL: 10, 17, 25, 32, 40, 47, 55, 62 cm [4",6¾",9¾",12½",15¾",18½",21⅝",24⅜"] Size XXXL: 10, 18, 26, 33, 41, 48, 56, 64 cm [4",7",10¼",13",16⅛",19",22",25¼"] Back and front piece: Knitted back and forth on circular needle from mid front. Cast on 198-222-238-262-286-318 sts (includes 5 front band sts each side) on circular needle size 5 mm [US 8] with 1 thread of each quality. Work 2 rows garter st – see above. Continue in Rib (first row = RS) as follows: 5 front band sts in garter st until finished measurements, *K4, P4*, repeat from *-* and finish row with K4 and 5 front band sts in garter st until finished measurements. Work 1 row in rib from WS, and then on next row from RS dec all K4 to K2 – see Decreasing tip = 150-168-180-198-216-240 sts. Continue in Rib, K2/P4 (seen from RS), until piece measures 4-4-4-6-6-6 cm [1½"-1½"-1½"-2⅜"-2⅜"-2⅜"]. K 1 row from RS, at the same time dec 0-2-2-0-2-2 sts evenly (do not dec on front bands) = 150-166-178-198-214-238 sts. P 1 row from WS. Now insert 2 Marking Threads (MT) in piece, 1 MT after 40-44-47-52-56-62 sts and 1 MT after 110-122-131-146-158-176 sts (to mark the sides) = 70-78-84-94-102-114 sts on back piece. Continue as follows: Size S + M + L: 5 garter sts (front band), 7 stockinette sts, M.1 (= 2 sts), 14 stockinette sts, M.1, 10-14-17 stockinette sts (side), 10-14-17 stockinette sts, *M.1, 14 stockinette sts*, repeat from *-* a total of 3 times, M.1, 10-14-17 stockinette sts, (side), 10-14-17 stockinette sts, M.1, 14 stockinette sts, M.1, 7 stockinette sts and 5 garter sts (front band). Size XL + XXL + XXXL: 5 garter sts (front band), 7 stockinette sts, M.1, 14 stockinette sts, M.1, 14 stockinette sts, M.1, 6-10-16 stockinette sts (side), 6-10-16 stockinette sts, *M.1, 14 stockinette sts*, repeat from *-* a total of 5 times, M.1, 6-10-16 stockinette sts, (side), 6-10-16 stockinette sts, M.1, 14 stockinette sts, M.1, 14 stockinette sts, M.1, 7 stockinette sts and 5 garter sts (front band). Continue like this in stockinette st and M.1. Remember the knitting gauge! At the same time when piece measures 8 cm [3⅛"] dec 1 st on each side of both MT on every 6-3-3-3-6-7 cm [2⅜"-1⅛"-1⅛"-1⅛"-2⅜"-2¾"] a total of 2-3-3-3-2-2 times = 142-154-166-186-206-230 sts. Continue in stockinette st and M.1. Note! Remember buttonholes on right front band – see above. When piece measures19-19-19-20-21-22 cm [7½"-7½"-7½"-8"-8¼"-8¾"] inc 1 st on each side of both MT on every 5-4-3-4-6-14 cm [2"-1½"-1⅛"-1½"-2⅜"-5½"] a total of 3-4-5-4-3-1 times = 154-170-186-202-218-234 sts (work inc sts in stockinette st). Continue in stockinette st and M.1 until piece measures 30-32-33-34-35-36 cm [11¾"-12½"-13"-13⅜"-13¾"-14¼"]. Work 1 row from RS as before, at the same time inc 1 st at the end of row (inc before front band) = 155-171-187-203-219-235 sts. Work 1 row from WS and continue as follows: 5 garter sts, M.2 (=16 sts) repeated until 6 sts remains on row, work these as follows: K1, 5 front band sts. Work 1 vertical repeat of M.2 like this. Now work 1 row from WS, at the same time bind off 5 sts on each side of both MT for armhole = 135-151-167-183-199-215 sts on row. Piece now measures approx 38-40-41-42-43-44 cm [15"-15¾"-16⅛"-16½"-17"-17¼"]. Put it aside and knit the sleeves. Sleeves: Worked in the round on circular needle 40 cm [15¾"]. Cast on 56-56-56-64-64-64 sts on needle size 5 mm [US 8] with 1 thread of each quality. Work 2 rounds garter st – see above. Continue in Rib, K4/P4. After 2 rounds dec all K4 to K2 – see Decreasing tip = 42-42-42-48-48-48 sts. Continue in Rib, K2/P4, until piece measures 4-4-4-6-6-6 cm [1½"-1½"-1½"-2⅜"-2⅜"-2⅜"]. Now work 2 rounds stockinette st. Insert 1 Marking Thread (MT) at beg of round and continue as follows: Size S + M + L: K4, M.1, K14, M.1, K14, M.1, K4. Continue like this. Size XL + XXL + XXXL: K7, M.1, K14, M.1, K14, M.1, K7. Continue like this. At the same time when piece measures approx 5-6-8-7-7-9 cm [2"-2⅜"-3⅛"-2¾"-2¾"-3½"] inc 1 st on both sides of MT on every 5.5-4-3-3.5-3-2.5 cm [2¼"-1½"-1⅛"-1¼"-1⅛"-⅞"] a total of 7-9-11-9-10-12 times = 56-60-64-66-68-72 sts (work inc sts in stockinette st). Continue until piece measures 40-40-40-40-39-39 cm [15¾"-15¾"-15¾"-15¾"-15¼"-15¼"] (less on the larger sizes because of longer sleeve cap and wider shoulder). Now continue as follows: K 4-6-0-1-2-4, M.2 on the next 48-48-64-64-64-64 sts and finish round with K 4-6-0-1-2-4. After 1 vertical repeat of M.2 K 1 round, at the same time dec 5 sts on both sides of MT = 46-50-54-56-58-62 sts. Sleeve measures approx 47-47-47-47-46-46 cm [18½"-18½"-18½"-18½"-18"-18"]. Put piece aside and knit the other sleeve. Yoke: Worked back and forth on needle. Put sleeves in on the same circular needle as body piece where bind off for armholes = 227-251-275-295-315-339 sts. Work 1-1-1-1-3-3 rows stockinette st (first row = WS). Now P 1 row from RS and K 1 row from WS. K 1 row from RS, at the same time dec 10-16-22-24-26-23 sts evenly (do not dec on front bands) = 217-235-253-271-289-316 sts. P 1 row from WS. Now continue in M.3 (= 9 sts) repeated across row with 5 front band sts each side. After 1 vertical repeat of M.3, K 1 row from RS, at the same time dec 18 sts evenly = 199-217-235-253-271-298 sts. P 1 row from WS, P 1 row from RS and K 1 row from WS. Now K 1 row from RS, at the same time dec 18-18-18-18-18-27 sts evenly = 181-199-217-235-253-271 sts. Work 7-7-7-9-9-9 rows stockinette st and then K 1 row from RS, at the same time dec 18-18-18-18-18-27 sts evenly = 163-181-199-217-235-244 sts. P 1 row from WS, P 1 row from RS and K 1 row from WS. Now K 1 row from RS, at the same time dec 18-18-18-18-18-27 sts evenly = 145-163-181-199-217-217 sts. P 1 row from WS and continue in M.3 repeated across row with 5 front band sts each side. After 1 vertical repeat of M.3, K 1 row from RS, at the same time dec 18-18-18-18-27-27 sts evenly = 127-145-163-181-190-190 sts. P 1 row from WS, P 1 row from RS and K 1 row from WS. Now K 1 row from RS, at the same time dec 18-18-18-27-27-27 sts evenly = 109-127-145-154-163-163 sts. Work 1-1-3-3-3-3 rows stockinette st. K 1 row from RS, at the same time dec 18-18-18-27-27-27 sts evenly = 91-109-127-127-136-136 sts. P 1 row from WS, K 1 row from RS and P 1 row from WS. Now K 1 row from RS, at the same time dec 18-18-27-27-27-27 sts evenly = 73-91-100-100-109-109 sts. P 1 row from WS, P 1 row from RS and K 1 row from WS. K 1 row from RS, at the same time dec 15-29-34-32-37-33 sts evenly = 58-62-66-68-72-76 sts. Work 1-1-1-1-1-3 rows stockinette st. Work 4 rows garter sts on all sts and bind off loosely. Assembly: Sew openings under arms. Sew on buttons. |
||||||||||||||||
Diagram explanations |
||||||||||||||||
|
||||||||||||||||
 |
||||||||||||||||
Have you finished this pattern?Tag your pictures with #dropspattern or submit them to the #dropsfan gallery. Do you need help with this pattern?You'll find 23 tutorial videos, a Comments/Questions area and more by visiting the pattern on garnstudio.com. © 1982-2026 DROPS Design A/S. We reserve all rights. This document, including all its sub-sections, has copyrights. Read more about what you can do with our patterns at the bottom of each pattern on our site. |
||||||||||||||||


With over 40 years in knitting and crochet design, DROPS Design offers one of the most extensive collections of free patterns on the internet - translated to 17 languages. As of today we count 325 catalogs and 12298 patterns - 12288 of which are translated into English (US/in).
We work hard to bring you the best knitting and crochet have to offer, inspiration and advice as well as great quality yarns at incredible prices! Would you like to use our patterns for other than personal use? You can read what you are allowed to do in the Copyright text at the bottom of all our patterns. Happy crafting!
Post a comment to pattern DROPS 107-9
We would love to hear what you have to say about this pattern!
If you want to leave a question, please make sure you select the correct category in the form below, to speed up the answering process. Required fields are marked *.