
Popular categories
Looking for a yarn?


Comments / Questions (25)
![]() Hermien Boekema wrote:
Hermien Boekema wrote:
Hallo. Pas: Zet alle st op dezelfde rondbreinld = 90-96-102 st voor het achterpand, 84-84-84 st voor de rechtermouw, 90-96-102 st voor het voorpand, 84-84-84 st voor de linkermouw = totaal 348-360-372 st. Ga verder in M.4, minder TEGELIJKERTIJD in de laatste nld 5 st gelijkmatig voor maat S en meerder 5 st gelijkmatig voor maat L = 285-300-315 st. Hoe kan ik 5 steken gelijkmatig minderen en dan 285 steken overhoud van de 328 (maat S). Ik hoor graag van jullie
15.05.2026 - 11:42
![]() Françoise TEYCHENEY wrote:
Françoise TEYCHENEY wrote:
Bonjour, je suis désolée mais je ne comprend pas comment compter les 15 mailles de point de riz. Faut-il intégrer dans ces 15 mailles les diminutions avant et après M5 ou faire i diminution , 13 mailles point de riz et une autre diminution ? Merci pour votre réponse
29.03.2023 - 18:35DROPS Design answered:
Bonjour Mme Teycheney, vous tricotez: *15 m point de riz, M.5* tout le tour. Vous diminuez de chaque côté de M.5 autrement dit, vous diminuez le nombre de mailles point de riz: *2 m ens, 11 m point de riz, 2 m ens, M.5*, il reste 13 m point de riz entre chaque M.5, puis la fois suivante, il ne restera que 11 m point de riz (= 2 m ens, 9 m point de riz, 2 m ens) entre chaque M.5 et ainsi de suite. Tricotez les 2 m ens à l'endroit ou à l'envers en fonction du point de riz. Bon tricot!
11.04.2023 - 09:32
![]() Françoise TEYCHENEY wrote:
Françoise TEYCHENEY wrote:
Bonjour, dans ce modèle en taille M, lorsque je tricote 15 mailles en point de riz et les diminutions avant M5, doit-on faire les diminutions sur les 14 et 15ème mailles de point de riz ou bien faut-il faire 15 mailles et une diminution sur la 16 et 17ème maille ? Merci pour votre réponse
28.03.2023 - 18:41DROPS Design answered:
Bonjour Mme Teycheney, on doit ici diminuer 1 m de chaque côté de chaque M.5, autrement dit, vous allez tricoter ensemble les 2 premières mailles point de riz et les 2 dernières mailles point de riz (il reste 13 m point de riz après la 1ère diminution et 11 m point de riz après la 2ème diminution entre chaque M.5). Bon tricot!
29.03.2023 - 09:36
![]() Ilona Baker wrote:
Ilona Baker wrote:
I am confused when it comes to knitting the sleeves. When I have 50 sts on round how do I knit M.6 and the M.2 and M.3 as 50 is not divisible by 4 or 12?
23.09.2020 - 22:37DROPS Design answered:
Dear Mrs Baker, there is a mistake in the English pattern, on sleeve you work M.1 for 6 cm then adjust the number of sts to 50 sts and work now M.2 one time in height, then work and repeat M.3 - centering one repeat mid on the sleeve - see this lesson. Pattern will be edited, thanks for your feedback, happy knitting!
24.09.2020 - 09:36
![]() Sharon Van Der Lee wrote:
Sharon Van Der Lee wrote:
My previous question was with regard to M5 in the yoke, not M4. Thank you.
01.01.2020 - 15:35
![]() Sharon Van Der Lee wrote:
Sharon Van Der Lee wrote:
When working the seed stitch and M4 in the yoke, do I keep knitting 15 seed stitches and M4 in every row, until the first decrease at the 9th row? That would mean there are 420 stitches in total at the 8th row. Is that correct? To me, it seems I should be making some kind of decrease in seed stitches on either side of M4 to compensate for the yarn over additional stitches in M4 on rows 3,5,7,9.
01.01.2020 - 15:31DROPS Design answered:
Dear Mrs Van Der Lee, the decreases in the seed stitch has to be worked two times on every 9th round, the increases in M.5 will be then decreased in the 2nd half of M.5. Happy knitting!
02.01.2020 - 15:31
![]() Monique AUBERT wrote:
Monique AUBERT wrote:
Bonjour , J'ai un doute : M6 et les 10 mailles envers se font avec des aiguilles 5 ou 4 . Ou est-ce que je prends les aig. 4 après les 8 cm *M6 , 10 m envers*. Merci et à très bientôt .
17.04.2019 - 16:26DROPS Design answered:
Bonjour Monique. Vous tricotez M6 e les 10 m envers avec les aiguilles n° 5. Vous passez aux aiguilles n° 4 après les 8 cm * M6, 10 m env* et quand vous restez avec 150 m (en taille M). Bon tricot !
17.04.2019 - 17:03
![]() Monique AUBERT wrote:
Monique AUBERT wrote:
En partant avec 300 mailles j'ai fait un premier tour en diminuant d'une maille de chaque côté de M 5 = 28 diminutions sur le tour mais le point de riz ne correspond pas avec M 5 , il me reste 6 mailles. j'ai bien vérifié , il n'y a pas d'erreur . J'ai peut-être mal compris . Que faire ? Dans l'attente de vous lire , recevez mes remerciements
12.04.2019 - 15:22DROPS Design answered:
Bonjour Mme Aubert, il faut en fait tricoter (15 m - et non 16 m en taille M) point de riz, M.5) et on répète de (à) tout le tour = 15 fois au total. La correction a été faite. Bon tricot!
12.04.2019 - 16:05
![]() Monique AUBERT wrote:
Monique AUBERT wrote:
A quel moment de M5 je dois diminuer les mailles dans le point de riz ? Merci
12.04.2019 - 10:57DROPS Design answered:
Bonjour Mme Aubert, vous diminuez ainsi dans M.5, je cite: Tricoter ensuite le tour suivant : *14-16-16 m point de riz, M5*, EN MÊME TEMPS, diminuer 1 m de chaque côté de M5, 2 fois tous les 9 tours. , donc la 1ère fois au 1er tour de M.5 puis encore une fois au 10ème tour de M.5. Bon tricot!
12.04.2019 - 12:07
![]() Monique Aubert wrote:
Monique Aubert wrote:
Je ne comprends pas M5 : Si je fais les jetés au centre cela augmente le nombre de maille . A quel moment doit on faire des diminutions. Merci pour votre dévouement.
12.04.2019 - 10:26DROPS Design answered:
Bonjour Mme Aubert, tout à fait, dans la 1ère partie de A.5, on va augmenter le nombre de mailles pour former la feuille, mais dans la 2ème moitié de M.5, on va diminuer ces mailles pour le haut de la feuille. Quand M.5 est terminé, il reste 3 mailles (au lieu de 5 au 1er rang). Mais en même temps que l'on tricote M.5, on va diminuer dans les mailles point de riz de chaque côté de M..5. Bon tricot!
12.04.2019 - 10:38
|
|||||||||||||||||||||||||||||||
Winter's Promise#winterspromisesweater |
|||||||||||||||||||||||||||||||
 |
 |
||||||||||||||||||||||||||||||
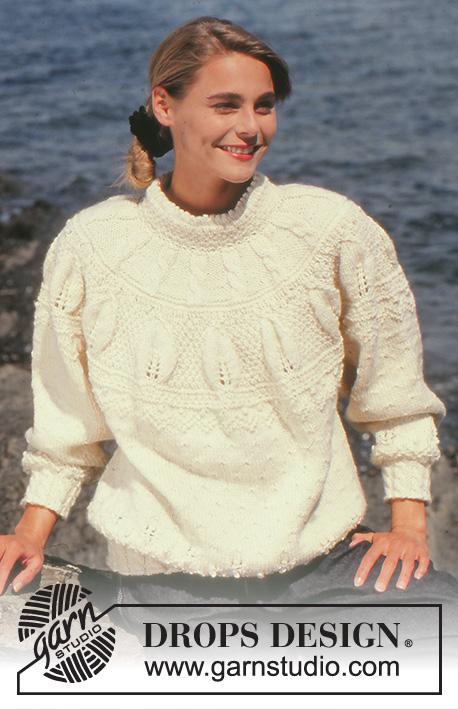
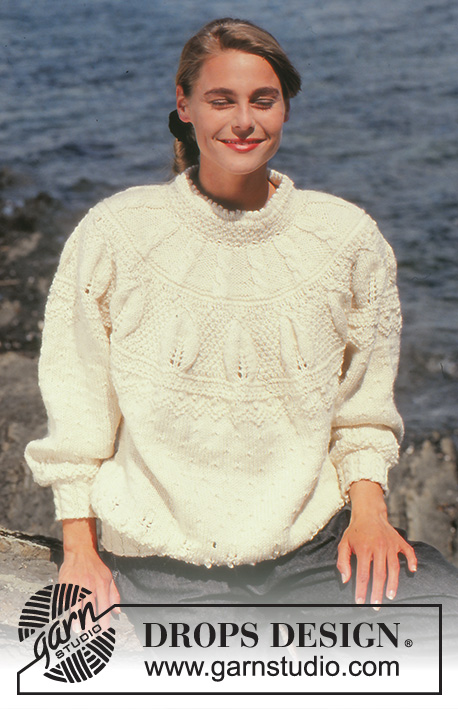
DROPS jumper with leafy pattern and yoke in “Alaska”.
DROPS 28-6 |
|||||||||||||||||||||||||||||||
|
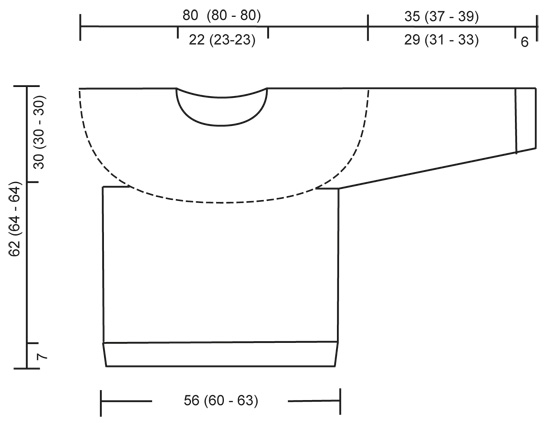
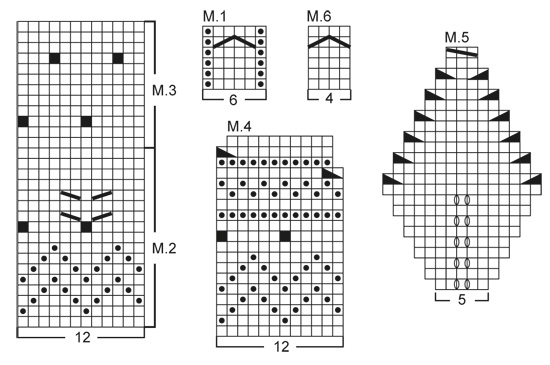
Seed st: First row: K1, P1. Second row: P over K, K over P, repeat second row. Bobble: Knitted from RS. Inc to 2 sts in 1 st, work 2 rows stockinette st on these 2 sts. On next row K2 tog. Pattern: See diagram. The diagram shows the pattern seen from the RS. Back and front piece: Worked in the round on circular needle. Cast on 198-204-210 sts on circular needle size 4 mm / US 6 and work 7 cm / 2¾" of M.1. Change to needle size 5 mm / US 8, at the same time dec/inc to 192-204-216 sts on round. Continue in M.2, and then M.3. Remember the knitting gauge. When piece measures 29-31-31 cm divide the piece in two and continue working each piece separately back and forth on needle until piece measures 32-34-34 cm. Now dec 3 sts each side = 90-96-102 sts on each piece. Put pieces aside and work the sleeves. Sleeves: Cast on 48-48-54 sts on double pointed needles size 4 mm / US 6 and work 6 cm / 2⅜" of M.1. Change to needle size 5 mm / US 8 , at the same time dec/inc to 50-50-50 sts on round. Work M.2, and then M.3 – make sure to place a pattern repeat mid upper sleeve. Remember the knitting gauge. At the same time after M.1 inc 2 sts mid under arm 21 times on every other and 3rd round alternately for size S + M and on every 3rd round for size L = 92 sts. When piece measures 33-35-37 cm divide sleeve mid under arm and continue back and forth on needle until piece measures 35-37-39 cm. Bind off 4 sts each side, put piece aside. Yoke: Put all sts in on the same circular needle = 90-96-102 sts on back piece, 84-84-84 sts on right sleeve, 90-96-102 sts on front piece, 84-84-84 sts on left sleeve = total 348-360-372 sts. Continue in M.4, at the same time on the last round dec 5 sts evenly for size S and inc 5 sts evenly for size L = 285-300-315 sts. Work next round as follows: *14-15-16 seed st, M.5*, at the same time dec 1 st on both sides of M.5 twice on every 9th round. After M.5 there are 195-210-225 sts on round. Now work 1 round seed st on all sts, at the same time inc 1 st in size S and dec 1 st in size L = 196-210-224 sts. Now work 2 rounds seed st, at the same time work a bobble in every 4-5-4 st on first round. P 1 round, K 2 rounds, P 1 round, K 1 round and work next round as follows: *M.6, P10*. Continue like this for 8 cm / 3⅛", at the same time dec 1 st on both sides of cables (P2 tog) twice on every 2 cm / ¾" = 140-150-160 sts. Change to needle size 4 mm / US 6, P 1 round, K 1 round, P 1 round, at the same time dec to 88-90-90 sts on first round. Work 4.5 cm seed st, 4 rounds stockinette st and work next round as follows: *K2 tog, 1 yo*, 4 rounds stockinette st, 4 cm / 1½" seed st and bind off. Fold neck double towards WS and fasten. Assembly: Sew opening under arms. |
|||||||||||||||||||||||||||||||
Diagram explanations |
|||||||||||||||||||||||||||||||
|
|||||||||||||||||||||||||||||||
 |
|||||||||||||||||||||||||||||||
 |
|||||||||||||||||||||||||||||||
Have you finished this pattern?Tag your pictures with #dropspattern #winterspromisesweater or submit them to the #dropsfan gallery. Do you need help with this pattern?You'll find 25 tutorial videos, a Comments/Questions area and more by visiting the pattern on garnstudio.com. © 1982-2026 DROPS Design A/S. We reserve all rights. This document, including all its sub-sections, has copyrights. Read more about what you can do with our patterns at the bottom of each pattern on our site. |
|||||||||||||||||||||||||||||||


With over 40 years in knitting and crochet design, DROPS Design offers one of the most extensive collections of free patterns on the internet - translated to 17 languages. As of today we count 325 catalogs and 12298 patterns - 12288 of which are translated into English (US/in).
We work hard to bring you the best knitting and crochet have to offer, inspiration and advice as well as great quality yarns at incredible prices! Would you like to use our patterns for other than personal use? You can read what you are allowed to do in the Copyright text at the bottom of all our patterns. Happy crafting!
Post a comment to pattern DROPS 28-6
We would love to hear what you have to say about this pattern!
If you want to leave a question, please make sure you select the correct category in the form below, to speed up the answering process. Required fields are marked *.