
Popular categories
Looking for a yarn?


Comments / Questions (41)
![]() Renáta wrote:
Renáta wrote:
Dobrý den, potřebuji pomoct s čepičkou. Nesedí mi počet ok. Máme 82 ok a když uzavřu 10 ok, 5 ok na každém okraji,tak zbývá 72 ok. V návodu je 70 ok. Mám vložit značku za 1. Kr.oko a pak za každé 13 oko. Ale na konci zůstane celkem 17 ok. Není to rovnoměrně rozložené. Děkuji
02.02.2026 - 17:57DROPS Design answered:
Dobrý den Renáto, v návodu je uvedeno, že celkový počet ok upravíme na výsledných 70. To znamená že ve zbylých 72 okách ještě rovnoměrně ujmete 2 oka, abyste se dostala na potřebných 70. Co se vkládání značek týče máte pravdu, děkujeme za upozornění, návod jsme opravili. Značky u vaší velikosti vkládáte za každé 14. oko, na konci zbyde 13 ok (13 + 1. oko = 14 ok). Hodně zdaru!
23.02.2026 - 07:35
![]() Ilona Reichwald wrote:
Ilona Reichwald wrote:
Was ist mit Bordmaschen gemeint?
24.10.2025 - 10:17DROPS Design answered:
Liebe Ilona, die Anleitung ist schon etwas älter und darum sprachlich etwas holpriger. Mit den Bordmaschen sind die Blendenmaschen gemeint. Viel Spaß beim Stricken!
24.10.2025 - 10:23
![]() Regina wrote:
Regina wrote:
Buongiorno, volevo sapere se la parte superiore è lavorata con ferri di misura inferiore. Dalla foto il punto sembra più stretto. Grazie
21.03.2025 - 05:26DROPS Design answered:
Buonasera Regina, il n° di ferri riportato nel modello è corretto. Buon lavoro!
22.03.2025 - 17:05
![]() Cathy wrote:
Cathy wrote:
Hi, Frage zu der Jacke bzw. Halsausschnitt beim Rückenteil (Größe 6/9 Monate), nach 29cm kettet man 20M für den Hals ab, und in jeder weiteren Runde dann zum Hals hin 2M (bzw. 4 insg.), richtig? Sollen dann insgesamt 78M abgenommen worden sein (sind die 20M hier inkludiert) oder sollen noch 78M auf der Nadel übrig bleiben? Vielen Dank
14.12.2024 - 00:18DROPS Design answered:
Liebe Cathy, wenn die mittleren Maschen für den Halsausschnitt abgekettet sind, wird man noch 2 Maschen am Anfang der nächsten Reihe ab Hals (= Am Anfang einer Hinreihe für die rechte Schulter / einer Rückreihe für die linke Schulter) abketten. Viel Spaß beim Stricken!
16.12.2024 - 09:52
![]() Lina wrote:
Lina wrote:
Ich beziehe mich auf die Frage von Dagmar: Wenn man 100M angeschlagen hat und 36 gleichm. vert. abnehmen soll (64 bleiben auf der Nadel übrig), rechnet sich das lt. Ihrer Erklärung wie folgt: 100/36=2,78, d.h. man nimmt jede 2. u. 3. M, dann jede 3. u. 4. M, dann wieder jede 2. u. 3. M usw. ab. Leider verbleiben dann aber 72 M auf meiner Nadel und es sind nur 28 M abgenommen worden. Warum?
11.12.2024 - 17:22DROPS Design answered:
Liebe Lina, so können Sie z.B. stricken: 1 M re, 2 M re zusammen x 4, (2 M re zusammen, 1 M re) x 27, 2 M rechts zusammen x 5 = sind noch 1+4+(2x27)+5=64 und 4+27+5=36 M wurden abgenommen. Viel Spaß beim Stricken!
12.12.2024 - 09:23
![]() Dagmar wrote:
Dagmar wrote:
In der Anleitung heißt es man soll gleichmäßig verteilt Maschen abketten. Ist damit zusammenstricken gemeint oder abketten wie z.b. am Ende?
16.11.2024 - 13:32DROPS Design answered:
Liebe Dagmar, hier ist es "abnehmen" gemeint - in diese Lektion erklärt man, wie man regelmäßig verteilt ab- (oder zu-) nimmt. Viel Spaß beim Stricken!
18.11.2024 - 07:28
![]() Petra Jürs wrote:
Petra Jürs wrote:
Liebes DROPS Design Team, ich habe diese zauberhafte Jacke vor 2 Jahren für meine Enkeltochter in Größe 98/104 gestrickt. Leider ist sie nun zu klein und ich würde sie gerne noch einmal in Größe 134/140 stricken. Gibt es die Anleitung zufällig auch in dieser Größe? Ich würde mich sehr freuen (und meine Enkelin auch). Viele Grüße aus Hamburg Petra Jürs
02.11.2024 - 19:09DROPS Design answered:
Liebe Frau Jürs, genauso die selben haben wir leider nicht, aber hier finden Sie alle unsere Jacken für diese Größe - vielleicht kann Ihnen ein von diesen Modellen inspirieren. Viel Spaß beim Stricken!
04.11.2024 - 08:30
![]() Bjørg wrote:
Bjørg wrote:
Jeg strikker på den søte jakken, men stusser litt på oppskriften som gjelder forstykkene og økning av masker til arm. På bakstykket skal det økes masker på armene, slik at armen blir litt skrå. Dette skal ikke gjøres på forstykkene, der skal man bare legge opp maskene til arm og ingen økning og . Kan dette være riktig? Mvh Bjørg
04.01.2024 - 21:55DROPS Design answered:
Hej Bjørg, jo, Når arb måler 18-19-21 (22-24) cm legges det opp nye m i siden til erme som på bakstk = 90-95-104 (119-130) m :)
09.01.2024 - 15:27
![]() Sherill Hezfeld wrote:
Sherill Hezfeld wrote:
In regard to the question I had about the 5 band stitches where I am confused is are these cast on right away from the start or is this a band that is made after the right and left sides are completed?
04.07.2023 - 13:29DROPS Design answered:
Dear Mrs Hezfeld, the front band stitches are cast on from the start (they are included in the number of stitches stated to cast on), you don't have to cast on these stitches extra. Happy knitting!
04.07.2023 - 14:49
![]() Sherill Herzfeld wrote:
Sherill Herzfeld wrote:
In making the Left Front, what do you mean with the cast on statement " Cast on 52-55-59 (63-66) sts (includes 1 edge st at side and 5 front band sts towards mid front)"? What/How do I knit the 5 front band stitches towards mid front?
04.07.2023 - 02:07DROPS Design answered:
Dear Mrs Herzfeld, these stitches are included in the number of stitches to cast on so that you don't have to cast them on extra; you will then work the edge stitch on the side (beg of row from RS for left front piece) and the front band stitches (end of row from RS for left front piece) in garter stitch to finished measurements; when decreasing evenly, do not decrease over these 5 front band stitches. Happy knitting!
04.07.2023 - 08:56
|
|
Josie Cardigan#josiecardigan |
|
 |
 |
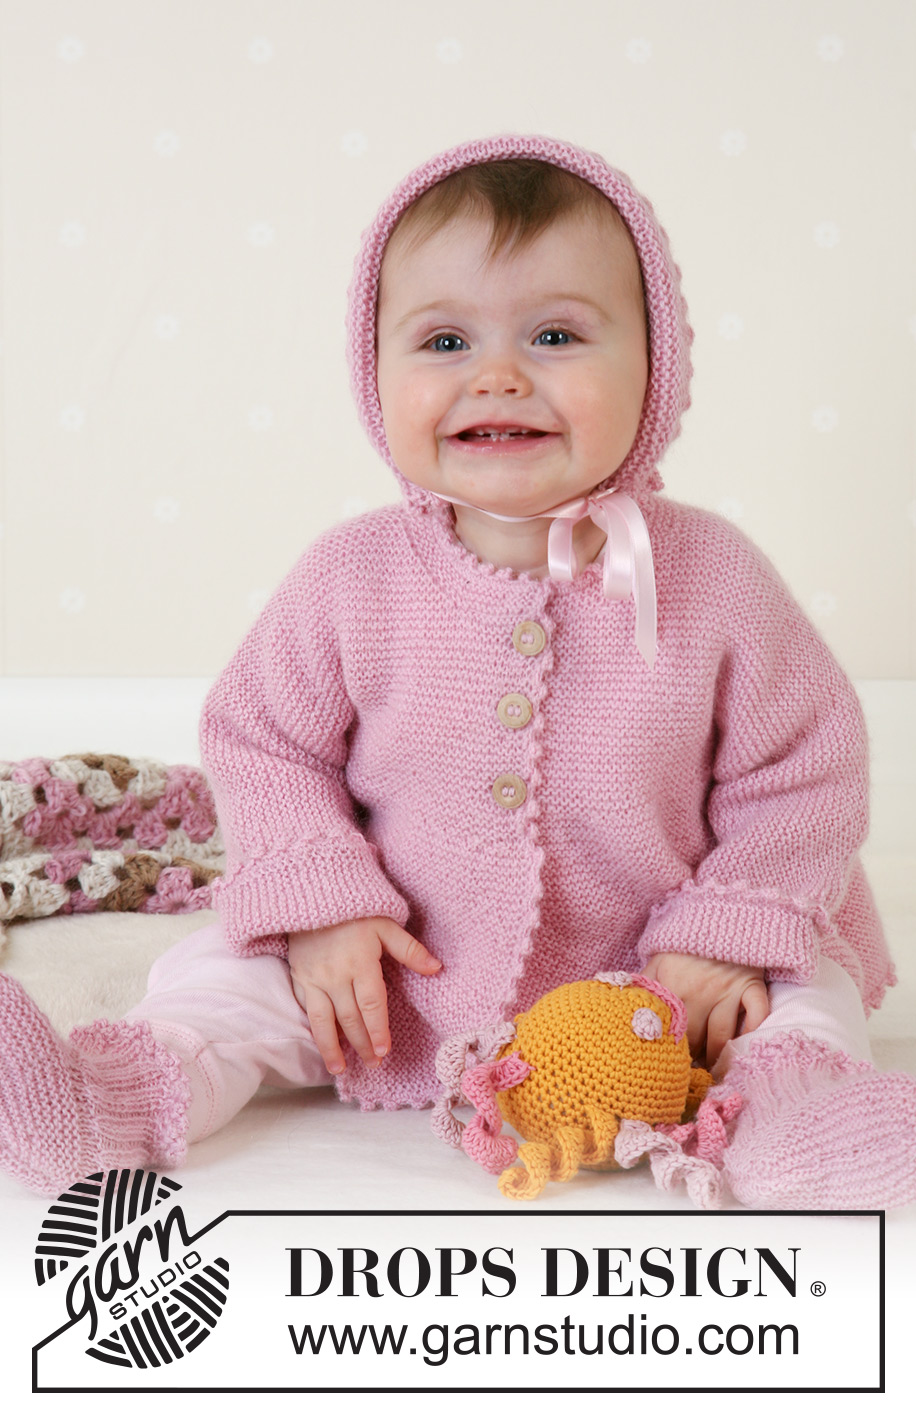
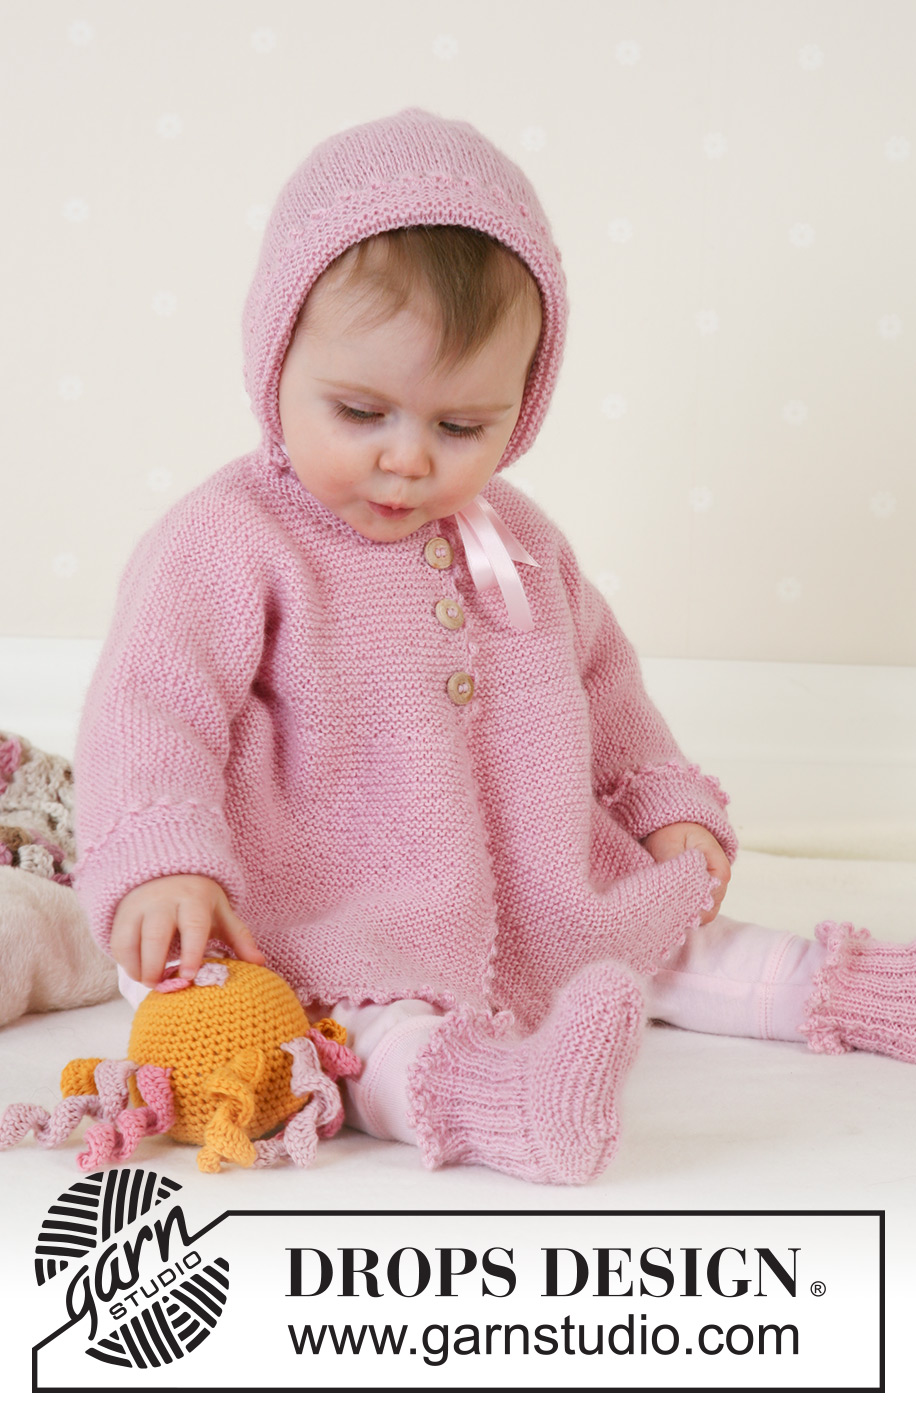
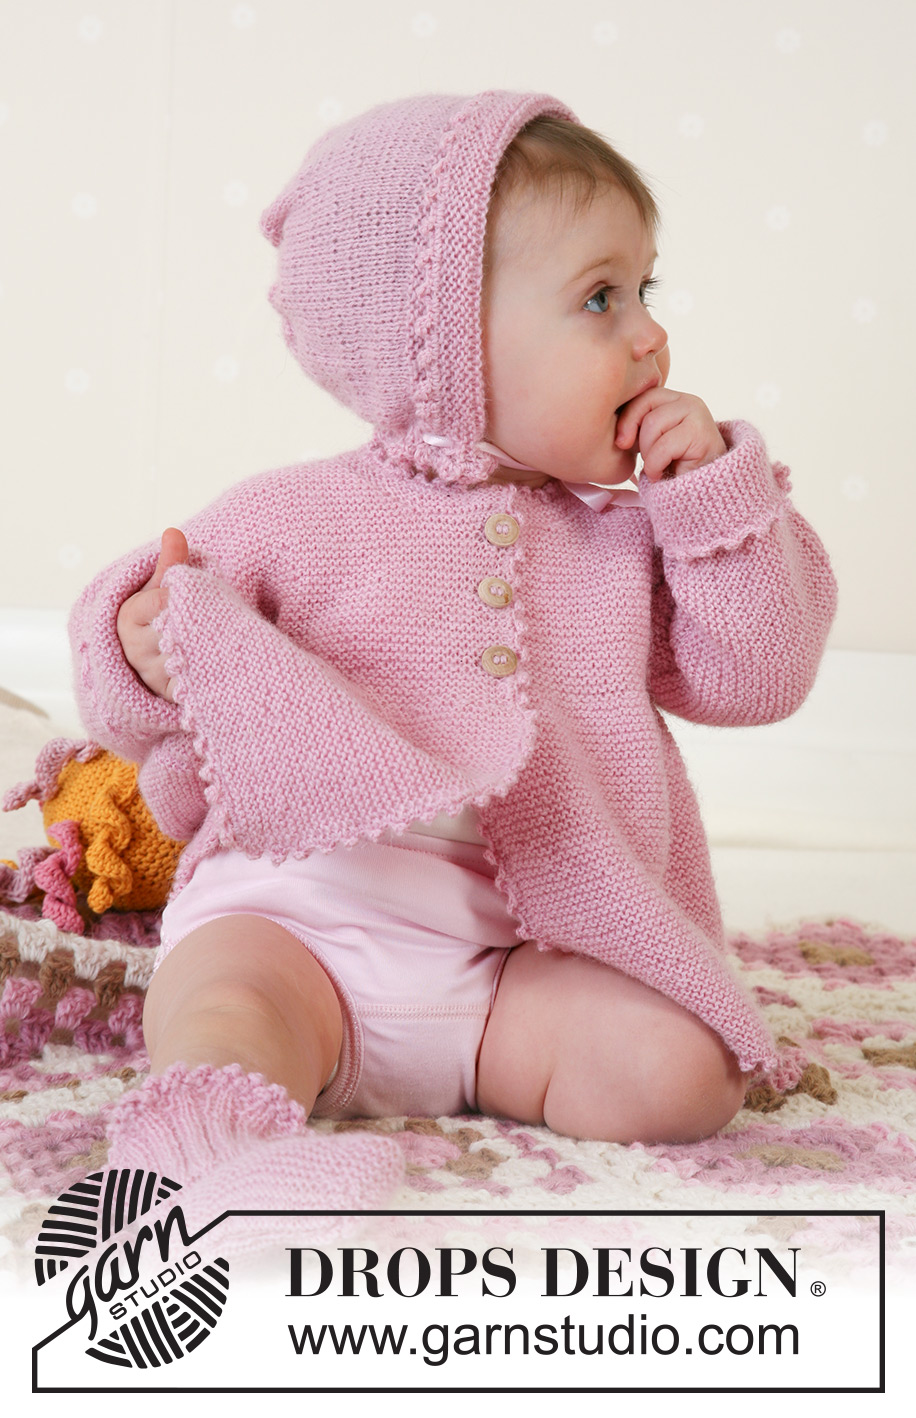
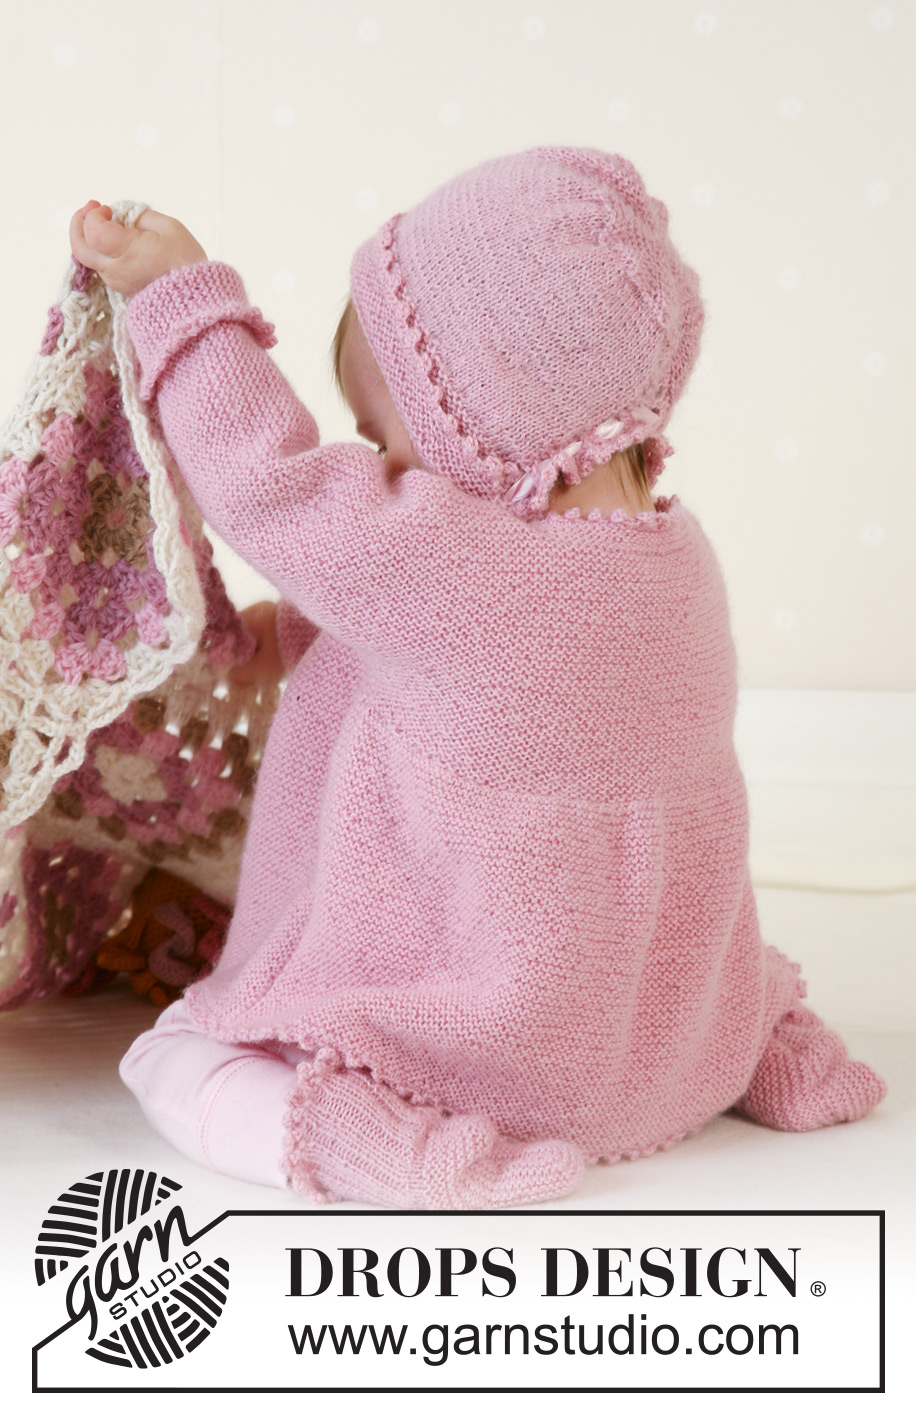
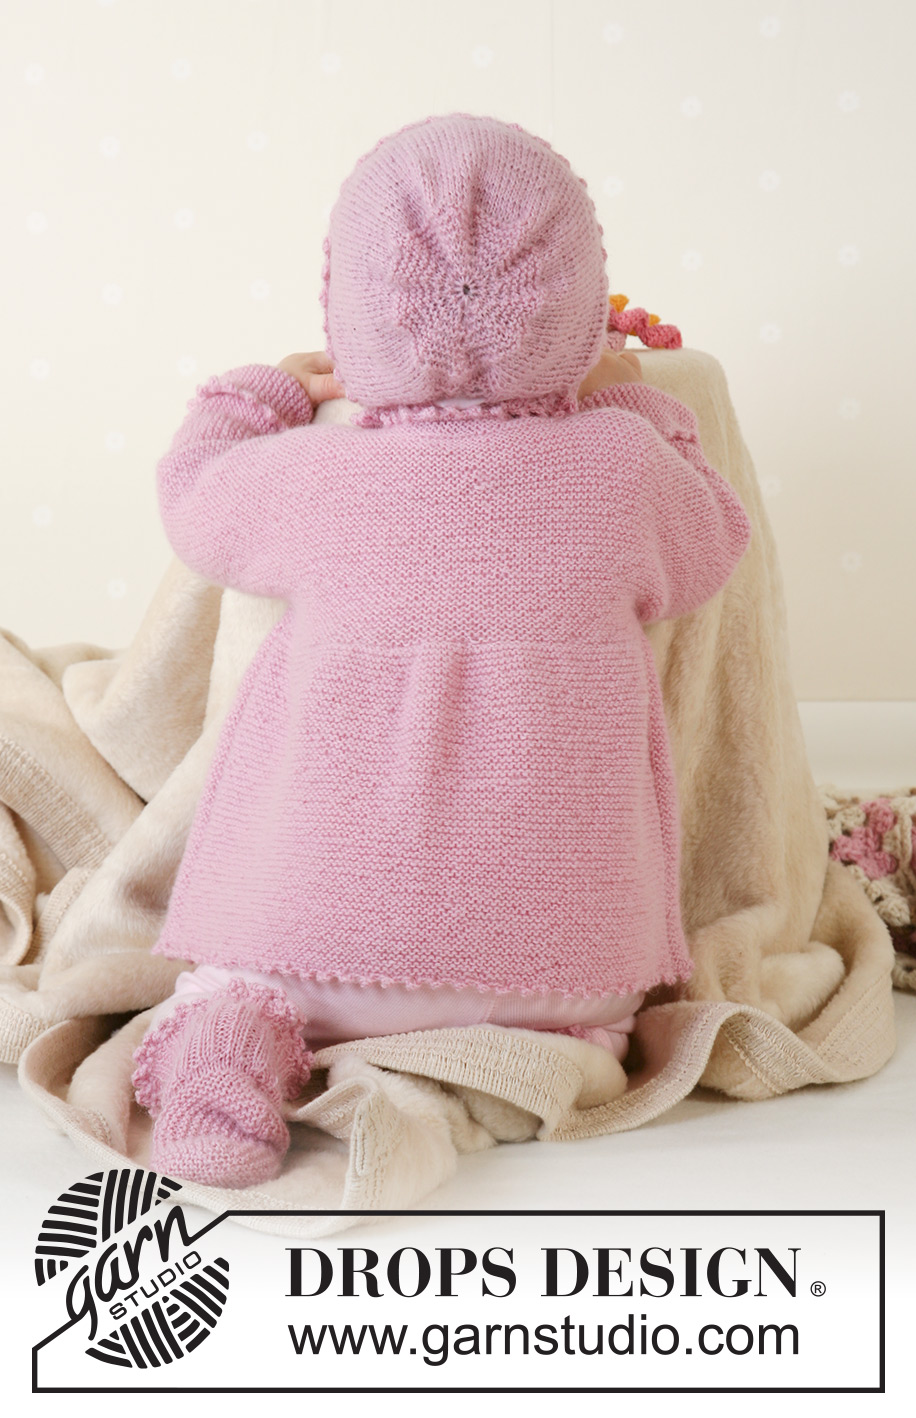
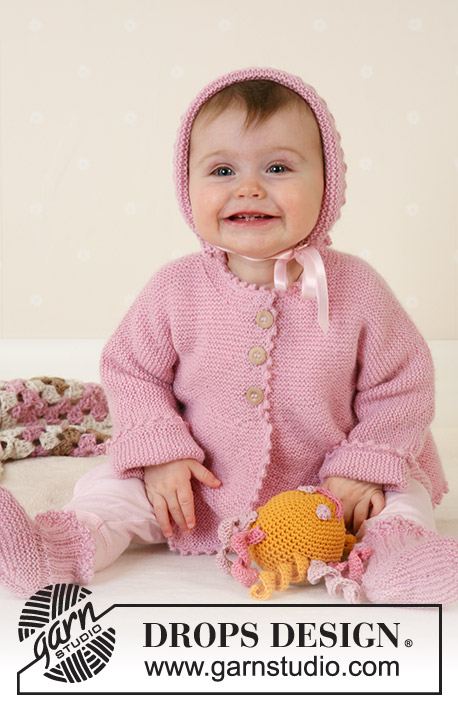
Knitted jacket with seamless sleeves, bonnet and socks in garter stitch in DROPS Alpaca. Sizes for baby and children, 1 month to 4 years.
DROPS Baby 14-7 |
|
|
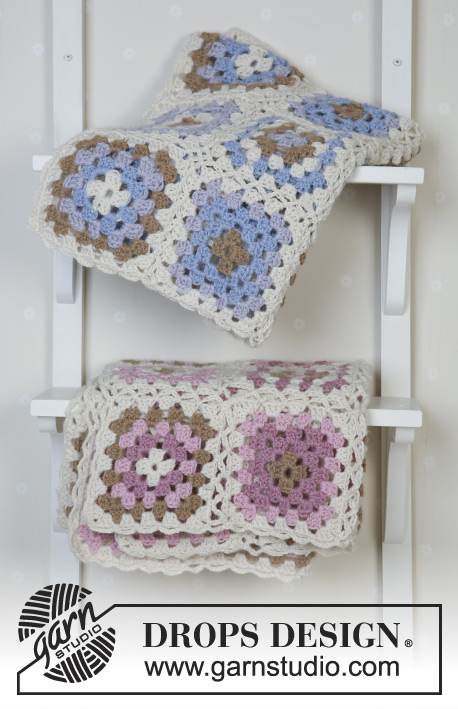
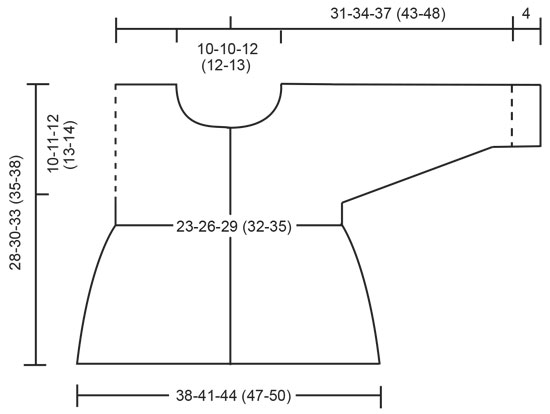
Garter sts: Knit all rows Buttonhole: Make buttonholes on right front band from the right side as follows: bind off 3rd and 4th st from the edge, on next row cast on 2 new sts over the bind off sts. Make buttonholes as follows: Size 1/3 months: 18, 21 and 24 cm / 7",8¼",9½" Size 6/9 months: 18, 22 and 26 cm / 7",8¾",10¼" Size 12/18 months: 19, 24 and 29 cm / 7½",9½",11⅜" Size 2years: 19, 25 and 30 cm/ 7½",9¾",11¾" Size 3/4 years: 21, 27 and 33 cm / 8¼",10⅝",13" Note! Make last buttonhole 2 rows before neckline. JACKET: Back piece: Cast on 93-100-108 (115-122) sts (includes 1 edge st each side) with Alpaca on circular needle size 3 mm / US 2or3 and work garter sts. When piece measures 16-17-19 (20-22) cm / 6¼"-6¾"-7½" (8"-8¾") dec 36 sts evenly on row = 57-64-72 (79-86) sts. When piece measures 18-19-21 (22-24) cm / 7"-7½"-8¼" (8¾"-9½") cast on new sts for sleeves at the end of each row each side: 3 sts 3-3-3 (3-2) times, 4 sts 4-4-3 (5-8) times, 10 sts 2-2-3 (3-3) times and 11-13-12 (15-14) sts 1 time = 169-180-198 (227-250) sts. When piece measures 27-29-32 (34-37) cm / 10⅝"-11⅜"-12½" (13⅜"-14½") bind off the middle 19-20-24 (25-26) sts for neck and work each side separately. On next row from neck bind off 2 sts = 73-78-85 (99-110) left on each shoulder/sleeve. When piece measures 28-30-33 (35-38) cm / 11"-11¾"-13" (13¾"-15") – stop after 1 row from wrong side – put all sts on a thread. Left front: Cast on 52-55-59 (63-66) sts (includes 1 edge st at side and 5 front band sts towards mid front) with Alpaca on circular needle size 3 mm / US 2or3. Work garter sts. When piece measures 16-17-19 (20-22) cm / 6¼"-6¾"-7½" (8"-8¾") dec 18 sts evenly on row (do not dec over the 5 front band sts) = 34-37-41 (45-48) sts. When piece measures 18-19-21 (22-24) cm / 7"-7½"-8¼" (8¾"-9½") inc for sleeve at side as described for back piece = 90-95-104 (119-130) sts. When piece measures 24-26-29 (30-33) cm / 9½"-10¼"-11⅜" (11¾"-13") bind off the outermost 10-10-12 (13-13) sts towards mid front for neck. Continue to bind off to shape the neckline in beg of every row from neck: 2 sts 2 times, 1 st 3 times = 73-78-85 (99-110) sts left on shoulder/sleeve. When piece measures 28-30-33 (35-38) cm / 11"-11¾"-13" (13¾"-15") – stop after 1 row from wrong side – put all sts on a holder. Right front: Cast on and work as left front, but mirrored. Note - Remember buttonholes- see above. Assembly: Sew shoulder and sleeve seams (sts from holders). Sew under arm and side seams within 1 edge st. Neck: Pick up approx 65 to 85 sts with Alpaca on needle size 3mm/ US 2 or 3. Work 6 rows garter sts (1st row = wrong side). Bind off loosely from the wrong side. Sew on buttons. Crochet border: Crochet a border round the whole opening (i.e. along both front pieces, along neckline and along lower edge) and round sleeve edges using Alpaca and crochet hook size 2.5mm/US C as follows: 1 sc in 1st st, *ch 3, 1 dc in the 1st of the 3 ch, skip 1 st, 1 sc in each of the next 3 sts*, repeat from *-* and finish with 1 sl st in 1st sc from beginning of round. Fold the lower 4 cm / 1½" on each sleeve towards the right side and attach with neat sts. SOCKS: Size: 1/3 – 6/9 – 12/18 months (2 years) To fit foot length: 10-11-12 (14) cm / 4"-4⅜"-4¾" (5½") Rib: *K2, P2*, repeat from *-* The sock is knitted back and forth from mid back. Cast on 48-52-56 (56) sts with 2 strands of Alpaca and needles size 2.5 mm / US 1. Remove 1 strand and work 5-6-6- (7) cm / 2"-2½"-2½" (2¾") in Rib – stop after a RS row. Knit 1 row from the wrong side, at the same time dec 14-14-18 (14) sts evenly on row = 34-38-38 (42) sts. With row of eyelet holes: Work next row from the right side as follows: K1, *K2 tog, yo*, repeat from *-* and finish with K1. Knit 1 row from wrong side. Without row of eyelet holes: Knit 1 row from right side and 1 row from wrong side. Now put the outermost 12-13-13 (15) sts each side on a holder. Knit 4-4.5-5.5 (6.5) cm / 1½"-1¾"-2" (2½") garter sts over the middle 10-12-12 (12) sts. Put sts from holders back on needle and pick up 10-11-13 (16) sts on each side of middle piece = 54-60-64 (74) sts. Knit 3-4-5 (5) cm / 1"-1½"-2" (2") garter sts over all sts, at the same time after 1.5-2-2.5 (3) cm/½"-¾"-⅞" (1") start to dec on every other row until finished measurements as follows: Dec 1 st at the beginning and at the end of row and K2 tog on each side of the 2 middle sts. Bind off and sew seam under foot and up mid back. Pull a silk ribbon or similar through eyelet holes. Crochet border: Crochet a border round the top of the sock with Alpaca using crochet hook size 2.5mm/US C as follows: 1 sc in 1st st, *ch 3, 1 dc in the 1st of the 3 ch, 1 sc in each of the next 3 sts*, repeat from *-* and finish with 1 sl st in sc from beginning of round. BONNET: Size: 1/3 – 6/9 – 12/18 months To fit head circumference: approx 40/42 – 42/44 – 44/46 cm / 16" - 17" - 17¾" The bonnet is knitted back and forth on needle. Cast on 82-88-100 sts with Alpaca and needles size 2.5mm/US 1 or 2. Work garter sts, at the same time making a hole each side on every 6th row by binding off the 3rd st from the edge and make a yo over the bind off st on next row, continue like this until piece measures 6 cm / 2⅜". Read all of the following section before knitting it! Continue in stockinette sts, but the 5 outermost sts each side are worked in in garter sts (continue making the holes on every 6th row as before) until piece measures 14-15-16 cm / 5½"-6"-6¼". AT THE SAME TIME, on the 2 last rows starting from RS, bind off the 5 first sts each side and on the last row also adjust the number of sts to 70-80-90. Now from RS insert 5 markers in piece as follows: 1st after 1 st, and thereafter 13-15-17 sts between each. Work garter sts, at the same time dec 1 st after each marker on every other row a total of 12-14-16 times = 10 sts left. Cut the yarn, pull through remaining sts and sew. Assembly: Sew seam mid back. Crochet a border round the opening of bonnet, i.e. along cast-on row and lower edge, with Alpaca and crochet hook size 2.5mm/US C as follows: 1 sc in 1st st, *ch 3, 1 dc in the 1st of the 3 ch, 1 sc in each of the next 3 sts*, repeat from *-* and finish with 1 sl st in sc from beginning of row. Fold the front edge 3 cm / 1⅛" towards right side and attach with neat sts – make sure the holes at lower edge fits over each other. Pull silk ribbon through the row of holes. SOFT TOY: see pattern baby 14-30 BLANKET: see pattern baby 14-24 |
|
 |
|
Have you finished this pattern?Tag your pictures with #dropspattern #josiecardigan or submit them to the #dropsfan gallery. Do you need help with this pattern?You'll find 24 tutorial videos, a Comments/Questions area and more by visiting the pattern on garnstudio.com. © 1982-2026 DROPS Design A/S. We reserve all rights. This document, including all its sub-sections, has copyrights. Read more about what you can do with our patterns at the bottom of each pattern on our site. |
|


With over 40 years in knitting and crochet design, DROPS Design offers one of the most extensive collections of free patterns on the internet - translated to 17 languages. As of today we count 325 catalogs and 12298 patterns - 12288 of which are translated into English (US/in).
We work hard to bring you the best knitting and crochet have to offer, inspiration and advice as well as great quality yarns at incredible prices! Would you like to use our patterns for other than personal use? You can read what you are allowed to do in the Copyright text at the bottom of all our patterns. Happy crafting!
Post a comment to pattern DROPS Baby 14-7
We would love to hear what you have to say about this pattern!
If you want to leave a question, please make sure you select the correct category in the form below, to speed up the answering process. Required fields are marked *.