
Popular categories
Looking for a yarn?


Comments / Questions (148)
![]() Candy Womer wrote:
Candy Womer wrote:
In the instructions for the mittens - how does one do this when knitting with double pointed needles ? don’t let the threads follow the piece all the way round, only the pattern sts).
17.02.2026 - 05:17
![]() Sonja Brygmann Evju wrote:
Sonja Brygmann Evju wrote:
Hei! Finner ikke mønster på lue! M 2 .... Kan det sendes?
01.02.2026 - 16:02DROPS Design answered:
Hei Sonja, Diagrammene er på bunnen av oppskriften og M.2 er diagrammet som er nest-øverst på høyre siden. Hilsen Drops Team.
02.02.2026 - 07:01
![]() Anna wrote:
Anna wrote:
Hei, Haluaisin aloittaa työn mutta en oikeen huomannut ohjeesta kuinka pitkiä pyöröpuikkoja tulisi käyttää. Uskoisin että ei korvin pitkät niin varmaan 40 cm vai pienemmät kenties?
27.01.2026 - 09:18DROPS Design answered:
Hei, jakku neulotaan tasona, joten voit neuloa sen esim. 60 tai 80 cm:n pituisella pyöröpuikolla.
27.01.2026 - 19:22
![]() Rateau Monique wrote:
Rateau Monique wrote:
Pour le dos est ce bien M3 à suivre au début ? je ne comprends pas vos explications.désolée merci de bien vouloir me préciser .
16.01.2026 - 12:23DROPS Design answered:
Bonjour Mme Rateau, tout à fait, vous continuez simplement M.3 comme avant. Bon tricot!
19.01.2026 - 07:34
![]() Cecilia wrote:
Cecilia wrote:
Är det meningen att garnet skall klippas av var och varannat varv mönster 3, tappar lusten att sticka vidare, synd på sån fin kofta. Har stickat så många tröjor/koftor Drops mönster, aldrig varit med om detta tidigare.
13.01.2026 - 09:49DROPS Design answered:
Hej Cecilia, går det at strikke fra den side hvor du har tråden? Eller om du kan trække tråden med på omgangen til den side du skal bruge den :)
29.01.2026 - 10:16
![]() Cecilia wrote:
Cecilia wrote:
Hej! Är det meningen att man ska klippa av mönstertråden efter varje mönstervarv, gäller M2 kofta?
06.01.2026 - 08:06
![]() Cecilia wrote:
Cecilia wrote:
Hej! Är det meningen att man ska klippa av mönstertråden efter varje mönstervarv, gäller M2 kofta?
06.01.2026 - 08:05
![]() Floratricote wrote:
Floratricote wrote:
Bonjour, au niveau du pantalon j'ai un doute concernant la réhausse du dos : quand il est indiqué "Continuer ainsi encore 10 fois (=12 rangs) en tricotant 9-10-10 (11-11) m en plus avant de tourner" c'est qu'il faut à chaque fois ajouter 9 mailles dans la réhausse de chaque côté ? mais si on le fait 10 fois cela correspond à 90 mailles et prend tout le pantalon non ?
28.12.2025 - 15:33DROPS Design answered:
Bonjour, exactement. 18 mailles au debut + 90 mailles supplementaires =108 mailles. A partir de ce moment vous tricotez toutes les mailles, en rond. Bon tricot!
28.12.2025 - 17:20
![]() Olga wrote:
Olga wrote:
Is Aanpassen Hetzelfde Als Steken minderen
15.12.2025 - 15:33
![]() Rebecca wrote:
Rebecca wrote:
Hej! Gällande ärm: det ska sättas en märktråd efter 5 cm och "hädanefter så ska arbetet mätas därifrån". Så när det står tex: "tills arbetet mäter 16-17-19" så är det alltså måttet från märktråden?
10.12.2025 - 18:20DROPS Design answered:
Hei Rebecca. Ja, fra merketråden. Se gjerne alle mål på målskissen. mvh DROPS Design
15.12.2025 - 10:31
|
||||||||||
Winter Snuggles Set#wintersnugglesset |
||||||||||
 |
 |
|||||||||
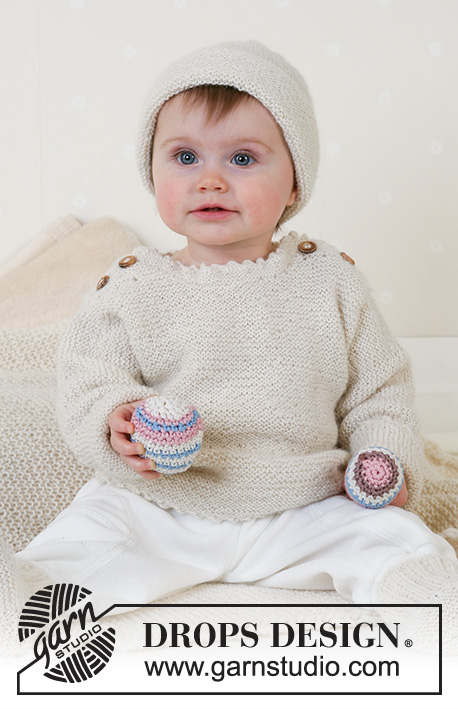
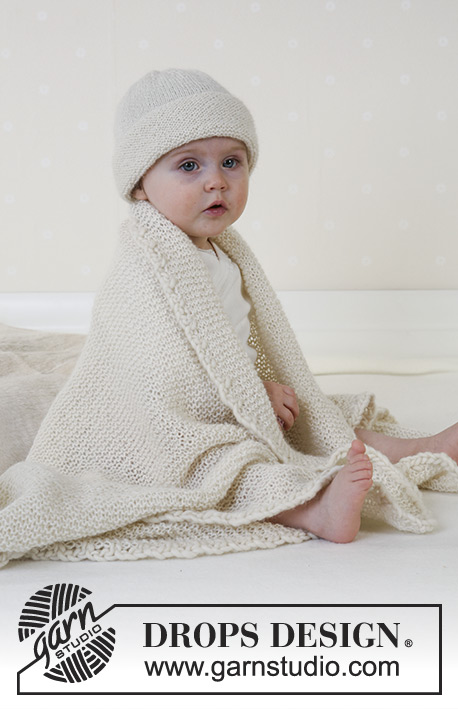
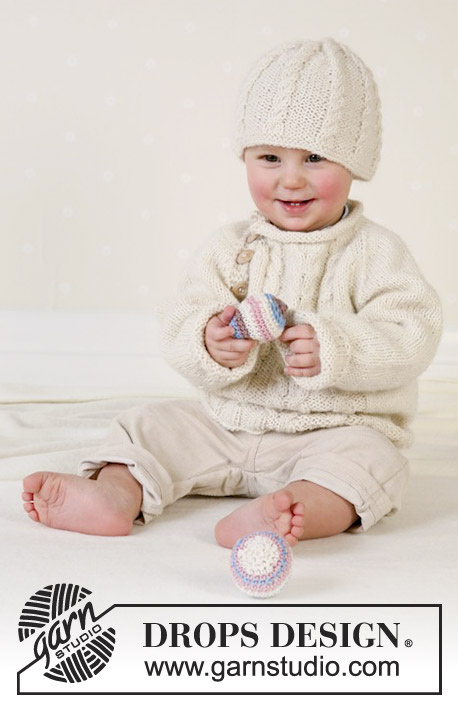
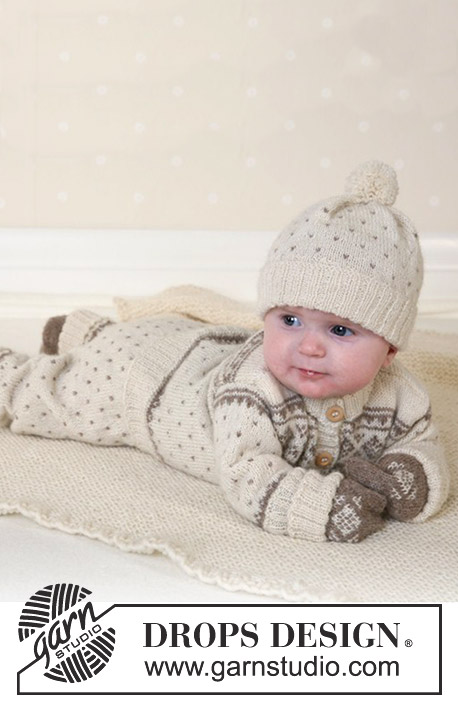
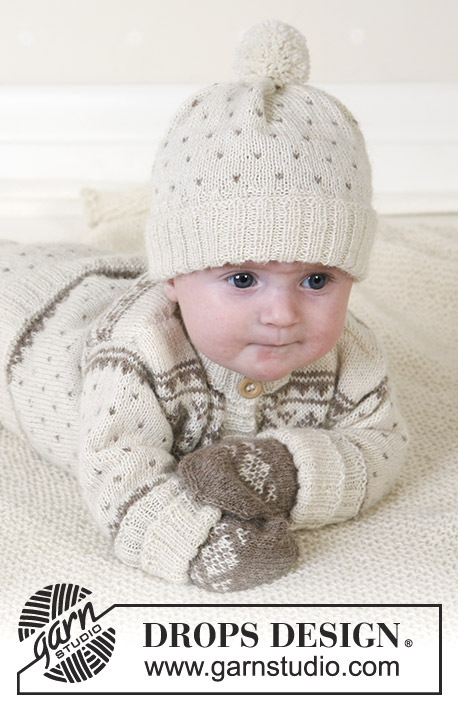
Jacket, pants, hat, mittens, socks and blanket in Alpaca
DROPS Baby 13-5 |
||||||||||
|
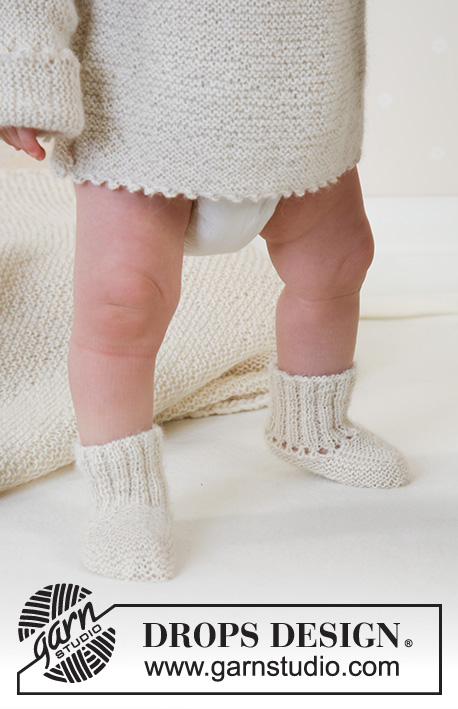
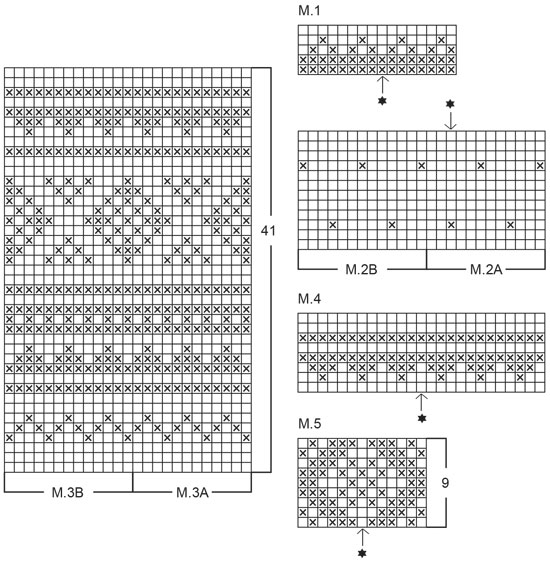
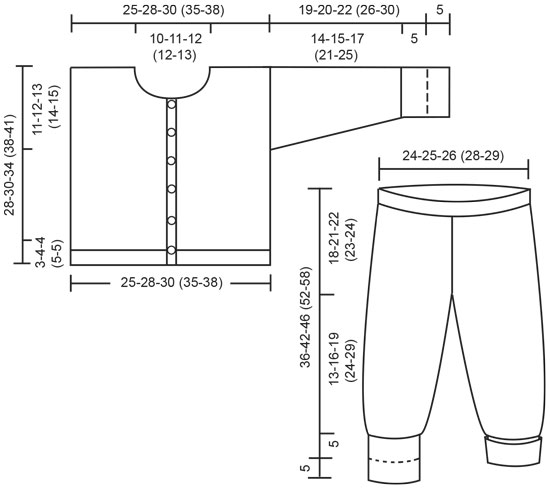
JACKET: Rib: *K2, P2*, repeat from *-*. Garter sts (back and forth on needle): Knit all rows Pattern: See diagrams M.1 to M.4. The diagrams show the pattern from the right side. Front and back piece: Knit the jacket back and forth on circular needle from mid front. Cast on 144-160-172 (200-212) sts (incl 1 edge st towards mid front each side, knitted in garter sts throughout) with Alpaca on circular needle size 2.5 mm / US 1.5. Knit 1 row from the wrong side and continue in Rib with 1 edge st and 2 further sts in garter sts towards mid front (seen from the right side). When Rib measures 3-4-4 (5-5) cm, change to circular needle size 3 mm / US 2.5. Knit 1 row from the right side, at the same time adjusting number of sts evenly to 123-135-147 (171-183). Now purl 1 row from wrong side and knit 1 row from right side. Insert a marker 31-34-37 (43-46) sts in from each side = 61-67-73 (85-91) sts between markers on back piece – let the markers follow the piece as you progress. Knit M.1 with 1 edge st each side and knit next row as follows: 1 edge st, M.2A over the next 108-120-132 (156-168) sts, M.2B (= 13 sts), 1 edge st. Continue like this. Read all of the following section before knitting it! When piece measures approx 15-17-21 (25-28) cm – adjust after 2 rows with off-white after 1 row with pattern - continue in M.3 in the same way, i.e. 1 edge st, M.3A over the next 108-120-132 (156-168) sts, M.3B (= 13 sts) and 1 edge st. At the same time, when piece measures 17-18-21 (24-26) cm / 6¾"-7"-8¼" (9½"-10¼") split the piece for armholes by both markers and finish back and front pieces separately. Back piece: = 61-67-73 (85-91) sts. Cast on 1 new st each side (= edge st for seam) = 63-69-75 (87-93) sts. Continue in M.3 with 1 edge st each side. When piece measures 27-29-33 (37-40) cm / 10⅝"-11⅜"-13" (14½"-15¾") bind off the middle 21-23-25 (25-27) sts for neck. Dec 2 sts on neckline on next row = 19-21-23 (29-31) sts left on shoulder. Bind off remaining sts after M.3, piece measures approx 28-30-34 (38-41) cm. Note! If piece is shorter continue in off-white until finished measurements. Left front piece: = 31-34-37 (43-46) sts. Cast on 1 new st towards armhole (= edge st for seam) = 32-35-38 (44-47) sts. Continue in M.3 with 1 edge st each side. At the same time, when piece measures 24-26-29 (33-35) cm put the 7-8-9 (9-9) sts towards mid front on holder for neck. Now dec to shape the neckline on every other row: 2 sts 2 times and 1 st 2-2-2 (2-3) times = 19-21-23 (29-31) sts left on shoulder. Bind off when piece measures the same as back piece. Right front piece: Knit as left front, but mirrored. Sleeve: Read all of this section before knitting it! Cast on 48-53-56 (60-64) sts with off-white Alpaca on double pointed needles size 2.5 mm / US 1.5 and knit 1 round. Continue in Rib. When piece measures 5 cm / 2", insert a marker – measure piece from here - and change to needle size 3 mm / US 2.5. Knit 1 round whilst adjusting number of sts to 40-42-44 (46-48). Purl 1 round, knit 1 round and continue in M.1 – adjust the middle, see arrow in diagram. After M.1 continue in M.2 (adjust middle after arrow) until piece measures 16-17-19 (23-27) cm. Now knit M.4. At the same time when piece measures 7 cm / 2¾" inc 2 sts mid under arm a total of 7-8-9 (11-12) times: Size 1/3 + 6/9 + 12/18 months + 2 years: on every 5th round Size 3/4 years: on every 6th round = 54-58-62 (58-72) sts – incorporate new sts in pattern as you go along. After M.4 bind off loosely, piece measures approx 19-20-22 (26-30) cm from marker. Note! If piece is shorter continue in off-white until finished measurements. Assembly: Sew shoulder seams. Front edge: Pick up 74-78-86 (94-102) sts along left front piece with off-white and needle size 2.5 mm / US 1.5. Knit 1 row from wrong side and 1 row from right side. Continue in Rib with 2 sts in garter sts and 2 knitted sts each side (seen from the right side). When Rib measures 2.5 cm / ⅞" bind off in rib. Repeat along right front piece but when Rib measures approx 1 cm / ⅜", make 5-5-5 (6-6) buttonholes evenly distributed – the lower one approx 1 cm / ⅜" from lower edge and the top one approx 4-6 cm from neckline (the last buttonhole will be on the neckline). 1 buttonhole: bind off 2 purled sts from the right side and cast on 2 new sts on next row. Neckline: Pick up approx 86 to 110 sts, incl sts on holders on front pieces (number of sts should be dividable by 4 + 2) round neck and front edges with off-white Alpaca and needle size 2.5 mm / US 1.5. Knit 1 row from wrong side and 1 row from right side and continue in Rib with 2 sts in garter sts and 2 K sts each side (seen from the right side). When rib measures 1 cm / ⅜" make a buttonhole over the others on right front edge (knit tog 3rd and 4th st from edge and make a yo). When rib measures 3-4-4 (5-5) cm make another buttonhole and when neckline measures 4-5-5 (6-6) cm / 1½"-2"-2" (2⅜"-2⅜") bind off in rib. Fold neckline double towards the wrong side and attach with neat sts on wrong side. Sew in sleeves and sew on buttons. Fold the rib on sleeves towards the right side. -------------------------------------------------------- PANTS: Rib: *K2, P2*, repeat from *-*. Pattern: see diagrams M.1 and M.2. The whole pattern is knitted in stockinette sts. Buttonhole: Make 2 buttonholes at front with approx 8-9-10 (11-12) cm between each. 1 buttonhole: bind off 2 purled sts from right and cast on 2 new sts on next row. Decreasing tips (applies to inner side of leg): Dec as follows 1 st before the marker: K2 tog Decrease as follows 1 st after the marker: slip 1 st as if to knit, K1, psso. Start at the top and knit downwards. Cast on 160-168-176 (184-192) sts with off-white and circular needle size 2.5 mm / US 1.5. Purl 1 round (round starts and finishes mid back). Continue in Rib. When Rib measures 2 cm / ¾", make 2 buttonholes at front – see above. When piece measures 4 cm / 1½" insert a marker mid front (= folding edge) and measure piece from here from now on. When piece measures 2 cm / ¾", make 2 buttonholes as before (they have to fit over the first 2 when folding the edge double). When Rib measures 4 cm / 1½" change to needle size 3 mm / US 2.5. Knit 1 round, at the same time dec evenly to 114-120-126 (132-138) sts. Purl 1 round and knit 1 round. Elevation at the back: Knit M.2A, at the same time knitting elevation at the back as follows: knit 9-10-10 (11-11) sts from beginning of round, turn the piece (to avoid a hole slip the first st as if to knit and tighten yarn when knitting back), knit 18-20-20 (22-22) sts, turn the piece. Continue like this by knitting 9-10-10 (11-11) sts more before each turn another 10 times (= 12 rows). Now knit M.2A round over all sts. Increases: When piece measures 13-16-17 (18-19) cm (measured from marker mid front) insert a new marker at beginning of round and after 57-60-63 (66-69) sts. Inc 1 st on each side of these markers (= 4 inc per round) on every 3rd round a total of 6 times = 138-144-150 (156-162) sts. After the last inc the piece measures approx 18-21-22 (23-24) cm mid front. Legs: Knit 69-72-75 (78-81) sts from mid back (= leg) and put remaining sts on a thread. Knit round and continue M.2A as before. Insert a new marker at beginning of round (= inner side of leg). Decrease like this 2-2-3 (3-3) times on every round, then decrease a total of 11-10-8 (8-8) times: Size 1/3 months: on every 3rd round Size 6/9 months: on every 4th round Size 12/18 months: on every 6th round: Size 2 years: on every 8th round Size 3/4 years: on every 10th = 43-48-53 (56-59) sts. When piece measures approx 30-36-40 (46-52) cm – adjust after 2 rounds of off-white after a round of pattern – knit M/1 - start at the top of diagram and see arrow which marks the middle of round (= outer side of leg). After M.1 change to off-white and needle size 2.5 mm / US 1.5. Knit 1 round, at the same time adjusting number of sts to 68-72-76 (80-84). Knit 10 cm Rib and bind off loosely. Knit the other leg in the same way. Assembly: Fold rib at the top of the trousers down on the inside of the garment. Make sure the buttonholes fit over each other. Fasten rib on the inside of the garment. To avoid the rib being too tight it is important to make the seam elastic. Braces: Cast on 12 sts on needle size 2.5 mm / US 1.5 with off-white and knit Rib with 1 edge st and a further 2 sts each side in garter sts (seen from the right side). Bind off when piece measures approx 34-40-48 (58-64) cm. Make two and sew to back of pants (on the inside of rib) with approx 8-9-10 (11-12) cm in between. Sew on buttons to front end of braces and cross braces at back when worn. -------------------------------------------------------- HAT: Size: 1/3 – 6/9 – 12/18 months (2 - 3/4 years) To fit head circumference: 40/42 – 42/44 – 44/46 (46/48 - 48/50) cm Pattern: See diagram M.2. The whole pattern is knitted in stockinette sts. The hat is knitted round. Loosely cast on 112-116-120 (124-132) sts with off-white Alpaca on needles size 2.5 mm / US 1.5 and purl 1 round. Now knit 10 cm Rib, K2/P2, and change to needle size 3 mm / US 2.5 and stockinette sts and M.2A, at the same time adjusting number of sts to 90-96-102 (108-114). When piece measures 17-17-18 (19-20) cm insert 6 markers in piece with 15-16-17 (18-19) sts between each. Continue in M.2A, at the same time dec 1 st on each side of all markers (see Decreasing tips under pants): on every other row 6-7-7 (6-6) times and then on every row 0-0-0 (2-2) times = 18-12-18 (12-18) sts left – knit sts not fitting into pattern when decreasing in off-white. Pull a double strand of Alpaca through the remaining sts, pull tight and attach. Fold the lower 5 cm / 2" Rib towards the right side, the hat measures approx 15-16-17 (18-19) cm / 6"-6¼"-6¾" (7"-7½"). Pompon: Make a pompon with a diameter of approx 4-5 cm and attach to top of hat. -------------------------------------------------------- MITTENS: Size: 1/3 – 6/9 – 12/18 months (2 -3/4 years) The 3 bigger sizes with thumbs, the 2 smaller sizes without.. The mitten is knitted round on double pointed needles. Loosely cast on 36-40-44 (48-52) sts with beige-mix Alpaca on needles size 2.5 mm / US 1.5 and purl 1 round. Continue in Rib with K2/P2 until piece measures 8-8-10 (10-12) cm. Now continue in stockinette sts, at the same time adjusting number of sts to 38-42-46 (50-54). The 3 bigger sizes: After 1 (2-3) cm in stockinette sts, put the last 5 (6-6) sts on round on a thread for thumb. Cast on 5 (6-6) new sts over the thread on next row. All sizes: When piece measures 10-11-12 (13-14) cm / 4"-4⅜"-4¾" (5⅛"-5½") knit M.5 over the middle 13 sts on top of hand, knit remaining sts in beige-mix (knit the threads from color changes into the piece as you go along so that the fingers don’t get caught when wearing the mitten – don’t let the threads follow the piece all the way round, only the pattern sts). After M.5 continue with beige-mix over all sts and insert a marker each side when piece measures 15-16-18 (19-21) cm. Now dec 1 st on each side of both markers on every row until there are 10 sts left – see Decreasing tips under pants. Pull a double strand of Alpaca through remaining sts, pull tight and sew. Fold the outer 4-4-5 (5-6) cm of Rib, mitten measures approx 13-14-16 (17-18) cm. Thumb: Put the 5 (6-6) sts from thread back on double pointed needles size 2.5 mm / US 1.5 and pick up 7 (8-8) sts behind these = 12 (14-14) sts. K until thumb measures 3 (4-5) cm. Now K2 tog around. Pull thread through remaining sts and attach. Knit another mitten, but knit the thumb the other side (applies to the 3 bigger sizes). -------------------------------------------------------- SOCKS: Size: 1/3 – 6/9 – 12/18 months (2 -3/4 years) To fit foot length: 10-11-12 (14-15) cm The sock is knitted round. Cast on 44-48-48 (52-56) sts using beige-mix Alpaca on needles size 2.5 mm / US 1.5. Knit 1 round and continue in Rib with K2/P2 until piece measures 4-5-5 (6-7) cm. Knit 1 round, at the same time dec 4-8-4 (8-8) sts evenly = 40-40-44 (44-48) sts. Knit heel as follows: Knit 3-3.5–3.5 (4-4.5) cm stockinette stitch back and forth over 16-16-16 (18-18) sts mid back. Heel decreases: (1st row = right side): K 9-9-9 (10-10), K2 tog into back of st, K1, turn the piece, 2nd row: slip 1 st as if to knit, P 3-3-3 (4-4), P2 tog, P1, turn the piece, 3rd row: slip 1 st as if to knit, K 4-4-4 (5-5), K2 tog into back of st, K1, turn the piece, 4th row: slip 1 st as if to knit, P 5-5-5 (6-6), P2 tog, P1, turn the piece, 5th row: slip 1 st as if to knit, K 6-6-6 (7-7), K2 tog into back of st, K1, turn the piece, 6th row: slip 1 st as if to knit, P 7-7-7 (8-8), P2 tog, P1, turn the piece, 7th row: K2 tog, K 6-6-6 (8-8), K2 tog into back of st = 8-8-8 (10-10) sts on row (= total 32-32-36 (40-40) sts. Pick up 7-8-8 (9-11) sts on each side of heel and put all sts on same needle = 46-48-52 (54-62) sts. Continue in stockinette st over all sts. At the same time, dec on each side of the upper 18-20-22 (24-26) sts: 1 st on every other row a total of 7 times = 32-34-38 (40-48) sts. When foot measures 8-9-9 (12-12) cm from the beginning of the dec for heel, insert a marker each side. Now dec on both sides of each marker (= 4 dec per round) a total of 7-7-8 (8-10) times. Pull thread though remaining sts and sew. |
||||||||||
Diagram explanations |
||||||||||
|
||||||||||
 |
||||||||||
 |
||||||||||
Have you finished this pattern?Tag your pictures with #dropspattern #wintersnugglesset or submit them to the #dropsfan gallery. Do you need help with this pattern?You'll find 33 tutorial videos, a Comments/Questions area and more by visiting the pattern on garnstudio.com. © 1982-2026 DROPS Design A/S. We reserve all rights. This document, including all its sub-sections, has copyrights. Read more about what you can do with our patterns at the bottom of each pattern on our site. |
||||||||||


With over 40 years in knitting and crochet design, DROPS Design offers one of the most extensive collections of free patterns on the internet - translated to 17 languages. As of today we count 324 catalogs and 12290 patterns - 12280 of which are translated into English (US/in).
We work hard to bring you the best knitting and crochet have to offer, inspiration and advice as well as great quality yarns at incredible prices! Would you like to use our patterns for other than personal use? You can read what you are allowed to do in the Copyright text at the bottom of all our patterns. Happy crafting!
Post a comment to pattern DROPS Baby 13-5
We would love to hear what you have to say about this pattern!
If you want to leave a question, please make sure you select the correct category in the form below, to speed up the answering process. Required fields are marked *.