
Popular categories
Looking for a yarn?


Comments / Questions (113)
![]() Lisette wrote:
Lisette wrote:
Wat een leuk patroon! Het is al best oud, dus bedankt dat het nog beschikbaar is. Hier ga ik veel mensen blij mee maken en het is zo prettig om te breien. Super!
18.10.2025 - 01:26
![]() Anneli Kokkola wrote:
Anneli Kokkola wrote:
This is very nice, and there are my daughters and their friends hoping me to make this for them❣️
30.03.2025 - 12:30
![]() Silvia wrote:
Silvia wrote:
Seit Jahren stricke ich dieses Stirnband für mich und Freundinnen in allen möglichen Farben. Gut verständliche Anleitung und das Ergebnis sitzt perfek. Vielen Dank für dieses zeitlose und doch pfiffige Accessoire für kalte Tage.
24.02.2025 - 18:08
![]() Annika wrote:
Annika wrote:
Det fattas ju en del av mönstret på svenska! Inte konstigt att det blir fel är jag försöker sticka. Hade varit tacksam om ni rättade till det!
07.02.2025 - 17:14
![]() Janine Luisier wrote:
Janine Luisier wrote:
Bonjour votre site est excellent belles laines, beaux modèles, et le 86-10 super comme tant d'autres. Les explications à portée de tous. Mille MERCIS ż
05.12.2024 - 15:08
![]() Stéphanie P wrote:
Stéphanie P wrote:
Bonjour, Comment joindre les deux extrémités du tricot sans rabattre les mailles? Je ne trouve aucun tutos ... Merci d'avance Stéphanie
01.11.2024 - 00:33
![]() Lorraine wrote:
Lorraine wrote:
Bonjour, pourquoi ne pas rabattre les mailles avant de coudre le bandeau.
11.09.2024 - 17:20DROPS Design answered:
Bonjour Lorraine, pour éviter que la couture ne soit trop épaisse, mais vous pouvez tout à fait rabattre avant si vous le préférez. Bon tricot!
12.09.2024 - 09:26
![]() June wrote:
June wrote:
Do I do the first two rows actually like they are written after doing the first increase row?
23.03.2024 - 00:43DROPS Design answered:
Dear June, in this pattern you have a rib pattern, where you will repeat the rib explained in rows 1 and 2. However, as you increase, the rib will slightly change. For example, in the first increase at 3", you increase from P1 in the rib to P2 from the RS (by purling 2 stitches in 1 purl stitch). Then, on the WS knit over the new purl stitches (so the new rib will look like K2, P2 from the RS and P2, K2 from the WS). As you continue increasing you will add P stitches from the RS, which are knitted from the WS (so K2, P3 from the RS and P2, K3 from the WS; then K2, P4 from the RS and P2, K4 from the WS). Continue increasing like this. Happy knitting!
25.03.2024 - 00:00
![]() June wrote:
June wrote:
When the piece messages 3 ins what do I do now?
23.03.2024 - 00:30DROPS Design answered:
Dear June, in the first increase at 3", you will work as follows from the RS: K 1 (edge st knit in garter st), * K 2, P 2 (that is, purl 2 stitches in the P1 to increase 1 purl stitch) * repeat a total of 5 times – finish row with K 2 and K 1 (edge st knit in garter st). Due to these increases, in the WS the rib also changes: from P2, K1 to P2, K2 (you don't increase in this row, just work over the increased stitches in the previous row). Happy knitting!
25.03.2024 - 00:00
![]() Carole Saidah wrote:
Carole Saidah wrote:
Bonjour, pour le bandeau, est ce que les diminutions se font sur l'endroit du travail comme pour les augmentations ? Merci pour votre réponse
27.12.2022 - 19:55DROPS Design answered:
Bonjour Mme Saidah, tout à fait, on doit diminuer le nombre de mailles envers, vu sur l''endroit, on va tricoter ainsi 2 m ens à l'envers sur l'endroit. Bon tricot!
02.01.2023 - 10:33
|
|
Saturn Rings |
|
|
|
|
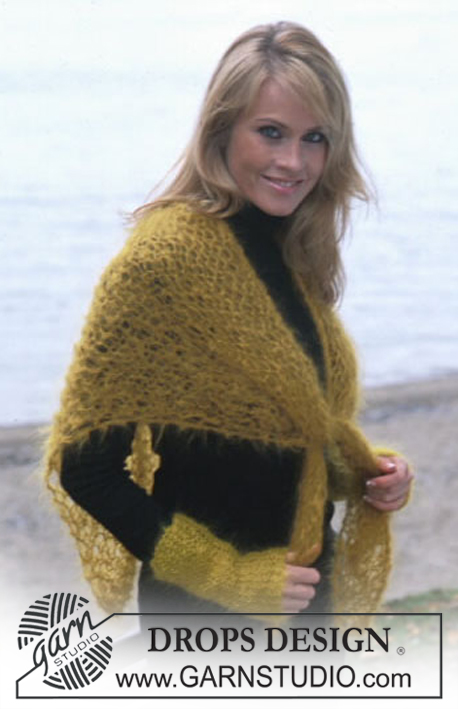
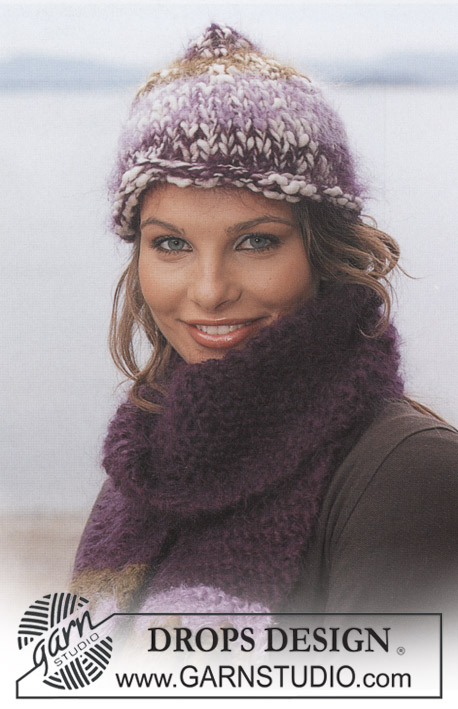
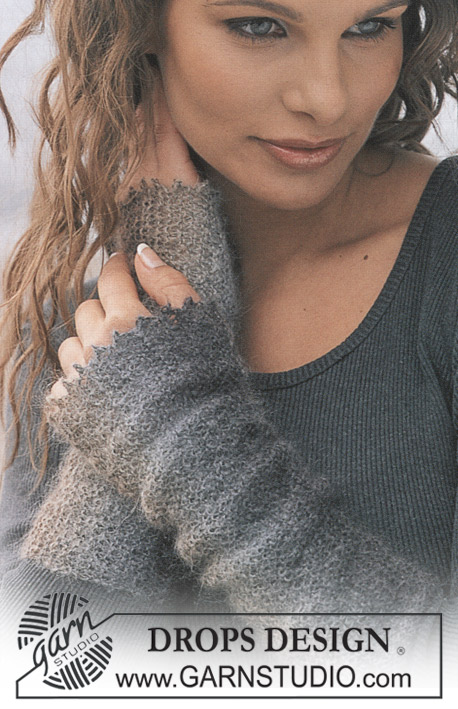
DROPS Headband in Alaska and Shawl in Vienna
DROPS 86-10 |
|
|
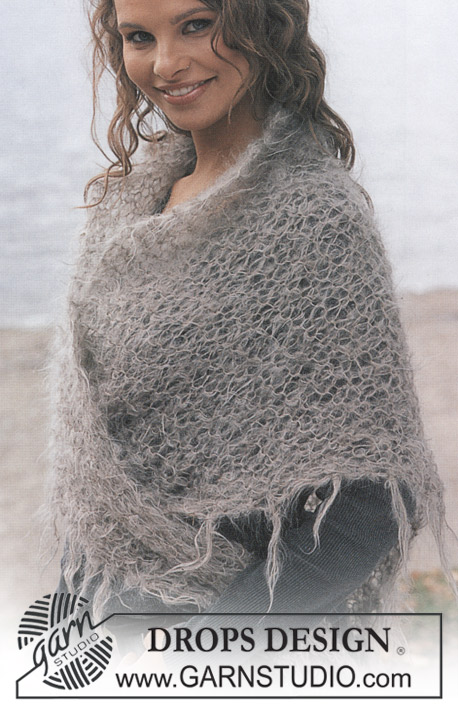
Gauge: 18 sts x 23 rows in stockinette st = 10 x 10 cm Headband: Start at center back. Cast on 19 sts. Work in rib as follows: Row 1 (right side): K 1 (edge st knit in garter st), * K 2, P 1 * repeat a total of 5 times – finish row with K 2 and K 1 (edge st knit in garter st). Row 2 (wrong side): K 1 (edge st knit in garter st), * P 2, K 1 * repeat a total of 5 times – finish row with P 2 and K 1 (edge st knit in garter st). Make all incs on right side rows, inc by P 2 sts into 1 P stitch. When the piece measures 8 cm/3" inc all P 1 to P 2 = 24 sts. When the piece measures 14 cm/5½" inc all P 2 to P 3 = 29 sts. When the piece measures 18 cm/7" inc all P 3 to P 4 = 34 sts. When the piece measures 21 cm/ 8¼" inc all P 4 to P 5 = 39 sts. When the piece measures 24 cm/ 9½" place a marker = this is the center of headband. Now reverse shaping – measure from marker. Make all decs on right side rows, dec by P2 tog. When the piece measures 3 cm/ 1" dec all P 5 to P 4 = 34 sts. When the piece measures 6 cm/ 2½" dec all P 4 to P 3 = 29 sts. When the piece measures 10 cm/ 4" dec all P 3 to P 2 = 24 sts. When the piece measures 16 cm/ 6¼" dec all P 2 to P 1 = 19 sts. When the piece measures a total of 48 cm/ 19" bind off and sew to cast on edge. ----------------------------------------------------- SHAWL : Measurements: Length: 100 cm [39 ½"] Width: 205 cm [80.75"] Materials: VIENNA from Garnstudio 200 gr nr 43, light brown DROPS 15 mm [US 19] needles, or size needed to obtain correct gauge. Gauge: 5 sts x 9 rows in garter st = 10 x 10 cm (this is loosely knit) Shawl: Cast on 4 sts and knit garter st, increasing 1 st at one side every other row. Inc by knitting 2 sts in 1 st. Continue incs until there are 50 sts, the piece measures approx. 102 cm. Now dec on the same side as incs – dec every other row by K 2 tog the 2 outermost sts. Continue dec until 4 sts remain, the piece measures approx. 205 cm, bind off. Fringe: Fasten fringe tufts along both sides approx. 4-5 cm apart – start at point at lower edge. Cut 6 strands 35 cm long, fold in half, pull folded end through outermost st and pull ends through loop. |
|
Have you finished this pattern?Tag your pictures with #dropspattern or submit them to the #dropsfan gallery. Do you need help with this pattern?You'll find 15 tutorial videos, a Comments/Questions area and more by visiting the pattern on garnstudio.com. © 1982-2026 DROPS Design A/S. We reserve all rights. This document, including all its sub-sections, has copyrights. Read more about what you can do with our patterns at the bottom of each pattern on our site. |


With over 40 years in knitting and crochet design, DROPS Design offers one of the most extensive collections of free patterns on the internet - translated to 17 languages. As of today we count 324 catalogs and 12290 patterns - 12280 of which are translated into English (US/in).
We work hard to bring you the best knitting and crochet have to offer, inspiration and advice as well as great quality yarns at incredible prices! Would you like to use our patterns for other than personal use? You can read what you are allowed to do in the Copyright text at the bottom of all our patterns. Happy crafting!
Post a comment to pattern DROPS 86-10
We would love to hear what you have to say about this pattern!
If you want to leave a question, please make sure you select the correct category in the form below, to speed up the answering process. Required fields are marked *.