
Popular categories
Looking for a yarn?


Comments / Questions (35)
![]() Annica Lindeberg wrote:
Annica Lindeberg wrote:
Hej! Jag förstår inte storleken på tröjan. Det verkar vara barnstorlek. Finns det även mönster i vuxenstorlek? Mvh. Annica
29.04.2025 - 20:45DROPS Design answered:
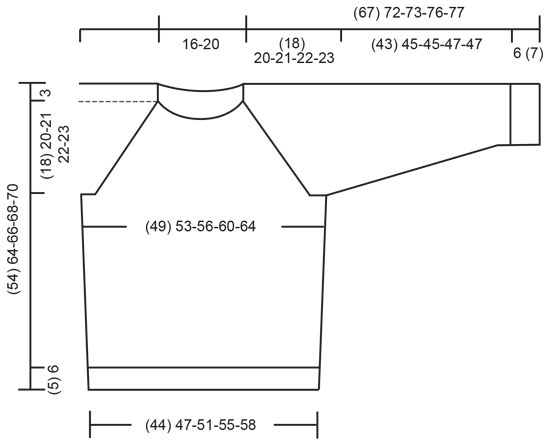
Hei Annica. Denne genseren er skrevet i 5 størrelse, fra 12/14 år og opp til str. XXL. Se på målskissen nederst i oppskriften, der ser du de ulike målene. mvh DROPS Design
05.05.2025 - 13:27
![]() Marissa wrote:
Marissa wrote:
Hi I am a little confused about the neckline instructions where it says "Continue to cast off in each side towards the neck on every other row: 2 sts 1 time and 1 st 1 time." Pkease could you explain this in more detail? 2sts 1 time and 1 sts 1 time? On the Dec tip, it says Dec 1 sts each side of marker but not sure about this neckline instruction, Thank you
26.01.2023 - 18:39DROPS Design answered:
Dear Marissa, the decrease tip applies only for raglan, for the neck you will cast off at the beginning of every row from neck towards shoulder (both from RS and from WS so that neckline will be symmetrical) 2 sts 1 time = 2 sts at the beginning of next 2 rows and 1 stitch 1 time = 1 stitch at the beg of next 2 rows. You have now cast off 3 sts on each side of the middle stitches on the thread. Remember to continue decrease to raglan. Happy knitting!
27.01.2023 - 08:37
![]() Nathalie wrote:
Nathalie wrote:
Vos instructions mentionnent un pull orange et un pullbleu, je ne vois aucune photo de pull bleu et on ne voit pas le col du pull orange. C’est incompréhensible
07.11.2022 - 23:07DROPS Design answered:
Bonjour Nathalie, retrouvez le pull bleu mentionné ici. Bon tricot!
08.11.2022 - 09:02
![]() Suzanne wrote:
Suzanne wrote:
My question is similar to that of Pat and Nadine. As a newbie knitter I managed to get up to the neck finding your instructions helpful and clear, but do not understand the cast off instructions about working 2 sts in approximately every 5th st. How do these get cast off if they are worked? Just seen the photos below. They look great! But each neck is different!! I think the middle one is per your pattern? Thanks for this website - it’s really helpful with all the videos and tips.
10.05.2022 - 23:58DROPS Design answered:
Dear Suzanne, when casting off the stitches, cast off as usual but then just work every 5th stitches twice before casting it off (or make a yarn over after every 5th stitch, as shown in this video, this will allow the neck edge to roll inwards nicely. Happy knitting!
11.05.2022 - 08:37
![]() Arne wrote:
Arne wrote:
13.07.2013 Ich stehe vor dem geleichen Problem. Vorder- bzw. Rückseite ist nicht eindeutig als Formulierung. Innenseite vs Außenseite wäre eindeutiger. Reihe in der man zuvor rechts gestrickt hat wäre ebenso eindeutiger. Bitte erläutern Sie diese Stelle noch einmal. Danke!
29.04.2021 - 13:49DROPS Design answered:
Danke für Ihren Hinweis, die Anleitung für den Pullover wurde komplett neu übersetzt und sollte jetzt verständlicher sein. Gutes Gelingen und viel Spaß beim Stricken!
30.04.2021 - 00:17
![]() Renee Waltman wrote:
Renee Waltman wrote:
Garns studio drops Eskimo yarn. 85-3 c - Nils headband. Can I purchase the pattern, yarn and hook from you online.
28.02.2021 - 22:43DROPS Design answered:
Dear Mrs Waltman, pattern can be printed for free from our website, yarn (DROPS Snow, new name to Eskimo) can be ordered from our DROPS retailer in Canada /shipping to Canada - see list here. Happy knitting!
01.03.2021 - 10:02
![]() Ernesto wrote:
Ernesto wrote:
Hej Sælger i de sweaters lavet, eller bare giver opskrifter? Jeg er blot interesseret i at købe en :)
20.08.2019 - 23:35DROPS Design answered:
Hej. Vi säljer dessvärre inte färdiga plagg. Mvh DROPS Design
21.08.2019 - 11:25
![]() Maria Helena Sousa wrote:
Maria Helena Sousa wrote:
I bought online 20 balls of Eskimo colour 14 dyelot 1035. Just want to tell you one ball in those 20 couldn't be worked because it just broke a few meters after starting and again a few meters after second start. As the remaining 19 had no problems I believe I ll be able to finish my project. I can send you a photo, just tell me your email address. Best regards
20.02.2019 - 17:48DROPS Design answered:
Dear Mrs Sousa, we are sorry about this, please contact your DROPS store relating all these informations. Happy knitting!
21.02.2019 - 10:53
![]() Pernilla wrote:
Pernilla wrote:
Tröjan är ,rolig och snabb att sticka och fint tjockt garn. Sambon älskar den också. Minskningarna för raglanärmen gjorde jag på vart 3:e varv istället för vartannat annars hade den inte passat.
21.01.2019 - 17:18
![]() Pat wrote:
Pat wrote:
My question is the same as Nadine's, Repeating the same instructions doesn't help. Can we see a picture without the scarf?
13.01.2019 - 22:07DROPS Design answered:
Dear Pat, we do not have any picture of the pullover without the scarf - depending on the pattern you are working, decrease for the raglan and at the same time when piece measures 48-63 cm, slip the middle 8-14 sts on a thread for neck, then continue as before but back and forth (from neckline on one side towards neckline on the other side) binding off for neck as explained for your size. Then after all decreases are done, pick up sts around neck and slip sts from thread back on needle = 60-72 sts. Happy knitting!
14.01.2019 - 12:31
|
|
Nils |
|
|
|
|
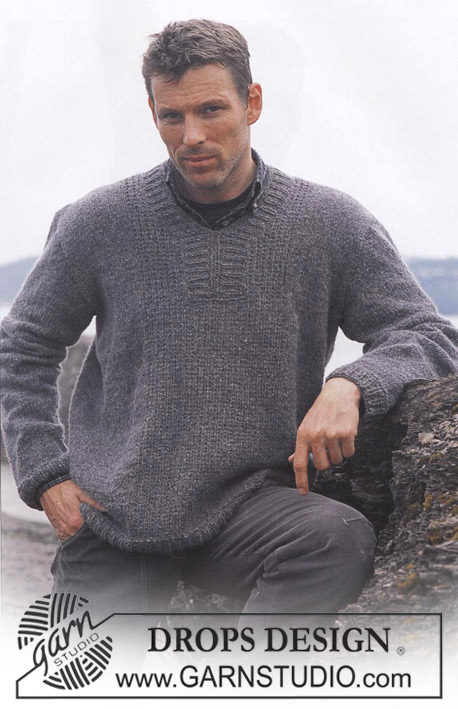
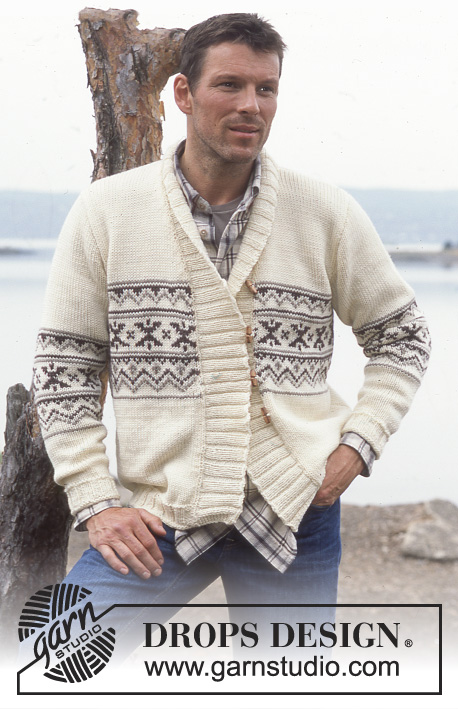
Set of knitted sweater with raglan, scarf with English rib and crocheted cap, for men, in DROPS Snow.
DROPS 85-3 |
|
|
PULLOVER: Gauge: 11 sts x 15 rows on larger needles in stockinette st = 10 x 10 cm. Rib: *K 4, P 4*, repeat from *-*. Decreasing tips (for raglan): From right side: Dec 1 st as follows in each transition between sleeve and front/back (start 4 sts before the marker): Sl 1 as if to knit, K 1, psso, K 4 (the marker is in the middle of these 4 sts), K 2 tog.From wrong side: Start 4 sts before the marker, P 2 tog, P 4, P 2 tog, twisting sts (if this is too difficult, sl 2, return to left needle, twisting each, then P 2 tog). Raglan tips: If your row gauge is not accurate, your armhole will not be the correct length. If your gauge is too tight, the armhole will be too short. You can correct for this by knitting extra rows without decreasing. BODY Cast on 96-104-112-120-128 sts on smaller circular needles with Snow; join and place a marker at the join. Knit rib – see instructions above. When the piece measures 5-6-6-6-6 cm change to larger circular needles and stockinette st. Put a second marker at side = 48-52-56-60-64 sts between markers. When the piece measures 12 cm inc 1 st on each side of each marker every 6-10-10-10-10 cm a total of 3 times = (108) 116-124-132-140 sts. When the piece measures 33-41-42-43-44 cm bind off 6 sts at each side for armhole (= 3 sts each side of each marker) = 48-52-56-60-64 sts on Front and Back. Lay piece aside and knit the sleeves. Sleeve: Cast on 24-24-24-32-32 sts on smaller double-pointed needles; join and place a marker at the join. K 2 rows, then knit rib for 6-7-7-7-7 cm. Change to larger double pointed needles and stockinette st. When the piece measures 10-9-9-12-12 cm inc 1 st each side of marker every 5-4.5-4-5.5-5 cm a total of 8-10-11-8-9 times = 40-44-46-48-50 sts. When the piece measures 49-52-52-54-54 cm bind off 3 sts each side of marker = 34-38-40-42-44 sts. Lay piece aside and knit a second sleeve. Yoke: Put the sleeves in on the same circular needles as Body where you bound off for armholes = 164-180-192-204-216 sts. Put a marker in each transition between sleeve and front/ back = 4 markers. Knit 2-1-1-0-0 rows and then begin raglan shaping. Read the entire next section before knitting: Raglan shaping: Read raglan tips above. Dec 1 st inside 2 sts each side of marker – see Decreasing tips above: every other row 13-15-16-17-18 times. Neck: When the piece measures 48-57-59-61-63 cm put the center front 8-8-10-12-14 sts on a st holder and work kback and forth on needles. Then bind off at each neck edge every other row: 2 sts 1 time and 1 st 1 time. After all raglan and neck shaping is complete 46-46-48-50-52 sts remain. Neckband: Pick up approx. 14-20-20-20-20 sts (incl. sts from st holder) on front neck and put all sts on smaller double-pointed needles = approx. 60-72-72-72-72 sts. P 1 right side row, then knit 4 rows stockinette st (= rolled edge), decreasing evenly distributed to 48-48-50-52-54 sts on the 1st row. Bind off – to make the edge roll nicely, K 2 sts in approx every 5th st at the same time as binding off. Assembly: Sew opening under the sleeve. SCARF: English rib: Row 1 (wrong side): K 1 (edge st knit in garter st), *K 1, yo, sl 1 as if to purl*, repeat *-* to last 2 sts, K 2. Row 2 (right side): K 1 (edge st knit in garter st), *yo, sl 1 as if to purl, K tog the next st and yo from previous row*, repeat *-* to last 2 sts, yo, sl 1 as if to purl, K 1 (edge st knit in garter st). Row 3 (wrong side): K 1 (edge st), *K tog the next st and yo from previous row, yo, sl 1 as if to purl*, repeat *-* to last 2 sts + yo from previous row, K tog the next st and yo, K 1. Repeat rows 2 and 3 over all sts. Scarf: Loosely cast on 13 sts and knit English rib – see instructions above. Bind off when the piece measures approx. 150 cm. CAP: Crochet tip: At the beginning of each row, ch 3 replaces 1 dc. Cap: Ch 10. Row 1: start in 4th ch from hook and crochet 1 dc in each st = 8 dc on row, turn the work. Row 2: ch 3 (= 1 dc), crochet 1 dc in each dc (= 8 dc), turn the work. Continue until the piece measures approx. 50 cm (or to desired length – the headband should fit snugly around head). Join ends (this is the back), cut yarn and fasten. Visor: Crochet a visor over the center 8 rows along front edge of headband as follows: Row 1: crochet 2 dc in each row = 16 dc, turn the work. Row 2: ch 2, skip over 2 dc, 1 sc in each dc to last 2 dc (= 12 sc), ch 2, sl st in last dc, turn the work. Row 3: ch 2, skip over 2 sc, 1 sc in each sc to last 2 sc (= 8 sc), ch 2, sl st in last sc. Cut yarn and fasten. |
|
 |
|
Have you finished this pattern?Tag your pictures with #dropspattern or submit them to the #dropsfan gallery. Do you need help with this pattern?You'll find 31 tutorial videos, a Comments/Questions area and more by visiting the pattern on garnstudio.com. © 1982-2026 DROPS Design A/S. We reserve all rights. This document, including all its sub-sections, has copyrights. Read more about what you can do with our patterns at the bottom of each pattern on our site. |


With over 40 years in knitting and crochet design, DROPS Design offers one of the most extensive collections of free patterns on the internet - translated to 17 languages. As of today we count 325 catalogs and 12298 patterns - 12288 of which are translated into English (US/in).
We work hard to bring you the best knitting and crochet have to offer, inspiration and advice as well as great quality yarns at incredible prices! Would you like to use our patterns for other than personal use? You can read what you are allowed to do in the Copyright text at the bottom of all our patterns. Happy crafting!
Post a comment to pattern DROPS 85-3
We would love to hear what you have to say about this pattern!
If you want to leave a question, please make sure you select the correct category in the form below, to speed up the answering process. Required fields are marked *.