
Looking for a yarn?


Comments / Questions (8)
![]() Christine wrote:
Christine wrote:
Bonjour, d'abord, un gros merci pour votre aide! J'ai encore une question. Je ne comprends pas comment je dois répéter M1 en le commençant avec 152m (taille m). 152/13=11,69. Ce qui veut dire que je ne pourrai pas compléter le dernier motif de M1...? Comment dois-je le faire? Merci d'avance :)
21.02.2024 - 21:50DROPS Design answered:
Bonjour Christine, au tout premier rang de l'empiècement, vous devez d'abord tricoter un rang en diminuant 9 mailles à intervalles réguliers (cf cette leçon), il vous reste donc 143 mailles soit de quoi répéter 11 fois les 13 mailles de M.1. Bon tricot!
22.02.2024 - 09:07
![]() Christine Pelletier wrote:
Christine Pelletier wrote:
Pour ce qui est des manche, doit-on les tricoter à part, en premier et ensuite on les insère au reste du travail déjà entamé? On les commence bien par les emmanchures? À quel moment doit-on commencer le motif jacquard dans leur cas??? Seulement une fois qu'on les insère au haut?
27.01.2024 - 02:20DROPS Design answered:
Bonjour Mme Pelletier, on tricote effectivement les manches séparément du bas du pull, et on tricote ensuite l'empiècement en plaçant les manches sur la même aiguille que le dos et le devant pout terminer l'empiècement en rond (cf cette vidéo en exemple). Bon tricot!
29.01.2024 - 11:36
![]() Christine Pelletier wrote:
Christine Pelletier wrote:
Bonjour, le patron ne décrit pas bien les étapes à suivre pour construire le chandail. Je me demande à quel moment doit-on commencer le jacquard? Est-ce tout de suite après avoir terminé le col, à 8 cm de hauteur? Aussi, si on doit suivre M1 de bas en haut, de droite à gauche, pourquoi le haut du motif de M1 est ce qu'il doit y avoir en haut du chandail?... On commence bien à tricoter de haut en bas?? Comment doit-on le faire alors? Lire le patron à l'envers??
27.01.2024 - 02:16DROPS Design answered:
Bonjour Mme Pelletier, le jacquard est tricoté pendant l'empiècement, lorsque l'on doit tricoter M.1 (qui correspond au motif à répéter); le diagramme se lit de bas en haut et de droite à gauche tous les tours. Ce pull se tricote de bas en haut, autrement dit, on termine par l'empiècement et on diminue dans le diagramme /jacquard pour terminer par le col. Bon tricot!
29.01.2024 - 11:35
![]() Isabelle wrote:
Isabelle wrote:
Bonjour, Dommage qu'il n'y ait pas de rehausse pour le dos. Les épaules ne sont pas suffisamment marquées. Au final, très chaud mais pas très agréable à porter car il ne tombe pas bien. Déçue.
20.02.2016 - 09:31DROPS Design answered:
Bonjour Isabelle, au moment de la publication de ce modèle, cette technique n'était pas courante, mais vous pouvez tout à fait en ajouter en vous basant sur un modèle similaire. Bon tricot!
20.02.2016 - 12:51
![]() Marjolijn Den Hartog wrote:
Marjolijn Den Hartog wrote:
Even een vraagje over de mouw. Moet je als je op lengte bent de middelste 8 steken afkanten of aan weerskanten 4 steken? Patroon staat een beetje raar geschreven
20.10.2012 - 17:39DROPS Design answered:
Je moet de middelste 8 st in het midden van de ondermouw afkanten = 4 st aan beide kanten van het begin van de naald.
22.10.2012 - 10:56
![]() DROPS Design NL wrote:
DROPS Design NL wrote:
Hallo Tea. Ja, dit klopt. Na het breien van de boord, moet u in de 3 kleine maten geen steken minderen. In de overige maten moet u minderen. U gaat naar een grotere breinaald en een andere steek. Met te veel steken zou de mouw te breed worden. Succes! Gr. Tine
22.10.2009 - 11:33
![]() Tea Van Hoeve wrote:
Tea Van Hoeve wrote:
De mouwen moet je opzetten: 24 en na het boord aanpassen naar 24? bij de grotere maten zelfs verminderen??
19.10.2009 - 18:41
![]() Cathis wrote:
Cathis wrote:
Tröjan blev helt underbart skön och snygg...
09.01.2006 - 15:35
|
||||||||||||||||||||||
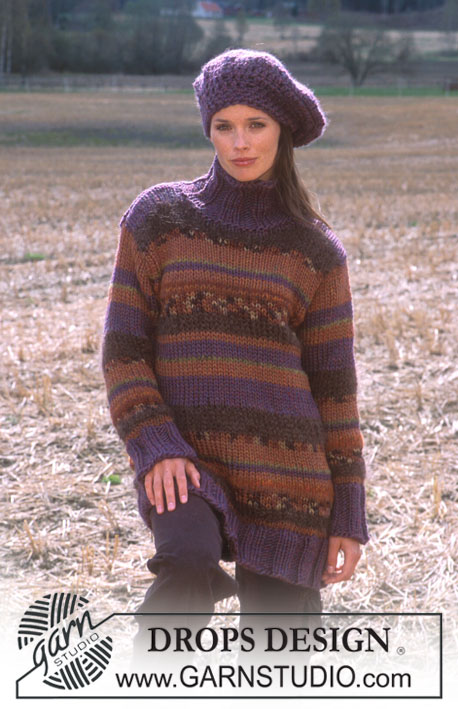
Purple Horizon |
||||||||||||||||||||||
 |
 |
|||||||||||||||||||||
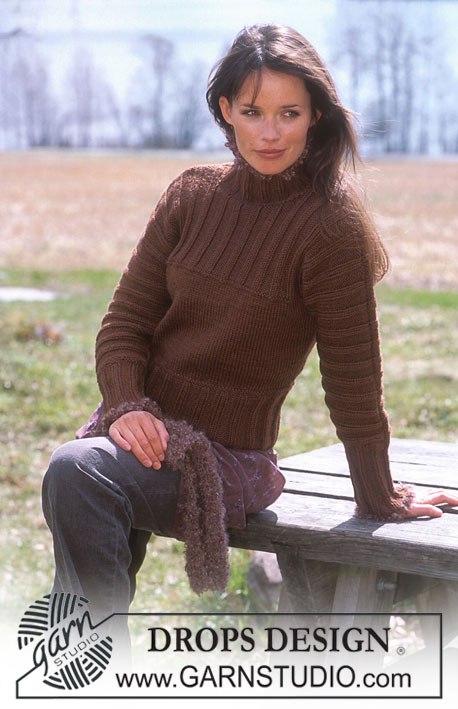
DROPS Sweater with Yoke in Snow. Scarf & Mittens in Snow.
DROPS 91-1 |
||||||||||||||||||||||
|
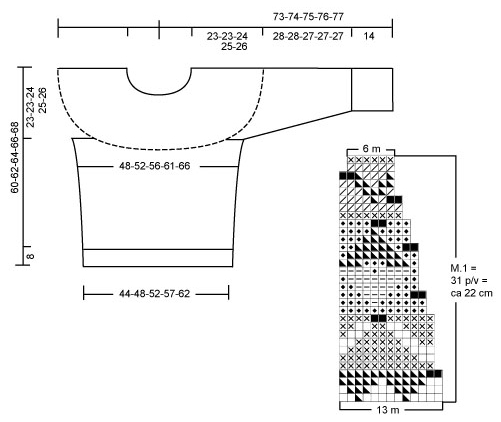
Gauge: 10 sts x 14 rows stocking st with larger ndls = 10 x 10 cm [4 x 4 in.] Rib: *K 3, p 3*, repeat *to*. Pattern: See diagram M. 1. Diagrams are shown from the right side. The diagram starts with 13 sts which are repeated around. After 4 rows dec where shown and continue to dec where shown. After 31 rows approx. 22 cm will have been worked and there are 6 sts rem in the repeat. Garment information: The sweater is worked entirely in a circular manner = no seaming. Body: With 8 mm circular ndls and dark purple cast on 90-96-102-114-126 sts. K 1 row around. Then work Rib as described above for 8 cm. Change thereafter to 9 mm ndls, work st st around and adjust sts on the first row to 88-96-104-114-124 sts. Place a marker thread at each side with 44-48-52-57-62 sts between markers. When the garment meas 12 cm as well as 24 cm inc 1 st at each side of both markers = 96-104-112-122-132 sts. When the garment meas 37-39-40-41-42 cm bind off for armholes 8-8-8-10-10 sts at each side [= 4-4-4-5-5 sts at each side of both markers]. There are 40-44-48-51-56 sts rem on each the back and the front. Put the garment aside while working the sleeves. Sleeves: With 8 mm double pointed ndls and dark purple cast on 24-24-24-30-30 sts. K 1 row around. Then work Rib as described above for 14 cm. Change to 9 mm ndls, work st st around and adjust sts on the first row to 24-24-24-26-28 sts. Place a marker thread at the beg of the row [= underarm marker], and when the sleeve meas 15 cm inc 1 st at each side of the marker. Inc in this manner every 4-3.5-3-3-3 cm a total of 7-8-9-9-9 times = 38-40-42-44-46 sts. When the sleeve meas 42-42-41-41-41 cm bind off for armhole 8-8-8-10-10 middle armhole sts [= 4-4-4-5-5 sts each side of the marker]. Transfer rem 30-32-34-34-36 sts to a thread and put aside. Work the other sleeve the same. Yoke: Transfer sleeve sts to the circular ndl, placing one sleeve in each armhole space between back and front. There are 140-152-164-170-184 sts on the round. Work 1-1-3-4-5 rows st st around with dark purple and on the first row dec evenly spaced around to 130-143-156-169-182 sts. Work hereafter pattern M.1 with inc where shown. After the last dec there are 60-66-72-78-84 sts around. Complete M.1. Neckband: Change to dark purple. K 1 row around while dec evenly spaced to 42-42-48-48-54 sts [=multiples of 6]. Change to double pointed 8 mm ndls and work Rib for 12-12-12-14-14 cm. Bind off loosely rib-wise. Assembly: Sew armhole openings. SCARF: Measurement: Approx. 18 x 220 cm or [7 x 79 in.] Materials: Snow 150 g colour no. 23, dark purple 200 g colour no. 30, pink Knitting needles: 20 mm or size needed to obtain correct gauge. Gauge: 5 sts with double yarn worked Pattern on 20 mm ndls = 10 x 10 cm [4 x 4 in.] Pattern: Row 1: *K 2 tog, yarn over ndl*, repeat *to* until 1 st remain on the row, k 1. Repeat Row 1 to full length [all rows are worked the same]. With 2 ndls cast on 9 sts with double yarn [= 1 strand each colour]. The 2 ndls assure a loose cast-on. Pull out one of the ndls and work pattern above. Work until the scarf meas approx. 220 cm [or desired length]. Bind off loosely. Pompons: Make 4 pompons with pink, each pompon should meas approx. 7-8 cm in diameter. Sew 1 pompon to each corner of the scarf. MITTENS One size Materials: Snow 100 g colour no. 09, old rose Crochet hook: DROPS 7 mm or size needed to obtain correct gauge. Gauge: 14s1 with 7 mm hook = 10 cm [4 in.] in the width. Crochet abbreviations: ch = chain [= Norwegian Im], sl = slip [= Norwegian km]. The mitten is worked sl in a circular manner continuous without joining rows. Cast on loosely 28ch with Snow on 7 mm hook [the chain row should meas approx. 26 cm or desired length. The mitten will be approx. 5-6 cm smaller than the chain row. Join the row with 1s1. Work 3 rows sl stitches around and insert hook into the back loops of each ch/sl = 28 sl around. Hereafter work sl around and insert hook into both loops. When the mitten meas 13 cm create opening for thumb as follows: At beg of the row work 5 loose ch, skip the first 5s1 and work sl in next sl. Continue around and work 1s1 in each of the 5ch. [Note! The thumb opening wili be approx. 4 cm. 1f desired, this can be adjusts by working 1ch more or less, then work the same number of sl as ch in the ch-loop]. There are still 28s1 around. Work until the mitten meas 24 cm [or 2 cm before desired length]. Dec on the next row as follows: Skip every other sl around = 14s1 rem. Work 1 row without dec. *Skip every other sl around on the next row* = 7s1 rem. Repeat *to* once more = 3 or 4s1 rem. Cut the yarn, thread a needle and sew the stand through rem sts. Gather and fasten well. Thumb: Crochet 10s1 around the thumb opening [1s1 in each of the 5s1 which were skipped, through both loops]. When the thumb meas approx. 5 cm dec as follows: Skip every other sl around = 5s1 rem. Cut the yarn, thread a needle and sew the stand through rem sts. Gather and fasten well. |
||||||||||||||||||||||
Diagram explanations |
||||||||||||||||||||||
|
||||||||||||||||||||||
 |
||||||||||||||||||||||
Have you finished this pattern?Tag your pictures with #dropspattern or submit them to the #dropsfan gallery. Do you need help with this pattern?You'll find 26 tutorial videos, a Comments/Questions area and more by visiting the pattern on garnstudio.com. © 1982-2026 DROPS Design A/S. We reserve all rights. This document, including all its sub-sections, has copyrights. Read more about what you can do with our patterns at the bottom of each pattern on our site. |
||||||||||||||||||||||


With over 40 years in knitting and crochet design, DROPS Design offers one of the most extensive collections of free patterns on the internet - translated to 17 languages. As of today we count 320 catalogs and 12106 patterns - 12096 of which are translated into English (US/in).
We work hard to bring you the best knitting and crochet have to offer, inspiration and advice as well as great quality yarns at incredible prices! Would you like to use our patterns for other than personal use? You can read what you are allowed to do in the Copyright text at the bottom of all our patterns. Happy crafting!
Post a comment to pattern DROPS 91-1
We would love to hear what you have to say about this pattern!
If you want to leave a question, please make sure you select the correct category in the form below, to speed up the answering process. Required fields are marked *.