
Popular categories
Looking for a yarn?


|
||||||||||||||||||||||||||||
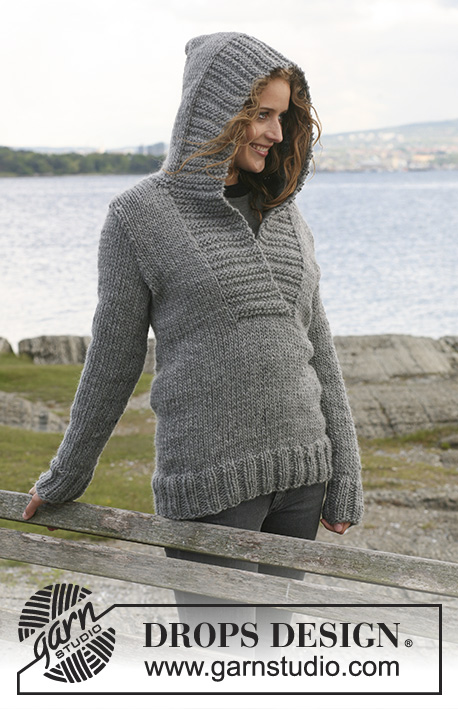
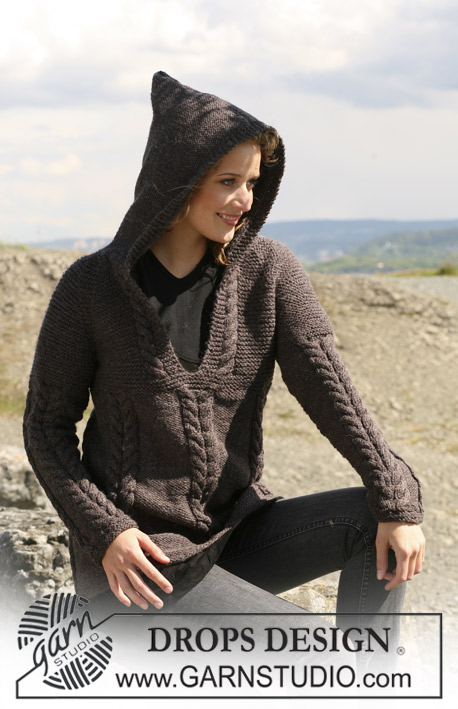
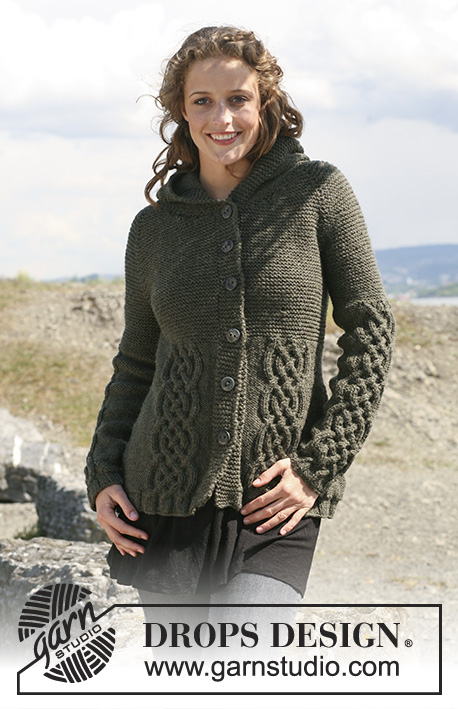
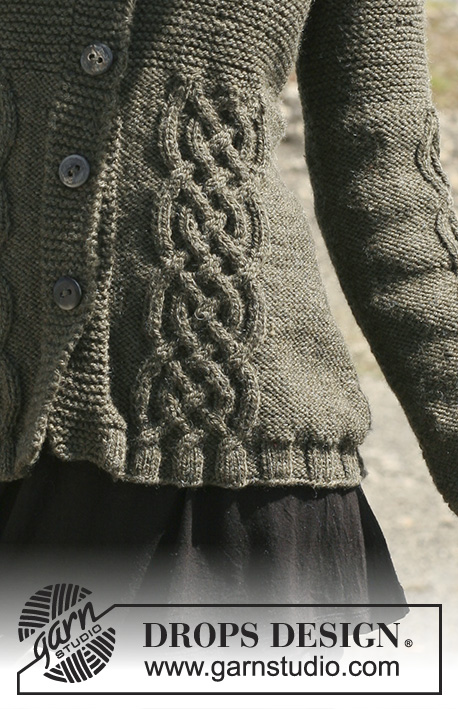
Celtic Charm |
||||||||||||||||||||||||||||
 |
 |
|||||||||||||||||||||||||||
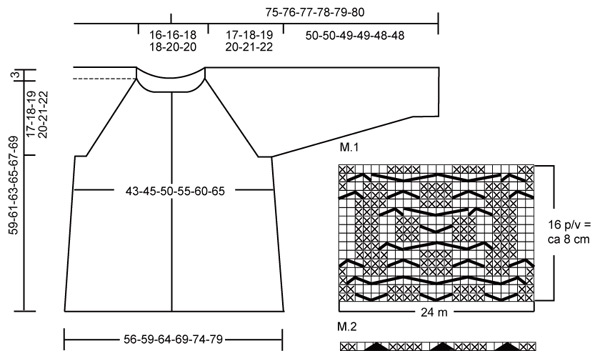
Knitted DROPS jacket in ”Alaska” with cables, raglan sleeves and hood. Size S - XXXL.
DROPS 109-3 |
||||||||||||||||||||||||||||
|
Garter st back and forth on needle: K all rows. Garter st in the round: K 1 round, P 1 round. Pattern: See diagram M.1 and M.2. Diagram shows the pattern from the RS. Knitting tip: If your knitting tension is too tight, the raglan will be too short and the armhole to small. You may compensate for this by working 1 extra row without dec at regular intervals between dec. Decreasing tip, applies to raglan: Make all dec from the RS as follows: Beg 2 sts before Marking Thread (MT), K2 tog, MT, slip 1 st as if to K, K1, psso. Buttonholes: Cast off for buttonholes on right front piece. 1 buttonhole = cast off 4th st from mid front and cast on 1 new st on return row. Cast off for buttonholes when piece measures: Size S: 16, 23, 30, 37, 44 and 52 cm. Size M: 16, 23, 30, 38, 46 and 54 cm Size L: 16, 24, 32, 40, 48 and 56 cm. Size XL: 16, 23, 30, 37, 44, 51 and 58 cm. Size XXL: 16, 23, 30, 37, 44, 52 and 59 cm. Size XXXL: 16, 23, 30, 37, 45, 53 and 61 cm. Body piece: Worked back and forth on circular needle from mid front. Cast on 220-228-244-260-276-292 sts (includes 8 front band sts each side) on circular needle size 5 mm with Alaska. P 1 row from WS and continue as follows: 8 garter sts (front band), rib, K4/P4, on the next 200-208-224-240-256-272 sts, finish with K4 and 8 garter sts (front band). When piece measures 4 cm change to circular needle size 5.5 mm and continue as follows from RS: 8 garter sts, 6-6-6-6-14-14 sts in reverse stocking st, M.1 (= 24 sts), 40-40-48-56-56-64 sts in reverse stocking st, M.1, 16-24-24-24-24-24 sts in reverse stocking st, M.1, 40-40-48-56-56-64 sts in reverse stocking st, M.1, 6-6-6-6-14-14 sts in reverse stocking st, and finish with 8 garter sts. Note: 4 K sts in M.1 should sit over K4 from rib. Insert 2 Marking Threads (MT) in piece, 59-61-65-69-73-77 sts in from each side (back piece = 102-106-114-122-130-138 sts). Continue in pattern. Remember the knitting tension! When piece measures 8 cm dec 1 st on each side of both MT (= 4 dec per row) on every 2 cm a total of 11 times = 176-184-200-216-232-248 sts. Remember to cast off for buttonholes – see above. After 4 vertical repeats of M.1 (piece measures approx 36 cm), work 1 vertical repeat of M.2 over M.1, continue in reverse stocking st on remaining sts = 152-160-176-192-208-224 sts. On next row change to needle size 5 mm and now complete piece in garter st – see above. When piece measures 42-43-44-45-46-47 cm cast off 8 sts each side for armhole (i.e. 4 sts on each side of both MT) = 136-144-160-176-192-208 sts. Put piece aside. Sleeve: Worked in the round on double pointed needles. Cast on 40-40-40-48-48-48 sts on double pointed needles size 5 mm with Alaska. Work 4 cm rib, P4/K4. Change to double pointed needles size 5.5 mm and work next round as follows: 10-10-10-18-18-18 sts in reverse stocking st, M.1 (= 24 sts) and finish with 6-6-6-6-6-6 sts in reverse stocking st. Note: 4 K sts in M.1 should sit over K4 from rib. On next round inc 2-4-6-0-2-4 sts evenly = 42-44-46-48-50-52 sts, do not inc on M.1. Insert 1 MT in piece 9-10-11-12-13-14 sts after M.1 = mid under sleeve. Continue in M.1 and reverse stocking st. When piece measures 8 cm inc 1 st on each side of MT on every 9.5-7.5-7.5-6-5-5 cm a total of 5-6-6-7-8-8 times. After 5 vertical repeats of M.1 (piece measures approx 44 cm), work 1 vertical repeat of M.2 over M.1, continue in reverse stocking st on remaining sts. Change to needle size 5 mm and complete piece in garter st. After all dec and inc are complete there are 46-50-52-56-60-62 sts on round. When piece measures 50-50-49-49-48-48 cm – less on the larger sizes because of longer sleeve cap and wider shoulders - cast off 4 sts on each side of MT for armhole = 38-42-44-48-52-54 sts. Put piece aside and knit the other sleeve. Yoke: See Knitting tip! Slip sleeves in on the same circular needle size 5 mm as body piece where cast off for armholes = 212-228-248-272-296-316 sts. Insert 1 MT in all transitions between body piece and sleeves = 4 MT. Work yoke in garter st, back and forth on needle. Work 2-1-0-1-0-1 rows and now dec for raglan – see Decreasing tip! Dec on every 4th row: 13-13-14-13-13-13 times and then on every other row: 0-2-2-5-7-8 times. At the same time when piece measures 53-55-57-59-60-62 cm slip 10 sts each side on separate stitch holders towards mid front. Cast off to shape the neckline at the beg of every row: 2 sts 3-3-6-8-9-9 times and 1 st 5-5-2-0-0-0 times. After all dec are complete there are 66-66-72-76-80-86 sts on row. K 1 row dec 8-8-12-16-16-22 sts evenly = 58-58-60-60-64-64 sts. Hood: Pick up 25-25-28-28-30-30 sts on each front piece (incl sts from stitch holders) = 108-108-116-116-124-124 sts. Change to needle size 5.5 mm and work 4 rows garter st, at the same time dec 18 sts evenly on first row = 90-90-98-98-106-106 sts. Insert 1 MT mid back (after 45-45-49-49-53-53 sts). Continue in reverse stocking st with 8 garter sts each side. At the same time inc 1 st on each side on MT on every 8th row a total of 4 times = 98-98-106-106-114-114 sts. Cast off when hood measures 38-38-39-39-40-40 cm. Assembly: Sew openings under arms. Sew on buttons. Fold hood double and sew tog at top from the RS. |
||||||||||||||||||||||||||||
Diagram explanations |
||||||||||||||||||||||||||||
|
||||||||||||||||||||||||||||
|
||||||||||||||||||||||||||||
|
Have you made this or any other of our designs? Tag your pictures in social media with #dropsdesign so we can see them! Do you need help with this pattern?You'll find tutorial videos, a Comments/Questions area and more by visiting the pattern on garnstudio.com. © 1982-2024 DROPS Design A/S. We reserve all rights. This document, including all its sub-sections, has copyrights. Read more about what you can do with our patterns at the bottom of each pattern on our site. |
||||||||||||||||||||||||||||


With over 40 years in knitting and crochet design, DROPS Design offers one of the most extensive collections of free patterns on the internet - translated to 17 languages. As of today we count 304 catalogues and 11422 patterns - 11422 of which are translated into English (UK/cm).
We work hard to bring you the best knitting and crochet have to offer, inspiration and advice as well as great quality yarns at incredible prices! Would you like to use our patterns for other than personal use? You can read what you are allowed to do in the Copyright text at the bottom of all our patterns. Happy crafting!
Comments / Questions (85)
Ich verstehe diesen Satzabschnitt nicht Alle 2cm total 11 mal 176m . Was bedeutet das? Herzliche Grüße
20.03.2024 - 14:21DROPS Design answered:
Liebe Frau Tiefenbach, nach 8 cm nehmen Sie 1 Masche beidseitig von jeder Markierungsfäden ab (1. Abnahme), dann *stricken Sie 2 cm ohne Abnahmen, dann nehmen Sie bei der nächsten Hinreihe ab*, von *bis* insgesamt 10 Mal stricken = so haben Sie 11 Mal abgenommen. Es waren 220 Maschen - (11 x 4 Maschen) = 176 Maschen übrig. Viel Spaß beim Stricken!
20.03.2024 - 15:28Es steht man solle in der Passe in jeder 4. Hinreihe für die Raglanschräge abnehmen. Das geht aber nur in jeder 5. Reihe.Die 4. Reihe wäre ja eine Rückreihe
18.02.2024 - 09:23DROPS Design answered:
Liebe Frau Pasch, wenn man in jder 4. Reihe abnehmen muss, strickt man so: *1 Reihe (Hin-Reihe) mit Abnahmen), 3 Reihen (=1 Rückreihe + 1 Hin- + 1 Rückreihe) ohne Abnahme*, und von *bis* wiederholen. Viel Spaß beim stricken!
19.02.2024 - 09:15Pattern 109 3. The sleeve size medium says to cast on 40. After ribbing, add 4. 44. Then has 6 increases on either side of MT, 12. After this it says 50 stitches total. That doesn't add up correctly. What am I counting wrong?
05.01.2024 - 02:47DROPS Design answered:
Hi Kathleen, You increase, as you say, first 4 stitches then 12 more stitches on either side of marker-thread. However, in M.2 you have 2 x 3 decreases in width (slip 1 stitch, knit 2 together and pass sliupped stitch over x 3), which then leaves you with a total of 50 stitches. Happy knitting!
05.01.2024 - 07:53Muster zeigt nur vorderseite an. Wie stricke ich die rückreihen ? Maschen wie sie erscheinen dann ist das muster höher als 16 reihen und 4x M1 ist nicht 36 cm.Hilfe bitte. Dankeschön….
11.12.2023 - 04:15DROPS Design answered:
Liebe Andrea, alle Reihen sind im M.1 gezeichnet, dh die Hin- sowie die Rückreihen; bei den Rückreihen lesen Sie das Diagram links nach rechts. Viel Spaß beim stricken!
11.12.2023 - 09:33De minderingen voor de zijkant staan niet apart beschreven alleen de minderingen voor de raglan. De minderingen voor de zijkant moeten averechts gebreid worden op de goede kant, niet rechts
11.11.2023 - 08:29Buongionrno e grazie mille per i modelli e i filati fantastici. Ho acquistato l'Alaska e i bottoni per la taglia XXXL - Avete qualche consiglio su come gestire il lavaggio a mano di un capo pesante più di 1 chilo e 200 grammi? Grazie ancora, Claudia
30.03.2023 - 14:07DROPS Design answered:
Buonasera Claudia Carolina, il capo va lavato come indicato, in acqua leggermente tiepida, e asciugato disteso su una superficie piana. Cerchi di eliminare più acqua possibile avvolgendolo in asciugamani prima di procedere all'asciugatura. Buon lavoro!
11.04.2023 - 23:03Is there written instruction for the cables in this pattern? Meaning each row written out (so one doesn't have to follow the chart (which I have trouble with)? Sorry but it's not explained well enough in this pattern for me to follow. I've done cable many times but with each row written.Thank you for understanding.
12.04.2022 - 03:30DROPS Design answered:
Hi Alice, there is nothing but a chart available. It seems like difficult, but with explanation above you will be able to do it. Just give it a try. If you have any questions, let us know. Happy knitting!
12.04.2022 - 08:56Bonjour, Je m'interroge pour la couture de la capuche. Il est indiqué coudre sur l'endroit, mais est-ce qu'on parle de l'endroit de l'ouvrage, qui est donc le côté point envers puisqu'on est sur un jersey envers, ou bien sur le côté endroit du jersey envers ? C'est béta, mais je ne sais pas quoi faire...
13.02.2022 - 15:59DROPS Design answered:
Bonjour Béa, vous assemblez effectivement bien la capuche sur l'endroit, mais non pas en jersey endroit comme dans la vidéo (standard), mais en jersey envers, autrement dit, comme le montre cette vidéo ci. Bonnes finitions!
14.02.2022 - 10:27De minderingen aan de zijkant: worden die recht of averechts gebreid? Bij recht breien ontstaat een rij van twee rechten tot een bepaalde hoogte. Of moet ik op de goede kant (averechtse steken) averechts minderen ?
16.06.2021 - 18:25Tellen de opzet-steken als 1e naald? In dit patroon betekent dat een geribbelde onderkant, Klopt dat?
17.05.2021 - 18:47DROPS Design answered:
Dag Gera,
Nee, de eerste naald na het opzetten is de eerste naald. Na het opzetten brei je de eerste naald averecht aan de verkeerde kant. Dan begin je aan de goede kant met het boordpatroon.
20.05.2021 - 16:58