
Popular categories
Looking for a yarn?


|
||||||||||||||||
Arabica |
||||||||||||||||
|
|
||||||||||||||||
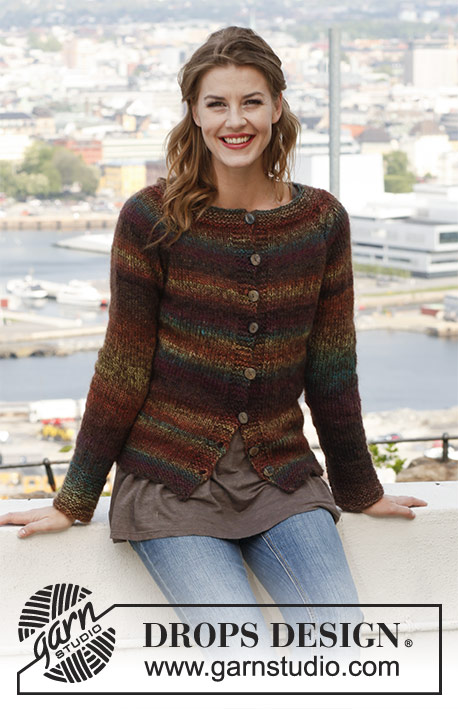
Crochet DROPS jacket with granny squares in ”Delight”, “Fabel and “Kid-Silk”. Size: S - XXXL.
DROPS 143-22 |
||||||||||||||||
|
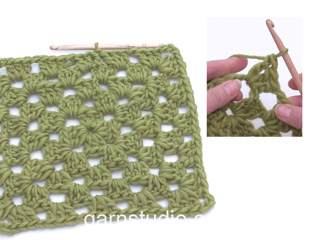
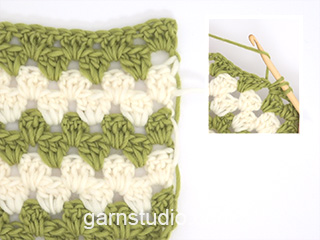
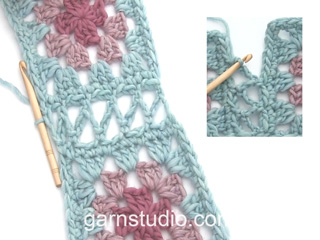
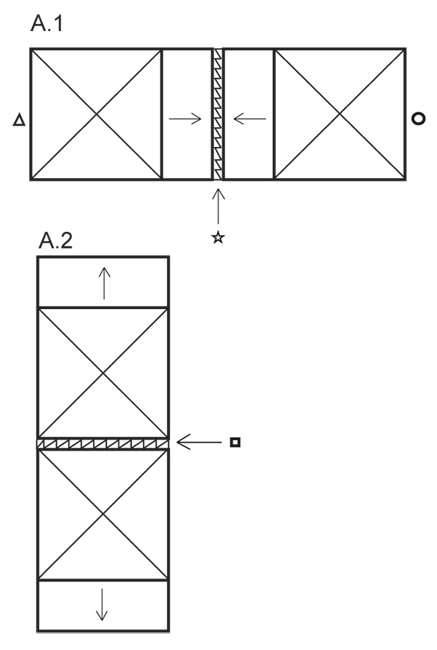
STRIPES BODY: DE = Delight, F = Fabel, KS = Kid-Silk ROUND 1: 1 strand brown F + 1 strand dark brown KS ROUND 2: 1 strand DE + 1 strand dark brown KS ROUND 3: 1 strand DE + 1 strand light beige KS ROUND 4: 1 strand brown F + 1 strand dark brown KS ROUND 5-6: 1 strand DE + 1 strand dark brown KS ROUND 7: 1 strand black F + 1 strand dark brown KS Repeat rounds 1 to 7. STRIPES SLEEVE: ROUND 1: 1 strand DE + 1 strand light beige KS ROUND 2-3: 1 strand DE + 1 strand dark brown KS ROUND 4: 1 strand black F + 1 strand dark brown KS Repeat rounds 1 to 4. -------------------------------------------------------- JACKET: Work 2 large granny squares for front piece which are then lengthened for back piece. Work 4 squares for sleeves which are lengthened before working 2 and 2 tog on overarm. Finally work yoke upwards with dc-groups back and forth before working all parts tog. RIGHT FRONT PIECE + BACK PIECE: Ch 6 on hook size 4 mm / G/6 with 1 strand brown Fabel and 1 strand dark brown Kid-Silk (= 2 strands) and form a ring with 1 sl st in first ch. ROUND 1: ch 3 (= 1 dc), 2 dc in ch-ring, ch 3, * 3 dc in ch-ring, ch 3 *, repeat from *-* a total of 3 times and finish with 1 sl st in 3rd ch from beg of round, turn piece (= 4 dc-groups with 3 ch between each). Then work STRIPES BODY – see explanation above, AT THE SAME TIME continue in the round as explained below. ROUND 2: ch 3 (= 1 dc), 2 dc in first ch-space, ch 3, 3 dc in same ch-space, * ch 1, 3 dc in next ch-space, ch 3, 3 dc in same ch-space *, repeat from *-* a total of 3 times and finish with 1 ch and 1 sl st in 3rd ch from beg of round, turn piece. ROUND 3: ch 3 (= 1 dc), 2 dc in first ch-space, ch 1, * 3 dc in next ch-space, ch 3, 3 dc in same ch-space, ch 1, 3 dc in next ch-space, 1 ch *, repeat from *-* a total of 3 times, 3 dc in next ch-space, ch 3, 3 dc in same ch-space, 1 ch and finish with 1 sl st in 3rd ch from beg of round, turn piece. Continue in the round like this (on every round worked there is 1 dc-group more between every corner) until square measures approx. 36-38-38-40-40-42 cm / 14¼"-15"-15"-15¾"-15¾"-16½" along each side (= approx. 18-19-19-20-20-21 rounds in the round). Fasten off. Now lengthen the square and work dc-groups back and forth along one side of the square as follows (continue STRIPES BODY as before - adjust so that when 1 row remains until finished measurements, work last row with 1 strand black Fabel + 1 strand dark brown Kid Silk): ROW 1: 1 sl st in ch-space in the corner on square, ch 4 (= 1 dc + 1 ch), * 3 dc in next ch-space, 1 ch *, repeat from *-* until last ch-space (= corner) and finish with 3 dc in ch-space in the corner, turn piece. ROW 2: ch 4 (= 1 dc + 1 ch), * 3 dc in next ch-space, 1 ch *, repeat from *-* until last ch-space and finish with 3 dc in last ch-space. Repeat 2nd row until square measures approx. 24-27-31-36-42-47 cm / 9½"-10⅝"-12¼"-14¼"-16½"-18"½ from the centre and outwards (i.e. 42-46-50-56-62-68 cm / 16½"-18"-19¾"-22"-24⅜"-26¾" from one side to the other side measured at the widest). Fasten off. LEFT FRONT PIECE + BACK PIECE: Work as right piece. Work the 2 squares tog mid back so that rows worked back and forth are against each other - see illustration A.1. Work with 1 strand black Fabel + 1 strand dark brown Kid-Silk as follows: 1 sc in outermost dc in the corner on one square, ch 1, 1 sc in ch-space in the corner on the other square, * ch 3, 1 sc in ch-space on first square, ch 1, 1 sc in ch-space on the other square *, repeat from *-* and finish with ch 3, 1 sc in dc on first square, 1 ch and 1 sl st in dc on the other square. SLEEVE: Beg as on right front piece but from and with 2nd round work STRIPES SLEEVE – see explanation above. When 1 round remains before square measures 18-18-20-20-22-22 cm / 7"-7"-8"-8"-8¾"-8¾", work last round with 1 strand black Fabel + 1 strand dark brown Kid-Silk. Then work back and forth along one side on the square the same way as on back piece (continue stripes as before - adjust so that when 1 row remains until finished measurements, work last row with 1 strand black Fabel + 1 strand dark brown Kid Silk). When square measures 24-24-26-26-28-28 cm / 9½"-9½"-10¼"-10¼"-11"-11" at the widest, fasten off. Sleeve at the front is now done. Work another piece the same way (= sleeve at the back). Then work the 2 squares tog on overarm as shown in illustration A.2 – work them tog the same way as piece was worked tog mid back. Work 2 squares with lengthening the same way for the other sleeve and work them tog on overarm as explained above. BACK PIECE: Insert 1 marker in the middle of one front piece so that there are 21-23-25-28-31-34 cm / 8¼"-9"-9¾"-11"-12¼"-13⅜" from mid back until marker and 21-23-25-28-31-34 cm / 8¼"-9"-9¾"-11"-12¼"-13⅜" from marker mid front – insert marker between 2 dc-groups. Insert another marker on the other front piece. There are now approx. 42-46-50-56-62-68 cm / 16½"-18"-19¾"-22"-24⅜"-26¾" between the 2 markers on back piece and approx. 21-23-25-28-31-34 dc-groups between markers. Then work dc-groups back and forth between the 2 markers at the back with 1 strand Delight + 1 strand dark brown Kid-Silk (= 2 strands – NOTE: Work with these 2 strands until finished measurements) as follows: 1 sl st in ch-space between 2 dc-groups, ch 4 (= 1 dc + 1 ch), * 3 dc in next ch-space, 1 ch *, repeat from *-* and finish with 3 dc in ch-space at the marker, turn piece. Work next row as follows: ch 4 (= 1 dc + 1 ch), * 3 dc in next ch-space, 1 ch *, repeat from *-* and finish with 3 dc in last ch-space, turn piece. Work back and forth like this until 2 rows remain before piece measures 60-62-64-66-68-70 cm / 23⅝"-24⅜"-25¼"-26"-26¾"-27½" from bottom edge and up (i.e. piece measures approx. 22-22-24-24-26-26 cm / 8¾"-8¾"-9½"-9½"-10¼"-10¼" from where back piece beg). Now work 2 rows with dc-groups back and forth over the outermost 16-18-20-22-24-26 cm / 6¼"-7"-8"-8¾"-9½"-10¼" on one shoulder (i.e. over approx. 8-9-10-11-12-13 dc-groups). Cut the thread and work 2 rows with dc-groups over the outermost 16-18-20-22-24-26 cm / 6¼"-7"-8"-8¾"-9½"-10¼" on the other shoulder (make sure to work the same no of dc-groups on both shoulders = approx. 5-5-5-6-7-8 dc-groups mid back of neck). Piece measures approx. 60-62-64-66-68-70 cm / 23⅝"-24⅜"-25¼"-26"-26¾"-27½" from the shoulder to bottom edge and 24-24-26-26-28-28 cm / 9½"-9½"-10¼"-10¼"-11"-11" from the shoulder and down to where back piece beg. RIGHT FRONT PIECE: Work dc-groups the same way back and forth over right front piece, from mid front and to marker in the side with 1 strand Delight + 1 strand dark brown Kid-Silk (= 2 strands – NOTE: Work with these 2 strands until finished measurements). When front piece is the same length as back piece, work neck edge with dc-groups back and forth over the other dc-groups mid front (do not work over dc-groups on shoulder and make sure that same no of dc-groups have been worked on the shoulder at the front and back). Work back and forth until neck edge measures approx. 7-7-7-8-9-10 cm / 2¾"-2¾"-2¾"-3⅛"-3½"-4", cut and fasten the thread. LEFT FRONT PIECE: Work as right front piece but reversed. ASSEMBLY: Work shoulders tog the same way as the other parts were worked tog. Sew neck edge to neck line at the back of neck without sewing it tog mid back (to make an open split at the back). Work sleeve on to sleeve line. And work the openings under the sleeves tog. CROCHET EDGE: Work a finishing edge at the bottom around both sleeves and around the entire opening of jacket with 1 strand black Fabel + 1 strand dark brown Kid-Silk as follows: ROW/ROUND 1: Beg at the outer edge in the corner on neck edge at the back of neck, work towards front piece around the entire jacket and to the corner on the neck edge at the back of neck in the other side with 1 strand black Fabel + 1 strand dark brown Kid-Silk as follows: 1 sl st in outermost st in the corner on neck edge, ch 4 (= 1 dc + 1 ch), then work 3 dc in every ch or ch-space and 1 ch between every dc-group, finish with 1 dc in outermost st in the corner on neck edge. ROUND 2: Work around the entire opening on jacket (also along mid back in vent on neck edge): 1 sl st in first st, * ch 4, 1 sc in next ch-space *, repeat from *-* and finish with ch 4 and 1 sl st in sl st from beg of round. Fasten off. Work 1 buttonhole loop approx. 30-30-32-32-34-34 cm / 11¾"-11¾"-12½"-12½"-13½"-13½" from the shoulder and down on left front piece (try the jacket on for desired placement). Work with 1 strand black Fabel + 1 strand dark brown Kid-Silk as follows: 1 sc in first st, ch 7, 1 sc in same st. Fasten off. Sew the button on to right front piece. |
||||||||||||||||
Diagram explanations |
||||||||||||||||
|
||||||||||||||||
|
||||||||||||||||

|
||||||||||||||||
|
Have you made this or any other of our designs? Tag your pictures in social media with #dropsdesign so we can see them! Do you need help with this pattern?You'll find tutorial videos, a Comments/Questions area and more by visiting the pattern on garnstudio.com. © 1982-2024 DROPS Design A/S. We reserve all rights. This document, including all its sub-sections, has copyrights. Read more about what you can do with our patterns at the bottom of each pattern on our site. |
||||||||||||||||


With over 40 years in knitting and crochet design, DROPS Design offers one of the most extensive collections of free patterns on the internet - translated to 17 languages. As of today we count 304 catalogs and 11422 patterns - 11417 of which are translated into English (US/in).
We work hard to bring you the best knitting and crochet have to offer, inspiration and advice as well as great quality yarns at incredible prices! Would you like to use our patterns for other than personal use? You can read what you are allowed to do in the Copyright text at the bottom of all our patterns. Happy crafting!
Comments / Questions (64)
Underbar kofta. om man bara vill använda en tråd när man virkar, vilket garn kan ni rekommendera då?
01.03.2015 - 19:01DROPS Design answered:
Hej Ulrika. Du kan erstatte med 1 traad garn fra gruppe B. Se oversigt her Vi har her desvaerre ikke et garn med den flotte print som du har fra Delight.
03.03.2015 - 14:00Wie soll man die Jacke waschen? Für Delight und Fabel ist Maschinenwäsche (Woll- oder Feinwäsche) bei 40 °C empfohlen, für Kid Silk dagegen Handwäsche bei maximal 30 °C.
14.12.2014 - 14:17DROPS Design answered:
Sie waschen die Kleidungsstücke aus verschiedenen Garnen immer so, wie es das empfindlichste erlaubt - also in diesem Fall Kid-Silk. Waschen Sie die Jacke also vorsichtig von Hand, damit die Flauschigkeit von Kid-Silk nicht leidet.
15.12.2014 - 14:34Ena Hume wrote:
I am finding the section relating to the right and left front and collar instructions very confusing. Please supply me with either a clear diagram of how the collar should be done or clear instructions to crochet same. many thanks ena hume
15.09.2014 - 09:00DROPS Design answered:
Dear Mrs Hume, you are free to ask here the part you don't understand, and feel free to contact the store where you bought your yarn for any further individual assistance. Happy crocheting!
15.09.2014 - 09:58Quello chenon capisco è la fine del girocollo dei due davanti (destro e sinistro). precisamente il bordo del collo dopo aver lavorato la misura necessaria e uguale a quella del dietro. Grazie Antonella
11.11.2013 - 15:04DROPS Design answered:
Buongiorno Antonella, quando i due davanti raggiungono la lunghezza del dietro, deve lavorare a gruppi di m.a sugli altri gruppi di m.a al centro davanti, tralasciando i gruppi di m.a sulle spalle e assicurandosi di avere lo stesso n° di gruppi di m.a sulla spalla davanti e dietro. Ci riscriva se ha ancora bisogno. Buon lavoro!
11.11.2013 - 16:13Si possono avere delle spiegazioni per la taglia m , degli schemi e delle foto anche del dietro più chiare? grazie
09.11.2013 - 20:58DROPS Design answered:
Buonasera Antonella, le foto dei modelli sono solo quelle presenti sul sito, e anche le spiegazioni sono molto dettagliate; se ci illustra meglio qual è il suo problema possiamo cercare di aiutarla, altrimenti può mandare un mail a italy@garnstudio.com spiegando il problema. Buon lavoro!
10.11.2013 - 18:09Purtroppo ho la lana ma non riesco a capire bene le spiegazioni e i disegni se qualcuno potesse rendermele più semplici ne sarei grata
09.11.2013 - 20:53DROPS Design answered:
Buonasera Antonella, le foto dei modelli sono solo quelle presenti sul sito, e anche le spiegazioni sono molto dettagliate; se ci illustra meglio qual è il suo problema possiamo cercare di aiutarla, altrimenti può mandare un mail a italy@garnstudio.com spiegando il problema. Buon lavoro!
10.11.2013 - 18:09Gentilissima redazione il modello è bello ma non è spiegato bene. Si può avere una foto di spalle? grazie !
30.10.2012 - 09:33DROPS Design answered:
Chiederò se è possibile. Che cos'è che non è chiaro? Magari riesco a spiegare...
03.11.2012 - 01:32Adriana Goren wrote:
Me encanto!!! gracias
04.10.2012 - 12:08Aurora Fernandez wrote:
No me queda claro el cuello. El delantero va recto hasta los hombros?
11.09.2012 - 00:27DROPS Design answered:
Hola Aurora, sí, va recto hasta los hombros. Al pónerselo se forma un pequeño cuello.
07.12.2012 - 07:46Det står att det virkas ränder fram och bakstycket. Jag undrar om det menas vilka färger man ska ha i rutorna? Det står ju också om att rutorna förlängs till fram och bakstycket.
23.08.2012 - 17:33DROPS Design answered:
Ja rutorna är framst och rutan förlängs till bakst. Så förklaringen för färgerna på varje varv gäller rutorna.
25.08.2012 - 02:17