
Suositut kategoriat
Etsitkö tiettyä lankaa?


Silmukan lisääminen pienellä reiällä

Tällä tavoin lisäät edellisen kerroksen silmukoiden väliseen lenkkiin yhden oikean silmukan. Uuden silmukan alapuolelle muodostuu pieni reikä:
Kuvio 1: Neulo kunnes olet lisättävän silmukan kohdalla.
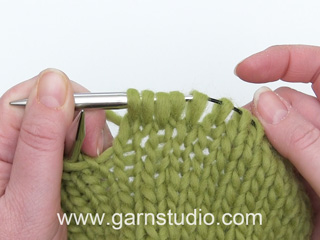
Kuvio 2: Vie vasemman käden puikko edestä edellisen kerroksen silmukoiden välisen lenkin läpi.
Kuvio 3: Vasemman käden puikolla on nyt uusi silmukka.
Kuvio 4: Vie oikean käden puikko uuden silmukan läpi ja ota lanka puikolle kuten neuloisit oikean silmukan.
Kuvio 5: Olet nyt neulonut uuden silmukan ja tämä silmukka on nyt oikean käden puikolla, pudota silmukka vasemman käden puikolta.
Kuvio 6: Neulo vasemman puikon seuraava silmukka oikein.
Kuvio 7: Neulo muutama kerros, jotta lisäyskohdan pieni reikä erottuisi helpommin.
Tämä lisäystapa sopii hyvin silloin, kun haluat työhön suoraan tai viistoon kulkevan lisäysrivin. Reiästä tulee pieni, mutta lisäykset näkyvät kuitenkin hyvin.Saat lisää apua tästä videosta


DROPS Design on toiminut neule- ja virkkausalalla yli 40 vuotta ja meillä on yksi kaikkein laajin valikoima ilmaisia ohjeita verkossa - käännettynä 17 kielelle. Tänään meiltä löytyy 314 lehteä ja 11822 ohjetta - joista 11217 ohjetta on käännetty suomeksi.
Työskentelemme ahkerasti, jotta voisimme antaa teille kaikkein parhaimpia neule- ja virkkausohjeita, inspiraatiota ja neuvoja sekä korkealaatuisia lankoja todella edulliseen hintaan! Haluaisitko käyttää ohjeitamme muuhun kuin henkilökohtaiseen käyttöön? Voit lukea säännöistä ohjeiden Tekijänoikeus -tekstissä, joka löytyy kaikkien ohjeidemme alapuolelta. Hauskoja hetkiä käsitöiden parissa!
De plaatjes en de tekst komen niet overeen. Plaatje 2 laat zien hoe een steek gemaakt wordt door de naald van achter naar voor te steken, terwijl de tekst het omgekeerde zegt. Ook wordt niet vermeld of er voor of achter in de lus gebreid moet worden en of dit een naar links of naar rechts vallende meerdering is.
19.03.2016 - 14:42