
Popular categories
Looking for a yarn?


|
|||||||||||||||||||
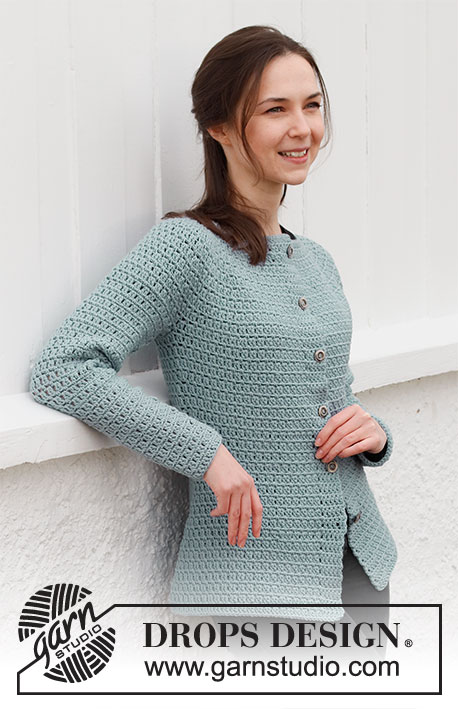
Grey Owl Jacket |
|||||||||||||||||||
 |
 |
||||||||||||||||||
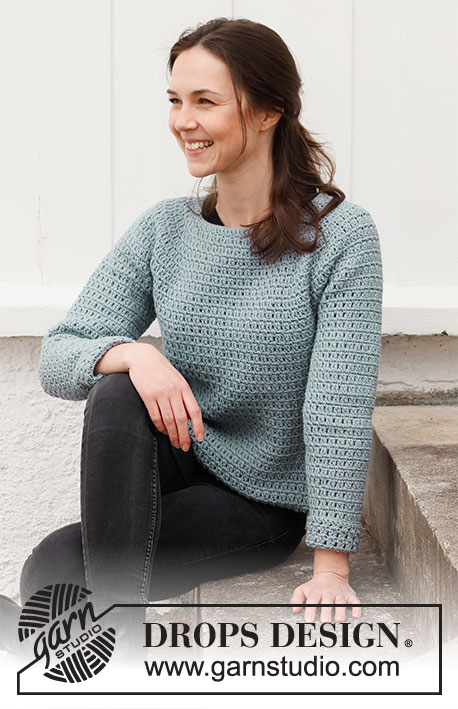
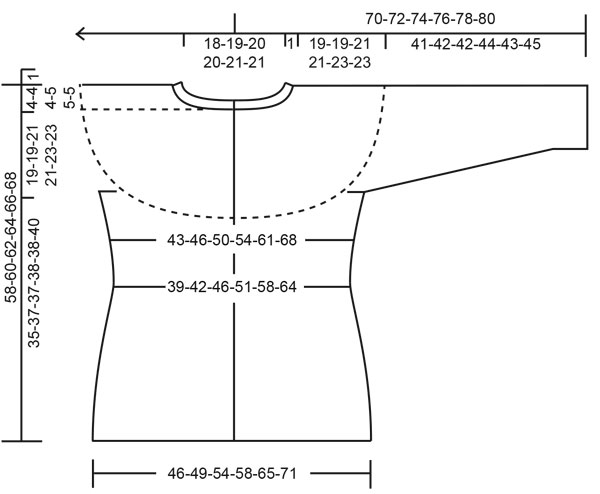
Crocheted jacket in DROPS Karisma. The piece is worked top down with round yoke, lace pattern and double crochets. Sizes S - XXXL.
DROPS 216-34 |
|||||||||||||||||||
|
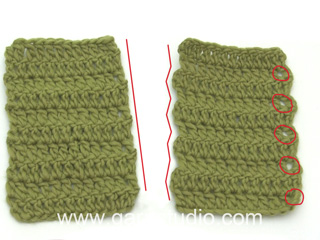
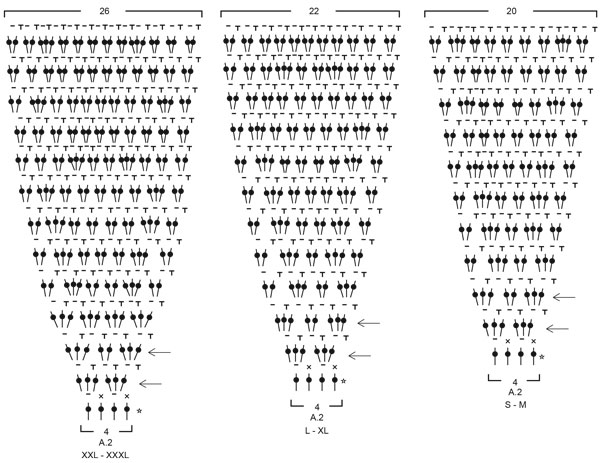
------------------------------------------------------- EXPLANATIONS FOR THE PATTERN: ------------------------------------------------------- CROCHET-TIP FOR CHAIN STITCH: If you work outermost on the hook the chain stitch will often be too tight; 1 chain stitch should be as long as 1 single/double crochet is wide. CROCHET INFORMATION: When working back and forth: Each row of single crochets starts with 1 chain stitch (does not replace the first single crochet but is in addition). Each row of double crochets starts with 3 chain stitches (replaces the first double crochet). When working in the round: Each round of single crochets starts with 1 chain stitch (replaces the first single crochet) and finishes with 1 slip stitch in the first chain stitch at the beginning of the round. Each round of double crochets starts with 3 chain stitches (replaces the first double crochet) and finishes with 1 slip stitch in the 3rd chain stitch at the beginning of the round. PATTERN: See diagrams A.1 and A.2. Choose diagram for your size. All rows of double crochets are worked from the right side. INCREASE TIP (for sides of body): Adjust so the next row is a row of double crochets (i.e. from the right side). Work as before until there are 3 chain stitches and 3 single crochets left before the marker thread, work 3 double crochets around the next chain stitch, work as before until you have worked 2 double crochets around each of the 2 chain stitches after the marker thread, work 3 double crochets around the next chain stitch = 2 double crochets increased at the marker thread. Repeat at the other marker thread (=4 double crochets increased on the row). Continue the pattern as before; for each increase-row, A.1c is repeated 2 more times in width on the row. DECREASE TIP-1 (for sides of body): Adjust so the next row is a row of double crochets (i.e. from the right side). Work as before until there are 3 chain stitches and 3 single crochets left before the marker thread, * work 1 double crochet around the next chain stitch, but wait with the last pull through, work 1 more double crochet around the same chain stitch and on the final pull-through, pull through all loops on the hook (= 1 double crochet decreased) *, work as before until you have worked 2 double crochets in each of the first 2 chain stitches after the marker thread, work from *-* around the next chain stitch (i.e. on the other side of the marker thread) = 2 double crochets decreased at the marker thread. Repeat at the other marker thread (= a total of 4 double crochets decreased on the row). Continue the pattern; each time you decrease, A.1c is repeated 2 times less in width on the row. DECREASE TIP-2 (for sleeves): Adjust so the next round is a round of double crochets. * Work 1 double crochet around the first/next chain stitch, but wait with the last pull-through, work 1 more double crochet around the same chain stitch, and on the last pull-through, pull through all loops on the hook (= 1 double crochet decreased) *, work from *-* around the next chain stitch = 2 double crochets decreased. Each time you decrease, A.1c is repeated 1 time less in width. Decrease alternately at the beginning and end of the round (i.e. when decreasing at the end, work as before until there are 2 chain stitches left on the round). ------------------------------------------------------- START THE PIECE HERE: ------------------------------------------------------- JACKET – SHORT OVERVIEW OF THE PIECE: The neck and yoke are worked back and forth, top down. The yoke is divided for the body and sleeves and the body continued back and forth. The sleeves are worked in the round, top down. NECK: Work 96-98-102-108-110-116 chain stitches (including 3 chain stitches to turn) – read CROCHET-TIP FOR CHAIN STITCH, using hook size 4.5 mm = US 7 and Karisma. Work 1 double crochet in the 4th chain stitch from the hook – read CROCHET INFORMATION, then work 1 double crochet in every chain stitch = 94-96-100-106-108-114 double crochets. Insert 1 marker after the first 5 stitches on the row; the yoke is measured from this marker. YOKE: Work 2nd row in the pattern as follows (= from the wrong side): Work A.1a over the first 5 double crochets (= band), A.1d over the next 2 double crochets, A.1c over the next 8-8-10-10-10-12 double crochets (= 4-4-5-5-5-6 times in width), A.2 over the next 8 double crochets (= 2 times in width), A.1c over the next 6-6-6-8-8-8 double crochets (= 3-3-3-4-4-4 times in width), A.2 over the next 8 double crochets (= 2 times in width), A.1c over the next 20-22-22-24-26-28 double crochets (= 10-11-11-12-13-14 times in width), A.2 over the next 8 double crochets (= 2 times in width), A.1c over the next 6-6-6-8-8-8 double crochets (= 3-3-3-4-4-4 times in width), A.2 over the next 8 double crochets (= 2 times in width), A.1c over the next 8-8-10-10-10-12 double crochets (= 4-4-5-5-5-6 times in width), A.1b over the next 2 double crochets and finish with A.1a over the last 5 double crochets (= band). Continue this pattern back and forth, repeating the last 2 rows in A.1a to A.1d in height and increasing as shown in A.2 – AT THE SAME TIME increase as described below: Work 3rd row in the pattern from the right side, AT THE SAME TIME as you increase as follows: Work A.1a over the first 5 double crochets (= band), A.1b over the next 2 stitches, A.1c over the next 8-8-10-10-10-12 stitches and increase 0-2-2-4-4-4 double crochets evenly spaced, A.2 as before (= 2 times in width), A.1c over the next 6-6-6-8-8-8 stitches and increase 0-4-4-4-4-4 double crochets evenly spaced, A.2 as before (= 2 times in width), A.1c over the next 20-22-22-24-26-28 stitches and increase 0-4-4-6-6-8 double crochets evenly spaced, A.2 as before (= 2 times in width), A.1c over the next 6-6-6-8-8-8 stitches and increase 0-4-4-4-4-4 double crochets evenly spaced, A.2 as before (= 2 times in width), A.1c over the next 8-8-10-10-10-12 stitches and increase 0-2-2-4-4-4 double crochets evenly spaced, A.1d over the next 2 stitches and finish with A.1a over the last 5 double crochets (= band) = 110-128-132-144-146-154 double crochets (including the increases in A.2). REMEMBER THE CROCHET GAUGE! Work 4th row in the pattern from the wrong side as follows: A.1a over the first 5 double crochets (= band), A.1d over the next 2 double crochets, A.1c over the next 8-10-12-14-14-16 double crochets, A.2 as before (= 2 times in width), A.1c over the next 6-10-10-12-12-12 double crochets, A.2 as before (= 2 times in width), A.1c over the next 20-26-26-30-32-36 double crochets, A.2 as before (= 2 times in width), A.1c over the next 6-10-10-12-12-12 double crochets, A.2 as before (= 2 times in width), A.1c over the next 8-10-12-14-14-16 double crochets, A.1a over the next 2 double crochets and finish with A.1a over the last 5 double crochets (= band). Work 5th row in the pattern from the right side, AT THE SAME TIME as you increase evenly as follows: Work A.1a over the first 5 double crochets (= band), A.1b over the next 2 stitches, A.1c over the next 8-10-12-14-14-16 stitches and increase 0-0-0-0-2-4 double crochets evenly spaced, A.2 as before (= 2 times in width), A.1c over the next 6-10-10-12-12-12 stitches and increase 0-2-4-4-0-0 double crochets evenly spaced, A.2 as before (= 2 times in width), A.1c over the next 20-26-26-30-32-36 stitches and increase 0-0-2-4-4-8 double crochets evenly spaced, A.2 as before (= 2 times in width), A.1c over the next 6-10-10-12-12-12 stitches and increase 0-2-4-4-0-0 double crochets evenly spaced, A.2 as before (= 2 times in width), A.1c over the next 8-10-12-14-14-16 stitches and increase 0-0-0-0-2-4 double crochets evenly spaced, A.1d over the next 2 stitches and finish with A.1a over the last 5 double crochets (= band) = 126-148-158-172-170-186 double crochets (including the increases in A.2). Continue this pattern and the increases in A.2. When the last row in A.2 remains, the piece measures approx. 18-18-19-19-21-21 cm = 7"-7"-7½"-7½"-8¼"-8¼" from the marker on the neck and there are 222-244-270-284-314-330 double crochets on the row. Work the last row in A.2 from the wrong side as follows: A.1a over the first 5 double crochets (= band), A.1d over the next 2 double crochets, A.1c over the next 8-10-12-14-16-20 double crochets, A.2 over the next 20-20-22-22-26-26 double crochets (= 1 time in width), 8-8-8-10-10-12 chain stitches, skip the next 46-52-58-60-64-64 double crochets (i.e. 20-20-22-22-26-26 double crochets in A.2, 6-12-14-16-12-12 double crochets in A.1c and 20-20-22-22-26-26 double crochets in A.2 for the sleeve), A.2 over the next 20-20-22-22-26-26 double crochets (= 1 time in width), A.1c over the next 20-26-28-34-36-44 double crochets, A.2 over the next 20-20-22-22-26-26 double crochets (= 1 time in width), 8-8-8-10-10-12 chain stitches, skip the next 46-52-58-60-64-64 double crochets (i.e. 20-20-22-22-26-26 double crochets in A.2, 6-12-14-16-12-12 double crochets in A.1c and 20-20-22-22-26-26 double crochets in A.2 for the sleeve), A.2 over the next 20-20-22-22-26-26 double crochets (= 1 time in width), A.1c over the next 8-10-12-14-16-20 double crochets, A.1b over 2 double crochets and finish with A.1a over the last 5 double crochets (= band) = 147-157-171-185-207-227 stitches. The next row is worked as follows from the right side: A.1a over the first 5 double crochets (= band), A.1b over the next 2 stitches, A.1c over the next 28-30-34-36-42-46 stitches, 1 double crochet in each of the 8-8-8-10-10-12 chain stitches under the sleeve, insert 1 marker in the middle of these stitches, A.1c over the next 60-66-72-78-88-96 stitches, 1 double crochet in each of the 8-8-8-10-10-12 chain stitches under the sleeve, insert 1 marker in the middle of these stitches, A.1c over the next 28-30-34-36-42-46 stitches, A.1d over the next 3 stitches and finish with A.1a over the last 5 double crochets (= band) = 146-156-170-184-206-226 double crochets. Body and sleeves are finished separately. THE PIECE IS NOW MEASURED FROM HERE! BODY: = 146-156-170-184-206-226 double crochets. Allow the marker threads to follow your work onwards; they will be used when decreasing and increasing in the sides. First row is worked as follows from the wrong side: Work A.1a over the first 5 double crochets (= band), A.1d over the next 2 double crochets as before, repeat A.1c over the next 132-142-156-170-192-212 double crochets, A.1b over the next 2 double crochets and finish with A.1a over the last 5 double crochets (= band). Continue this pattern back and forth. When the piece measures 4 cm = 1½" from the division, decrease 2 double crochets at both marker threads – read DECREASE TIP-1! Decrease like this every 3½-4-4½-5-5-5½ cm = 1¼"-1½"-1⅝"-2"-2"-2⅛" a total of 3 times = 134-144-158-172-194-214 double crochets. When the piece measures 14-16-17-18-18-19 cm = 5½"-6¼"-6¾"-7"-7"-7½" from the division, increase 2 double crochets at both marker threads – read INCREASE TIP! Increase like this every 2½ cm = 1" a total of 6 times = 158-168-182-196-218-238 double crochets. Continue working until the body measures 35-37-37-38-38-40 cm = 13¾"-14½"-14½"-15"-15"-15¾" from the division, or to desired length – finish after a row of double crochets. Cut and fasten the strand. The jacket measures approx. 58-60-62-64-66-68 cm = 22¾"-23⅝"-24⅜"-25¼"-26"-26¾" from the shoulder down. SLEEVE: = 46-52-58-60-64-64 double crochets + 8-8-8-10-10-12 chain stitches under the sleeve. Start mid under the sleeve as follows: Work 1 single crochet in the 5th-5th-5th-6th-6th-7th chain stitch under the sleeve, then 1 chain stitch (= 1 single crochet), 1 single crochet in each of the next 3-3-3-4-4-5 chain stitches, A.1c (i.e. 1 round of single crochets and chain stitches) over the next 46-52-58-60-64-64 double crochets and finish with 1 single crochet in each of the remaining 4-4-4-5-5-6 chain stitches under the sleeve = 54-60-66-70-74-76 stitches. Insert 1 marker at the beginning of the round – in the middle of the 8-8-8-10-10-12 stitches under the sleeve. Work A.1c in the round. When the sleeve measures 2 cm = ¾" from the division, decrease 2 double crochets under the sleeve – read DECREASE TIP-2. Decrease like this every 3-2½-2-2-2-2 cm = 1⅛"-1"-¾"-¾"-¾"-¾" a total of 11-13-15-17-18-18 times = 32-34-36-36-38-40 stitches. Continue working until the sleeve measures 41-42-42-44-43-45 cm = 16⅛"-16½"-16½"-17¼"-17"-17¾" from the division, or to desired length – finish after a round of double crochets. Cut and fasten the strand. Work the other sleeve in the same way. ASSEMBLY: Sew the buttons onto the left band. The top button is sewn in the transition between the neck and the yoke. The other 5-5-5-6-6-6 buttons are sewn with 8 cm = 3⅛" between each one. The buttons are buttoned between the 3rd and 4th double crochet on the right band. |
|||||||||||||||||||
Diagram explanations |
|||||||||||||||||||
|
|||||||||||||||||||
|
|||||||||||||||||||

|
|||||||||||||||||||
|
|||||||||||||||||||
|
Have you made this or any other of our designs? Tag your pictures in social media with #dropsdesign so we can see them! Do you need help with this pattern?You'll find tutorial videos, a Comments/Questions area and more by visiting the pattern on garnstudio.com. © 1982-2024 DROPS Design A/S. We reserve all rights. This document, including all its sub-sections, has copyrights. Read more about what you can do with our patterns at the bottom of each pattern on our site. |
|||||||||||||||||||


With over 40 years in knitting and crochet design, DROPS Design offers one of the most extensive collections of free patterns on the internet - translated to 17 languages. As of today we count 304 catalogs and 11422 patterns - 11417 of which are translated into English (US/in).
We work hard to bring you the best knitting and crochet have to offer, inspiration and advice as well as great quality yarns at incredible prices! Would you like to use our patterns for other than personal use? You can read what you are allowed to do in the Copyright text at the bottom of all our patterns. Happy crafting!
Comments / Questions (9)
Bonjour, Le modèle à subit une modification. Celle ci renvoie sur le gilet, qui a lui même, la même indication. Pourriez vous nous informer de ce qui a changé au niveau du diagramme s'il vous plaît ? Merci
02.12.2023 - 18:42DROPS Design answered:
Bonjour Marina, la correction ne s'applique que si vous aviez déjà imprimé les explications avant la date de cette correction, sinon, les explications sont justes ainsi. Bon crochet!
04.12.2023 - 07:59Hallo die musterreihe 5 habe ich gehäkelt ,habe auch 172 Maschen bei Größe XL (da ich dünneres Garn habe), meine Frage: komme bei der nächsten reihe nur auf 160 Maschen , 5+2+14+16+12+16+30+16+12+16+14+2+5=160 Maschen. Leider keine 172M. obwohl ich original die vierte Reihe wiederholt habe und vom A2(XL)Diagramm her von der sechsten Reihe 8maschen mal 2 =16M. Gehäkelt habe, wo ist mein Fehler? Mfg.gabriele
29.04.2021 - 17:38DROPS Design answered:
Liebe Gabriele, bei A.1c sollten Sie keine 12 sondern auch 16 Maschen haben (es sind 12 Maschen aber es wird bei der 5. Reihe 4 Maschen zugenommen = 16 M in jedem A.1c). Bei der 6. Reihe häkeln Sie feste Maschen und Luftmaschen und bei der 7. Reihe häkeln Sie alle Diagramme wie zuvor ohne Zunahmen, nur bei A.2 wird es jeweils zugenomen (= bei 7. Reihe sind es 10 M in jedem A.2 = 188 Stb nach 7. Reihe). Kann es Ihnen helfen?
30.04.2021 - 07:08Merci pour la réponse mais je fais la taille XXL et quand on compte les bridés du rang 1 on n’a pas assez de brides pour faire A2 2 fois ou A1c 5 fois en largeur ...etc ...?
27.01.2021 - 13:27DROPS Design answered:
Bonjour Mme Arnal, en XXL crochetez ainsi sur l'envers: A.1a (= 5 premières brides = bordure devant), A.1d (= 2 brides) , A.1c (= 5 x 2 brides = 10 brides), A.2 (= 2 x 4 brides = 8 brides), A.1c (= 4 x 2 brides = 8 brides), A.2 (= 2 x 4 brides = 8 brides), A.1c (= 13 x 2 brides = 26 brides, A.2 (= 2 x 4 brides = 8 brides), A.1c (= 4 x 2 brides = 8 brides, A.2 (= 2 x 4 brides = 8 brides, A.1c (= 5 x 2 brides = 10 brides) , A.1b (= 2 brides) et A.1a (= 5 brides = bordure devant) autrement dit: 5+2+10+8+8+8+26+8+8+8+10+2+5=108 mailles. En espérant que ce détail puisse vous aider. Bon crochet!
27.01.2021 - 15:28Je ne comprends pas ce que veut dire A2 comme avant = 2 fois en largeur ? Ainsi que A1c au dessus de 8 mailles et augmenter de 4 bridés à intervalles réguliers ? On ne suit pas le diagramme alors ?
27.01.2021 - 11:12DROPS Design answered:
Bonjour Mme Arnal, dans la description du 1er rang et des différents points fantaisie à crocheter, vous répétez 2 fois A.2 en largeur, vous continuez ensuite en crochetant toujours 2 fois A.2 en largeur à chaque fois, mais le nombre de mailles à crocheter dans les autres diagrammes va varier en fonction des augmentations faites (et de la taille). Quand vous crochetez A.1c au-dessus de 8 mailles = vous répétez 4 fois les 2 mailles de A.1c - en augmentant 4 mailles = crochetez 3 brides (au lieu de 2) autour de chaque maille en l'air des 4 motifs suivants = 4 augmentations. Bon crochet!
27.01.2021 - 13:15Vet inte om det blev så mycket bättre - mönstret refererar till a1 a, c, d etc medan diagrammen heter a2??! Omöjligt att virka den här koftan med så ofullständigt mönster!
12.10.2020 - 17:06DROPS Design answered:
Hej Lena. Prova att uppdatera sidan / byta webläsare så ska du kunna se alla diagram. Mvh DROPS Design
13.10.2020 - 07:46Var hitter man A1c som ska virkas enligt mönstret i början av oket??
11.10.2020 - 15:18DROPS Design answered:
Hei Lena. Her hadde diagrammer og målskisse til jakken og en lignende genser blitt byttet om, men skal nå være OK. Takk for at du gjorde oss oppmerksom på dette. mvh DROPS design
12.10.2020 - 14:14Oh, das gefällt mir super und mal etwas tailliert. Freue mich schon auf die Anleitung
27.08.2020 - 13:26Simple but elegant wear. Great to pair as business jacket in slacks or skirt. I love the lines. Business casual.
03.07.2020 - 19:48Mademoiselle Coco avrebbe scelto questo!👏
04.06.2020 - 21:53