DROPS Karisma
DROPS Karisma
100% Wool
from 2.50 € /50g
DROPS Cotton Viscose
54% Cotton, 46% Viscose
Discontinued
find alternatives
DROPS Super Sale

Frosted Vines

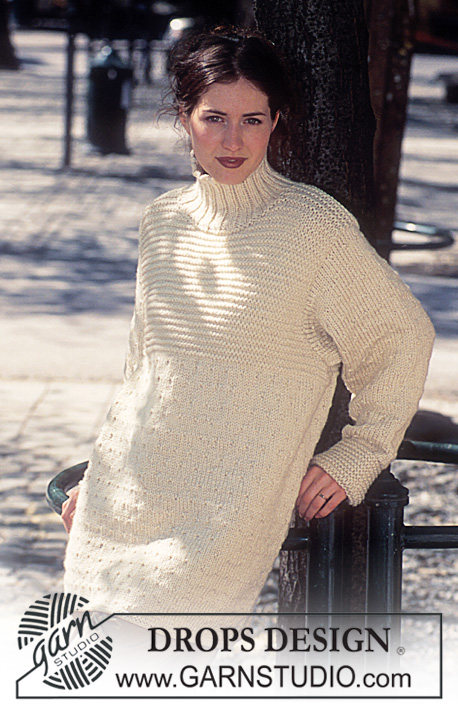
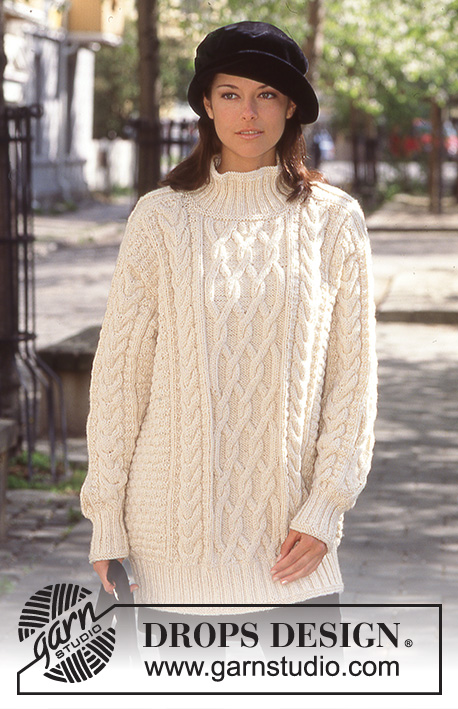
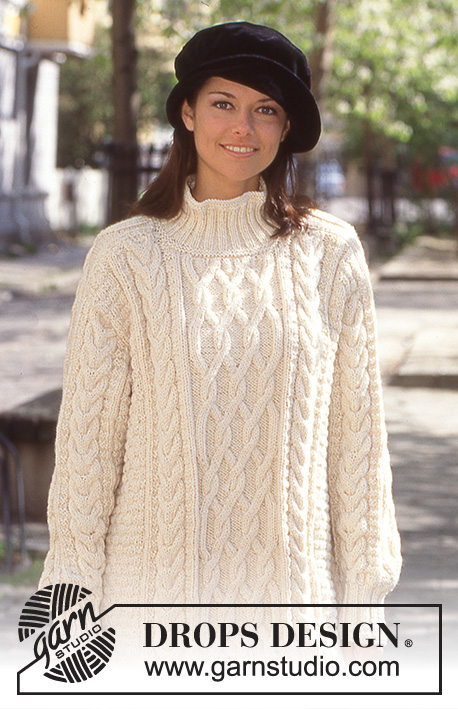
DROPS Sweater in Karisma Superwash and Cotton Viscose or Lima and Kid-Silk. Long or short model.

DROPS 58-6
Sizes: Small/Medium (Medium/Large-Extra Large)
Finished Measurements: 114 (124-132) cm

Materials: DROPS KARISMA SUPERWASH from Garnstudio
800 (900-1000) g in Color No. 01, Natural.
and: DROPS COTTON-VISCOSE from Garnstudio
700 (800-850) g in Color No. 02, Natural.

Or use:
DROPS LIMA from Garnstudio
800 (900-1000) g in Color No. 0100, off-white.
and: DROPS KID-SILK from Garnstudio
200(225-250) g in Color No. 01, off-white.

The close up picture show:
A: Lima and Kid-Silk
B: Karisma and Cotton-Viscose

DROPS 4 mm and 5 mm circular and double pointed needles, or sizes needed to obtain correct gauge.

-------------------------------------------------------

Alternative Yarn – See how to change yarns here
Yarn Groups A to F – Use the same pattern and change the yarn here
Yarn usage using an alternative yarn – Use our yarn converter here

-------------------------------------------------------

DROPS Karisma
DROPS Karisma
100% Wool
from 2.50 € /50g
DROPS Cotton Viscose
54% Cotton, 46% Viscose
Discontinued
find alternatives

Pattern instructions

NOTE: This pattern is written in British English. All measurements in charts are in cm. For conversion from cm to inches - click here. There are different terms for crocheting in British and American English. If this pattern includes crochet, click for "crochet terms" here. For this pattern in American English, please click here.
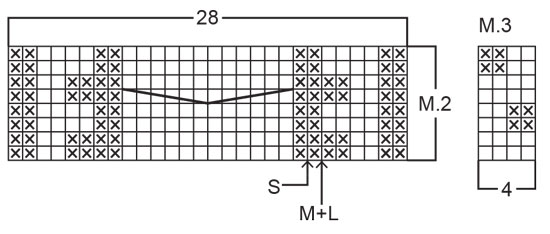
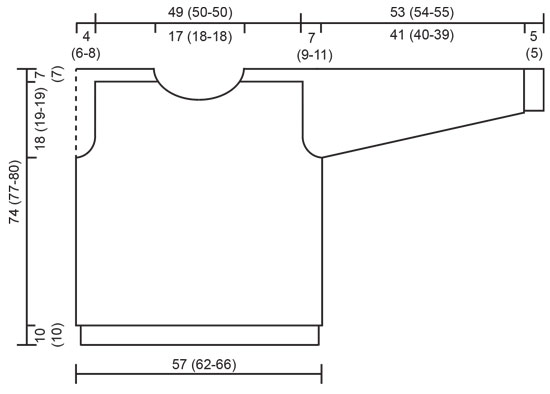
Gauge: 17 sts and 22 rows on smaller needles in Pattern 3 = 10 x 10 cm.

Pattern: See charts. One chart equals one repeat of the pattern. The pattern is seen from the right side. The charts for Patterns 1, 4 & 6 (identical for all sizes) and Pattern 2 (with arrows indicating the starting points for different sizes). NOTE: there is no Pattern 5.

Garter st, when knitting flat: Knit all sts all rows.
Garter st, when knitting in the round: *Rnd 1, knit. Rnd 2, purl. Repeat from * - *.

Rib: *Knit 2, purl 2. Repeat from * - *.

Short model: If a short model is desired, reduce the measurements at armhole, neck and binding off by 14 (15-16) cm . Finished length = 60 (62-64) cm . Reduce the amount of yarn by approximately 50 g of Karisma/Lima and approximately 50 g of Cotton Viscose / 25 g Kid-Silk.

Body: Cast on 192 (208-224) sts on smaller circular needles with 1 strand Karisma and 1 strand Cotton Viscose or 1 strand Lima and 1 strand Cotton Viscose. Join, being careful not to twist the sts. Place a marker at the join and knit 4 rows garter st, then rib until the work measures 10 cm . Knit 2 rows garter st, increasing 56 (56-56) sts evenly distributed on the last row. 248 (264-280) sts. Change to larger needles and establish pattern as follows: front (124 (132-140) sts): * 16 (20-24) sts of Pattern 3, Pattern 2, Pattern 4, Pattern 2, 16 (20-24) sts of Pattern 3*. Place a marker, repeat from * - * over the back sts. When the work measures 49 (51-54) cm , knit the next row as follows: bind off 2 sts for armhole, 120 (128-136) sts for the front, bind off 4 sts for armhole, 120 (128-136) sts for the back, bind off 2 sts for armhole. Knit the rest of the front and back separately from this point.

Front: 120 (128-136) sts. Bind off for armholes every other row: 3 sts 0 (1-1) time, 2 sts 1 (1-3) times, 1 st 3 times. 110 (112-112) sts. On the row before the work measures 65 (68-71) cm , decrease 15 sts evenly distributed over the center 38 (40-40) sts. On the next row, bind off the center 23 (25-25) sts for the neck. Bind off at each neck edge every other row: 2 sts 1 time, 1 st 1 time. 33 (33-33) sts on either shoulder. When the work measures 67 (70-73) cm , decrease 6 sts evenly distributed over the remaining sts of each Pattern 2. 27 (27-27) sts on the shoulder. Knit 2 rows garter st (for seam) and bind off.

Back: 120 (128-136) sts. Bind off for armholes as for front = 110 (112-112) sts. When the work measures 67 (70-73) cm , dec 6 sts evenly distributed over the center 12 sts of each Pattern 2 and 15 sts evenly distributed over the 36 sts of Pattern 4. 83 (85-85) sts. Knit 2 rows garter st (for seam) and bind off.

Right sleeve: Cast on 40 (44-44) sts on smaller double pointed needles with 1 strand Karisma and 1 strand Cotton Viscose or 1 strand Lima and 1 strand Kid-Silk. Join, being careful not to twist the sts. Place a marker at the join and knit 4 rows garter st, then rib until the work measures 10 cm . The rib will be folded over double and is therefore measured as 5 cm . Knit 2 rows garter st, increasing 26 (24-24) sts evenly distributed on the last row. 66 (68-68) sts.
Change to larger double pointed needles and establish pattern as follows: 21 (22-22) sts of Pattern 2 (start at the arrow on the diagram), Pattern 1, Pattern 6, 21 (22-22) sts of Pattern 2.
At the same time, after the rib, inc 1 st on each side of the marker 20 (21-21) times:
Size Small: every 4th row
Sizes M/L + XL: alternately every 3rd and 4th row
= 106 (110-110) sts (the increased sts are first knit into Pattern 2, then into Pattern 3).
When the work measures 46 (45-44) cm (+ 5 cm rib), bind off 2 sts on each side of the marker and knit the rest back and forth on the needles. Bind off for sleeve caps on each side every other row: 4 (3-3) sts 6 (8-10) times and then 11 (13-7) sts 1 time. 32 (32-32) sts remaining on the needle. The work measures approx. 53 (54-55) cm (measure from here).
Inc 1 st on each side for seam. 34 (34-34) sts (the edge sts are knit in garter st.) Continue the pattern with 1 edge st, 2 sts stockinette st, purl 2 sts, Pattern 1, Pattern 6, purl 2 sts, 2 sts stockinette st, 1 edge st. On the row before the work measures 16 (16-16) cm , decrease 6 sts evenly distributed over the outer 20 sts on the right side (as seen from the right side). On the next row bind off the outer 14 sts on the right side. 14 sts on the needle. Dec 2 sts over the next 4 sts. On the next row bind off a further 2 sts on the right side. 10 sts on the needle. Continue knitting on these 10 sts until the work measures 24.5 (25-25) cm . Knit the last st of Pattern 1 and then first st of Pattern 6 together on the next row. 9 sts on the needle. Put these 9 sts on a holder. The work measures approximately 77.5 (79-80) cm (+ 5 cm rib) in total.

Left sleeve: Knit like the right, but reverse all shaping.

Assembly: Sew on the sleeves. Sew the shoulder seams from the body on each side of the sleeve in the outer sts (in garter st). Sew the sts from the holder on both sleeves together at the center back in the neck of the body. Pick up approximately 88-96 sts (divisible by 4 sts) around the neck on smaller double pointed needles with 1 strand Karisma and 1 strand Cotton Viscose or 1 strand Lima and 1 strand Kid-Silk; join and knit 4 rows garter st, 8 cm rib, 4 rows garter st. Bind off.

Diagram

symbols = K
symbols = P
symbols = put 3 sts on a cable needle in front of the work, knit 3, knit 3 from the cable needle
symbols = put 3 sts on a cable needle behind the work, knit 3, knit 3 from the cable needle
symbols = put 3 sts on a cable needle in front of the work, purl 1, knit 3 from the cable needle
symbols = put 1 st on a cable needle behind the work, knit 3, purl 1 from the cable needle
diagram
diagram
diagram

Each of our patterns has specific tutorial videos to help you.

Do you have a question? See a list of frequently asked questions (FAQ)

Knitting tension is what determines the final measurements of your work, and is usually measured per 10 x 10 cm. It is provided like so: number of stitches in width x number of rows in height - eg: 19 stitches x 26 rows = 10 x 10 cm.

The knitting tension is very individual; some people knit/crochet loosely while others work tightly. You adjust the knitting tension with the needle size, which is why the suggested needle size is only meant as a guide! You need to adjust this (up or down) to ensure that YOUR knitting tension matches the knitting tension provided in the pattern. If you work with a different knitting tension than provided you will have a different yarn consumption, and your work will have different measurements than what the pattern suggests.

The knitting tension also determines which yarns can replace each other. As long as you achieve the same knitting tension you can replace one yarn with another.

See DROPS lesson: How to measure your tension/gauge

See DROPS video: How to make a gauge tension swatch

The required amount of yarn is provided in grams, eg: 450 g. To calculate how many balls you’ll need you first need to know how many grams are in 1 ball (25g, 50g or 100g). This information is available if you click on the individual yarn quality on our pages. Divide the amount required with the amount of each ball. For example, if each ball is 50g (the most common amount), the calculation will be as follows: 450 / 50 = 9 balls.

The important thing when changing from one yarn to another is that the knitting/crochet tension remains the same. This is so that the measurements of the finished piece will be the same as on the sketch provided. It is easier to achieve the same knitting tension using yarns from the same yarn group. It is also possible to work with multiple strands of a thinner yarn to achieve the knitting tension of a thicker one. Please try our yarn converter. We recommend you to always work a test swatch.

Please NOTE: when changing yarn the garment might have a different look and feel to the garment in the photo, due to individual properties and qualities of each yarn.

See DROPS lesson: Can I use a different yarn than the one mentioned in the pattern?

All our yarns are categorised into yarn groups (from A to F) according to thickness and knitting tension – group A contains the thinnest yarns and group F the thickest. This makes it easier for you to find alternative yarns to our patterns, should you wish to switch yarn. All yarns within the same group have a similar knitting tension and can easily replace each other. However, different yarn qualities have different structures and properties which will give the finished work a unique look and feel.

Click here for an overview of the yarns in each yarn group

At the top of all our patterns you’ll find a link to our yarn calculator, which is a helpful tool should you wish to use a different yarn than suggested. By filling in the yarn quality you wish to replace, the amount (in your size) and number of strands, the calculator will present good alternative yarns with the same knitting tension. Additionally it will tell you how much you’ll require in the new qualities and whether you’ll need to work with multiple strands. Most skeins are 50g (some are 25g or 100g).

If the pattern is worked with multiple colours, every colour will have to be calculated separately. Similarly, if the pattern is worked with several strands of different yarns (for example 1 strand Alpaca and 1 strand Kid-Silk) you will have to find alternatives for each, individually.

Click here to see our yarn calculator

Since different yarns have different qualities and textures we have chosen to keep the original yarn in our patterns. However, you can easily find options among our available qualities by using our yarn calculator, or simply pick a yarn from the same yarn group.

It is possible that some retailers still have discontinued yarns in stock, or that someone has a few skeins at home that they would like to find patterns for.

The yarn calculator will provide both alternative yarn as well as required amount in the new quality.

If you think it's hard to decide what size to make, it can be a good idea to measure a garment you own already and like the size of. Then you can pick the size by comparing those measures with the ones available in the pattern's size chart.

You'll find the size chart at the bottom of the pattern.

See DROPS lesson: How to read size chart

The needle size provided in the pattern serves only as a guide, the important thing is to follow the knitting tension. And since knitting tension is very individual, you will have to adjust the needle size to ensure that YOUR tension is the same as in the pattern – maybe you’ll have to adjust 1, or even 2 needle sizes, up or down to achieve the correct tension. For this, we recommend that you work test swatches.

Should you work with a different knitting tension than the one provided, the measurements of the finished garment might deviate from the measurement sketch.

See DROPS lesson: How to measure your tension/gauge

See DROPS video: How to make a tension/gauge swatch

Working a garment top-down provides more flexibility and room for personal adjustment. For example it is easier to try the garment on while working, as well as making adjustments to length of yoke and shoulder caps.

The instructions are carefully explaining every step, in the correct order. Diagrams are adjusted to the knitting direction and are worked as usual.

The diagram depicts all rows/rounds, and every stitch seen from the right side. It is read from bottom to top, from right to left. 1 square = 1 stitch.

When working back and forth, every other row is worked from the right side and every other row is worked from the wrong side. When working from the wrong side, the diagram will have to be worked reversed: from left to right, knit stitches are purled, purl stitches are knit etc.

When working in the round every round is worked from the right side and the diagram are worked from right to left on all rounds.

See DROPS lesson: How to read knitting diagrams

The diagram depicts all rows/rounds, and every stitch seen from the right side. It is worked from bottom to top, from right to left.

When working back and forth every other row is worked from the right side: from right to left and every other row is worked from the wrong side: from left to right.

When working in the round, every row in the diagram are worked from the right side, from right to left.

When working a circular diagram you start in the middle and work your way outwards, counter clockwise, row by row.

The rows usually start with a given number of chain stitches (equivalent to the height of the following stitch), this will either be depicted in the diagram or explained in the pattern.

See DROPS lesson: How to read crochet diagrams

Instructions for working several diagrams after each other on the same row/round, will often be written like so: “work A.1, A.2, A.3 a total of 0-0-2-3-4 times". This means you work A.1 once, then A.2 is worked once, and A.3 is repeated (in width) the number of times provided for your size – in this case like so: S = 0 times, M = 0 times, L=2 times, XL= 3 times and XXL = 4 times.

The diagrams are worked as usual: begin with the first row in A.1, then work the first row in A.2 etc.

See DROPS lesson: How to read knitting diagrams

See DROPS lesson: How to read crochet diagrams

The total width of the garment (from wrist-to-wrist) will be larger in the larger sizes, despite the actual sleeves being shorter. The larger sizes have longer sleeve caps and wider shoulders, so there will be a good fit in all sizes.

The measurement sketch/schematic drawing provides information regarding the full length of the garment. If it’s a jumper or a jacket the length is measured from the highest point on the shoulder closest to the neckline, and straight down to the bottom of the garment. It is NOT measured from the tip of shoulder. Similarly, the length of yoke is measured from the highest point on the shoulder and down to where yoke is split into body and sleeves.

On a jacket measures are never taken along bands, unless specifically stated. Always measure inside band stitches when measuring the length.

See DROPS lesson: How to read a schematic drawing

Diagrams are often repeated on the round or in height. 1 repeat is the diagram the way it appears in the pattern. If it says to work 5 repeats of A.1 in the round, then you work A.1 a total of 5 times after/next to each other in the round. If it says to work 2 repeats of A.1 vertically/in height you work the entire diagram once, then begin again at the start and work the entire diagram one more time.

Chain stitches are slightly narrower than other stitches and to avoid working the cast-on edge too tight, we simply chain more stitches to begin with. The stitch count will be adjusted on the following row to fit the pattern and measurement sketch.

The rib edge is more elastic and will contract slightly compared to, for example, stocking stitch. By increasing before the rib edge, you avoid a visible difference in width between the rib edge and the rest of the body.

It’s very easy to cast off too tightly, and by making yarn overs while casting off (and simultaneously casting these off) you avoid a too tight cast off edge.

See DROPS video: How to bind off with yarn overs (yo)

To achieve an even increase (or decrease) you can increase on, for example: every 3rd and 4th row alternately, like so: work 2 rows and increase on the 3rd row, work 3 rows and increase on the 4th. Repeat this until the increase is complete.

See DROPS lesson: Increase or decrease 1 st on every 3rd and 4th row alternately

Should you prefer to work in the round instead of back and forth, you may of course adjust the pattern. You’ll need to add steeks mid-front (usually 5 stitches), and follow the instructions. When you would normally turn and work from the wrong side, simply work across the steek and continue in the round. At the end you’ll cut the piece open, pick up stitches to work bands, and cover the cut edges.

See DROPS video: How to knit steeks and cut open

Should you prefer to work back and forth instead of in the round, you may of course adjust the pattern so you work the pieces separately and then assemble them at the end. Divide the stitches for the body in 2, add 1 edge stitch in each side (for sewing) and work the front and back pieces separately.

See DROPS lesson: Can I adapt a pattern for circular needles into straight needles?

Pattern repeats can vary slightly in the different sizes, in order to get the correct proportions. If you’re not working the exact same size as the garment in the photo, yours might deviate slightly. This has been carefully developed and adjusted so that the complete impression of the garment is the same in all sizes.

Make sure to follow instructions and diagrams for your size!

If you have found a pattern you like which is available in women’s size it’s not very difficult to convert it to men’s size. The biggest difference will be the length of sleeves and body. Start working on the women size that you think would fit across the chest. The additional length will be worked right before you cast off for the armhole/sleeve cap. If the pattern is worked top-down you can add the length right after the armhole or before the first decrease on sleeve.

Regarding additional yarn amount, this will depend on how much length you add, but it is better with a skein too many than too few.

All yarns will have excess fibres (from production) that might come off as lint or shedding. Brushed yarns (ie hairier yarns) have more of these loose, excess fibres, causing more shedding.

Shedding also depends on what is worn under or over the garment, and whether this pulls at the yarn fibres. It’s therefore not possible to guarantee that there will be no shedding

Below are some tips on how to get the best result when working with hairier yarns:

1. When the garment is finished (before you wash it) shake it vigorously so the looser hairs come off. NOTE: do NOT use a lint roller, brush or any method that pulls at the yarn.

2. Place the garment in a plastic bag and put it in your freezer - the temperature will cause the fibres to become less attached to each other, and excess fibres will come off easier.

3. Leave in the freezer for a few hours before taking it out and shaking it again.

4. Wash the garment according to the instructions on the yarn label.

Pilling is a natural process that happens to even the most exclusive of fibers. It's a natural sign of wear and tear that is hard to avoid, and that is most visible in high friction areas of your garment like a sweater's arms and cuffs.

You can make your garment look as new by removing the pilling, using a fabric comb or a pill/lint remover.

Still can't find the answer you need? Then scroll down and leave your question so one of our experts can try to help you. This will be done normally within 5 to 10 working days.
In the meantime, you can read the questions and answers that others have left to this pattern or join the DROPS Workshop on Facebook to get help from fellow knitters/crocheters!

You might also like...

Post a comment to pattern DROPS 58-6

We would love to hear what you have to say about this pattern!

If you want to leave a question, please make sure you select the correct category in the form below, to speed up the answering process. Required fields are marked *.

Comments / Questions (39)

country flag Inma wrote:

Hello! I would like to ask if it's possible to make this garment with just lima and not to use Drops kids silk, without modifications in the pattern. Thank you!

07.12.2019 - 23:02

DROPS Design answered:

Dear Inma, if you like to work with only 1 strand of yarn, what about working with 1 strand Nepal? If you want to work with Lima, you have then to add 1 strand Kid-Silk and work with the both yarns together. Happy knitting!

09.12.2019 - 09:10

country flag Solveig Magnusdottir wrote:

Góðan daginn Ég er að fara að setja ermarnar í peysu 58-6 og er að spá hvort ég eigi að byrja að sauma ermarnar við búkinn undir, þe í armkrika, eða uppi á öxl? Kveðja Solveig

29.07.2019 - 15:08

DROPS Design answered:

Saumið ermar í. Saumið niður axlarlykkjur frá búk að hvorri hlið á ermi í ystu lykkju (garðaprjón). Saumið saman lykkjur af bandi efst á báðum ermum mitt aftan í hnakka á búk með lykkjuspori.

30.07.2019 - 12:27

country flag Solveig Magnusdottir wrote:

Ég er að prjóna ermarnar á kaðlapeysu 58-6 og er búin að fella af 4 undir ermi. Þá kemur “fellið síðan af á hvorri hlið fyrir öxl” Er það ekki áfram undir erminni? Ég á að fella af 3L 8 sinnum og síðan 13L 1sinni, hvoru megin á öxlinni er þetta 1 sinni þá?

11.07.2019 - 12:44

DROPS Design answered:

Blessuð. Þú ert með 106 (110-110) lykkjur á prjóni, síðan eru felldar af 4 lykkjur mitt undir ermi (= 102 (106-106) lykkjur á prjóni) og stykkið er prjónað til loka fram og til baka. Síðan eru felldar af í hvorri hlið 4 (3-3) lykkjur x 6 (8-10) sinnum = 48 (48-60) lykkjur felldar af og 54 (58-46) lykkjur eftir á prjóni. Síðan eru felldar af 11 ( 13-7) lykkjur 1 sinni í hvori hlið = 22 (26-14) lykkjur felldar af og 32 (32-32) lykkjur eftir á prjóni. Gangi þér vel.

12.07.2019 - 11:30

country flag Solveig Magnúsdóttir wrote:

Varðandi það að byrja við pílu M/L á munstri M2 í uppskrift DROPS 58-6 þá telur munstrið bara 22 lykkjur í staðin fyrir 28 og þá stemmir ekki lykkju fjöldinn á peysunni. Aftur á móti ef ég byrja frá byrjun á M 2 þá stemmir lykkju fjöldinn eða 264

12.04.2019 - 11:49

DROPS Design answered:

Blessuð ég er búin að fá svar frá DROPS um að á fram- og bakstykki er öll mynsturteikningin prjónuð, en á ermi þá stendur að prjóna eigi 21-22-22 lykkjur M.2 (byrjið við ör í réttri stærð). Þ.e.a.s. bara þegar stendur eitthvað um að byrja við örina þá á að fylgja því. Vona að þetta hjálpi :)

12.04.2019 - 13:29

country flag Solveig Magnúsdóttir wrote:

Ég er að prjóna peysu DROPS 58-6 í stærð M/L og er að spá í munstur M.2. Á ég að byrja þar sem pílan M+L bendir eða á ég að byrja frá byrjun á munstri?

11.04.2019 - 22:40

DROPS Design answered:

Blessuð Sólveig. Þú byrjar á mynstri við ör og heldur áfram með mynstrið út, en í hvert skipti sem þú byrjar aftur á M.2 í næstu umferð þá byrjar þú aftur við örina.

12.04.2019 - 00:24

country flag Natalie Urlings wrote:

Ich würde dieses Modell gerne mit einem dickeren Garn stricken. Haben sie eine Alternative?

13.01.2019 - 19:43

DROPS Design answered:

Liebe Frau Ulrings, hier lesen Sie mehr über Garnalternativen, gerne wird Ihnen Ihr DROPS Laden andere Garne weiterempfehlen. Viel Spaß beim stricken!

14.01.2019 - 12:07

country flag INGELA wrote:

JAG STICKAR MED RUNDSTICKOR. HAR SVÅRT ATT FÖRSTÅ DIAGRAMMET M2. STICKAR EFTER STORLEK M+L. VÄNLIGEN FÖRKLARA.

13.04.2018 - 14:07

DROPS Design answered:

Diagrammet visar mönstret sett från rätsidan. Ovanför diagrammen har du förklaringarna: Tom ruta är 1 rät maska, ruta med kryss är 1 avig maska, osv.

17.04.2018 - 13:41

country flag Ingel wrote:

Mönster med diagram, var börjar man? höger eller vänster?

12.04.2018 - 10:19

DROPS Design answered:

Du börjar från höger och stickar mot vänster. Då du stickar fram och tillbaka ska varven från avigsidan stickas från vänster mot höger.

12.04.2018 - 13:49

Laurie Yeo wrote:

I want to keep this sweater lightweight with natural fibres. What would you recommend?

30.04.2017 - 07:40

DROPS Design answered:

Dear Mrs Yeo, please find here how to find an alternative and calculate new amount of yarn. Your DROPS store will provide you any further personnal assistance choosing a yarn, even per mail or telephone. Happy knitting!

02.05.2017 - 10:09

country flag Anna wrote:

Vorrei fare il modello corto, ma non capisco cosa significa il punto in cui si dice "intrecciate a14 j15_16) cm". Che cosa devo intrecciate e da dove misuro i 14 cm?

15.04.2017 - 19:05

DROPS Design answered:

Buonasera Anna. Abbiamo corretto il testo. Per la versione corta, deve ridurre le misure dello scalfo, dello scollo e la chiusura finale di 14 (15-16) cm rispetto alle misure indicate per la versione lunga. Buon lavoro!

15.04.2017 - 21:17