DROPS Air
DROPS Air
65% Alpaca, 28% Polyamide, 7% Wool
from 4.80 £ /50g
Get the yarn to make this pattern from 38.40£.

The yarn cost is calculated from the pattern’s smallest size and the yarn’s cheapest product type. Looking for an even better price? You might find it on the DROPS Deals!

DROPS SS24

Sweet Pearl

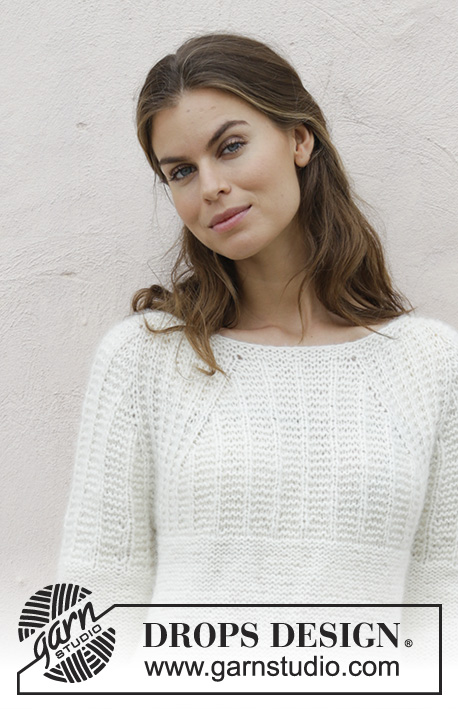
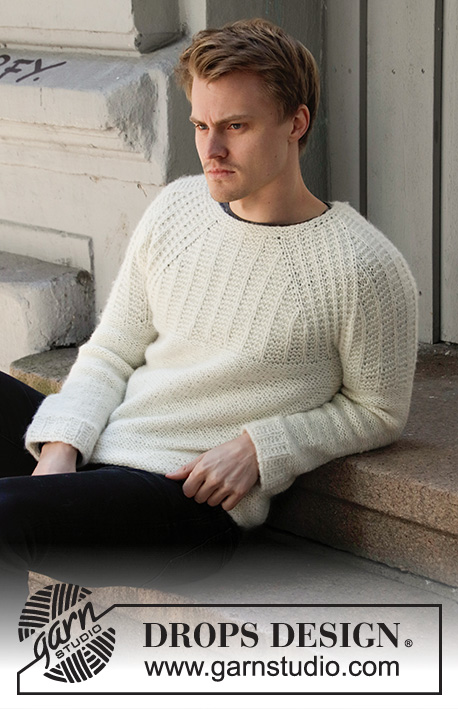
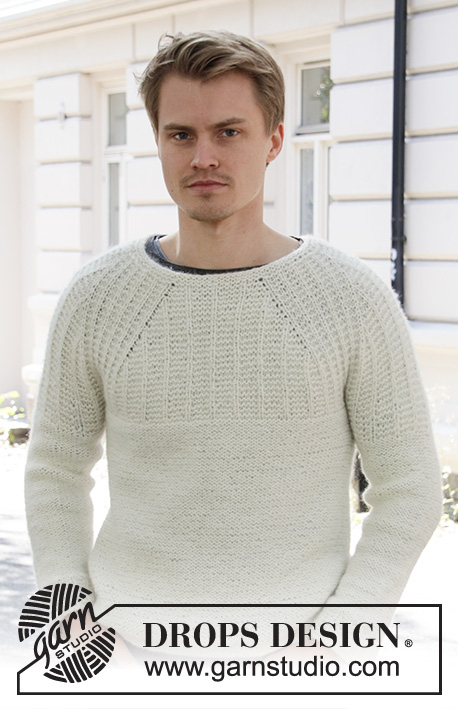
Jumper with garter stitch and raglan for men, knitted top down. Size: S - XXXL Piece is knitted in DROPS Air.

DROPS 208-6
DROPS design: Pattern ai-238
Yarn group C or A + A
----------------------------------------------------------
Size: S - M - L - XL - XXL - XXXL

Materials:
DROPS AIR from Garnstudio (belongs to yarn group C)
400-400-450-500-500-550 g colour 01, off white

KNITTING TENSION:
16 stitches in width and 20 rows vertically in stocking stitch = 10 x 10 cm.

NEEDLES:
DROPS DOUBLE POINTED NEEDLES SIZE 4.5 mm - for edges
DROPS CIRCULAR NEEDLE SIZE 4.5 mm : Length 60 or 80 cm.
DROPS DOUBLE POINTED NEEDLES SIZE 5.5 mm for sleeves
DROPS CIRCULAR NEEDLE SIZE 5.5 mm : Length 60 and 80 cm
Needle size is only a suggestion! If you have too many stitches on 10 cm switch to larger needles. If you have too few stitches on 10 cm switch to smaller needles.

-------------------------------------------------------

Alternative Yarn – See how to change yarns here
Yarn Groups A to F – Use the same pattern and change the yarn here
Yarn usage using an alternative yarn – Use our yarn converter here

-------------------------------------------------------

DROPS Air
DROPS Air
65% Alpaca, 28% Polyamide, 7% Wool
from 4.80 £ /50g
Get the yarn to make this pattern from 38.40£.

The yarn cost is calculated from the pattern’s smallest size and the yarn’s cheapest product type. Looking for an even better price? You might find it on the DROPS Deals!

Pattern instructions

NOTE: This pattern is written in British English. All measurements in charts are in cm. For conversion from cm to inches - click here. There are different terms for crocheting in British and American English. If this pattern includes crochet, click for "crochet terms" here. For this pattern in American English, please click here.
----------------------------------------------------------

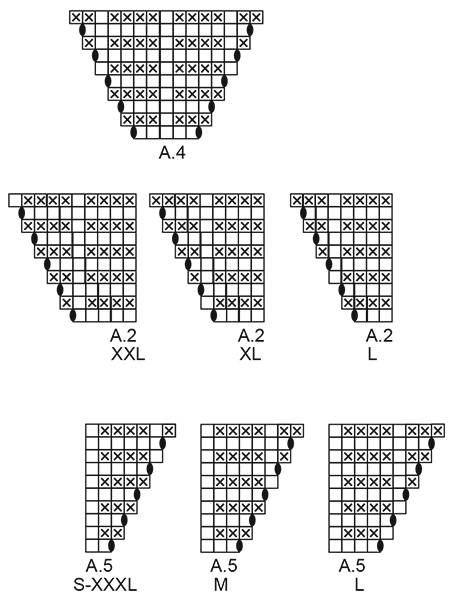
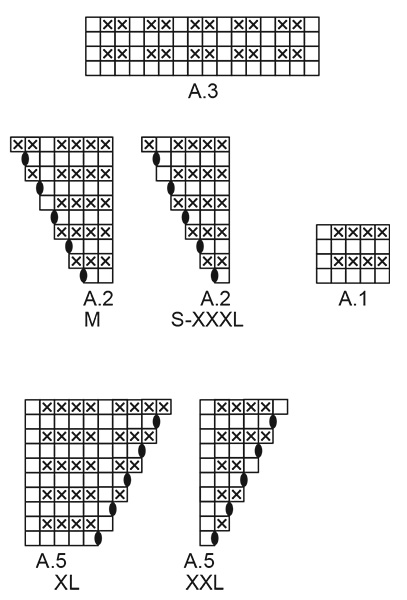
EXPLANATION FOR THE PATTERN:

----------------------------------------------------------

GARTER STITCH (worked in the round):
1 ridge = 2 rounds. Knit 1 round and purl 1 round.

PATTERN:
See diagrams A.1 to A.5. Choose diagram for your size in A.2 and A.5.

DECREASE TIP (applies to sleeves): 
Decrease 1 stitch on each side of marker thread as follows: Work until 3 stitches remain before marker thread, slip 1 stitch knitwise, knit 1, pass slipped stitch over stitch worked, knit 2 (marker thread is in the middle of these stitches), knit the next 2 stitches together (= 2 stitches decreased). 

CAST-OFF TIP:
To avoid a tight cast-off edge you may use a needle ½ size larger or cast off with knit over knit and purl over purl and make 1 yarn over after every 4th stitch (cast off yarn overs as regular stitches).

----------------------------------------------------------

START THE PIECE HERE:

----------------------------------------------------------

JUMPER - SHORT OVERVIEW OF THE GARMENT:
Yoke and body are worked in the round on circular needle, top down. Work sleeves in the round on double pointed needles.

YOKE:
Cast on 76-80-84-88-92-96 stitches on circular needle size 4.5 mm. Work 2 ridges in GARTER STITCH - see explanation above - neck is a little bit tighter if you work 4 ridges in garter stitch, it is up to you. Switch to circular needle size 5.5 mm. Knit 1 round and increase 24 stitches evenly with yarn overs = 100-104-108-112-116-120 stitches. Purl 1 round, work yarn overs twisted to avoid holes.
Then work pattern from mid back as follows:
Work as follows over half back piece: Work A.1 (= 5 stitches) over the next 5-5-5-5-5-10 stitches (= 1-1-1-1-1-2 times in width), A.2 (= 1-2-3-4-5-1 stitches).
Work as follows over right sleeve: Work A.3 (= 16 stitches), A.4 (= 5 stitches), A.3 over 16 stitches.
Work as follows over front piece: Work A.5 (= 2-3-4-5-1-2 stitches), A.1 over 10-10-10-10-15-20 stitches, A.2 over 1-2-3-4-5-1 stitches.
Work as follows over left sleeve: Work A.3 over 16 stitches, A.4 over 5 stitches, A.3 over 16 stitches.
Work as follows over half back piece: Work A.5 over 2-3-4-5-1-2 stitches and A.1 over 5-5-5-5-10-10 stitches.
Continue pattern and increase as shown in A.2, A.4 and A.5 (i.e. increase 1 stitch on each side of A.3 = 8 stitches increased in total every other round). Work the increased stitches twisted in pattern to avoid holes. REMEMBER THE KNITTING TENSION!
Repeat diagram A.1 and A.3 vertically. When A.2, A.4 and A.5 have been worked 1 time vertically, continue increases every other round and work the increased stitches in pattern as before. Increase on each side of A.3 14-16-19-21-24-27 times in total (including increases in A.2, A.4 and A.5) = 212-232-260-280-308-336 stitches. Then continue with garter stitch over garter stitch and knit over knit until piece measures 20-22-23-25-27-29 cm from neck edge.
Now divide sleeves and body as follows:
Purl 31-33-36-40-45-51 stitches (= half back piece), slip the next 43-49-57-59-63-65 stitches on a stitch holder (= sleeve), cast on 8-10-10-10-10-8 stitches under sleeve, purl 63-67-73-81-91-103 stitches (= front piece), slip the next 43-49-57-59-63-65 stitches on a stitch holder (= sleeve), cast on 8-10-10-10-10-8 stitches under sleeve, purl 32-34-37-41-46-52 stitches (= half back piece). Now finish body and sleeves separately.

BODY:
= 142-154-166-182-202-222 stitches.
Now work piece in stocking stitch with wrong side outwards, i.e. Turn piece and knit from wrong side in the round.
When piece measures 34-34-35-35-35-35 cm from where body was divided from sleeves, switch to circular needle size 4.5 mm, knit 1 round while increasing 10-10-10-20-20-20 stitches evenly on round= 152-164-176-202-222-242 stitches. Work 4 cm in rib (= knit 1/purl 1), cast off - read CAST-OFF TIP. Piece measures approx. 62-64-66-68-70-72 cm in total from shoulder.

SLEEVE:
Worked in the round on double pointed needles. Slip the 43-49-57-59-63-65 stitches from stitch holder in one side of piece on double pointed needles size 5.5 mm and pick up 1 stitch in each of the 8-10-10-10-10-8 stitches cast on stitch on body mid under sleeve = 51-59-67-69-73-73 stitches. Insert a marker thread in the middle of the new stitches.
Continue with garter stitch over garter stitch and knit over knit, work the new 8-10-10-10-10-8 under sleeve in garter stitch.
When piece measures 4 cm from where sleeve was divided for body, decrease 2 stitches mid under sleeve - read DECREASE TIP.
Then decrease every 6½-5-3-2.5-2.5-2.5 cm 6-8-12-12-14-12 times in total = 39-43-43-45-45-49 stitches.
AT THE SAME TIME when sleeve measures 5 cm from where sleeve was divided from body, continue with stocking stitch from wrong side, i.e. Turn piece and knit with wrong side out.
When piece measures 46-45-44-42-41-39 cm, switch to double pointed needles size 4.5 mm and work edge (purl 1, 2 stitches in GARTER STITCH – see explanation above) in the round from wrong side, AT THE SAME TIME on first round decrease 0-1-1-0-0-1 stitch = 39-42-42-45-45-48 stitches. When piece measures 51-50-49-47-46-44 cm from where sleeve was divided from body, cast off, read CAST-OFF TIP. Make sure to avoid a tight cast-off edge, cast off with 1 larger needle size if needed. Work the other sleeve the same way.

Diagram

symbols = knit
symbols = purl
symbols = between 2 stitches make 1 yarn over, work yarn over twisted on next round; it should not make a hole
diagram
diagram
diagram

Each of our patterns has specific tutorial videos to help you.

Do you have a question? See a list of frequently asked questions (FAQ)

Knitting tension is what determines the final measurements of your work, and is usually measured per 10 x 10 cm. It is provided like so: number of stitches in width x number of rows in height - eg: 19 stitches x 26 rows = 10 x 10 cm.

The knitting tension is very individual; some people knit/crochet loosely while others work tightly. You adjust the knitting tension with the needle size, which is why the suggested needle size is only meant as a guide! You need to adjust this (up or down) to ensure that YOUR knitting tension matches the knitting tension provided in the pattern. If you work with a different knitting tension than provided you will have a different yarn consumption, and your work will have different measurements than what the pattern suggests.

The knitting tension also determines which yarns can replace each other. As long as you achieve the same knitting tension you can replace one yarn with another.

See DROPS lesson: How to measure your tension/gauge

See DROPS video: How to make a gauge tension swatch

The required amount of yarn is provided in grams, eg: 450 g. To calculate how many balls you’ll need you first need to know how many grams are in 1 ball (25g, 50g or 100g). This information is available if you click on the individual yarn quality on our pages. Divide the amount required with the amount of each ball. For example, if each ball is 50g (the most common amount), the calculation will be as follows: 450 / 50 = 9 balls.

The important thing when changing from one yarn to another is that the knitting/crochet tension remains the same. This is so that the measurements of the finished piece will be the same as on the sketch provided. It is easier to achieve the same knitting tension using yarns from the same yarn group. It is also possible to work with multiple strands of a thinner yarn to achieve the knitting tension of a thicker one. Please try our yarn converter. We recommend you to always work a test swatch.

Please NOTE: when changing yarn the garment might have a different look and feel to the garment in the photo, due to individual properties and qualities of each yarn.

See DROPS lesson: Can I use a different yarn than the one mentioned in the pattern?

All our yarns are categorised into yarn groups (from A to F) according to thickness and knitting tension – group A contains the thinnest yarns and group F the thickest. This makes it easier for you to find alternative yarns to our patterns, should you wish to switch yarn. All yarns within the same group have a similar knitting tension and can easily replace each other. However, different yarn qualities have different structures and properties which will give the finished work a unique look and feel.

Click here for an overview of the yarns in each yarn group

At the top of all our patterns you’ll find a link to our yarn calculator, which is a helpful tool should you wish to use a different yarn than suggested. By filling in the yarn quality you wish to replace, the amount (in your size) and number of strands, the calculator will present good alternative yarns with the same knitting tension. Additionally it will tell you how much you’ll require in the new qualities and whether you’ll need to work with multiple strands. Most skeins are 50g (some are 25g or 100g).

If the pattern is worked with multiple colours, every colour will have to be calculated separately. Similarly, if the pattern is worked with several strands of different yarns (for example 1 strand Alpaca and 1 strand Kid-Silk) you will have to find alternatives for each, individually.

Click here to see our yarn calculator

Since different yarns have different qualities and textures we have chosen to keep the original yarn in our patterns. However, you can easily find options among our available qualities by using our yarn calculator, or simply pick a yarn from the same yarn group.

It is possible that some retailers still have discontinued yarns in stock, or that someone has a few skeins at home that they would like to find patterns for.

The yarn calculator will provide both alternative yarn as well as required amount in the new quality.

If you think it's hard to decide what size to make, it can be a good idea to measure a garment you own already and like the size of. Then you can pick the size by comparing those measures with the ones available in the pattern's size chart.

You'll find the size chart at the bottom of the pattern.

See DROPS lesson: How to read size chart

The needle size provided in the pattern serves only as a guide, the important thing is to follow the knitting tension. And since knitting tension is very individual, you will have to adjust the needle size to ensure that YOUR tension is the same as in the pattern – maybe you’ll have to adjust 1, or even 2 needle sizes, up or down to achieve the correct tension. For this, we recommend that you work test swatches.

Should you work with a different knitting tension than the one provided, the measurements of the finished garment might deviate from the measurement sketch.

See DROPS lesson: How to measure your tension/gauge

See DROPS video: How to make a tension/gauge swatch

Working a garment top-down provides more flexibility and room for personal adjustment. For example it is easier to try the garment on while working, as well as making adjustments to length of yoke and shoulder caps.

The instructions are carefully explaining every step, in the correct order. Diagrams are adjusted to the knitting direction and are worked as usual.

The diagram depicts all rows/rounds, and every stitch seen from the right side. It is read from bottom to top, from right to left. 1 square = 1 stitch.

When working back and forth, every other row is worked from the right side and every other row is worked from the wrong side. When working from the wrong side, the diagram will have to be worked reversed: from left to right, knit stitches are purled, purl stitches are knit etc.

When working in the round every round is worked from the right side and the diagram are worked from right to left on all rounds.

See DROPS lesson: How to read knitting diagrams

The diagram depicts all rows/rounds, and every stitch seen from the right side. It is worked from bottom to top, from right to left.

When working back and forth every other row is worked from the right side: from right to left and every other row is worked from the wrong side: from left to right.

When working in the round, every row in the diagram are worked from the right side, from right to left.

When working a circular diagram you start in the middle and work your way outwards, counter clockwise, row by row.

The rows usually start with a given number of chain stitches (equivalent to the height of the following stitch), this will either be depicted in the diagram or explained in the pattern.

See DROPS lesson: How to read crochet diagrams

Instructions for working several diagrams after each other on the same row/round, will often be written like so: “work A.1, A.2, A.3 a total of 0-0-2-3-4 times". This means you work A.1 once, then A.2 is worked once, and A.3 is repeated (in width) the number of times provided for your size – in this case like so: S = 0 times, M = 0 times, L=2 times, XL= 3 times and XXL = 4 times.

The diagrams are worked as usual: begin with the first row in A.1, then work the first row in A.2 etc.

See DROPS lesson: How to read knitting diagrams

See DROPS lesson: How to read crochet diagrams

The total width of the garment (from wrist-to-wrist) will be larger in the larger sizes, despite the actual sleeves being shorter. The larger sizes have longer sleeve caps and wider shoulders, so there will be a good fit in all sizes.

The measurement sketch/schematic drawing provides information regarding the full length of the garment. If it’s a jumper or a jacket the length is measured from the highest point on the shoulder closest to the neckline, and straight down to the bottom of the garment. It is NOT measured from the tip of shoulder. Similarly, the length of yoke is measured from the highest point on the shoulder and down to where yoke is split into body and sleeves.

On a jacket measures are never taken along bands, unless specifically stated. Always measure inside band stitches when measuring the length.

See DROPS lesson: How to read a schematic drawing

Diagrams are often repeated on the round or in height. 1 repeat is the diagram the way it appears in the pattern. If it says to work 5 repeats of A.1 in the round, then you work A.1 a total of 5 times after/next to each other in the round. If it says to work 2 repeats of A.1 vertically/in height you work the entire diagram once, then begin again at the start and work the entire diagram one more time.

Chain stitches are slightly narrower than other stitches and to avoid working the cast-on edge too tight, we simply chain more stitches to begin with. The stitch count will be adjusted on the following row to fit the pattern and measurement sketch.

The rib edge is more elastic and will contract slightly compared to, for example, stocking stitch. By increasing before the rib edge, you avoid a visible difference in width between the rib edge and the rest of the body.

It’s very easy to cast off too tightly, and by making yarn overs while casting off (and simultaneously casting these off) you avoid a too tight cast off edge.

See DROPS video: How to bind off with yarn overs (yo)

To achieve an even increase (or decrease) you can increase on, for example: every 3rd and 4th row alternately, like so: work 2 rows and increase on the 3rd row, work 3 rows and increase on the 4th. Repeat this until the increase is complete.

See DROPS lesson: Increase or decrease 1 st on every 3rd and 4th row alternately

Should you prefer to work in the round instead of back and forth, you may of course adjust the pattern. You’ll need to add steeks mid-front (usually 5 stitches), and follow the instructions. When you would normally turn and work from the wrong side, simply work across the steek and continue in the round. At the end you’ll cut the piece open, pick up stitches to work bands, and cover the cut edges.

See DROPS video: How to knit steeks and cut open

Should you prefer to work back and forth instead of in the round, you may of course adjust the pattern so you work the pieces separately and then assemble them at the end. Divide the stitches for the body in 2, add 1 edge stitch in each side (for sewing) and work the front and back pieces separately.

See DROPS lesson: Can I adapt a pattern for circular needles into straight needles?

Pattern repeats can vary slightly in the different sizes, in order to get the correct proportions. If you’re not working the exact same size as the garment in the photo, yours might deviate slightly. This has been carefully developed and adjusted so that the complete impression of the garment is the same in all sizes.

Make sure to follow instructions and diagrams for your size!

If you have found a pattern you like which is available in women’s size it’s not very difficult to convert it to men’s size. The biggest difference will be the length of sleeves and body. Start working on the women size that you think would fit across the chest. The additional length will be worked right before you cast off for the armhole/sleeve cap. If the pattern is worked top-down you can add the length right after the armhole or before the first decrease on sleeve.

Regarding additional yarn amount, this will depend on how much length you add, but it is better with a skein too many than too few.

All yarns will have excess fibres (from production) that might come off as lint or shedding. Brushed yarns (ie hairier yarns) have more of these loose, excess fibres, causing more shedding.

Shedding also depends on what is worn under or over the garment, and whether this pulls at the yarn fibres. It’s therefore not possible to guarantee that there will be no shedding

Below are some tips on how to get the best result when working with hairier yarns:

1. When the garment is finished (before you wash it) shake it vigorously so the looser hairs come off. NOTE: do NOT use a lint roller, brush or any method that pulls at the yarn.

2. Place the garment in a plastic bag and put it in your freezer - the temperature will cause the fibres to become less attached to each other, and excess fibres will come off easier.

3. Leave in the freezer for a few hours before taking it out and shaking it again.

4. Wash the garment according to the instructions on the yarn label.

Pilling is a natural process that happens to even the most exclusive of fibers. It's a natural sign of wear and tear that is hard to avoid, and that is most visible in high friction areas of your garment like a sweater's arms and cuffs.

You can make your garment look as new by removing the pilling, using a fabric comb or a pill/lint remover.

Still can't find the answer you need? Then scroll down and leave your question so one of our experts can try to help you. This will be done normally within 5 to 10 working days.
In the meantime, you can read the questions and answers that others have left to this pattern or join the DROPS Workshop on Facebook to get help from fellow knitters/crocheters!

You might also like...

Post a comment to pattern DROPS 208-6

We would love to hear what you have to say about this pattern!

If you want to leave a question, please make sure you select the correct category in the form below, to speed up the answering process. Required fields are marked *.

Comments / Questions (11)

country flag Guro wrote:

Hei Jeg har strikket ferdig bærestykket og har delt opp ermer og bol. Men hvordan snur jeg arbeidet og fortsetter på vrangen uten å måtte bryte tråden? Jeg fant ingen video med dette

08.08.2023 - 21:03

DROPS Design answered:

Hei Guro, Du vrenger arbeidet helt og strikker neste omgangen rett, men i motsatt retning (så du trenger ikke å klippe tråden). Når du er ferdig med første omgangen er det kanskje lurt å plukke opp tråden mellom siste masken og første masken på neste omgang, slik at du ikke får et hull der du snudde. Håper dette hjelper og god fornøyelse!

10.08.2023 - 06:48

country flag Guro Ortiz-Fuglesteg wrote:

Hei, Hvor mye av garnet beregnes til strukturdelen øverst på denne genseren? Jeg vurderer å strikke den tofarget i str. M eller L.

15.05.2023 - 09:30

DROPS Design answered:

Hei Guro. Det har vi ikke oversikten over. Vi veier et plagg kun når det er ferdig strikket og sammenligner det med de nøstene vi har brukt.mvh DROPS Design

15.05.2023 - 12:48

country flag Lucas Gontijo wrote:

Hi! I've got two questions about diagram A3. First, which row should I start increasing? In the first or in the second? Since the diagram doesn't have the black dots that signal the increases, I felt that this was not so clear in the instructions. On the other diagrams, it's always in the odd rows. I wonder if it's the same with A3. Also, once I've done the row in which A3 has been increased, I feel that the A3 diagram doesn't tell me what I should do with these increases in the next row.

27.12.2022 - 05:59

DROPS Design answered:

Dear Mr Gontijo, the stitches in A.3 are the raglan lines, this means you will increase before A.3 (as shown in A.2 for example) or after A.3 (as shown in A.4 or A.5) - this means that you just have to follow the diagrams, and when they are done in height, just continue increasing as shown in A.2, A.4 and A.5 (= before A.3 and after A.3). Happy knitting!

02.01.2023 - 09:48

country flag Susanne wrote:

Hallo, Sie scheiben, dass man für den Rumpf die Arbeit auch wenden kann, sodass die Rückseite nach außen zeigt und man so glatt rechts stricken kann. Aber das gibt doch an der Wendestelle ein Loch. Wie vermeiden Sie das? Vielen Dank.

19.07.2022 - 15:26

DROPS Design answered:

Liebe Susanne, das können Sie mit einer sog. "Doppelmasche" verstecken, oder mit einem Umschlag, wie mit verkürzten Reihen (siehe Video). Viel Spaß beim stricken!

01.08.2022 - 10:48

country flag Sallis wrote:

Hei, ohjeen neuletiheydeksi on merkitty 10 s, 20 krs. Ohjeessa käytetään kahta eri kokoa olevia puikkoja. Onko ilmoitettu tiheys ajateltu olevan pienemmille vai suuremmille puikoille?

08.10.2020 - 16:45

DROPS Design answered:

Neuletiheys on tarkoitettu puikoille nro 5,5.

19.10.2020 - 17:36

country flag Carla wrote:

Hola. No entiendo cuantos aumentos se deben hacer una vez se termino en vertical A2,A4 y A5 para la talla S. Y una vez se terminan los aumentos donde queda A3? Los puntos de A3 van todos en ña manga o quedan alfunos en delantero y espalda? Quisiera saber porque tuve que destejer y no se como continuar. Gracias

26.05.2020 - 21:50

DROPS Design answered:

Hola Carla! Cuando se hayan trabajado A.2, A.4 y A.5 1 vez en vertical, continuar con los aumentos cada 2ª vuelta (aumentar a cada lado de A.3 en total 14 veces) = 212 puntos. No importa donde esta A.3 ahora. Despues mira como dividir para las mangas y el cuerpo. Buen trabajo!

20.11.2020 - 13:37

country flag Matteo wrote:

Una XL.. però già dai punti montati per il collo a me era enorme... ho fatto i punti di avvio di una M per poi arrivare alla fine dello sprone con una XL

08.04.2020 - 10:34

country flag Matteo wrote:

Io ho fatto questo modello con il vostro filato Paris Denim... ho sempre 16 maglie in 10 cm... ma la lavorazione non torna...sono a 304 maglie ma non sono arrivato nemmeno a 20cm di sprone.. dove sbaglio?

08.04.2020 - 00:36

DROPS Design answered:

Buongiorno Matteo, il campione indicato prevede 16 maglie in larghezza ma 20 ferri in altezza: la sua tensione è corretta anche in verticale? Quale taglia sta lavorando? Buon lavoro!

08.04.2020 - 08:47

country flag Ange wrote:

Bonjour, Pour le sweet pearl, comment puis- je savoir quelle taille tricoter pour homme, je n'arrive pas a me rendre compte s'il est pres du corps ou pas? Si on souhaite le porter au dessus d'une chemise, je me base sur les dimensions de la chemise, en largeur, mais c'est au niveau des cotes, pas du buste. Ou alors j'ai loupe cette mesure. Merci a vous pour la reponse. Merci pour vos modèles. . .

22.03.2020 - 09:41

DROPS Design answered:

Bonjour Ange, tout dépend comme Monsieur veut porter ce pull. Mesurez un de ces pulls similaire qui lui va et dont il aime la forme et comparez ces mesures à celles du schéma - plus d'infos ici sur les tailles et les schémas. Bon tricot!

23.03.2020 - 10:02

country flag Loli wrote:

Hola, no puedo ver los patrones y diagramas. Un saludo

12.02.2020 - 00:15

DROPS Design answered:

Hola Loli, el sitio web está funcionando normalmente ahora. Por favor, intentalo de nuevo.

12.02.2020 - 07:13