The yarn cost is calculated from the pattern’s smallest size and the yarn’s cheapest product type. Looking for an even better price? You might find it on the DROPS Deals!
-------------------------------------------------------
Alternative Yarn – See how to change yarns here
Yarn Groups A to F – Use the same pattern and change the yarn here
Yarn usage using an alternative yarn – Use our yarn converter here
-------------------------------------------------------
The yarn cost is calculated from the pattern’s smallest size and the yarn’s cheapest product type. Looking for an even better price? You might find it on the DROPS Deals!
This pattern has been corrected. Click here to see the correction/s.
= knit from right side, purl from wrong side | |
= purl from right side, knit from wrong side | |
= between 2 stitches make 1 yarn over; on next row/round work the yarn over to leave a hole | |
= between 2 stitches make 1 yarn over; on next row/round work the yarn over twisted to avoid a hole | |
= knit 2 together | |
= slip 1 stitch as if to knit, knit 1 and pass the slipped stitch over the knitted stitch | |
= place 3 stitches on cable needle behind the piece, knit 3, knit 3 from cable needle | |
= place 3 stitches on cable needle in front of piece, knit 3, knit 3 from cable needle | |
= BOBBLE: Knit 1 stitch in front and back of same stitch until there are 4 stitches, work 3 rows stocking stitch over these 4 stitches, then knit these 4 stitches together (= 1 stitch) | |
= this square is no stitch; go straight to first row in diagram |
Each of our patterns has specific tutorial videos to help you.
These step-by-step tutorials might also help you:
Why is the knitting/crochet tension so important?
Knitting tension is what determines the final measurements of your work, and is usually measured per 10 x 10 cm. It is provided like so: number of stitches in width x number of rows in height - eg: 19 stitches x 26 rows = 10 x 10 cm.
The knitting tension is very individual; some people knit/crochet loosely while others work tightly. You adjust the knitting tension with the needle size, which is why the suggested needle size is only meant as a guide! You need to adjust this (up or down) to ensure that YOUR knitting tension matches the knitting tension provided in the pattern. If you work with a different knitting tension than provided you will have a different yarn consumption, and your work will have different measurements than what the pattern suggests.
The knitting tension also determines which yarns can replace each other. As long as you achieve the same knitting tension you can replace one yarn with another.
See DROPS lesson: How to measure your tension/gauge
See DROPS video: How to make a gauge tension swatch
How do I know how many balls of yarn I need?
The required amount of yarn is provided in grams, eg: 450 g. To calculate how many balls you’ll need you first need to know how many grams are in 1 ball (25g, 50g or 100g). This information is available if you click on the individual yarn quality on our pages. Divide the amount required with the amount of each ball. For example, if each ball is 50g (the most common amount), the calculation will be as follows: 450 / 50 = 9 balls.
Can I use a different yarn than what the pattern suggests?
The important thing when changing from one yarn to another is that the knitting/crochet tension remains the same. This is so that the measurements of the finished piece will be the same as on the sketch provided. It is easier to achieve the same knitting tension using yarns from the same yarn group. It is also possible to work with multiple strands of a thinner yarn to achieve the knitting tension of a thicker one. Please try our yarn converter. We recommend you to always work a test swatch.
Please NOTE: when changing yarn the garment might have a different look and feel to the garment in the photo, due to individual properties and qualities of each yarn.
See DROPS lesson: Can I use a different yarn than the one mentioned in the pattern?
What are the yarn groups?
All our yarns are categorised into yarn groups (from A to F) according to thickness and knitting tension – group A contains the thinnest yarns and group F the thickest. This makes it easier for you to find alternative yarns to our patterns, should you wish to switch yarn. All yarns within the same group have a similar knitting tension and can easily replace each other. However, different yarn qualities have different structures and properties which will give the finished work a unique look and feel.
How do I use the yarn calculator?
At the top of all our patterns you’ll find a link to our yarn calculator, which is a helpful tool should you wish to use a different yarn than suggested. By filling in the yarn quality you wish to replace, the amount (in your size) and number of strands, the calculator will present good alternative yarns with the same knitting tension. Additionally it will tell you how much you’ll require in the new qualities and whether you’ll need to work with multiple strands. Most skeins are 50g (some are 25g or 100g).
If the pattern is worked with multiple colours, every colour will have to be calculated separately. Similarly, if the pattern is worked with several strands of different yarns (for example 1 strand Alpaca and 1 strand Kid-Silk) you will have to find alternatives for each, individually.
Why do you show discontinued yarns in the patterns?
Since different yarns have different qualities and textures we have chosen to keep the original yarn in our patterns. However, you can easily find options among our available qualities by using our yarn calculator, or simply pick a yarn from the same yarn group.
It is possible that some retailers still have discontinued yarns in stock, or that someone has a few skeins at home that they would like to find patterns for.
The yarn calculator will provide both alternative yarn as well as required amount in the new quality.
What size should I knit?
If you think it's hard to decide what size to make, it can be a good idea to measure a garment you own already and like the size of. Then you can pick the size by comparing those measures with the ones available in the pattern's size chart.
You'll find the size chart at the bottom of the pattern.
See DROPS lesson: How to read size chart
Why do I get the wrong knitting tension with the suggested needle size?
The needle size provided in the pattern serves only as a guide, the important thing is to follow the knitting tension. And since knitting tension is very individual, you will have to adjust the needle size to ensure that YOUR tension is the same as in the pattern – maybe you’ll have to adjust 1, or even 2 needle sizes, up or down to achieve the correct tension. For this, we recommend that you work test swatches.
Should you work with a different knitting tension than the one provided, the measurements of the finished garment might deviate from the measurement sketch.
See DROPS lesson: How to measure your tension/gauge
See DROPS video: How to make a tension/gauge swatch
Why is the pattern worked top-down?
Working a garment top-down provides more flexibility and room for personal adjustment. For example it is easier to try the garment on while working, as well as making adjustments to length of yoke and shoulder caps.
The instructions are carefully explaining every step, in the correct order. Diagrams are adjusted to the knitting direction and are worked as usual.
How do I work according to a knitting diagram?
The diagram depicts all rows/rounds, and every stitch seen from the right side. It is read from bottom to top, from right to left. 1 square = 1 stitch.
When working back and forth, every other row is worked from the right side and every other row is worked from the wrong side. When working from the wrong side, the diagram will have to be worked reversed: from left to right, knit stitches are purled, purl stitches are knit etc.
When working in the round every round is worked from the right side and the diagram are worked from right to left on all rounds.
See DROPS lesson: How to read knitting diagrams
How do I work according to a crochet diagram?
The diagram depicts all rows/rounds, and every stitch seen from the right side. It is worked from bottom to top, from right to left.
When working back and forth every other row is worked from the right side: from right to left and every other row is worked from the wrong side: from left to right.
When working in the round, every row in the diagram are worked from the right side, from right to left.
When working a circular diagram you start in the middle and work your way outwards, counter clockwise, row by row.
The rows usually start with a given number of chain stitches (equivalent to the height of the following stitch), this will either be depicted in the diagram or explained in the pattern.
See DROPS lesson: How to read crochet diagrams
How do I work several diagrams simultaneously on the same row/round?
Instructions for working several diagrams after each other on the same row/round, will often be written like so: “work A.1, A.2, A.3 a total of 0-0-2-3-4 times". This means you work A.1 once, then A.2 is worked once, and A.3 is repeated (in width) the number of times provided for your size – in this case like so: S = 0 times, M = 0 times, L=2 times, XL= 3 times and XXL = 4 times.
The diagrams are worked as usual: begin with the first row in A.1, then work the first row in A.2 etc.
See DROPS lesson: How to read knitting diagrams
See DROPS lesson: How to read crochet diagrams
Why are the sleeves shorter in larger sizes?
The total width of the garment (from wrist-to-wrist) will be larger in the larger sizes, despite the actual sleeves being shorter. The larger sizes have longer sleeve caps and wider shoulders, so there will be a good fit in all sizes.
Where on the garment is the length measured?
The measurement sketch/schematic drawing provides information regarding the full length of the garment. If it’s a jumper or a jacket the length is measured from the highest point on the shoulder closest to the neckline, and straight down to the bottom of the garment. It is NOT measured from the tip of shoulder. Similarly, the length of yoke is measured from the highest point on the shoulder and down to where yoke is split into body and sleeves.
On a jacket measures are never taken along bands, unless specifically stated. Always measure inside band stitches when measuring the length.
See DROPS lesson: How to read a schematic drawing
What is a repeat?
Diagrams are often repeated on the round or in height. 1 repeat is the diagram the way it appears in the pattern. If it says to work 5 repeats of A.1 in the round, then you work A.1 a total of 5 times after/next to each other in the round. If it says to work 2 repeats of A.1 vertically/in height you work the entire diagram once, then begin again at the start and work the entire diagram one more time.
Why does the piece start with more chain stitches than it’s worked with?
Chain stitches are slightly narrower than other stitches and to avoid working the cast-on edge too tight, we simply chain more stitches to begin with. The stitch count will be adjusted on the following row to fit the pattern and measurement sketch.
Why increase before the rib edge when the piece is worked top-down?
The rib edge is more elastic and will contract slightly compared to, for example, stocking stitch. By increasing before the rib edge, you avoid a visible difference in width between the rib edge and the rest of the body.
Why increase in the cast-off edge?
It’s very easy to cast off too tightly, and by making yarn overs while casting off (and simultaneously casting these off) you avoid a too tight cast off edge.
See DROPS video: How to bind off with yarn overs (yo)
How do I increase/decrease on every 3rd and 4th row/round alternately?
To achieve an even increase (or decrease) you can increase on, for example: every 3rd and 4th row alternately, like so: work 2 rows and increase on the 3rd row, work 3 rows and increase on the 4th. Repeat this until the increase is complete.
See DROPS lesson: Increase or decrease 1 st on every 3rd and 4th row alternately
How can I work a jacket in the round instead of back and forth?
Should you prefer to work in the round instead of back and forth, you may of course adjust the pattern. You’ll need to add steeks mid-front (usually 5 stitches), and follow the instructions. When you would normally turn and work from the wrong side, simply work across the steek and continue in the round. At the end you’ll cut the piece open, pick up stitches to work bands, and cover the cut edges.
See DROPS video: How to knit steeks and cut open
Can I work a jumper back and forth instead of in the round?
Should you prefer to work back and forth instead of in the round, you may of course adjust the pattern so you work the pieces separately and then assemble them at the end. Divide the stitches for the body in 2, add 1 edge stitch in each side (for sewing) and work the front and back pieces separately.
See DROPS lesson: Can I adapt a pattern for circular needles into straight needles?
Why is the pattern slightly different than what I see in the photo?
Pattern repeats can vary slightly in the different sizes, in order to get the correct proportions. If you’re not working the exact same size as the garment in the photo, yours might deviate slightly. This has been carefully developed and adjusted so that the complete impression of the garment is the same in all sizes.
Make sure to follow instructions and diagrams for your size!
How do I make a women’s size garment into a men’s size one?
If you have found a pattern you like which is available in women’s size it’s not very difficult to convert it to men’s size. The biggest difference will be the length of sleeves and body. Start working on the women size that you think would fit across the chest. The additional length will be worked right before you cast off for the armhole/sleeve cap. If the pattern is worked top-down you can add the length right after the armhole or before the first decrease on sleeve.
Regarding additional yarn amount, this will depend on how much length you add, but it is better with a skein too many than too few.
How do I prevent a hairy garment from shedding?
All yarns will have excess fibres (from production) that might come off as lint or shedding. Brushed yarns (ie hairier yarns) have more of these loose, excess fibres, causing more shedding.
Shedding also depends on what is worn under or over the garment, and whether this pulls at the yarn fibres. It’s therefore not possible to guarantee that there will be no shedding
Below are some tips on how to get the best result when working with hairier yarns:
1. When the garment is finished (before you wash it) shake it vigorously so the looser hairs come off. NOTE: do NOT use a lint roller, brush or any method that pulls at the yarn.
2. Place the garment in a plastic bag and put it in your freezer - the temperature will cause the fibres to become less attached to each other, and excess fibres will come off easier.
3. Leave in the freezer for a few hours before taking it out and shaking it again.
4. Wash the garment according to the instructions on the yarn label.
Why does my garment pill?
Pilling is a natural process that happens to even the most exclusive of fibers. It's a natural sign of wear and tear that is hard to avoid, and that is most visible in high friction areas of your garment like a sweater's arms and cuffs.
You can make your garment look as new by removing the pilling, using a fabric comb or a pill/lint remover.
Mountain Holiday |
|||||||||||||||||||||||||||||||
|
|
||||||||||||||||||||||||||||||
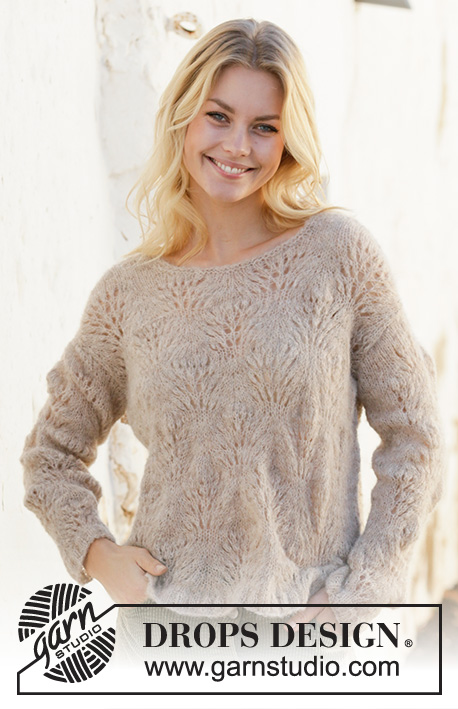
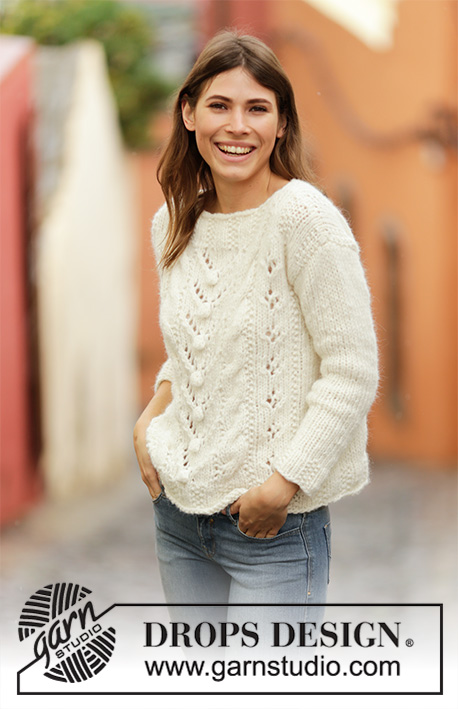
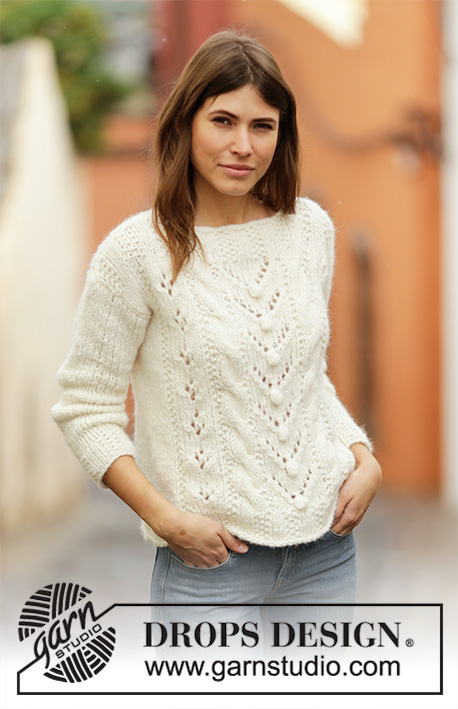
Knitted jumper in 2 strands DROPS Air. The piece is worked with lace pattern, bobbles, cables and moss stitch. Sizes S - XXXL.
DROPS 202-28 |
|||||||||||||||||||||||||||||||
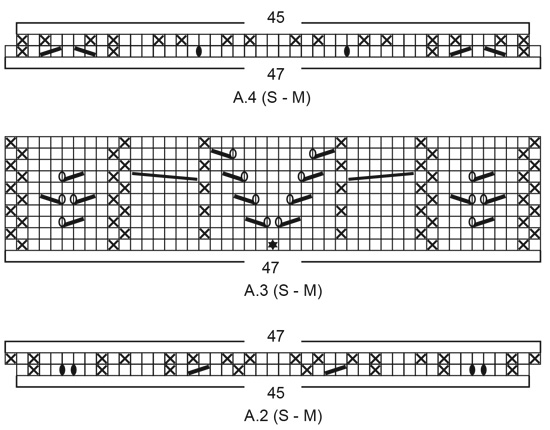
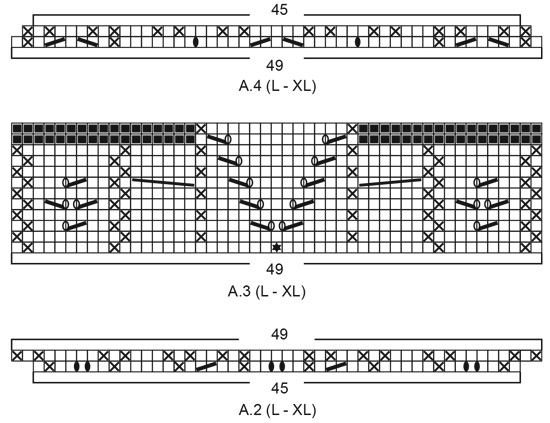
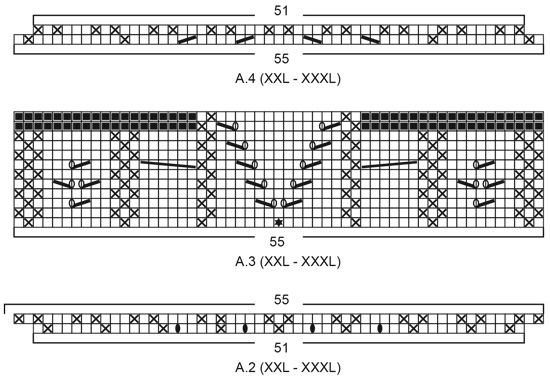
------------------------------------------------------- EXPLANATIONS FOR THE PATTERN: ------------------------------------------------------- PATTERN: See diagrams A.1 to A.4. Choose diagram for your size. INCREASE TIP (for sleeves): Work until there is 1 stitch left before the marker thread, 1 yarn over, knit 2 (marker thread sits between these 2 stitches), 1 yarn over. On the next round knit the yarn overs twisted to avoid holes. Then work the new stitches in stocking stitch. ------------------------------------------------------- START THE PIECE HERE: ------------------------------------------------------- JUMPER - SHORT OVERVIEW OF THE PIECE: The piece is worked in the round with circular needle as far as the armholes, then the front and back pieces are worked back and forth separately. The sleeves are worked in the round with double pointed needles. BODY: Cast on 102-120-120-132-144-156 stitches with circular needle size 7 mm and 2 strands Air. Knit 1 round. Then work rib as follows: * A.1 (= 3 stitches), knit 3 *, work from *-* to end of round. Work this rib for 6 cm. The next round is worked as follows: Work A.2 (= 45-45-45-45-51-51 stitches) and rib as before over the remaining 57-75-75-87-93-105 stitches. Work until A.2 has been completed in height = 104-122-124-136-148-160 stitches. Change to circular needle size 8 mm. Work A.3 (= 47-47-49-49-55-55 stitches), work 57-75-75-87-93-105 stitches in stocking stitch – decrease 4-8-4-8-6-4 stitches evenly over these stitches = 100-114-120-128-142-156 stitches. Insert 1 marker thread after the first 50-54-56-58-64-68 stitches, 1 marker thread after the next 47-53-57-61-69-75 stitches, there are now 3-7-7-9-9-13 stitches remaining on the round. The marker threads mark the sides; allow them to follow your work onwards. Continue working according to A.3 and stocking stitch over the remaining stitches – REMEMBER THE KNITTING TENSION! When the piece measures 37-38-39-40-41-42 cm (adjust so that the next row worked is a row with holes in A.3) divide the piece at the markers and each section is finished separately. FRONT PIECE: = 53-61-63-67-73-81 stitches. Start in the side from the right side and work back and forth with A.3 and stocking stitch as before. When the piece measures 47-49-51-53-55-57 cm work the next row from the wrong side as follows: Work 41-45-47-49-53-57 stitches as before and place the last 29-29-31-31-33-33 stitches worked on a thread for neck, work the remaining 12-16-16-18-20-24 stitches as before. Work 1 row from the right side over the first 12-16-16-18-20-24 stitches as before, turn, tighten the strand and work 1 row from the wrong side. Cut the strand and place the stitches on 1 thread. Work 1 row from the right side over the last 12-16-16-18-20-24 stitches as before, turn, tighten the strand and work 1 row from the wrong side. Cut the strand. Place all stitches back on the same needle = 53-61-63-67-73-81 stitches. The next row is worked as follows – from the right side: Work 3-7-7-9-9-13 stitches in stocking stitch – decrease 0-1-1-0-0-1 stitch over these stitches, A.4 (= 47-47-49-49-55-55 stitches), finish with 3-7-7-9-9-13 stitches in stocking stitch – decrease 0-1-1-0-0-1 stitch over these stitches. Complete A.4 in height = 51-57-57-63-69-75 stitches. Change to circular needle size 7 mm. Work rib as follows – from the right side: * A.1 (= 3 stitches), 3 stitches in stocking stitch *, work from *-* until there are 3 stitches left and finish with A.1 (= 3 stitches). Work rib like this for 7 cm. Cast off with knit over knit and purl over purl, but make sure that the cast-off edge is not tight (use a larger needle if necessary). The piece measures approx. 54-56-58-60-62-64 cm. BACK PIECE: = 47-53-57-61-69-75 stitches. Start in the side from the right side and work back and forth with stocking stitch. When the piece measures 47-49-51-53-55-57 cm work the next row from the wrong side as follows : Work 38-41-44-46-51-54 stitches as before, and place the last 29-29-31-31-33-33 stitches worked on 1 thread for neck, work the remaining 9-12-13-15-18-21 stitches as before. Work 1 row from the right side over the first 9-12-13-15-18-21 stitches as before, turn, tighten the strand and work 1 row from the wrong side. Cut the strand. Place the stitches on 1 thread. Work 1 row from the right side over the last 9-12-13-15-18-21 stitches as before, turn, tighten the strand and work 1 row from the wrong side. Cut the strand. Place all stitches on circular needle size 8 mm = 47-53-57-61-69-75 stitches. Work 1 row stocking stitch where you increase 4-4-0-2-0-0 stitches evenly spaced = 51-57-57-63-69-75 stitches. Change to circular needle size 7 mm. Work rib as follows – from the right side: * A.1 (= 3 stitches), 3 stitches in stocking stitch *, work from *-* until there are 3 stitches left and finish with A.1 (= 3 stitches). Work this rib for 7 cm. Cast off with knit over knit and purl over purl, but make sure that the cast-off edge is not tight (use a larger needle if necessary). The piece measures approx. 54-56-58-60-62-64 cm. SLEEVE: Cast on 24-24-24-30-30-30 stitches with double pointed needles size 7 mm and 2 strands Air. * Knit 3, A.1 (= 3 stitches) *, work from *-* to end of round. Work this rib for 6 cm. Knit 1 round where you increase 0-2-2-0-0-0 stitches evenly = 24-26-26-30-30-30 stitches. Insert 1 marker thread at the beginning of the round and allow it to follow your work onwards. It will be used later when increasing mid under sleeve. Change to double pointed needles size 8 mm. Then work in stocking stitch. When the piece measures 9 cm increase 1 stitch on each side of the marker thread mid under sleeve – read INCREASE TIP. Increase like this every 6½-6½-5½-6-5-4 cm a total of 7-7-8-7-8-9 times = 38-40-42-44-46-48 stitches. Continue working until the piece measures 52-50-50-48-46-44 cm (shorter measurements in larger sizes due to wider shoulders). Cast off, but make sure that the cast-off edge is not tight (use a larger needle if necessary). Work the other sleeve in the same way. ASSEMBLY: Sew shoulder seams; leave 26-27-28-29-30-31 cm for neck. Sew in sleeves. |
|||||||||||||||||||||||||||||||
Diagram explanations |
|||||||||||||||||||||||||||||||
|
|||||||||||||||||||||||||||||||
Have you made this or any other of our designs? Tag your pictures in social media with #dropsdesign so we can see them! Do you need help with this pattern?You'll find tutorial videos, a Comments/Questions area and more by visiting the pattern on garnstudio.com. © 1982-2024 DROPS Design A/S. We reserve all rights. This document, including all its sub-sections, has copyrights. Read more about what you can do with our patterns at the bottom of each pattern on our site. |
With over 40 years in knitting and crochet design, DROPS Design offers one of the most extensive collections of free patterns on the internet - translated to 17 languages. As of today we count 304 catalogues and 11422 patterns - 11422 of which are translated into English (UK/cm).
We work hard to bring you the best knitting and crochet have to offer, inspiration and advice as well as great quality yarns at incredible prices! Would you like to use our patterns for other than personal use? You can read what you are allowed to do in the Copyright text at the bottom of all our patterns. Happy crafting!
Comments / Questions (29)
Véronique Kuyle wrote:
RE Bonjour , Désolée , je n'avais pas bien lu !!!!! Je vais faire les manches avec des aiguilles circulaires ! Merci pour vos si jolis modèles et vos tutos qui me sont d'une grande utilité ! Cordialement .
26.06.2022 - 09:11Véronique Kuyle wrote:
Bonjour , Je me demande à quoi servent les aiguilles DOUBLES POINTES ??? Pour les rangs en aller/retour , je pensais utiliser des aiguilles droites normales ! En vous remerciant par avance , cordialement , Véronique .
25.06.2022 - 19:57DROPS Design answered:
Bonjour Mme Kuyle, les manches se tricotent ici en rond, sur les aiguilles doubles pointes, vous pouvez utiliser une aiguille circulaire ou la technique du magic loop si vous préférez. Bon tricot!
27.06.2022 - 08:27Lorena wrote:
En el frente, falta un dato, si tengo 53 puntos (talla S) debería decir "tejer 12 puntos como antes, colocar los siguientes 29 puntos tejidos en un hilo para el escote, y tejer los 12 puntos restantes como antes. ¿o no? además me queda una duda, cuando dice "Cortar el hilo y colocar los puntos en 1 hilo" quiere decir que a partir de ahí tejo con 1 hebra? o debo traspasar los puntos a un hilo como el video en cuyo caso queda una parte mas corta y los laterales mas largos ..
11.08.2021 - 20:55DROPS Design answered:
Hola Lorena, en la talla S, trabajas 41 puntos, y de estos 41, los 29 últimos los dejas en un gancho auxiliar para el escote. Después trabajas los 12 que te quedaban del frente. Por otro lado, colocar los puntos en 1 hilo es lo mismo que pasarlos a una aguja auxiliar, se sigue tejiendo con 2 hebras.
16.08.2021 - 20:26Annita Van Den Bosschee wrote:
Ik zou graag een patroon met beschrijving hebben voor maat 48
15.05.2020 - 12:06DROPS Design answered:
Dag Annita,
Onze patronen zijn aangegeven in de volgende maten: S - M - L - XL - XXL - XXXL. De maat XL zou dan ongeveer overeen moeten komen met maat 48. Maar je kunt het beste even een bestaande trui erbij pakken die lekker zit en deze vergelijken met de maten die onderaan in de schematekening staan.
20.05.2020 - 09:25Elisabeth wrote:
Grüß Gott. Rumpfteil: Ich verstehe nicht warum man in Rippen strickt. Es sind 3 rechte Maschen angegeben die man dann 6 cm in Rippen stricken sollte. Für mich ist eine Rippe immer abwechselnd rechte und linke Masche. Danke im Voraus!
06.02.2020 - 22:33DROPS Design answered:
Liebe Elisabeth, bei diesem Modell wird man das Bündchen mit 3 Maschen im Perlmuster anstatt 3 Maschen recht, dh hier stricken Sie (3 Maschen im Perlmuster (= A.1), 3 Maschen rechts). Viel Spaß beim stricken!
07.02.2020 - 07:55Eli wrote:
Grüsse! Ich verstehen nicht das Rippenmuster was in der Anleitung erwähnt wird für den Rumpfteil. Neben dem Perlmuster - Sind das jetzt nur rechte Maschen oder rechts links abwechselnd (also Rippe)?
06.02.2020 - 21:37DROPS Design answered:
Liebe Eli, das Rippenmuster besteht aus 3 Maschen im Perlmuster (= A.1) und 3 Maschen glatt rechts (wie beim normalen Bündchen). Rumpfteil wird in Runden gestrickt, so stricken Sie immer (A.1, 3 Maschen rechts). Diagram lesen Sie von der unteren rechten Kante nach links bei jeder Runde. Viel Spaß beim stricken!
07.02.2020 - 07:53Maria wrote:
Hola, el diagrama muestra las vueltas como se ven por lado derecho o son las vueltas de derecho? Gracias
21.01.2020 - 18:49DROPS Design answered:
Hola Maria. Todos los diagramas de Drops muestran todas las filas del patrón vistas por el lado derecho.
29.02.2020 - 23:04åse wrote:
Jeg forstår ingen ting av de svarte firkantene i m3.Det går da ikke an å bare strikke i mønsterfeltet framme? Jeg strikker jo på rundpinne. Er det ikke glatt strikk jeg skal strikke der hvor det er svarte firkanter? Kunne det ikke like godt stått det? Ser at en også har spurt om dette, men jeg forstår ikke deres forklaringer. Kan du forklare dette på en annen måte?
28.11.2019 - 17:38DROPS Design answered:
Hei Åse! De midterste maskene i diagram A.3 strikkes over 12 omganger, mens de resterende maskene strikkes over 10 omganger. Når 10 omganger er strikket skal resten maskene i A.3 som ikke strikkes over 12 omganger strikkes fra første omgang i A.3 igjen. Mens de midterste maskene fortsetter å strikkes på 11. og 12 omgang i mønsteret. Når alle omgangene er strikket vil de midterste maskene starte på omgang 1, når de andre maskene vil da starte på omgang 3 i diagram A.3. Lykke til!
29.11.2019 - 10:44åse wrote:
Når det står at oppskriften er rettet, må jeg da se på rettelsen eller kan jeg bare følge oppskriften? Jeg sjekker og sammenligner, men.....
26.11.2019 - 21:07DROPS Design answered:
Hei Åse! Selve oppskriften er rettet og oppdatert, men det er mulig å se selve rettelsen ved å klikke på "klikk her for å se selve rettelsen". Lykke til!
27.11.2019 - 09:26Charlotte Pagh Andersen wrote:
Lækker trøje! Mønster A 3 - da forstår jeg ikke, hvordan jeg skal gøre ift de to rækker med både mønster og de sorte firkanter, hvor der som forklaring står: 'denne rude er ingen maske, gå direkte videre til første række i diagrammet'. Hvordan kan jeg strikke noget af rækken og gå videre til første række på andre masker?
22.10.2019 - 16:35DROPS Design answered:
Hej Charlotte, jo det midterste stykke i diagrammet går over 12 pinde i højden, men maskerne på hver side går kun over 10 pinde i højden, du starter altså forfra i diagrammet for hver 10.pind og de midterste for hver 12 pind. God fornøjelse!
23.10.2019 - 13:59