
Popular categories
Looking for a yarn?


|
|||||||
Truly Wooly |
|||||||
 |
 |
||||||
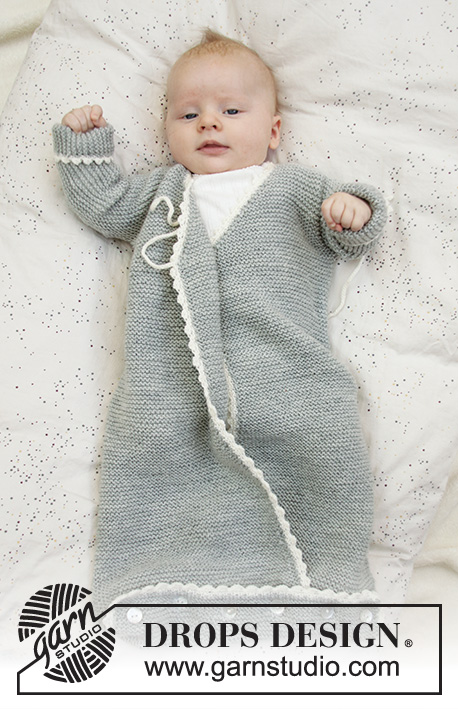
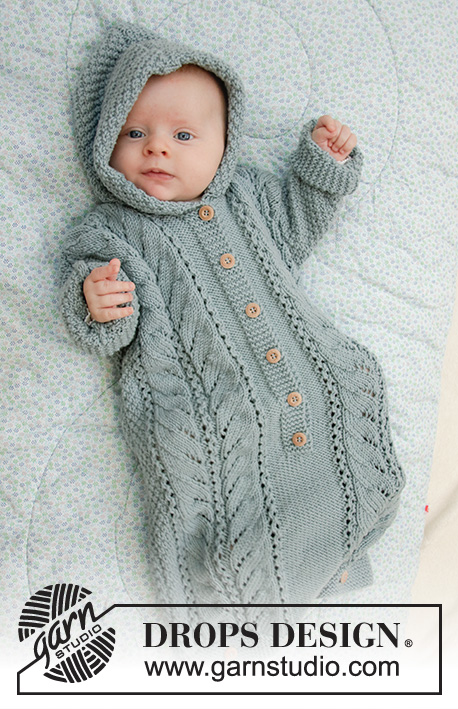
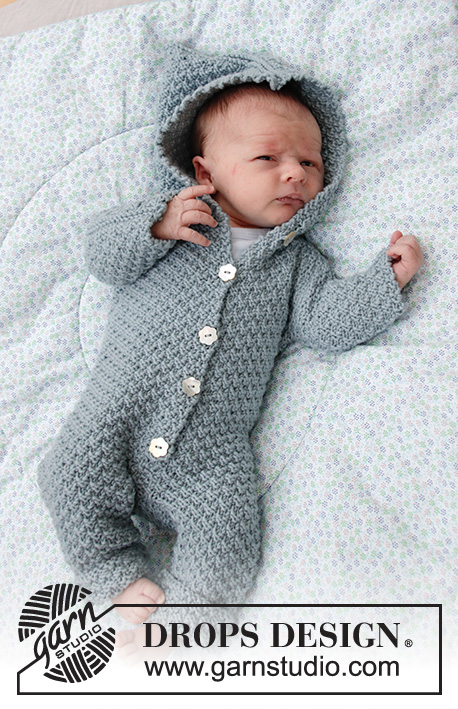
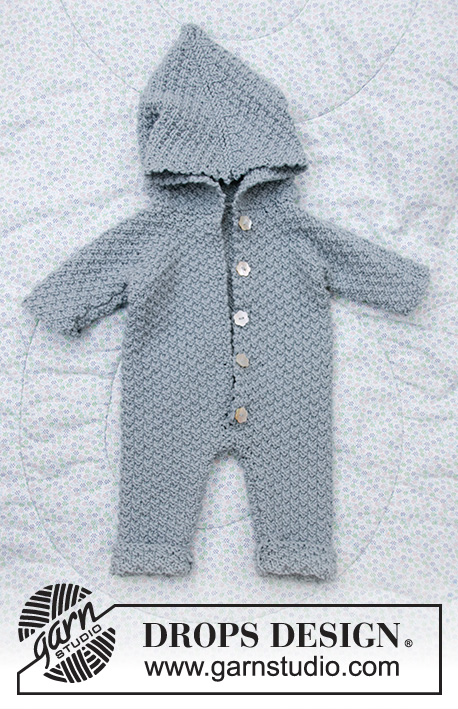
Knitted suit for baby in DROPS Merino Extra Fine. Piece is knitted with textured pattern and hood. Size premature - 4 years
DROPS Baby 33-8 |
|||||||
|
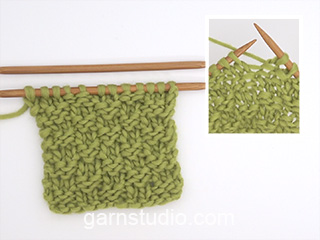
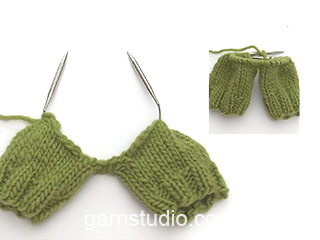
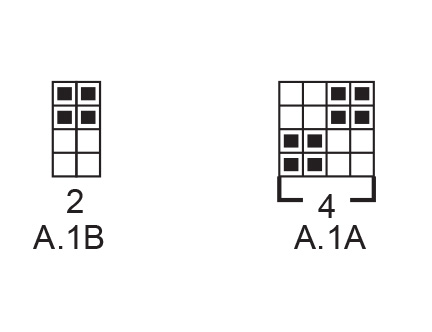
EXPLANATION FOR THE PATTERN: ---------------------------------------------------------- GARTER STITCH (back and forth): 1 ridge = knit 2 rows. 1 edge stitch in garter stitch = knit stitch from right side and knit stitch from wrong side. PATTERN: See diagram A.1. Diagrams show all rows in pattern seen from the right side. INCREASE TIP-1 (applies to legs in size 3/4 years): Increase 1 stitch inside 1 edge stitch in garter stitch by making 1 yarn over. On next row work yarn overs twisted to avoid holes. Work the increased stitches in A.1. INCREASE TIP-2 (evenly): To calculate how to increase evenly, use the total number of stitches on row (e.g. 44 stitches) and divide stitches by number of increases to be done (e.g. 14) = 3.1. In this example increase by making 1 yarn over after approx. every 3rd stitch. On next row knit yarn overs twisted to avoid holes. BUTTONHOLES (bottom up): Decrease for buttonholes on right band. 1 BUTTONHOLE = knit third and fourth stitch from edge together and make 1 yarn over. On next row purl or knit yarn over (depending on where in the diagram you are) to make holes. Decrease for buttonholes when piece measures (measured from where legs where put together): (<0): 5, 10, 15 and 20 cm 0/1 months: 6, 11, 16, 21 and 26 cm 1/3 months: 5, 10, 15, 20, 25 and 30 cm. 6/9 months: 6, 12, 17, 22, 27 and 32 cm. 12/18 months: 6, 12, 17, 23, 28 and 34 cm. 2 years: 9, 15, 21, 27, 33 and 39 cm. 3/4 years: 7, 13, 19, 25, 31, 37 and 43 cm ---------------------------------------------------------- START THE PIECE HERE: ---------------------------------------------------------- SUIT - SHORT OVERVIEW OF THE PIECE: Work each leg back and forth on circular needle, bottom up. Place legs together and work back and forth on circular needle from mid front up to sleeves. Then cast on new stitches for sleeves in each side and finish front pieces and back piece separately. Sew piece together on the shoulder. Finish by picking up stitches around the neck and work a hood. RIGHT LEG (when suit is worn): Cast on (32) 36-40-40-44 (44-48) stitches on circular needle size 4 mm with Merino Extra Fine. Work first row as follows from right side: 1 edge stitch in GARTER STITCH – read explanation above, work A.1A until 3 stitches remain on row (= 7-8-9-9-10 (10-11) repetitions of 4 stitches), work A.1B (= 2 stitches) and finish with 1 edge stitch in garter stitch. Continue pattern like this. REMEMBER THE KNITTING TENSION! When piece measures 4 cm, insert 1 marker in piece (marks fold). When piece measures 14 cm (only applies to size 3/4 years) increase 1 stitch in each side – read INCREASE TIP-1 (do not increase in the other sizes). Repeat increase in size 3/4 years when piece measures 24 cm = (32) 36-40-40-44 (44-52) stitches on needle. Work until piece measures (12) 12-16-23-31 (32-35) cm from cast-on edge, adjust so that next row is worked from right side. Cast off 1 stitch at beginning of the next 2 rows (i.e. cast off edge stitches) = (30) 34-38-38-42 (42-50) stitches. Then work the next 2 rows as follows, begin from right side: Work as before over all stitches and cast on (3) 3-3-5-5 (7-7) new stitches at the end of row (= mid back). Turn piece, work A.1 as before over all stitches, but make sure to continue pattern correctly, then cast on (4) 4-4-6-6 (8-8) stitches at the end of row from wrong side (= mid front). There are now (37) 41-45-49-53 (57-65) stitches on needle and piece measures approx. (13) 13-17-24-32 (33-36) cm from cast-on edge. Put piece aside and work left leg as explained below. LEFT LEG (when suit is worn): Cast on (32) 36-40-40-44 (44-48) stitches on circular needle size 4 mm and work first row as follows from right side: 1 edge stitch in garter stitch, work A.1A until 3 stitches remain on row (= 7-8-9-9-10 (10-11) repetitions of 4 stitches), work A.1B (= 2 stitches) and finish with 1 edge stitch in garter stitch. Continue pattern like this. When piece measures 4 cm, insert 1 marker in piece (marks fold). When piece measures 14 cm (only applies to size 3/4 years) increase 1 stitch in each side – remember INCREASE TIP-1 (do not increase in the other sizes). Repeat increase in size 3/4 years when piece measures 24 cm = (32) 36-40-40-44 (44-52) stitches on needle. Work until piece measures (12) 12-16-23-31 (32-35) cm from cast-on edge, adjust so that next row is worked from right side. Cast off 1 stitch at beginning of the next 2 rows (i.e. cast off edge stitches) = (30) 34-38-38-42 (42-50) stitches. Then work the next 2 rows as follows, begin from right side: Work as before over all stitches and cast on (4) 4-4-6-6 (8-8) new stitches at the end of row (= mid front). Turn piece, work A.1 as before over all stitches, but make sure to continue pattern correctly, then cast on (3) 3-3-5-5 (7-7) stitches at the end of row from wrong side (= mid back). There are now (37) 41-45-49-53 (57-65) stitches on needle and piece measures approx. (13) 13-17-24-32 (33-36) cm from cast-on edge. Cut the yarn. Now place the parts together as explained below. BODY: Place right leg and left leg on same circular needle with right leg first. Begin from right side on right leg, work 1 edge stitch in garter stitch, continue A.1 as before over the remaining stitches on right leg (make sure to continue pattern correct according to finish on leg), then continue pattern over the first (36) 40-44-48-52 (56-64) stitches on left leg (make sure to continue pattern correct) and finish with 1 edge stitch in garter stitch = (74) 82-90-98-106 (114-130) stitches on needle. Insert another marker in piece! NOW MEASURE PIECE FROM THIS MARKER! Continue A.1 back and forth with 1 edge stitch in garter stitch in each side towards mid front. When piece measures (3) 3-3-3-4 (5-5) cm from marker (adjust to work next row from right side) cast off 1 stitch at beginning of the next 2 rows (i.e. cast off edge stitches). Then work the next 2 rows as follows, begin from right side: Work as before over all stitches and cast on 3 new stitches at the end of row (= left band at the front). Turn piece, work A.1 as before over all stitches (make sure to continue pattern correctly) and cast on 3 new stitches at the end of row from wrong side (= right band at the front). There are now (78) 86-94-102-110 (118-134) stitches on needle. Continue A.1 back and forth over all stitches (i.e. do not work edge stitches in garter stitch). Remember BUTTONHOLES on right band - read explanation above. When piece measures (15) 20-24-27-28 (32-36) cm from the new marker, i.e. (28) 33-41-51-60 (65-72) cm from cast-on edge, divide the piece in each side. Finish front pieces and back piece separately as explained below. RIGHT FRONT PIECE: Begin from right side and work as before over the first (21) 23-25-27-29 (31-35) stitches, then cast on (9) 13-13-17-17 (21-25) new stitches for sleeve. Slip the remaining stitches on 1 stitch holder for back piece and left front piece. Continue A.1 back and forth as before but make sure that pattern fits over all stitches. AT THE SAME TIME cast on (8) 10-14-14-16 (20-22) new stitches for sleeve at the end of the next 2 rows from right side = (46) 56-66-72-78 (92-104) stitches on needle. Continue pattern back and forth over all stitches until piece measures (22) 28-32-35-36 (41-45) cm from marker, i.e. (35) 41-49-59-68 (74-81) cm from cast-on edge. At the beginning of next row from right side slip the first (8) 8-9-11-11 (12-12) stitches on 1 stitch holder for neck but to avoid cutting the yarn work them before slipping them on the stitch holder. Continue pattern back and forth as before and cast off for neck at the beginning of every row from mid front as follows: Cast off 2 stitches 1 time and 1 stitch (1) 1-2-2-2 (3-3) times = (35) 45-53-57-63 (75-87) stitches remain on needle. Then work until the entire suit measures approx. (24) 30-34-37-39 (44-49) cm from marker, i.e. (37) 43-51-61-71 (77-85) cm from cast-on edge, but adjust so that next row is worked from right side. Work 1 ridge back and forth over all stitches. Then cast off by knitting from the right side. The entire suit measures approx. (38) 44-52-62-72 (78-86) cm from cast-on edge. Now work back piece as explained below. BACK PIECE: Slip the first (36) 40-44-48-52 (56-64) stitches on stitch holder (seen from right side) on circular needle size 4 mm and continue A.1 back and forth over these stitches as before. AT THE SAME TIME cast on new stitches for sleeves at the end of every row in each side as follows: Cast on (9) 13-13-17-17 (21-25) stitches 1 time in each side and then (8) 10-14-14-16 (20-22) stitches 2 times in each side = (86) 106-126-138-150 (178-202) stitches on needle. Continue pattern back and forth over all stitches until piece measures (23) 29-33-36-38 (43-48) cm from marker). On next row cast off the middle (12) 12-16-20-20 (24-24) stitches for neck and finish each shoulder/sleeve separately. Then cast off 2 stitches on next row from neck = (35) 45-53-57-63 (75-87) stitches remain on needle for shoulder/sleeve. Then work until the entire suit measures approx. (24) 30-34-37-39 (44-49) cm from marker, but adjust according to front piece and make sure that next row is from right side. Work 1 ridge back and forth over all stitches. Then cast off by knitting from the right side. Work the other shoulder/sleeve the same way. Then work left front piece as explained below. LEFT FRONT PIECE: Slip the remaining (21) 23-25-27-29 (31-35) stitches on stitch holder back on needle size 4 mm. Begin from right side and continue A.1 back and forth as before. AT THE SAME TIME cast on new stitches for sleeve at the end of the next 3 rows from wrong side as follows: Cast on (9) 13-13-17-17 (21-25) stitches 1 time and then (8) 10-14-14-16 (20-22) stitches 2 times = (46) 56-66-72-78 (92-104) stitches on needle. Continue pattern back and forth over all stitches until piece measures the same as right front piece. At the beginning of next row from wrong side slip the first (8) 8-9-11-11 (12-12) stitches on 1 stitch holder for neck but to avoid cutting the yarn work them before slipping them on the stitch holder. Continue pattern back and forth as before and cast off for neck at the beginning of every row from mid front as follows: Cast off 2 stitches 1 time and 1 stitch (1) 1-2-2-2 (3-3) times = (35) 45-53-57-63 (75-87) stitches remain on needle. Then work until the entire suit measures approx. (24) 30-34-37-39 (44-49) cm from marker, i.e. (37) 43-51-61-71 (77-85) cm from cast-on edge, but measure so that next row is worked from right side. Work 1 ridge back and forth over all stitches. Then cast off by knitting from the right side. The entire suit measures approx. (38) 44-52-62-72 (78-86) cm from cast-on edge. ASSEMBLY: Sew shoulder seams inside cast-off edges. Sew the seams under the sleeve. Sew seam on inside of both legs inside 1 edge stitch in each side. Sew seam mid front from bottom of band and down inside 1 edge stitch in each side. Sew together the opening between the legs. Fold the end of legs at the marker. Sew the buttons on to the left band. HOOD: Pick up from right side approx. 44 to 70 stitches around the neck (including stitches on stitch holders at the front). Knit 1 row from wrong side while increasing evenly to (58) 70-74-74-78 (86-86) stitches – read INCREASE TIP-2. Knit 1 row from right side and knit 1 row from wrong side. Work next row as follows from right side: Work A.1A until 2 stitches remain on needle and finish with A.1B (= 2 stitches). Continue pattern like this until piece measures (17) 18-19-20-21 (22-23) cm from ridge in the neck, but adjust so that next row is from right side. Work 1 ridge back and forth over all stitches. Then cast off by knitting from the right side. Place the hood double and sew seam at the top inside cast-off edge. |
|||||||
Diagram explanations |
|||||||
|
|||||||
|
|||||||

|
|||||||
|
Have you made this or any other of our designs? Tag your pictures in social media with #dropsdesign so we can see them! Do you need help with this pattern?You'll find tutorial videos, a Comments/Questions area and more by visiting the pattern on garnstudio.com. © 1982-2024 DROPS Design A/S. We reserve all rights. This document, including all its sub-sections, has copyrights. Read more about what you can do with our patterns at the bottom of each pattern on our site. |
|||||||


With over 40 years in knitting and crochet design, DROPS Design offers one of the most extensive collections of free patterns on the internet - translated to 17 languages. As of today we count 304 catalogues and 11422 patterns - 11422 of which are translated into English (UK/cm).
We work hard to bring you the best knitting and crochet have to offer, inspiration and advice as well as great quality yarns at incredible prices! Would you like to use our patterns for other than personal use? You can read what you are allowed to do in the Copyright text at the bottom of all our patterns. Happy crafting!
Comments / Questions (170)
Also ich komme nicht einmal mit einer Nadelstärke von 6 auf die 10x10 cm bei 21 Maschen. Bei einer Stärke von 4,5 hatte ich mit 21 Maschen nur 6cm. Bei einer Stärke von 6 habe ich ca 9,5cm. Woran liegt das? Ich habe auch die richtige Wolle bestellt. Die Größe 12-18 Monate sieht aus wie 0-1. Bitte um Aufklärung. Es stimmt irgendetwas nicht.
26.02.2019 - 23:27DROPS Design answered:
Liebe Gringots, waschen Sie Ihre Maschenprobe (mehr Lesen Sie hier) und messen Sie sie wieder, bei Merino Extra Fine ist es wichtig die Maschenprobe genau einzuhalten und im Zweifelsfall lieber zu fest als zu locker stricken. Viel Spaß beim stricken!
01.03.2019 - 10:23Hallo! Das gehört eigentlich nicht hier rein aber ich hab auf die schnelle kein anderes KontaktFormular entdeckt. Ich arbeite gerade am diesem Overall und bin an sich immer total glücklich mit euren Anleitungen aber ... wann kommt was neues für Babys & Kinder? Da würde ich mich mega drüber freuen! LG
24.02.2019 - 11:32DROPS Design answered:
Liebe Eny, neue Baby- und Kinder Modellen werden in den nächsten Wochen hochgeladen ... Melden Sie sich für unsere Mailingliste an so verpassen Sie nicht die neuen Modellen! Viel Spaß beim stricken!
25.02.2019 - 10:52Ik begrijp de fantasiesteek niet goed is dit gewoon gerstekorrelsteek ? Mvg
05.02.2019 - 22:47DROPS Design answered:
Dag Bernadette,
De fantasiesteek is in het telpatroon getekend en dit is inderdaad een variant op de gerstekorrel.
08.02.2019 - 16:41Hallo, eine Frage/Verbesserung zu Größe 12/18 Mon.: Beim Anschlagen der neuen Maschen am Ende der Beine muss doch die Reihenfolge genau umgekehrt sein, oder? Dh. beim rechten Bein am Ende der Hinreihe 6 M anschlagen, und am Ende der RückR 5 (Linkes Bein genau umgekehrt), sonst geht in der hinteren Mitte A1 beim Zusammenfügen nicht mehr auf (da 10 M insges.), genauso bei der Vorderen Mitte beim Zusammennähen. Danke schonmal für die Antwort!
25.01.2019 - 19:33DROPS Design answered:
Liebe Helena, die Maschenanzahl ist richtig, die neuen 5 Maschen stricken Sie wie im Muster (z.B. 2 li, 2 re, 1 li am rechten Bein) und die gleiche Reihe dann am linken Bein, dh von der Vorderseite gesehen 1 li, 2 re, 2 li, so sind die 2 x 1 M li dann weiter im Muster gestrickt und Sie haben immer abwechslungsweise 2 re/2 li über alle Maschen. Viel Spaß beim stricken!
28.01.2019 - 09:20J explication répond pas a ma question je peu vous monterai une photo j ai suivie les modelé mais je trouve comment bizarre ou j en suit merci
15.01.2019 - 08:05Je tricote se modelé dit moi si j ai bien compris y a 4 pièce pour les bras a superposé une pièce pour les jambe qu' on plie en deux a la couture ses bien sa merci de la réponse vu que je suis bloque dans mon tricot.
14.01.2019 - 10:18DROPS Design answered:
Bonjour Mme Bernaied, on commence par tricoter les jambes séparément, puis on continue en les reprenant toutes les 2 (DOS & DEVANTS) jusqu'aux emmanchures, on termine ensuite chaque partie séparément: devant droit, devant gauche, dos, en montant les mailles de la manche/des manches. On rabat ensuite les mailles des épaules/manches, on fait les coutures et on va relever les mailles de la capuche autour de l'encolure. Bon tricot!
14.01.2019 - 12:57Ik brei kruippakje in maat 1 tot 3 maanden.Alles klopt... behalve het aantal knotten wol.Ik kom zeker halve knot te kort . Erg vervelend,hopelijk krijg ik zelfde kleur en ik moet zowieso opnieuw verzendkosten betalen.Prijzig breiwerkje
08.01.2019 - 08:11J arrive pas a vu le diagramme qui peu explique je fait 2 maille endroit 2 maille envers jusqua la fin meme sur ouvrage envers ?
05.01.2019 - 14:51DROPS Design answered:
Bonjour Mme Benaied, les diagrammes A.1A et A.1B se tricote comme dans cette vidéo, on alterne 2 m end/2 m env vu sur l'endroit sur 2 rangs. Bon tricot!
05.03.2019 - 12:48Diane wrote:
I also would like to knit this without the hood. Is there a pattern without the hood?
10.11.2018 - 14:38DROPS Design answered:
Hi Diane, This particular pattern has a hood, but there are other patterns for baby suits available. Hope you find one you like. Happy knitting!
10.11.2018 - 15:44Is it possible to have a version of this pattern, but without the hoodie? it is not very practical with it. How can I finish off this garment without it? Thanks for the advice!
09.11.2018 - 15:14