
Popular categories
Looking for a yarn?


|
||||||||||||||||||||||
DROPS 61-8 |
||||||||||||||||||||||
 |
 |
|||||||||||||||||||||
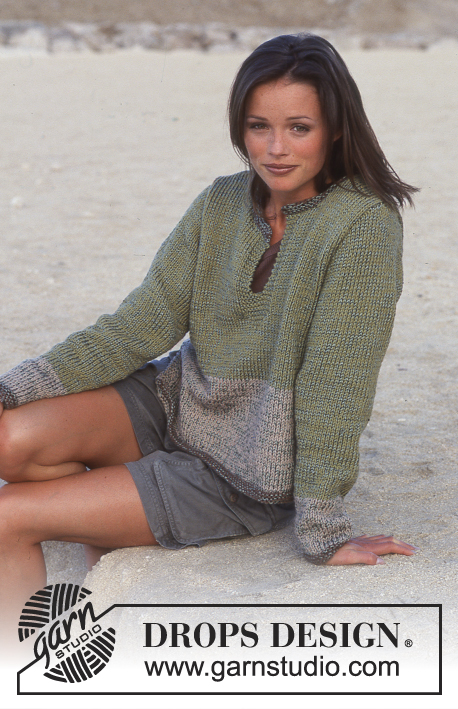
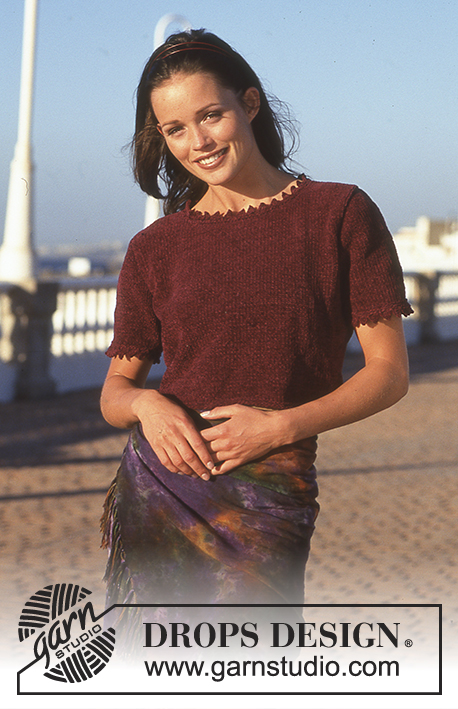
DROPS Jacket/Vest in Tynn Chenille and Cotton Viscose
DROPS 61-8 |
||||||||||||||||||||||
|
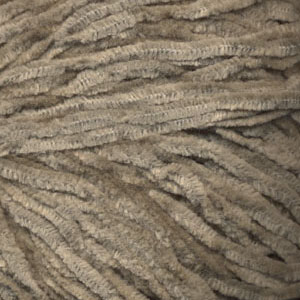
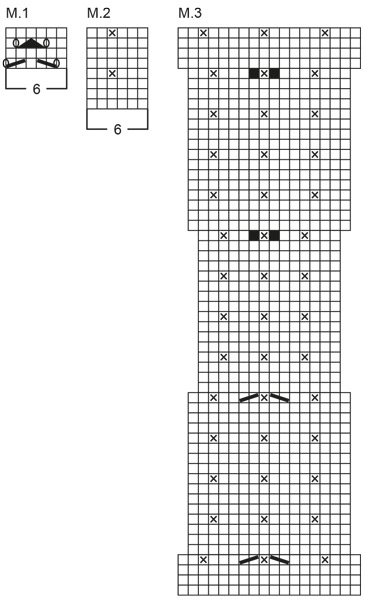
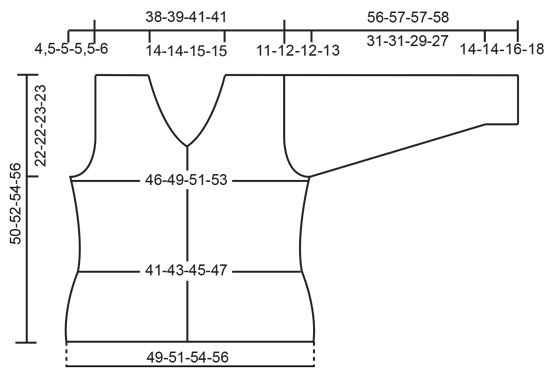
Pattern: See diagram (1 diagram = 1 repeat). The pattern in the diagram is seen from the right side. Ridge: 1 ridge of garter st = 2 rows. 1st row K, 2nd row K. Buttonhole: Cast off for buttonholes on right front piece as follows: Cast off the 4th and 5th st (4th st) and cast on 2 (1) new sts over these sts on next row. Dec when work measures: Size S: 2-6-10.5-14.5-18.5-23-27 cm. Size M: 2-6.5-11-15.5-20-24.5-29 cm. Size L: 2-6.5-11.5-16-20.5-25.5-30 cm Size XL: 2-7-11.5-16.5-21.5-26-31 cm Knitting tip 1: Avoid knitting in the round, as the chenille yarn has a tendency to twist/turn. Knitting tip 2: There are a lot of numbers in this pattern. To prevent using the wrong numbers, it is advisable to read through the whole pattern and underline the right numbers before starting the work. Body: The jacket is worked back and forth on the circular needle – see knitting tips 1+ 2. Cast on 185-189-199-205 (177-185-195-201) sts (incl. 2 x 7 (5) sts for band) on circular needle size 5 (5) with 2 strands natural Cotton Viscose. Work 2 ridges while at the same time on the last row inc (dec) 28-30-32-32 (28-30-34-34) sts evenly across the row = 213-219-231-237 (149-155-161-167) sts. Change to circular needle size 2.5 (4) and 1 strand natural Tynn Chenille (1 strand natural Cotton Chenille). Insert a marker in each side: Front piece = 57-58-61-63 (40-41-43-44) sts, Back piece = 99-103-109-111 (69-73-75-79) sts. Work Pattern 2 (P2) upwards, but the outermost 7 (5) sts on each side towards mid front are worked in ridges upwards (= bands) – remember to make the buttonholes (see description above). When the piece measures approx 4-5-6-7-(2-3-4-5) cm – adjust according to pattern – work the next row as follows: 7 (5) ridges, 18 (12) sts of P2, P3, 30-30-36-36 (12-12-12-12) sts of P2, P3, 30-36-36-42 (18-24-30-36) sts P2, P3, 30-30-36-36 (12-12-12-12) sts of P2, P3, 19 (13) sts of P2, 7 (5) ridges, continue pattern upwards – at the same time after row 1 of the pattern, dec in the sides on both sides of the markers: 1 st x 3 (2) every 2nd (5th) cm. Continue pattern upwards. Remember the knitting tension. After P3, work the sts into P2. After the final dec/inc there are 201-207-219-225 (141-147-153-159) sts, divided as follows: Front pieces = 54-55-58-60 (38-39-41-42) sts, Back piece = 93-97-103-105 (65-69-71-75) sts. When the piece measures 28-30-31-32 (28-30-31-32) cm cast off for armholes and neck at the same time as follows: Armhole: Cast off 2 sts on each side of the markers, continue working each piece separately. Neck: Cast off 15 (11) sts in each side towards mid front for the neck. Then dec for neck every 8th row (10th row): 1 st x 6-5-6-7 (4-3-5-4). Front piece: Continue to cast off for armhole every 2nd row: 3 sts x 1 (0), 2 sts x 1-1-2-2 (1-1-1-2), 1 st x 2-3-2-3 (2-3-3-3). After cast off for armholes and dec for neck there are 24-25-26-26 (17-18-18-18) sts. Cast off when piece measures 50-52-54-56 (50-52-54-56) cm. Back piece: = 89-93-99-101 (61-65-67-71) sts. Continue to cast off for armholes as for front piece = 75-77-81-81 (53-55-57-57) sts. When piece measures 48-50-52-54 (48-50-52-54) cm cast off the middle 23-23-25-25 (15-15-17-17) sts for neck. Thereafter dec 2 sts on next row towards neck. Cast off the remaining 24-25-26-26 (17-18-18-18) sts on each shoulder when the piece measures 50-52-54-56 (50-52-54-56) cm. Sleeves: The sleeves are worked back and forth on circular needle (see knitting tips 1+2. Cast on 44-44-44-44 (44-44-44-44) sts (incl 1 st on each side for the seam) on circular needle size 5 (5) with 2 strands natural Cotton Viscose. Work 1 ridge. Thereafter work Pattern 1 until the piece measures 14-14-16-18 (14-14-16-18) cm. Change to circular needle size 2.5 (4) and 1 strand natural Tynn Chenille (1 strand natural cotton chenille). Work 2 ridges while at the same time on the last row inc (dec) 12-12-12-12 (6-6-6-6) sts evenly across the row = 56-56-56-56 (38-38-38-38) sts. Continue Pattern 2 to full length – make sure to work a repeat mid top of sleeve. At the same time, once the 2 ridges are complete, inc on each side: 1 st x 14-14-16-16 (11-11-12-12) with Tynn Chenille: S+M: Alternately 6th and 7th row, L: Every 5th row, XL: Alternately 4th and 5th row (Cotton Chenille: S +M: Alternately 6th and 7th row, L: Alternate 5th and 6th row, XL: Every 5th row) = 84-84-88-88 (60-60-62-62) sts. When the piece measures 45-45-45-45 (45-45-45-45) cm cast off for the sleeve cap in each side every 2nd row: Tynn Chenille: 3 sts x 2, 2 sts x 3-2-3-2, 1 st x 7-11-10-12, 2 sts x 4-3-3-3, 3sts x 2, (Cotton Chenille: 3 sts x 1, 2 sts x 2-1-2-1, 1 st x 9-11-10-12, 2 sts x 2-2-2-2, 3 sts x 1). Cast off. The piece measures approx 56-57-57-58 (56-57-57-58) cm. Assembly: Sew shoulder seams. Pick up 97-97-103-103 (97-97-103-103) sts round the neck and 17 (17) sts over each border using circular needle size 5 (5) with 2 strands of natural Viscose and work 2 ridges back and forth on needle while at the same time the 1st row of the 2nd ridge is worked as follows: Cast off 17 sts, inc 1 st, work to the last 17 sts, inc 1 st, cast off the remaining sts = 99-99-105-105 (99-99-105-105) sts. After the ridges work Pattern 1, but 1 edge st on each side is worked in ridges upwards. Work until the collar measures 8.5 cm, finish with 1 ridge, cast off. Sew collar ends to cross pieces mid front. Crochet borders: Crochet 1 row single crochet with 2 strands natural Cotton Viscose and hook size 4 across the ridge edge around the neck and at bottom of sleeves (not too tight around sleeves – remember Viscose does not stretch!). Sew sleeve seams, sew in the sleeves and buttons. VEST in Cotton Viscose. Sizes: Small (Medium/Large – Xlarge) Materials: Cotton Viscose, 54% cotton, 46% viscose, 50 g = approx 110m. Viscose may slacken, bear this in mind when the work is measured! Uneven sts will generally even out after washing. Must be hand washed. 300 (350-350) g colour no. 02, Natural DROPS circular needle size 3. DROPS Mother-of-pearl buttons (no.521): 7 items. Yarn alternatives: NB! When using alternative yarns, consider the different quantities needed. *Camelia, 100% pure wool, Superwash, 50 g = 175 m. *Safran, 100% all-year cotton, 50 g = 160m. * Silke-Tweed, 52% silk, 48% lambswool, 50 g = approx 200m. Knitting tension: 24 sts x 32 rows using needle size 3 and stocking stitch = 10 x 10 cm. Remember needle size is only a guide! Pattern: See the diagram (1 diagram = 1 repeat). The pattern in the diagram is seen from the right side – 1st row is RS. 1 ridge of garter stitch (back and forth on the needle): 1 ridge = 2 rows. 1st row K, 2nd row K. Buttonhole: When the piece measures 1 (1-1) cm (= transition from garter st to stocking st on the body), 6.5 (7-7) cm, 12.5 (13-13.5) cm, 18 (19-19.5) cm, 23.5 (25-25.5) cm, 29.5 (31-32) cm and 35 (37-38) cm cast off for buttonholes on the right front piece as follows: Cast off 4th and 5th sts and cast on again over these 2 sts on the next row. Body: The vest is worked back and forth on the circular needle. Cast on 193 (205-217) sts (incl 2 x 6 sts for band) on circular needle size 3 with natural and work 2 ridges. Insert a marker in both sides as follows: 51 (54-57) sts front piece, insert marker, 91 (97-103) sts back piece, insert marker, 51 (54-57) sts front piece. Work stocking st upwards – but the outermost 6 sts in each side towards mid front are worked as follows: Beginning of row, lift the 1st border st loosely off the needle, the remaining sts are worked in ridges; at the end of row 6, work all sts in garter st. Remember to cast off for the buttonholes on right front piece (see explanation above). Remember the knitting tension. At the same time, after the ridges, inc on each side of the markers: 1 st x 12 every 6th row = 241 (253-265) sts. When the piece measures 26 (27-28) cm, work 2 ridges, thereafter work the pattern upwards. At the same time, when the piece measures 27 (28-29) cm work 2 ridges over 5 (6-6) sts each side of the markers, thereafter cast off 2 (3-3) sts for armholes each side of the markers. Each part is finished separately. Front piece: = 61 (63-66) sts. Continue to dec for armhole inside the 3 edge sts (which are worked in ridges upwards) each row: 1 st x 5 (7-10), every 2nd row: 1 st x 2, every 4th row: 1 st x 2 = 52 (52-52) sts. When the piece measures 35 (37-38) cm work 2 ridges over the outermost 14 (15-16) sts towards mid front, thereafter cast off 11 (12-13) sts for neck. Continue to dec for neck within 3 edge sts (which are worked in ridges upwards) each row: 1 st x 9, every 2nd row: 1 st x 2, every 4th row: 1 st x 2. Cast off when the piece measures 50 (52-53) cm. Back piece: = 111 (115-121) sts. Dec for armholes inside 3 edge sts (which are worked in ridges upwards) as for front piece = 93 (93-93) sts. When piece measures 47 (49-50) cm work 2 ridges over the middle 39 (41-43) sts, thereafter cast off the middle 33 (35-37) sts at the back for the neck. Continue to dec for neck within the 3 edge sts (which are worked in ridges upwards) every row: 1 st x 2. Cast off when piece measures 50 (52-53) cm. Assembly: Sew shoulder seams. Sew on buttons. |
||||||||||||||||||||||
Diagram explanations |
||||||||||||||||||||||
|
||||||||||||||||||||||
|
||||||||||||||||||||||

|
||||||||||||||||||||||
|
||||||||||||||||||||||

|
||||||||||||||||||||||
|
Have you made this or any other of our designs? Tag your pictures in social media with #dropsdesign so we can see them! Do you need help with this pattern?You'll find tutorial videos, a Comments/Questions area and more by visiting the pattern on garnstudio.com. © 1982-2024 DROPS Design A/S. We reserve all rights. This document, including all its sub-sections, has copyrights. Read more about what you can do with our patterns at the bottom of each pattern on our site. |
||||||||||||||||||||||


With over 40 years in knitting and crochet design, DROPS Design offers one of the most extensive collections of free patterns on the internet - translated to 17 languages. As of today we count 304 catalogues and 11422 patterns - 11422 of which are translated into English (UK/cm).
We work hard to bring you the best knitting and crochet have to offer, inspiration and advice as well as great quality yarns at incredible prices! Would you like to use our patterns for other than personal use? You can read what you are allowed to do in the Copyright text at the bottom of all our patterns. Happy crafting!
Comments / Questions (3)
Hallo, ich habe jetzt M2 fertig gestrickt und soll jetzt auf beiden Seiten der Markierungsfäden 1 M abnehmen, also vier insgesamt? Und jeweils direkt neben den Fäden? Habe ich das so richtig verstanden? Vielen Dank und Grüße
03.09.2020 - 22:30DROPS Design answered:
Liebe Frau Ortland, ja genau es werden 4 Maschen pro Reihe zugenommen, die können Sie entweder direkt beidseitig der Markierung (aus der Masche der Vorreihe) zunehmen oder mit 1/2 Maschen dazwischen (mit Umschläge z.B.). Viel Spaß beim stricken!
04.09.2020 - 08:13Hallo, was bedeuten beim Diagramm die Kästen mit dem Kreuz? Als Beschreibung befindet sich dort nur ein „toter“ Link. Vielen Dank für Ihre Hilfe
23.08.2020 - 17:03DROPS Design answered:
Liebe Frau Ortland, danke für den Hinweis, text wird korrigiert, es sollte hier 1 linke Masche sein (= links bei den Hinreihen, rechts bei de Rückreihen). Viel Spaß beim stricken!
24.08.2020 - 08:48Får inte mönster att fungera med antal maskor i 61-8 Precis börjat på koftan o ska köra M2, M3 Så klurigt skrivet
15.07.2020 - 23:59DROPS Design answered:
Hej Ewa, det er forskelligt hvor mange masker du strikke i M.2 afhængigt af hvilken størrelse du strikker...
30.07.2020 - 14:43