
Popular categories
Looking for a yarn?


|
|||||||||||||
Garden Wedding |
|||||||||||||
|
|
|||||||||||||
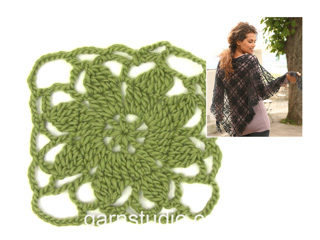
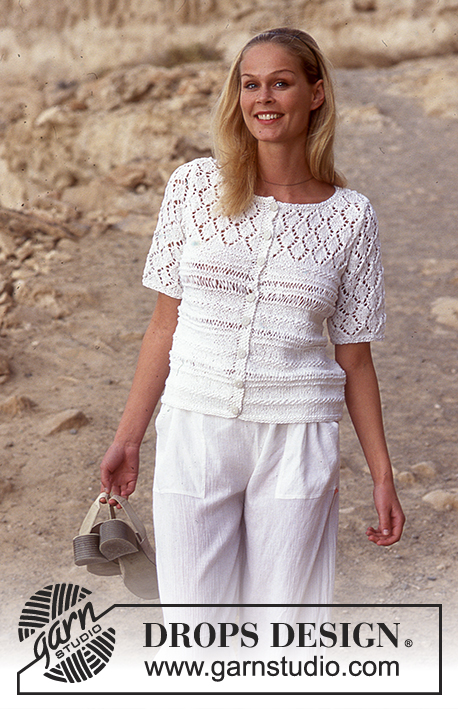
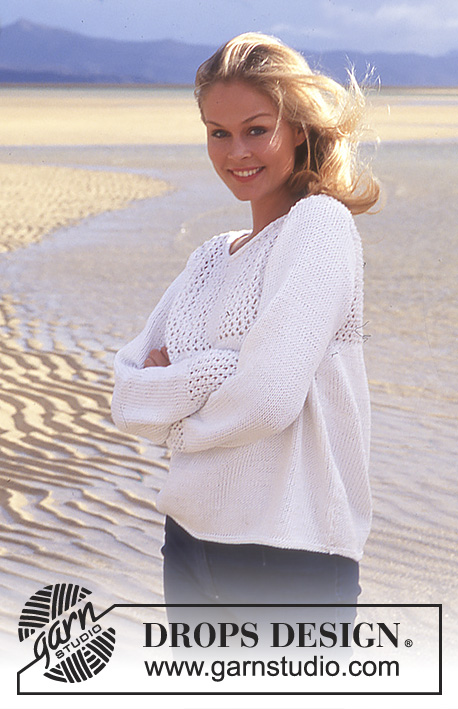
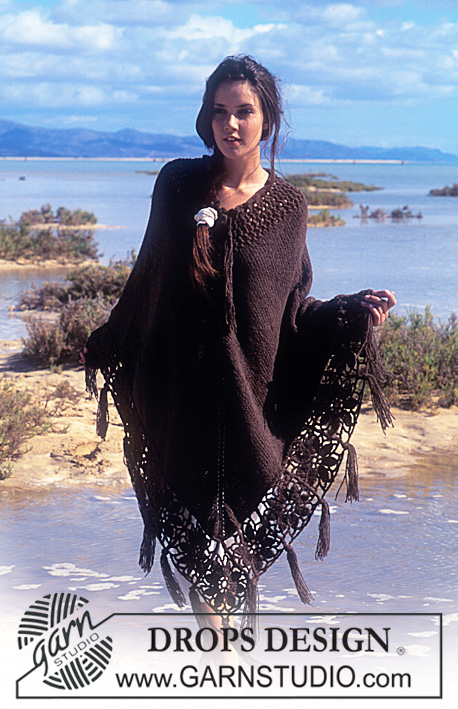
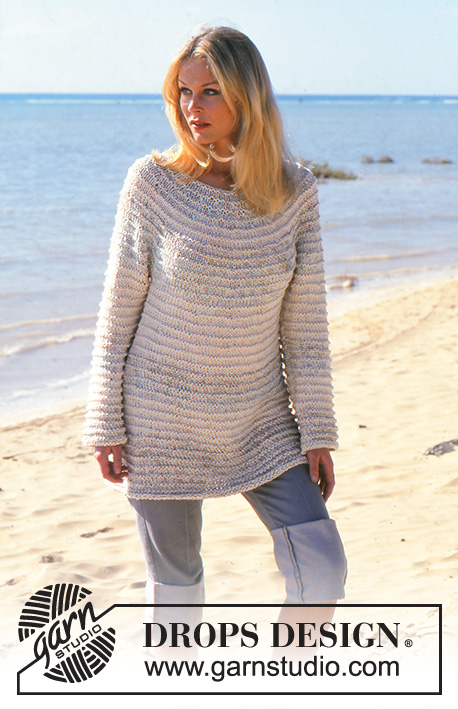
DROPS Crocheted cardigan or pullover in Muskat.
DROPS 65-9 |
|||||||||||||
|
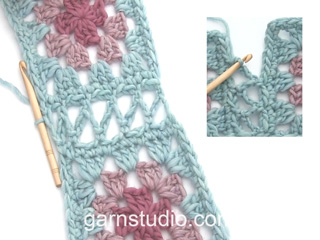
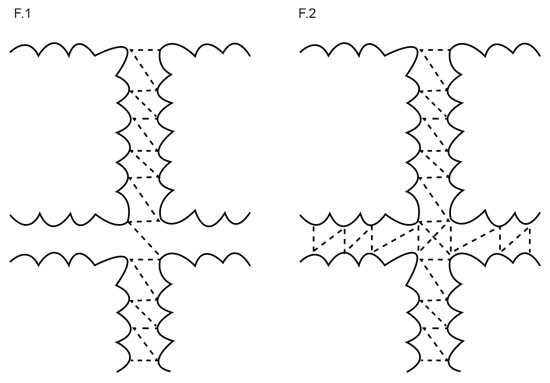
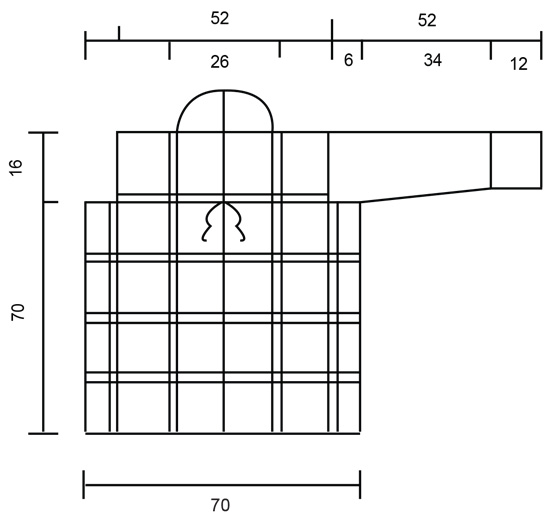
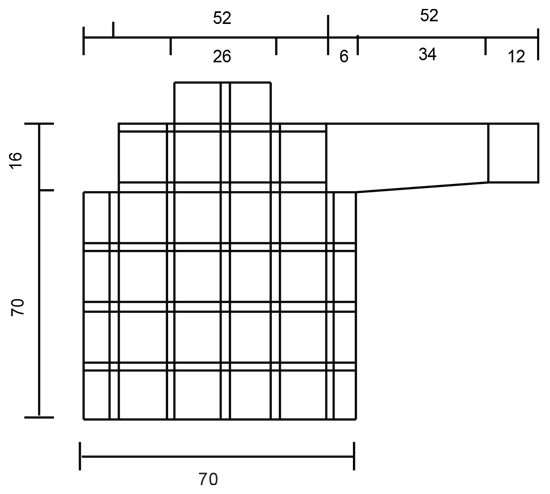
Crochet gauge: One square measures approx. 12 x 12 cm [4.75" x 4.75"] Pattern: See diagrams. Crocheted square: Chain 8 and join into a ring with a slip st. Round 1: * 1 double crochet (dc) (the first dc is replaced by ch 3), ch 2 *, repeat from * - * 8 times, join with 1 slip st in the first dc. Round 2: * 4 dc (the first dc is replaced by 3 slip sts) around the ch st bow, ch 2 *, repeat from * - * 8 times, join with 1 slip st in the first dc. Round 3: * 4 trebles in the 4 dc from the previous row (the first treble is replaced by ch 4) -- but keep the last loop of each on the hook until all trebles have been crocheted, then pull the yarn through all sts on the crochet hook (4 sts become 1), ch 6, 1 dc around the 2 ch sts from the previous row, ch 6, * repeat from * - * 8 times, join with 1 slip st in the first group of trebles. Round 4: Slip st to the center of the ch st bow, ch 1, 1 single crochet (sc) around the ch st bow, * ch 5, 1 sc around the next ch st bow, ch 5, 1 dc around the next ch st bow, ch 10, 1 dc around the next ch st bow (the corner), ch 5, 1 sc around the next ch st bow *, repeat from * - * a total of 3 times, then ch 5, 1 sc around the next ch st bow, ch 5, 1 dc around the next ch st bow, ch 10, 1 dc around the next ch st bow (the corner), ch 5, join with 1 slip st in the first sc. Round 5: Slip st to the center of the ch st bow, ch 1, 1 single crochet (sc) around the ch st bow, * ch 5, 1 sc around the next ch st bow, ch 5, 1 sc around the next ch st bow, ch 8, 1 sc around the same ch st bow approx. 1 cm [3/8"] away (= corner), ch 5, 1 sc around the next ch st bow, ch 5, 1 sc around the next ch st bow *, repeat from * - * a total of 3 times, then ch 5, 1 sc around the next ch st bow, ch 5, 1 sc around the next ch st bow, ch 8, 1 sc around the same ch st bow 1 cm [3/8"] away (= corner), ch 5, 1 sc around the next ch st bow, ch 5, join with 1 slip st in the first sc. Body: Either a cardigan or a pullover may be crocheted out of these squares; the difference is in how they are put together. The sleeves are the same length on both models. Cardigan - Body: Make 50 squares. Now join the squares in vertical columns as in Fig. 1 The columns contain the following number of squares: 1st column (center front): = 5 squares, 2nd column: = 5 squares 3rd column (side): = 4 squares, 4th column: = 5 squares, 5th column: = 6 squares (the center back is between the 5th and 6th column), 6th column: = 6 squares, 7th column: = 5 squares, 8th column (side): = 4 squares, 9th column: = 5 squares, 10th column (center front): = 5 squares. Now join the columns together as in Fig. 2. Join the shoulders in the same way as in Fig. 2 and then join the 2 squares from the center back and the 2 first columns of squares at the center front for the collar. Sweater - Body: Make 52 squares. Now join the squares in vertical columns as in Fig. 1. The columns contain the following number of squares: 1st column (center front): = 6 squares, 2nd column: = 6 squares, 3rd column: = 5 squares, 4th column (side): = 4 squares, 5th column: = 5 squares, 6th column: = 6 squares, 7th column: = 6 squares (the center back is between the 6th and 7th columns), 8th column (side): = 5 squares, 9th column: = 4 squares, 10th column (center front): = 5 squares. Now join the columns together as in Fig. 2. Join the shoulders and neck in the same way as in Fig. 2. Sleeve: Make 2 squares; join these into a ring as in Fig. 1. Continue crocheting the sleeve as follows: Row 1: 1 single crochet (sc) in the first ch st bow, * ch 5, 1 sc in the next ch st bow *, repeat from * - * around the entire sleeve = 13 ch st bows, fasten the last bow with 1 slip st in the first sc. Row 2: Slip st to the center of the first ch st bow, 1 sc around the bow, * ch 5, 1 sc in the next ch st bow *, repeat from * - *. Repeat row 2 until the sleeve measures 20 cm [7-⅞"]. Now inc each ch st bow to ch 6. Continue in this fashion until the sleeve measures 28 cm [11"]. Now inc each ch st bow to ch 7. When the sleeve measures 38 cm [14-⅞"], inc each ch st bow to ch 8. When the work measures 46 cm [18-⅛"], divide the work so that 1 square at the bottom of the sleeve is at the center of the hand and crochet back and forth. Finish when the sleeve measures 52 cm [20.5"]. Assembly: Set the sleeve into the body as in Fig. 1. Crochet around the bottom edge of the body: Row 1: * 1 sc, ch 1 *, repeat from * - *. Row 2: * 1 sc around the ch st from the previous row, ch 1 *, repeat from * - *. Crochet approx. 18 sc along the edge of 1 square. Assembly – cardigan: Repeat the 2 rows of crochet around the neck edge and at the center front on the cardigan. Make a cord as follows: ch 2 bands approx. 50 cm [19.75"] long with double yarn. Sew 1 cord onto each side at the center front, at the top of the fourth square from the bottom. Assembly – pullover: Repeat the 2 rows of crochet around the neck edge. |
|||||||||||||
Diagram explanations |
|||||||||||||
|
|||||||||||||
|
|||||||||||||
|
|||||||||||||
|
|||||||||||||
|
Have you made this or any other of our designs? Tag your pictures in social media with #dropsdesign so we can see them! Do you need help with this pattern?You'll find tutorial videos, a Comments/Questions area and more by visiting the pattern on garnstudio.com. © 1982-2024 DROPS Design A/S. We reserve all rights. This document, including all its sub-sections, has copyrights. Read more about what you can do with our patterns at the bottom of each pattern on our site. |
|||||||||||||


With over 40 years in knitting and crochet design, DROPS Design offers one of the most extensive collections of free patterns on the internet - translated to 17 languages. As of today we count 304 catalogs and 11422 patterns - 11417 of which are translated into English (US/in).
We work hard to bring you the best knitting and crochet have to offer, inspiration and advice as well as great quality yarns at incredible prices! Would you like to use our patterns for other than personal use? You can read what you are allowed to do in the Copyright text at the bottom of all our patterns. Happy crafting!
Comments / Questions (55)
Ik begrijp niet goed hoe ik verder moet met de mouw na 46 cm. Moet ik over alle bogen heen en weer? Komt er een soort kop op de mouw?
28.04.2015 - 13:56DROPS Design answered:
Hoi Jennie. Je hebt de mouw tot 46 cm in de rondte gehaakt. Vanaf 46 cm haak je door zoals eerder, maar dan heen en weer tot 52 cm = mouwkop
28.04.2015 - 16:02Love this design, exactly the kind of project I was looking for to make for cool nights walking on the beach. Please tell your designers they do an outstanding job as well as your crochet interpreters!! Of all the designs I search for online, I've come to love yours the most!! Thank you!
28.01.2015 - 17:25Wunderschoenes Muster, aber leider ohne detaillierte Fotos nur sehr schwer umzusetzen. Koennte man vielleicht das Foto nur eines Quadrates haben? Das waere echt toll!
15.09.2014 - 07:25DROPS Design answered:
Liebe Isabel, da es sich um ein recht betagtes Muster handelt, können wir momentan leider kein Foto oder Diagramm zur Verfügung stellen. Ein Tipp zur Selbsthilfe: Malen Sie sich selbst ein Diagramm, indem Sie die einzelnen Rd Schritt für Schritt durchgehen und für jede M ein Symbol zeichnen. Alternativ hilft es auch, sich die Anleitung in ein Textdokument zu kopieren und jeden einzelnen Schritt als neue Zeile abzusetzen, so wird es viel übersichtlicher.
15.09.2014 - 15:08Patricia Young wrote:
I believe the name for this cardigan should be GORGEOUS! I would love to print the pattern as I want to make it as a gift for a friend.
22.01.2014 - 08:58Hvordan hekle frem og tilbake på armen? Istedenfor å ta kjedemasken i fastmsken for å få den sammen hva gjør man istedenfor? Skal man ha 13 luftmaskebuer må man også på en eller annen måte feste den siste......
07.01.2014 - 01:48DROPS Design answered:
Hei Nina. Jeg ville ikke vaelge at hekle den her frem og tilbage da det er svaert at faa det til at passe. I mönstret skal du hele tiden hekle om buen fra sidste omgang - det er svaert at faa til at stemme naar du vil hekle frem og tilbage
14.01.2014 - 15:27So do i just pick a spot and and just start the bows again? do i continue around to where i started? do i stop and then start againg or do a number of chains and turn the work going back the other way? how many bows should i have? sorry for all the questions im just not understanding and on a deadline as this is supposed to be a gift
29.07.2013 - 20:37On what bow do i start the back and forth, and how many bows do i do this on before i turn and go back the other way? also how do i turn to go back the other way? that is what i dont get.
27.07.2013 - 05:54DROPS Design answered:
Dear Crystal, the best thing is to start the sleeve at the point where you will have to continue back and forth, so that you will be sure to start back and forth at the right place. Happy crocheting!
29.07.2013 - 09:21I need more in depth info on how to work the sleeve and attach it to the body. i cant figure it out. what am i supposed to crochet back and forth on and how do i turn to make it correct. 13 bows is not enough to attach to the body
15.07.2013 - 22:01DROPS Design answered:
Dear Crystal, to create sleeve cap, you continue in rows when sleeve measures 46 cm [18-1/8"], and continue in rows until sleeve measures 52 cm [20.5"]. You will then have enough ch st bow with 13 + first/last ch st bow of each row worked back and forth - see fig. 1 to see how to crochet sleeve to armhole. Happy crocheting!
16.07.2013 - 10:09I get that part about having one square on the top of the hand and bottom of the hand. what does it mean when it says crochet back and forth? do we add the sleeve the same way we join the rest of the squares?
14.07.2013 - 02:03DROPS Design answered:
Dear Crystal, working back and forth means you will crochet the sleeve cap in rows. Sleeve is then joined to body the same way as you joined squares together. Happy crocheting!
15.07.2013 - 08:50Im trying to make the sleeve but am kinda of confused. the last part of the sleeve says "divide the work so that 1 square at the bottom of the sleeve is at the center of the hand and crochet back and forth." what do you mean by that? thanks so much for the help
13.07.2013 - 01:58DROPS Design answered:
Dear Crystal, when dividing sleeve for working cap, make sure you will have 1 square each side of the hand/arm (1 above, 1 below) when wearing sleeve. Happy crocheting!
13.07.2013 - 10:12