DROPS Paris
DROPS Paris
100% Cotton
from 0.75 £ /50g
Get the yarn to make this pattern from 8.25£.

The yarn cost is calculated from the pattern’s smallest size and the yarn’s cheapest product type. Looking for an even better price? You might find it on the DROPS Deals!

DROPS Super Sale

Time for Tea

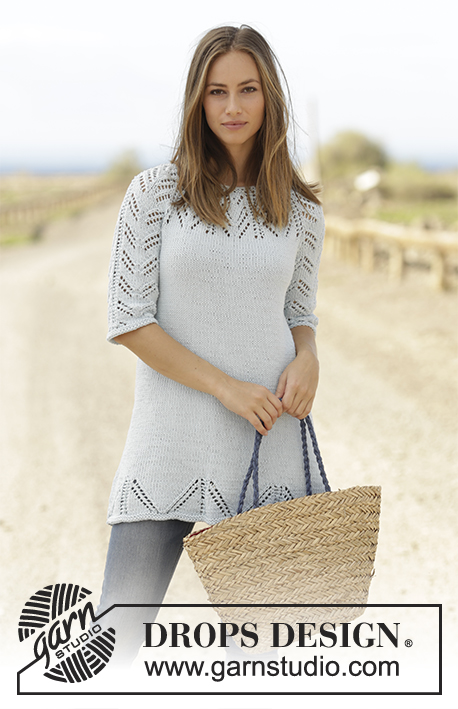
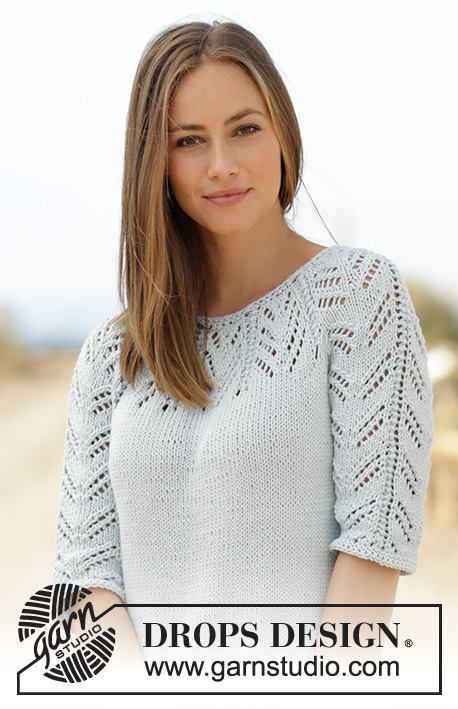
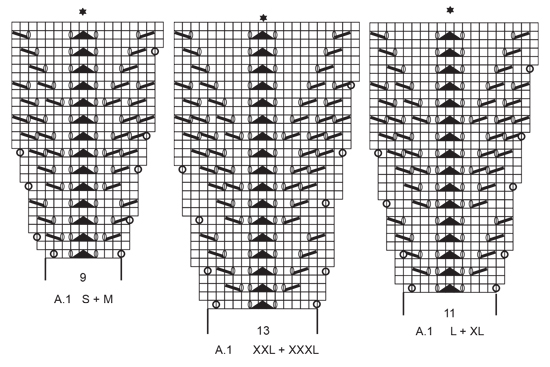
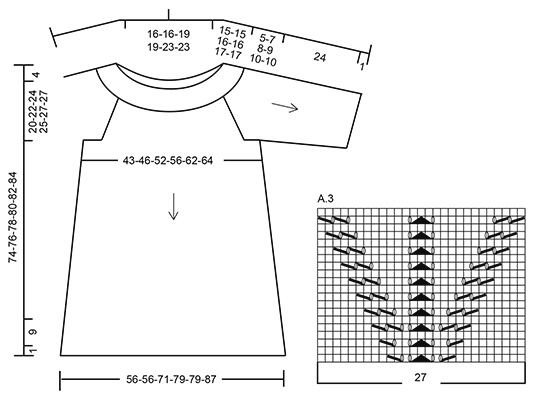
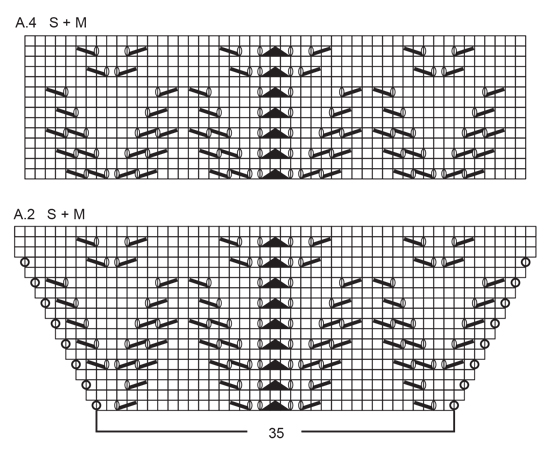
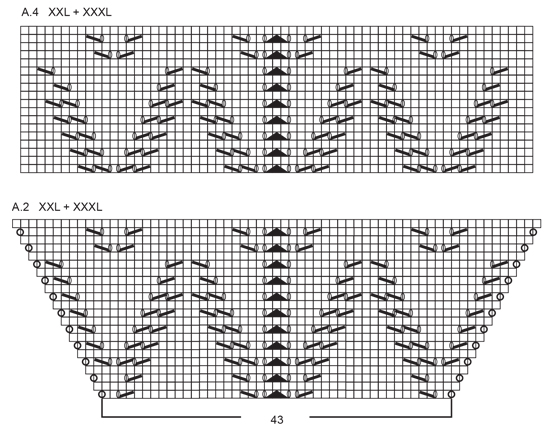
Tunic with lace pattern, raglan and ¾ sleeve, worked top down in DROPS Paris. Size: S - XXXL

DROPS 178-15
DROPS design: Pattern w-639
Yarn group C or A + A
----------------------------------------------------------
Size: S - M - L - XL - XXL - XXXL
Materials:
DROPS PARIS from Garnstudio (belongs to yarn group C)
550-600-700-750-800-900 g colour 29, light ice blue

DROPS DOUBLE POINTED NEEDLES AND CIRCULAR NEEDLE (40 and 80 cm) SIZE 5 mm – or size needed to get 17 stitches and 22 rows in stocking stitch = width 10 cm and 10 cm vertically.
DROPS DOUBLE POINTED NEEDLES AND CIRCULAR NEEDLE (40 and 80 cm) SIZE 4.5 mm for garter stitch edges – or size needed to get 18 stitches and 23 rows in stocking stitch = width 10 cm and 10 cm vertically.
----------------------------------------------------------

-------------------------------------------------------

Alternative Yarn – See how to change yarns here
Yarn Groups A to F – Use the same pattern and change the yarn here
Yarn usage using an alternative yarn – Use our yarn converter here

-------------------------------------------------------

DROPS Paris
DROPS Paris
100% Cotton
from 0.75 £ /50g
Get the yarn to make this pattern from 8.25£.

The yarn cost is calculated from the pattern’s smallest size and the yarn’s cheapest product type. Looking for an even better price? You might find it on the DROPS Deals!

DROPS Super Sale

SAVE 30% on 6 cotton favourites!
Valid until 12.04.2024

Pattern instructions

NOTE: This pattern is written in British English. All measurements in charts are in cm. For conversion from cm to inches - click here. There are different terms for crocheting in British and American English. If this pattern includes crochet, click for "crochet terms" here. For this pattern in American English, please click here.
GARTER STITCH (worked in the round):
1 ridge = 2 rounds. Knit 1 round and purl 1 round. 

PATTERN: 
See diagrams A.1 to A.4. Diagrams show all rows in pattern seen from the right side. Choose diagram for your size.

RAGLAN:
Increase for raglan on each side of the 4 marker threads. NOTE: Increase differently on body and sleeves. Increases on sleeves are shown in diagram A.2.
Increase 1 stitch by making a yarn over. On next round knit yarn overs twisted to avoid holes.

INCREASE TIP (evenly spaced):
To calculate how to increase evenly, use the total number of stitches on row (e.g. 86 stitches) and divide number of stitches by number of increases to be done (e.g. 4) = 21.5. In this example increase after approx. every 21st stitch.

INCREASE TIP (applies to sides of body):
Work until 2 stitches remain before marker thread, 1 yarn over, knit 4 (marker is in the middle of these 4 stitches), 1 yarn over (= 2 stitches increased). On next round knit yarn overs twisted to avoid holes.

DECREASE TIP (applies to mid under sleeve):
Begin 3 stitches before marker and knit 2 together, knit 2 (marker is between these 2 stitches), slip 1 stitch knitwise, knit 1, pass slipped stitch over (= 2 stitches decreased).
----------------------------------------------------------

TUNIC:
Worked top down in the round on circular needle/double pointed needle.

YOKE:
Cast on 86-88-92-96-100-106 stitches on circular needle size 4.5 mm with Paris. Work 2 ridges in GARTER STITCH - see explanation above, switch to circular needle size 5 mm. Knit 1 round while increasing 4-2-18-14-30-24 stitches evenly - READ INCREASE TIP (evenly spaced) = 90-90-110-110-130-130 stitches. On next round knit yarn overs twisted to avoid holes. Work pattern in the round according to diagram A.1 – choose diagram for your size (= 10 repetitions of 9-9-11-11-13-13 stitches). REMEMBER THE KNITTING TENSION
When A.1 has been worked 1 time vertically, there are 180-180-200-200-220-220 stitches on round. Piece measures approx. 15-15-16-16-17-17 cm from cast-on edge.

Insert 4 marker threads in piece without working stitches as follows: Insert every marker thread in the middle stitch in a repetition of A.1 (see star in diagrams) as follows: Insert 1st marker thread in the middle stitch in 1st repetition of A.1, insert 2nd marker thread in 3rd repetition of A.1, insert 3rd marker in 6th repetition of A.1 and insert 4th marker thread in 8th repetition of A.1.
Stitches between 1st and 2nd marker thread = right sleeve.
Stitches between 2nd and 3rd marker thread = front piece.
Stitches between 3rd and 4th marker thread = left sleeve.
Stitches between 4th and 1st marker thread = back piece.

READ ALL OF THE FOLLOWING SECTION BEFORE CONTINUING!
On next round begin increase for RAGLAN – see explanation above, and work pattern as follows:
Now work pattern A.2 (= 35-35-39-39-43-43 stitches) on sleeves (= between 1st and 2nd marker thread and between 3rd and 4th marker thread), and work in stocking stitch on front piece (= between 2nd and 3rd marker thread), on back piece (= between 4th and 1st marker thread) and work the 4 stitches with marker in stocking stitch.
RAGLAN SLEEVES:
Increases on sleeves are shown in diagram A.2. Increase 1 stitch after 1st and 3rd marker thread and 1 stitch before 2nd and 4th marker thread.
Increase like this every other round 7-8-9-10-11-11 times in total, i.e. until 5-3-3-1-1-1 round in A.2 remains.
RAGLAN FOR FRONT AND BACK PIECE:
Increase 1 stitch every round 0-0-0-3-5-6 times, and 1 stitch every other round 6-8-9-8-8-8 times.

When all increases are done and 5-3-3-1-1-1 round in diagram A.2 remains there are 232-244-272-284-316-320 stitches on needle.
Work next round as follows: Work until 1st marker thread, slip stitches between 1st and 2nd marker thread on a stitch holder (= 49-51-57-59-65-65 stitches for sleeve), cast on 6-8-10-12-12-14 new stitches under sleeve, work the next 67-71-79-83-93-95 stitches, slip stitches between 3rd and 4th marker thread on a stitch holder (= 49-51-57-59-65-65 stitches on sleeve), cast on 6-8-10-12-12-14 new stitches under sleeve, work the remaining stitches on round.
Piece measures approx. 20-22-24-25-27-27 cm from cast-on edge.

Remove the 4 marker threads in every transition between body and sleeves and insert 2 new marker threads in piece in the middle of the new stitches cast on under each sleeve. NOW MEASURE PIECE FROM HERE!

BODY:
= 146-158-178-190-210-218 stitches. Work in stocking stitch in the round. When piece measures 3 cm, increase 1 stitch on each side of both marker threads - READ INCREASE TIP (= 4 stitches increased). Increase like this every 8th-8th-5th-4th-5th-4th round 9-7-15-18-14-19 times in total = 182-186-238-262-266-294 stitches. When piece measures 40-40-40-41-41-43 cm, increase 7-3-5-8-4-3 stitches evenly = 189-189-243-270-270-297 stitches. Work pattern in the round according to diagram A.3 (= 7-7-9-10-10-11 repetitions of 27 stitches). When entire diagram A.3 has been worked vertically, switch to circular needle size 4.5 mm. Work 2 ridges. Switch back to circular needle size 5 mm and cast off - make sure to avoid a tight cast-off edge.

SLEEVE:
Work sleeves in the round on a short circular needle/double pointed needles. Slip the 49-51-57-59-65-65 stitches from stitch holder in one side of piece on double pointed needles size 5 mm and pick in addition up 1 new stitch in each of the 6-8-10-12-12-14 new stitches cast on under sleeve = 55-59-67-71-77-79 stitches on needle. Insert a marker thread mid under sleeve (i.e. in the middle of the 6-8-10-12-12-14 new stitches).
Now work pattern as follows: Work 3-5-5-7-7-8 stitches in stocking stitch, continue with pattern A.2/A.4 over the next 49-49-57-57-63-63 stitches - i.e. in size S, M and L work the remaining rounds in A.2 (without increases in each side of diagram) before continue with A.4 over A.2, work in stocking stitch over the remaining 3-5-5-7-7-8 stitches on round. When sleeve measures 3 cm from the new stitch cast on, decrease 1 stitch on each side of marker thread - READ DECREASE TIP. Decrease like this every 9th-7th-5th-4th-4th-4th round 6-7-10-11-11-11 times in total = 43-45-47-49-55-57 stitches (work the stitches that do not fit the pattern when decreasing in stocking stitch). When sleeve measures 24 cm, switch to double pointed needles size 4.5 mm. Work 2 ridges. Switch back to double pointed needles size 5 mm and cast off - make sure to avoid a tight cast-off edge.

This pattern has been corrected.

Updated online: 10.07.2017
YOKE:...cast on 6-8-10-12-12-14 new stitches under sleeve, work the next 67-71-79-83-93-95 stitches, slip stitches between 3rd and 4th marker thread on a stitch holder...
SLEEVE:
…READ DECREASE TIP. Decrease like this every 4-3-2-2-2-2 cm 6-7-10-11-11-11 times in total = 43-45-47-49-55-57 stitches...
Updated online: 25.08.2017
SLEEVE:...When sleeve measures 3 cm from the new stitch cast on, decrease 1 stitch on each side of marker thread - READ DECREASE TIP. Decrease like this every 9th-7th-5th-4th-4th-4th round 6-7-10-11-11-11 times in total = 43-45-47-49-55-57 stitches (work the stitches that do not fit the pattern when decreasing in stocking stitch)...

YOKE:...232-244-272-284-316-320 stitches on needle.
Work next round as follows: Work until 1st marker thread, slip stitches between 1st and 2nd marker thread on a stitch holder (= 49-51-57-59-65-65 stitches for sleeve), cast on 6-8-10-12-12-14 new stitches under sleeve, work the next 67-71-79-83-93-95 stitches,...
Updated online: 09.04.2019
Correction - BODY: When piece measures 40-40-40-41-41-43 cm, increase 7-3-5-8-4-3 stitches evenly

Diagram

symbols = knit
symbols = knit 2 together, 1 yarn over
symbols = 1 yarn over, slip 1 stitch knitwise, knit 1, pass slipped stitch over
symbols = 1 yarn over, slip 1 stitch knitwise, knit 2 together, pass slipped stitch over, 1 yarn over
symbols = 1 yarn over between 2 stitches On next round knit yarn over twisted to avoid holes.
symbols = knitting direction
symbols = insert marker threads in the middle stitch in diagrams - see explanation above
diagram
diagram
diagram
diagram
diagram

Each of our patterns has specific tutorial videos to help you.

Do you have a question? See a list of frequently asked questions (FAQ)

Knitting tension is what determines the final measurements of your work, and is usually measured per 10 x 10 cm. It is provided like so: number of stitches in width x number of rows in height - eg: 19 stitches x 26 rows = 10 x 10 cm.

The knitting tension is very individual; some people knit/crochet loosely while others work tightly. You adjust the knitting tension with the needle size, which is why the suggested needle size is only meant as a guide! You need to adjust this (up or down) to ensure that YOUR knitting tension matches the knitting tension provided in the pattern. If you work with a different knitting tension than provided you will have a different yarn consumption, and your work will have different measurements than what the pattern suggests.

The knitting tension also determines which yarns can replace each other. As long as you achieve the same knitting tension you can replace one yarn with another.

See DROPS lesson: How to measure your tension/gauge

See DROPS video: How to make a gauge tension swatch

The required amount of yarn is provided in grams, eg: 450 g. To calculate how many balls you’ll need you first need to know how many grams are in 1 ball (25g, 50g or 100g). This information is available if you click on the individual yarn quality on our pages. Divide the amount required with the amount of each ball. For example, if each ball is 50g (the most common amount), the calculation will be as follows: 450 / 50 = 9 balls.

The important thing when changing from one yarn to another is that the knitting/crochet tension remains the same. This is so that the measurements of the finished piece will be the same as on the sketch provided. It is easier to achieve the same knitting tension using yarns from the same yarn group. It is also possible to work with multiple strands of a thinner yarn to achieve the knitting tension of a thicker one. Please try our yarn converter. We recommend you to always work a test swatch.

Please NOTE: when changing yarn the garment might have a different look and feel to the garment in the photo, due to individual properties and qualities of each yarn.

See DROPS lesson: Can I use a different yarn than the one mentioned in the pattern?

All our yarns are categorised into yarn groups (from A to F) according to thickness and knitting tension – group A contains the thinnest yarns and group F the thickest. This makes it easier for you to find alternative yarns to our patterns, should you wish to switch yarn. All yarns within the same group have a similar knitting tension and can easily replace each other. However, different yarn qualities have different structures and properties which will give the finished work a unique look and feel.

Click here for an overview of the yarns in each yarn group

At the top of all our patterns you’ll find a link to our yarn calculator, which is a helpful tool should you wish to use a different yarn than suggested. By filling in the yarn quality you wish to replace, the amount (in your size) and number of strands, the calculator will present good alternative yarns with the same knitting tension. Additionally it will tell you how much you’ll require in the new qualities and whether you’ll need to work with multiple strands. Most skeins are 50g (some are 25g or 100g).

If the pattern is worked with multiple colours, every colour will have to be calculated separately. Similarly, if the pattern is worked with several strands of different yarns (for example 1 strand Alpaca and 1 strand Kid-Silk) you will have to find alternatives for each, individually.

Click here to see our yarn calculator

Since different yarns have different qualities and textures we have chosen to keep the original yarn in our patterns. However, you can easily find options among our available qualities by using our yarn calculator, or simply pick a yarn from the same yarn group.

It is possible that some retailers still have discontinued yarns in stock, or that someone has a few skeins at home that they would like to find patterns for.

The yarn calculator will provide both alternative yarn as well as required amount in the new quality.

If you think it's hard to decide what size to make, it can be a good idea to measure a garment you own already and like the size of. Then you can pick the size by comparing those measures with the ones available in the pattern's size chart.

You'll find the size chart at the bottom of the pattern.

See DROPS lesson: How to read size chart

The needle size provided in the pattern serves only as a guide, the important thing is to follow the knitting tension. And since knitting tension is very individual, you will have to adjust the needle size to ensure that YOUR tension is the same as in the pattern – maybe you’ll have to adjust 1, or even 2 needle sizes, up or down to achieve the correct tension. For this, we recommend that you work test swatches.

Should you work with a different knitting tension than the one provided, the measurements of the finished garment might deviate from the measurement sketch.

See DROPS lesson: How to measure your tension/gauge

See DROPS video: How to make a tension/gauge swatch

Working a garment top-down provides more flexibility and room for personal adjustment. For example it is easier to try the garment on while working, as well as making adjustments to length of yoke and shoulder caps.

The instructions are carefully explaining every step, in the correct order. Diagrams are adjusted to the knitting direction and are worked as usual.

The diagram depicts all rows/rounds, and every stitch seen from the right side. It is read from bottom to top, from right to left. 1 square = 1 stitch.

When working back and forth, every other row is worked from the right side and every other row is worked from the wrong side. When working from the wrong side, the diagram will have to be worked reversed: from left to right, knit stitches are purled, purl stitches are knit etc.

When working in the round every round is worked from the right side and the diagram are worked from right to left on all rounds.

See DROPS lesson: How to read knitting diagrams

The diagram depicts all rows/rounds, and every stitch seen from the right side. It is worked from bottom to top, from right to left.

When working back and forth every other row is worked from the right side: from right to left and every other row is worked from the wrong side: from left to right.

When working in the round, every row in the diagram are worked from the right side, from right to left.

When working a circular diagram you start in the middle and work your way outwards, counter clockwise, row by row.

The rows usually start with a given number of chain stitches (equivalent to the height of the following stitch), this will either be depicted in the diagram or explained in the pattern.

See DROPS lesson: How to read crochet diagrams

Instructions for working several diagrams after each other on the same row/round, will often be written like so: “work A.1, A.2, A.3 a total of 0-0-2-3-4 times". This means you work A.1 once, then A.2 is worked once, and A.3 is repeated (in width) the number of times provided for your size – in this case like so: S = 0 times, M = 0 times, L=2 times, XL= 3 times and XXL = 4 times.

The diagrams are worked as usual: begin with the first row in A.1, then work the first row in A.2 etc.

See DROPS lesson: How to read knitting diagrams

See DROPS lesson: How to read crochet diagrams

The total width of the garment (from wrist-to-wrist) will be larger in the larger sizes, despite the actual sleeves being shorter. The larger sizes have longer sleeve caps and wider shoulders, so there will be a good fit in all sizes.

The measurement sketch/schematic drawing provides information regarding the full length of the garment. If it’s a jumper or a jacket the length is measured from the highest point on the shoulder closest to the neckline, and straight down to the bottom of the garment. It is NOT measured from the tip of shoulder. Similarly, the length of yoke is measured from the highest point on the shoulder and down to where yoke is split into body and sleeves.

On a jacket measures are never taken along bands, unless specifically stated. Always measure inside band stitches when measuring the length.

See DROPS lesson: How to read a schematic drawing

Diagrams are often repeated on the round or in height. 1 repeat is the diagram the way it appears in the pattern. If it says to work 5 repeats of A.1 in the round, then you work A.1 a total of 5 times after/next to each other in the round. If it says to work 2 repeats of A.1 vertically/in height you work the entire diagram once, then begin again at the start and work the entire diagram one more time.

Chain stitches are slightly narrower than other stitches and to avoid working the cast-on edge too tight, we simply chain more stitches to begin with. The stitch count will be adjusted on the following row to fit the pattern and measurement sketch.

The rib edge is more elastic and will contract slightly compared to, for example, stocking stitch. By increasing before the rib edge, you avoid a visible difference in width between the rib edge and the rest of the body.

It’s very easy to cast off too tightly, and by making yarn overs while casting off (and simultaneously casting these off) you avoid a too tight cast off edge.

See DROPS video: How to bind off with yarn overs (yo)

To achieve an even increase (or decrease) you can increase on, for example: every 3rd and 4th row alternately, like so: work 2 rows and increase on the 3rd row, work 3 rows and increase on the 4th. Repeat this until the increase is complete.

See DROPS lesson: Increase or decrease 1 st on every 3rd and 4th row alternately

Should you prefer to work in the round instead of back and forth, you may of course adjust the pattern. You’ll need to add steeks mid-front (usually 5 stitches), and follow the instructions. When you would normally turn and work from the wrong side, simply work across the steek and continue in the round. At the end you’ll cut the piece open, pick up stitches to work bands, and cover the cut edges.

See DROPS video: How to knit steeks and cut open

Should you prefer to work back and forth instead of in the round, you may of course adjust the pattern so you work the pieces separately and then assemble them at the end. Divide the stitches for the body in 2, add 1 edge stitch in each side (for sewing) and work the front and back pieces separately.

See DROPS lesson: Can I adapt a pattern for circular needles into straight needles?

Pattern repeats can vary slightly in the different sizes, in order to get the correct proportions. If you’re not working the exact same size as the garment in the photo, yours might deviate slightly. This has been carefully developed and adjusted so that the complete impression of the garment is the same in all sizes.

Make sure to follow instructions and diagrams for your size!

If you have found a pattern you like which is available in women’s size it’s not very difficult to convert it to men’s size. The biggest difference will be the length of sleeves and body. Start working on the women size that you think would fit across the chest. The additional length will be worked right before you cast off for the armhole/sleeve cap. If the pattern is worked top-down you can add the length right after the armhole or before the first decrease on sleeve.

Regarding additional yarn amount, this will depend on how much length you add, but it is better with a skein too many than too few.

All yarns will have excess fibres (from production) that might come off as lint or shedding. Brushed yarns (ie hairier yarns) have more of these loose, excess fibres, causing more shedding.

Shedding also depends on what is worn under or over the garment, and whether this pulls at the yarn fibres. It’s therefore not possible to guarantee that there will be no shedding

Below are some tips on how to get the best result when working with hairier yarns:

1. When the garment is finished (before you wash it) shake it vigorously so the looser hairs come off. NOTE: do NOT use a lint roller, brush or any method that pulls at the yarn.

2. Place the garment in a plastic bag and put it in your freezer - the temperature will cause the fibres to become less attached to each other, and excess fibres will come off easier.

3. Leave in the freezer for a few hours before taking it out and shaking it again.

4. Wash the garment according to the instructions on the yarn label.

Pilling is a natural process that happens to even the most exclusive of fibers. It's a natural sign of wear and tear that is hard to avoid, and that is most visible in high friction areas of your garment like a sweater's arms and cuffs.

You can make your garment look as new by removing the pilling, using a fabric comb or a pill/lint remover.

Still can't find the answer you need? Then scroll down and leave your question so one of our experts can try to help you. This will be done normally within 5 to 10 working days.
In the meantime, you can read the questions and answers that others have left to this pattern or join the DROPS Workshop on Facebook to get help from fellow knitters/crocheters!

You might also like...

Post a comment to pattern DROPS 178-15

We would love to hear what you have to say about this pattern!

If you want to leave a question, please make sure you select the correct category in the form below, to speed up the answering process. Required fields are marked *.

Comments / Questions (32)

country flag Cynthia Blanckaert wrote:

Ik twijfel bij de 4 markeringen plaatsen voor een M De eerste is vanaf de 1ste herhaling Bedoel je daarmee de 2de keer je het patroon breit of vanaf de start van het telpatroon Mvg

15.03.2023 - 02:49

DROPS Design answered:

Dag Cynthia,

Je plaatst de markeerdraden of markeerders ter hoogte van waar je op dat moment bent (je hebt dan dus al een herhaling in de hoogte gemaakt) en je plaatst ze in de middelste steek van A.1 (dus waar je A.1 hebt gebreid en daar de middelste steek van.)

16.03.2023 - 20:42

country flag Marian wrote:

Kan ik het patroon ook breien met 2 draden Drops Fabel?

07.11.2022 - 19:31

DROPS Design answered:

Dag Marian,

Ja, dat kan! Fabel valt in garencategorie A en 2 draden van categorie A komt overeen met de dikte van categorie C.

08.11.2022 - 19:40

country flag Alexandra wrote:

Hallo, liebes Drops-Team, ich habe eine Frage zum Diagramm. Ich habe noch nie ein richtiges Lochmuster gestrickt, deshalb kenne ich mich noch nicht aus. Laut Diagramm müssten alle Umschläge in der nächsten Reihe verschränkt gestrickt werden damit kein Loch entsteht (das Symbol mit dem hohlen Kreis) - aber dann entsteht doch auch kein Lochmuster, glaube ich. Oder müssten einige dieser Kreise doch normal rechts gestrickt werden - wenn ja, welche?

01.08.2022 - 01:54

DROPS Design answered:

Liebe Alexandra, bei diesem Modell und den Diagrammen sind es 2 Sorten Umschläge: die für das Lochmuster sind mit 2., 3. und 4. Symbol erklärt und sollen Löcher bilden und die für die Zunahmen sind wie beim 5. Symbol gestrickt -diese sollen keine Löcher bilden. Viel Spaß beim stricken!

01.08.2022 - 12:05

country flag Emanuela wrote:

Vorrei lavorare il maglione dal basso verso l'alto, è possibile? Devo fare le diminuzioni al posto degli aumenti sullo sprone? Come posso fare le diminuzioni dei raglan Grazie per la risposta

16.05.2022 - 15:24

DROPS Design answered:

Buonasera Emanuela, questo modello è stato progettato per essere lavorato dall'alto in basso. Sul nostro sito può trovare tantissimi modelli lavorati dal basso verso l'alto. Buon lavoro!

17.05.2022 - 19:02

country flag Christine Almond wrote:

Can it be converted to straight needles

25.04.2022 - 10:27

DROPS Design answered:

Dear Mrs Amond, this lesson might help you to adapt the pattern into straight needles - it might be sometimes easier to have a try on circular needle, look at our videos, they might help you to understand how to do; happy knitting!

25.04.2022 - 12:12

country flag Agnes wrote:

Pleased, can i get this pattern time for tea in German?

24.02.2022 - 19:30

DROPS Design answered:

Dear Agnes, sure you can, click on the scroll down menu below the picture to select language and then choose "deutsch". Happy knitting!

25.02.2022 - 09:00

country flag Carmen-Gabriela wrote:

Danke für ihre Antwort:) Ich möchte "M" stricken. Start S+M ist gleich. Meine Passe ehe ich Raglan und glatt VT/RT stricke ist mit 13cm nach A.1 zu kurz. Verfahre ich nach Anleitung + 7cm (M) komme ich auf S. Daher meine Überlegung, ob ich gegen Ende A.2 nur in jed. 4.Rd. Raglan zunehme und später teile. A.4 müsste wiederholt werden? Soo ein hübsches Design:)!

26.01.2022 - 18:20

DROPS Design answered:

Liebe Carmen-Gabriela, wenn Ihre Maschenprobe in der Höhe nicht gerade stimmt, dann können Sie z.B. mehr Reihen zwischen den Raglan-Zunahmen stricken, oder nach den Raglan-Zunahmen einfach im Muster (ohne weitere Zunahmen) stricken, dann je nach Ihrer Maschenprobe in der Höhe beginnen Sie A.4 früher als in der Anleitung, und vielleicht haben Sie dann mehr A.4 in der Höhe aber am besten die Höhe der Passe so anpasse, damit die Verteilung richtig nach ca 22 cm verteilt wird. Viel Spaß beim stricken!

27.01.2022 - 08:28

country flag Carmen-Gabriela wrote:

Hallo, wird A.4 für den Ärmel wiederholt bis zur gewünschten Länge? Leider misst meine Passe nach A.1 gedehnt nur 13 cm lang (S/M). Nun weiß ich noch nicht, ob ich gleich mit glatt re. VT/RT + Raglan weiterstricke od. ob ich die Lochmusterpasse verlängere (mit Zunahmen) und ggf. dementsprechend die Raglanzunahmen reduziere. Haben Sie einen Tipp? Maschenprobe hatte gestimmt.

21.01.2022 - 18:32

DROPS Design answered:

Liebe Carmen-Gabriela, welche Größe stricken Sie? S oder M? Nach alle Raglanzunahmen soll die Passe ca 20-22 cm sein (15 cm nach A.1 + ca 6-7 cm Raglan). Kann das Ihnen helfen?

26.01.2022 - 10:00

country flag Hannelore Meier wrote:

Guten Tag. Kann ich mir auch dieses tolle Muster auch ausdrucken?

14.10.2021 - 16:59

DROPS Design answered:

Liebe Frau Meier, ganz gerne, klicken Sie auf "Drucken", dann wählen Sie "Anleitung", ein neues Fenster öffnet sich dann, klicken Sie auf "Die Anleitung ausdrucken →" um das Dialogfenster von Ihrem Drucker wird angezeigt. Viel Spaß beim stricken!

15.10.2021 - 13:38

country flag IRENE CAMBUS wrote:

J'ai commencé à tricoter le modèle 178-15 avec des aiguilles normales en commençant par le bas en prenant le diagramme à l'envers et c'est correct. Comment faire le raglan de cette façon? Merci pour vos conseils. Cordialement

24.05.2021 - 18:29

DROPS Design answered:

Bonjour Mme Cambus, nous ne sommes malheureusement pas en mesure de pouvoir adapter chacun de nos modèles à chaque demande; si vous tricotez ici la robe de bas en haut, il va vous falloir diminuer au lieu d'augmenter pour le raglan et diminuer au lieu d'augmenter dans les diagrammes après le raglan. Votre magasin saura vous aider, même par mail ou téléphone. Bon tricot!

25.05.2021 - 08:52