DROPS Paris
DROPS Paris
100% Cotton
from 0.75 £ /50g
Get the yarn to make this pattern from 8.25£.

The yarn cost is calculated from the pattern’s smallest size and the yarn’s cheapest product type. Looking for an even better price? You might find it on the DROPS Deals!

DROPS Super Sale
DROPS 175-5
DROPS Design: Pattern no w-622
Yarn group C or A + A
-----------------------------------------------------------
Sizes: S/M - L/XL - XXL/XXXL
Materials:
DROPS PARIS from Garnstudio (belongs to yarn group C)
550-650-800 g colour 01, apricot

DROPS CROCHET HOOK SIZE 5.5 MM – or the hook size needed to get 13 treble crochet on 10 cm in width. Pattern A.1B measures approx. 7 cm in width and A.x measures approx. 6.5 cm in height.
----------------------------------------------------------

-------------------------------------------------------

Alternative Yarn – See how to change yarns here
Yarn Groups A to F – Use the same pattern and change the yarn here
Yarn usage using an alternative yarn – Use our yarn converter here

-------------------------------------------------------

DROPS Paris
DROPS Paris
100% Cotton
from 0.75 £ /50g
Get the yarn to make this pattern from 8.25£.

The yarn cost is calculated from the pattern’s smallest size and the yarn’s cheapest product type. Looking for an even better price? You might find it on the DROPS Deals!

DROPS Super Sale

SAVE 30% on 6 cotton favourites!
Valid until 12.04.2024

Pattern instructions

NOTE: This pattern is written in British English. All measurements in charts are in cm. For conversion from cm to inches - click here. There are different terms for crocheting in British and American English. If this pattern includes crochet, click for "crochet terms" here. For this pattern in American English, please click here.
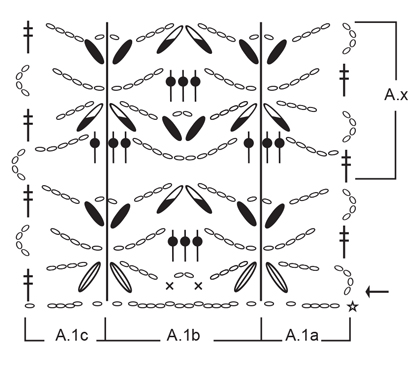
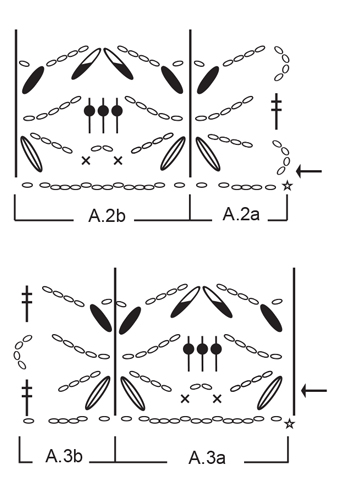
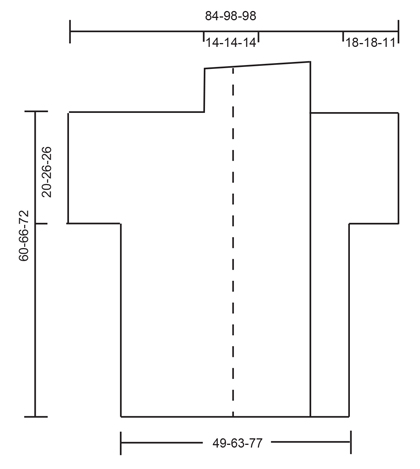
PATTERN:
See diagrams A.1 to A.3.
----------------------------------------------------------

JACKET:
The piece is worked back and forth. It is worked from the bottom up, the piece is then divided at the armhole and the front and back pieces are worked separately, with the sleeves.

THE BODY:
Work 278-334-390 chain stitches with hook size 5.5 mm and Paris. Then work as follows starting from the right side: A.1a, A.1b in total 19-23-27 times, finish with A.1c. Continue in this way until A.1 is completed in height, then repeat A.x upwards – REMEMBER THE CROCHET TENSION!
Continue in this way until the piece measures approx. 38-38-44 cm, finish after the row 3 in A.x (= row from the wrong side). Then work row 4 in A.x as follows, from the right side: Work A.1a, A.1b in total 6-7-8 times (= right front piece), insert 1 marker in the last chain stitch, work A.1b in total 7-9-11 times (= back piece), insert 1 marker in the last chain stitch, work A.1b in total 6-7-8 times, finish with A.1c (= left front piece). Now divide the piece and each part is worked separately – do not cut the strand.

LEFT FRONT PIECE:
The next row (= row 1 in A.x) is worked as follows from the wrong side: Work A.1c, A.1b in total 6-7-8 times, finish with 34-34-20 chain stitches for the sleeve. Turn. Next row (= row 2 in A.x and row 1 in A.2) works as follows, from the right side: Work A.2a, A.2b in total 2-2-1 times, A.1b in total 6-7-8 times, finish with A.1c. Continue in this way until A.2 is completed in height.
Next row (= row 1 in A.x) is worked as follows, from the wrong side: Work A.1c, A.1b in total 8-9-9 times, finish with A.1a. Continue by repeating A.x in height until the piece measures approx. 60-66-72 cm, adjust so that the last row is row 4 in A.x (= row from the right side). Work the shawl-collar.

SHAWL-COLLAR:
Next row (= row 1 in A.x) is worked as follows, from the wrong side: Work A.1c, A.1b in total 3-3-3 times, finish with A.1a. Turn. Continue upwards until A.x is completed in height and then work rows 1 and 2 of A.x 1 more time in height. Cut and fasten the strand.

RIGHT FRONT PIECE:
Next row (= row 1 in A.x) is worked as follows, from the wrong side: Work 34-34-20 chain stitches for the sleeve, continue over the right front piece as follows: A.1b in total 6-7-8 times, finish with A.1a. Turn.
Next row (= row 2 in A.x and row 1 in A.3) is worked as follows, from the right side: Work A.1a, A.1b in total 6-7-8 times, A.3a in total 2-2-1 times, finish with A.3b. Continue in this way until A.3 is completed in height.
Next row (= row 1 in A.x) is worked as follows, from the wrong side: Work A.1c, A.1b in total 8-9-9 times, finish with A.1a. Repeat A.x in height until the piece measures approx. 60-66-72 cm – adjust to the left front piece. Last row is row 4 in A.x (= row from the right side). Cut the strand and work the shawl-collar in the same way as for the left front piece, but reversed, so you work over the last 12 chain-spaces starting from the wrong side.

BACK PIECE:
Next row (= row 1 in A.x) is worked as follows, from the wrong side: Work 34-34-20 chain stitches for the sleeve, continue over the back piece and work A.1b in total 7-9-11 times, finish with 34-34-20 chain stitches for the sleeve. Turn.
Next row (= row 2 in A.x and row 1 in A.2 and A.3) is worked as follows, from the right side: Work A.2a, A.2b in total 2-2-1 times, A.1b in total 7-9-11 times, A.3a in total 2-2-1 times, finish with A.3b. Continue in this way until A.2 and A.3 are completed in height.
Next row (= row 1 in A.x) is worked as follows, from the right side: Work A.1a, A.1b in total 11-13-13 times, finish with A.1c. Repeat A.x in height until the piece measures approx. 60-66-72 cm – adjust to the front pieces. Last row is row 4 in A.x (= row from the right side). Cut and fasten the strand.

ASSEMBLY:
Lay the front piece on the back piece, right side to right side and crochet the shoulders together as follows: 1 double crochet through both layers, * 3 chain stitches, 1 double crochet around the next chain-space around both layers *, repeat from *-* along the whole shoulder/sleeve and finish with 1 double crochet. Do not work over the middle 5 chain-spaces, the collar will be attached here later. Repeat on the other shoulder.
Crochet together under the sleeves as follows: * 1 double crochet around the next chain-space around both layers, 3 chain stitches *, repeat from *-* and finish with 1 double crochet.

ASSEMBLING COLLAR:
Lay the uppermost edge/last round on the right shawl-collar against the uppermost edge/last round on the left shawl-collar and sew together with small stitches edge to edge. Then sew the side of the collar to the neck.

Diagram

symbols = chain stitch
symbols = double treble crochet in stitch
symbols = double treble crochet around the chain-space
symbols = work 1 double treble crochet in the first chain stitch, but wait with the last yarn over and pull through, work 1 double treble crochet in the next chain stitch and pull the last yarn over through all 3 loops on the hook (= 1 stitch)
symbols = work 1 double treble crochet around the first chain-space, but wait with the last yarn over and pull through, work 1 double treble crochet around the next chain-space and pull the last yarn through all 3 loops on the hook
symbols = work 1 double treble crochet over the chain-space and down in the stitch from the together-worked double treble crochets on the row below the chain-space
symbols = double crochet in stitch
symbols = the row has already been worked. Start on next row!
symbols = start here
diagram
diagram
diagram
Do you have a question? See a list of frequently asked questions (FAQ)

Knitting tension is what determines the final measurements of your work, and is usually measured per 10 x 10 cm. It is provided like so: number of stitches in width x number of rows in height - eg: 19 stitches x 26 rows = 10 x 10 cm.

The knitting tension is very individual; some people knit/crochet loosely while others work tightly. You adjust the knitting tension with the needle size, which is why the suggested needle size is only meant as a guide! You need to adjust this (up or down) to ensure that YOUR knitting tension matches the knitting tension provided in the pattern. If you work with a different knitting tension than provided you will have a different yarn consumption, and your work will have different measurements than what the pattern suggests.

The knitting tension also determines which yarns can replace each other. As long as you achieve the same knitting tension you can replace one yarn with another.

See DROPS lesson: How to measure your tension/gauge

See DROPS video: How to make a gauge tension swatch

The required amount of yarn is provided in grams, eg: 450 g. To calculate how many balls you’ll need you first need to know how many grams are in 1 ball (25g, 50g or 100g). This information is available if you click on the individual yarn quality on our pages. Divide the amount required with the amount of each ball. For example, if each ball is 50g (the most common amount), the calculation will be as follows: 450 / 50 = 9 balls.

The important thing when changing from one yarn to another is that the knitting/crochet tension remains the same. This is so that the measurements of the finished piece will be the same as on the sketch provided. It is easier to achieve the same knitting tension using yarns from the same yarn group. It is also possible to work with multiple strands of a thinner yarn to achieve the knitting tension of a thicker one. Please try our yarn converter. We recommend you to always work a test swatch.

Please NOTE: when changing yarn the garment might have a different look and feel to the garment in the photo, due to individual properties and qualities of each yarn.

See DROPS lesson: Can I use a different yarn than the one mentioned in the pattern?

All our yarns are categorised into yarn groups (from A to F) according to thickness and knitting tension – group A contains the thinnest yarns and group F the thickest. This makes it easier for you to find alternative yarns to our patterns, should you wish to switch yarn. All yarns within the same group have a similar knitting tension and can easily replace each other. However, different yarn qualities have different structures and properties which will give the finished work a unique look and feel.

Click here for an overview of the yarns in each yarn group

At the top of all our patterns you’ll find a link to our yarn calculator, which is a helpful tool should you wish to use a different yarn than suggested. By filling in the yarn quality you wish to replace, the amount (in your size) and number of strands, the calculator will present good alternative yarns with the same knitting tension. Additionally it will tell you how much you’ll require in the new qualities and whether you’ll need to work with multiple strands. Most skeins are 50g (some are 25g or 100g).

If the pattern is worked with multiple colours, every colour will have to be calculated separately. Similarly, if the pattern is worked with several strands of different yarns (for example 1 strand Alpaca and 1 strand Kid-Silk) you will have to find alternatives for each, individually.

Click here to see our yarn calculator

Since different yarns have different qualities and textures we have chosen to keep the original yarn in our patterns. However, you can easily find options among our available qualities by using our yarn calculator, or simply pick a yarn from the same yarn group.

It is possible that some retailers still have discontinued yarns in stock, or that someone has a few skeins at home that they would like to find patterns for.

The yarn calculator will provide both alternative yarn as well as required amount in the new quality.

If you think it's hard to decide what size to make, it can be a good idea to measure a garment you own already and like the size of. Then you can pick the size by comparing those measures with the ones available in the pattern's size chart.

You'll find the size chart at the bottom of the pattern.

See DROPS lesson: How to read size chart

The needle size provided in the pattern serves only as a guide, the important thing is to follow the knitting tension. And since knitting tension is very individual, you will have to adjust the needle size to ensure that YOUR tension is the same as in the pattern – maybe you’ll have to adjust 1, or even 2 needle sizes, up or down to achieve the correct tension. For this, we recommend that you work test swatches.

Should you work with a different knitting tension than the one provided, the measurements of the finished garment might deviate from the measurement sketch.

See DROPS lesson: How to measure your tension/gauge

See DROPS video: How to make a tension/gauge swatch

Working a garment top-down provides more flexibility and room for personal adjustment. For example it is easier to try the garment on while working, as well as making adjustments to length of yoke and shoulder caps.

The instructions are carefully explaining every step, in the correct order. Diagrams are adjusted to the knitting direction and are worked as usual.

The diagram depicts all rows/rounds, and every stitch seen from the right side. It is read from bottom to top, from right to left. 1 square = 1 stitch.

When working back and forth, every other row is worked from the right side and every other row is worked from the wrong side. When working from the wrong side, the diagram will have to be worked reversed: from left to right, knit stitches are purled, purl stitches are knit etc.

When working in the round every round is worked from the right side and the diagram are worked from right to left on all rounds.

See DROPS lesson: How to read knitting diagrams

The diagram depicts all rows/rounds, and every stitch seen from the right side. It is worked from bottom to top, from right to left.

When working back and forth every other row is worked from the right side: from right to left and every other row is worked from the wrong side: from left to right.

When working in the round, every row in the diagram are worked from the right side, from right to left.

When working a circular diagram you start in the middle and work your way outwards, counter clockwise, row by row.

The rows usually start with a given number of chain stitches (equivalent to the height of the following stitch), this will either be depicted in the diagram or explained in the pattern.

See DROPS lesson: How to read crochet diagrams

Instructions for working several diagrams after each other on the same row/round, will often be written like so: “work A.1, A.2, A.3 a total of 0-0-2-3-4 times". This means you work A.1 once, then A.2 is worked once, and A.3 is repeated (in width) the number of times provided for your size – in this case like so: S = 0 times, M = 0 times, L=2 times, XL= 3 times and XXL = 4 times.

The diagrams are worked as usual: begin with the first row in A.1, then work the first row in A.2 etc.

See DROPS lesson: How to read knitting diagrams

See DROPS lesson: How to read crochet diagrams

The total width of the garment (from wrist-to-wrist) will be larger in the larger sizes, despite the actual sleeves being shorter. The larger sizes have longer sleeve caps and wider shoulders, so there will be a good fit in all sizes.

The measurement sketch/schematic drawing provides information regarding the full length of the garment. If it’s a jumper or a jacket the length is measured from the highest point on the shoulder closest to the neckline, and straight down to the bottom of the garment. It is NOT measured from the tip of shoulder. Similarly, the length of yoke is measured from the highest point on the shoulder and down to where yoke is split into body and sleeves.

On a jacket measures are never taken along bands, unless specifically stated. Always measure inside band stitches when measuring the length.

See DROPS lesson: How to read a schematic drawing

Diagrams are often repeated on the round or in height. 1 repeat is the diagram the way it appears in the pattern. If it says to work 5 repeats of A.1 in the round, then you work A.1 a total of 5 times after/next to each other in the round. If it says to work 2 repeats of A.1 vertically/in height you work the entire diagram once, then begin again at the start and work the entire diagram one more time.

Chain stitches are slightly narrower than other stitches and to avoid working the cast-on edge too tight, we simply chain more stitches to begin with. The stitch count will be adjusted on the following row to fit the pattern and measurement sketch.

The rib edge is more elastic and will contract slightly compared to, for example, stocking stitch. By increasing before the rib edge, you avoid a visible difference in width between the rib edge and the rest of the body.

It’s very easy to cast off too tightly, and by making yarn overs while casting off (and simultaneously casting these off) you avoid a too tight cast off edge.

See DROPS video: How to bind off with yarn overs (yo)

To achieve an even increase (or decrease) you can increase on, for example: every 3rd and 4th row alternately, like so: work 2 rows and increase on the 3rd row, work 3 rows and increase on the 4th. Repeat this until the increase is complete.

See DROPS lesson: Increase or decrease 1 st on every 3rd and 4th row alternately

Should you prefer to work in the round instead of back and forth, you may of course adjust the pattern. You’ll need to add steeks mid-front (usually 5 stitches), and follow the instructions. When you would normally turn and work from the wrong side, simply work across the steek and continue in the round. At the end you’ll cut the piece open, pick up stitches to work bands, and cover the cut edges.

See DROPS video: How to knit steeks and cut open

Should you prefer to work back and forth instead of in the round, you may of course adjust the pattern so you work the pieces separately and then assemble them at the end. Divide the stitches for the body in 2, add 1 edge stitch in each side (for sewing) and work the front and back pieces separately.

See DROPS lesson: Can I adapt a pattern for circular needles into straight needles?

Pattern repeats can vary slightly in the different sizes, in order to get the correct proportions. If you’re not working the exact same size as the garment in the photo, yours might deviate slightly. This has been carefully developed and adjusted so that the complete impression of the garment is the same in all sizes.

Make sure to follow instructions and diagrams for your size!

If you have found a pattern you like which is available in women’s size it’s not very difficult to convert it to men’s size. The biggest difference will be the length of sleeves and body. Start working on the women size that you think would fit across the chest. The additional length will be worked right before you cast off for the armhole/sleeve cap. If the pattern is worked top-down you can add the length right after the armhole or before the first decrease on sleeve.

Regarding additional yarn amount, this will depend on how much length you add, but it is better with a skein too many than too few.

All yarns will have excess fibres (from production) that might come off as lint or shedding. Brushed yarns (ie hairier yarns) have more of these loose, excess fibres, causing more shedding.

Shedding also depends on what is worn under or over the garment, and whether this pulls at the yarn fibres. It’s therefore not possible to guarantee that there will be no shedding

Below are some tips on how to get the best result when working with hairier yarns:

1. When the garment is finished (before you wash it) shake it vigorously so the looser hairs come off. NOTE: do NOT use a lint roller, brush or any method that pulls at the yarn.

2. Place the garment in a plastic bag and put it in your freezer - the temperature will cause the fibres to become less attached to each other, and excess fibres will come off easier.

3. Leave in the freezer for a few hours before taking it out and shaking it again.

4. Wash the garment according to the instructions on the yarn label.

Pilling is a natural process that happens to even the most exclusive of fibers. It's a natural sign of wear and tear that is hard to avoid, and that is most visible in high friction areas of your garment like a sweater's arms and cuffs.

You can make your garment look as new by removing the pilling, using a fabric comb or a pill/lint remover.

Still can't find the answer you need? Then scroll down and leave your question so one of our experts can try to help you. This will be done normally within 5 to 10 working days.
In the meantime, you can read the questions and answers that others have left to this pattern or join the DROPS Workshop on Facebook to get help from fellow knitters/crocheters!

You might also like...

Post a comment to pattern DROPS 175-5

We would love to hear what you have to say about this pattern!

If you want to leave a question, please make sure you select the correct category in the form below, to speed up the answering process. Required fields are marked *.

Comments / Questions (24)

country flag Beaulieu, Sylvie wrote:

Bonjour, dans le 1er paragraphe je lis de faire A. 1a, 23 fois A 1b au total et terminer par A 1c. Je comprends pas trop. Dois-je faire A 1a, 1b et 1c un a la suite de l'autre 23 fois ?

10.11.2023 - 14:33

DROPS Design answered:

Bonjour Mme Beaulieu, vu sur l'endroit, vous allez crocheter: 1 fois A.1A (début du rang sur l'endroit/fin du rang sur l'envers), répéter A.1b (mettez bien les marqueurs comme indiqué) et terminer par A.1C (fin de rang sur l'endroit/début de rang sur l'envers). Bon crochet!

10.11.2023 - 16:01

country flag Ruth Weiss wrote:

Hallo zusammen, ich habe bevor ich angefangen habe eine Maschenprobe gemacht. Für die Größe S/M, habe ich ingesamt 154 cm für die Rumpfbreite. Ich häkle schon mit Nadelstärke 4. Können Sie mir bitte helfen?

10.01.2021 - 03:05

DROPS Design answered:

Liebe Frau Weiss, stimmt auch Ihre Maschenprobe mit A.1B? Sie sollten 7 cm für jeden A.1B haben, dh 19 x A.1B = 133 cm + A.1A + A.1C - Viel Spaß beim häkeln!

11.01.2021 - 09:07

country flag Julia Mödritscher wrote:

Hallo, ich habe das Rumpfteil, das linke Vorderteil und den Schalkragen fertig gehäkelt. Muss ich das rechte Vorderteil nun einzeln mit 34lm anschlagen oder kommen die 34lm beim linken Vorderteil dran? Vielen Dank

19.12.2020 - 20:26

DROPS Design answered:

Liebe Frau Mödritscher, das rechte Vorderteil beginnt mit den neuen 34 Luftmaschen für den Ärmel dann häklen Sie die nächste Rückreihe über die Maschen von rechten Vorderteil, bzw: A.1b und wie zuvor enden Sie mit A.1A. Viel Spaß beim häkeln!

21.12.2020 - 07:34

country flag Julia Mödritscher wrote:

Hallo, ich habe das Rumpfteil, das linke Vorderteil und den Schalkragen fertig gehäkelt. Muss ich das rechte Vorderteil nun einzeln mit 34lm anschlagen oder kommen die 34lm beim linken Vorderteil dran? Vielen Dank

19.12.2020 - 20:26

country flag Ellen Blom wrote:

Ik begrijp niet wat er bij de tekening 14 cm breed is? Enhoe breed is de sjaalkraag?

24.07.2019 - 15:08

DROPS Design answered:

Dag Ellen,

De 14 cm is de breedte vanaf waar de hals begint bij de linker schouder tot waar de hals ophoudt bij de rechter schouder. De totale breedte van de sjaalkraag staat inderdaad niet aangegeven in de tekening, maar de stippellijn is middenvoor, dus de hand van wat je over houdt (aantal steken bedoel ik) als je de helft van de steken van het achterpand van een voorpand aftrekt, dan weet je hoe breed de sjaalkraag is.

24.07.2019 - 20:26

country flag Patsy Gadberry wrote:

The photo of the jacket from the back shows the crocheted shoulder seam on the outside of the jacket. However, the instructions say, "Lay the front piece on the back piece, right side to right side and crochet the shoulders together," which would put the crocheted seam on the inside of the jacket instead of the outside.

27.06.2019 - 17:07

country flag Patsy Gadberry wrote:

I found in making the jacket that the techniques used in making the motifs pull inward and take out some of what seems at first to be extra width. Measurement for size is not accurate until several rows have been completed. Very pretty jacket!

11.10.2018 - 13:42

country flag Patsy Gadberry wrote:

Okay, gauge is 13 double crochets equals 10 cm / 4". To make 13 dc you have 13 chains, so by your gauge 13 chains equal 4". In that gauge you have 25 chains across the bottom of pattern A.1b, which would be 8" (not 2 3/4") across the bottom of A.1B, lacking one chain. With 334 chains (specified for L/XL) you would end up with a garment measuring 102.77" or 261.04 cm around the bottom! How many chains are truly supposed to be done to start (not 334) or what is the true gauge?

22.05.2018 - 14:06

DROPS Design answered:

Dear Mrs Gadberry, A.1b should be 7 cm in width, in 2nd size you work 23 times A.1b (= A.1a at the beg of row and A.1c at the end of row, ie approx. 1 more repeat) so that you will have approx. 24 repeats x 7 cm = 168 cm in total. As you can see in the measurement chart, both front piece will be quite larger than the half of back piece: back piece is 9 repeats and front piece are each 7 repeats + A.1a/c. Pattern is correct as it is, but feel free to adjust it to your own measurements if you like to. Happy crocheting!

22.05.2018 - 15:26

country flag Patsy Gadberry wrote:

I am making size L/XL, but the pattern calls for 334 chains--I believe that is wrong. It makes up into something that would wrap around a person 2 or 3 times. When I made a blanket that was 80" wide, I used only 258 chains. The numbers of starting chains for all sizes in the pattern are in error! Can you please tell how many start chains there are actually supposed to be for L/XL? Thank you!

19.05.2018 - 07:26

DROPS Design answered:

Dear Mrs Gadberry, make sure you get the correct tension, ie 13 double crochet on 10 cm / 4'' in width. Pattern A.1B measures approx. 7 cm / 2¾'' in width and A.x measures approx. 6.5 cm / 2½'' in height - and you'll get the measurements shown in the measurement chart (= in cm, taken flat from side to side). Happy crocheting!

22.05.2018 - 10:28

country flag Althea M Kirby wrote:

How many skeins does this pattern require?

12.05.2018 - 16:52

DROPS Design answered:

Dear Mrs Kirby, you will find total weight of yarn required in each size under the header, ie 550-650-800 g DROPS Paris color 01, apricot - DROPS Paris = 50 g a skein, so that you will need 550/50= 11 balls in first size. Happy crocheting!

14.05.2018 - 11:53