
Popular categories
Looking for a yarn?


|
||||||||||||||||||||||||||||||||||
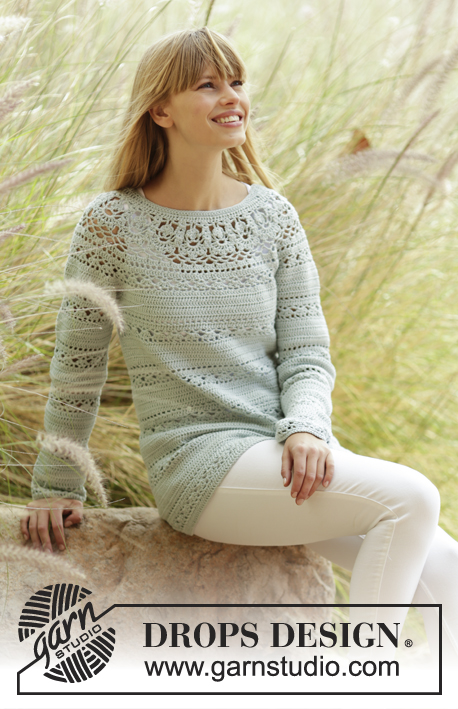
Sweet Mint Cardigan |
||||||||||||||||||||||||||||||||||
|
|
||||||||||||||||||||||||||||||||||
Crochet DROPS jacket with lace pattern and round yoke in ”Safran”. The piece is worked top down. Size: S - XXXL.
DROPS 169-32 |
||||||||||||||||||||||||||||||||||
|
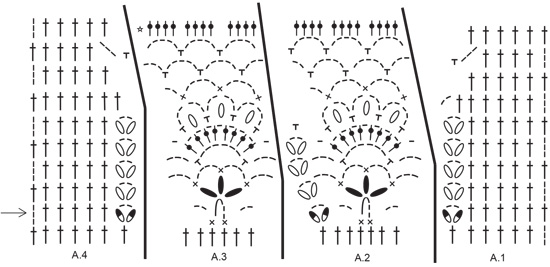
PATTERN: See diagrams A.1 to A.8. CROCHET INFO: On every dc row replace first dc with 3 ch. On every sc row replace first sc with 1 ch. Replace first dc at on every dc round with ch 3, finish the round with 1 sl st in 3rd ch from beg of round. Replace first sc at on every sc round with ch 1, finish the round with 1 sl st in first ch from beg of round. INCREASE TIP-1: Inc 1 dc by working 2 dc in same st. INCREASE TIP-2: Work until 2 dc/ch remain before marker, work 2 dc in/around next dc/ch (= 1 dc inc), work 1 dc in/around each of the next 2 dc/ch, markers is in the middle of these dc/ch, work 2 dc in/around next dc/ch (= 1 dc inc). Repeat inc at every marker. PATTERN-1 (applies to body): Work 1 dc in every dc until 6-8-10-10-10-10 rows have been worked, * work from RS: Work A.5 over the first 6 dc, A.6 over next dc, repeat A.7 until 6 dc remain, A.8 over the last 6 dc. When A.5 to A.8 have been worked 1 time vertically, work 6-8-10-10-10-10 rows with 1 dc in every dc *, repeat pattern from *-* until finished measurements. PATTERN-2 (applies to sleeve): * Work A.7 over all dc. When A.7 has been worked 1 time vertically, continue as follows: Work 6-8-10-10-10-10 rounds with 1 dc in every dc *, repeat from *-* until finished measurements. DECREASE TIP: Dec 1 dc by working the next 2 dc tog as follows: Work 1 dc but wait with last pull through (= 2 loops on hook), then work next dc but on last pull through, pull yarn through all 3 loops on hook. BUTTONHOLES: Make buttonholes on right band. 1 buttonhole = replace fourth dc from edge with 1 ch. On next row work band st as before (work 1 dc around ch). Work for buttonholes when piece measures: SIZE S: 2, 11, 20, 29, 38 and 47 cm SIZE M: 2, 11, 20, 29, 38 and 47 cm SIZE L: 2, 10, 18, 26, 34, 42 and 50 cm SIZE XL: 2, 10, 18, 26, 34, 42 and 50 cm SIZE XXL: 2, 11, 20, 29, 38, 47 and 55 cm SIZE XXXL: 2, 11, 20, 29, 38, 47 and 55 cm ---------------------------------------------------------- YOKE: Worked back and forth, top down. Work 163-163-172-172-180-180 ch on hook size 3.5 mm/E/4 with Safran. Work next row as follows: Work 1 dc in 4th ch from hook (= 2 dc) - READ CROCHET INFO, 1 dc in each of the next 5-5-0-0-1-1 ch, * skip ch 1, 1 dc in each of the next 6 ch *, repeat from *-* the entire row = 139-139-146-146-153-153 dc. Then work next row from WS as follows: Work A.4 over the first 7 dc (= right band), A.3 over the next 6 dc, repeat A.2 until 7 dc remain (= 17-17-18-18-19-19 times in width), finish with A.1 over the last 7 dc (= left band). Continue like this, i.e. work as follows from RS: A.1, A.2 17-17-18-18-19-19 times in total, A.3 and A.4. REMEMBER THE CROCHET GAUGE! Remember BUTTONHOLES - see explanation above. On last row in A.1-A.4 (= from WS) insert 8 markers and inc as follows: NOTE: Continue as shown in diagrams A.1-A.4. Work and inc like as follows AT THE SAME TIME inc in addition 0-3-3-9-3-3 dc evenly on the entire row – READ INCREASE TIP-1: Work 36-36-38-38-40-40 dc, insert 1 marker in piece, work 4 dc and inc 2-4-4-4-4-4 dc evenly (= right front piece), insert 1 marker, work 42-42-44-44-46-46 dc, insert 1 marker, work 4 dc and inc 2-4-4-4-4-4 dc evenly, insert 1 marker (= sleeve), work 56-56-60-60-64-64 dc, insert 1 marker, work 4 dc and inc 2-4-4-4-4-4 dc evenly, insert 1 marker (= back piece), work 42-42-44-44-46-46 dc, insert 1 marker, work 4 dc and inc 1-4-4-4-4-4 dc evenly, insert 1 marker (= sleeve), work 36-36-38-38-40-40 dc (= left front piece) = 235-247-259-265-271-271 dc on row. Move the markers upwards when working. Piece measures approx. 9 cm / 3½''. Work 0-0-0-0-2-2 row with 1 dc in every dc and inc 0-0-0-0-12-15 dc evenly on every row (= 0-0-0-0-24-30 dc in total) = 235-247-259-265-295-301 dc. Work A.5 to A.7 as follows (first row is from RS): Work A.5 over the first 6 dc (= left band), A.6 over next dc, repeat A.7 until 6 dc remain (= 37-39-41-42-47-48 times in width), finish with A.8 over the last 6 dc (= right band). On 2nd row (i.e. dc row) inc at every marker – READ INCREASE TIP-2 and inc 2-8-8-8-8-8 dc evenly on row (= 2 dc in at every marker and 2-8-8-8-8-8 dc inc evenly = 18-24-24-24-24-24 dc inc in total on row) = 253-271-283-289-319-325 dc. Now repeat A.7 40-43-45-46-51-52 times in width. Repeat inc (i.e. 2 dc inc at every marker and 2-8-8-8-8-8 dc inc evenly = 18-24-24-24-24-24 dc inc in total on row). On last row in A.5 to A.8 = 271-295-307-313-343-349 dc. * Work 1 row with 1 dc in every dc. Work 1 row with dc and inc 18-18-16-17-24-26 dc evenly *, repeat from *-* 1-1-2-3-2-3 times in total = 289-313-339-364-391-427 dc. Work 0-1-1-0-1-0 rows with 1 dc in every dc. Piece measures approx. 17-18-19-20-21-22 cm / 6¾''-7''-7½''-8''-8¼''-8¾''. On next row (= from RS), work as follows: Work 1 dc in each of the first 46-50-54-58-64-70 dc (= left front piece), work 8 ch, skip 60-64-69-73-75-79 dc from previous row (= sleeve), 1 dc in each of the next 77-85-93-102-113-129 dc (= back piece), 8 ch, skip 60-64-69-73-75-79 dc from previous round (= sleeve), 1 dc in each of the last 46-50-54-58-64-70 dc (= right front piece) = 185-201-217-234-257-285 dc/ch on row. Insert 1 marker in piece, NOW MEASURE PIECE FROM HERE. Work 1 row with 1 dc in every dc/ch. Then work PATTERN-1 from RS - see explanation above and dec 4-2-0-5-4-2 dc evenly in first row of dc- READ DECREASE TIP = 181-199-217-229-253-283 dc. When piece measures 12 cm / 4¾'', adjust so that next row is a row with dc, dec 6-12-12-6-6-6 dc evenly = 175-187-205-223-247-277 dc. Continue with pattern as before. When piece measures 19-20-21-22-23-24 cm / 7½''-8''-8¼''-8¾''-9''-9½'' – adjust so that next row is a row with dc, inc 12 dc evenly. Repeat inc every 3 cm / 1'' 5-5-5-5-6-6 more times = 247-259-277-295-331-361 dc. Work pattern as before until piece measures 44-45-46-47-48-49 cm / 17 1/4''-17 3/4''-18''-18½''-19''-19 1/4'' from marker. Fasten off. SLEEVE: Sleeve is worked in the round, top down. Beg by working mid under sleeve as follows: Work 1 sc in 5th ch of the 8 ch work in armhole on body, 3 ch (= 1 dc), work 1 dc in each of the next ch 3, work 1 dc in every dc over sleeve, work 1 dc in each of the remaining 4 ch under sleeve = 68-72-77-81-83-87 dc. Insert 1 marker thread mid under sleeve. Insert 1 marker in piece, NOW MEASURE PIECE FROM HERE. Leave marker in piece, move marker thread when working. SIZE S-M: Work 1 dc in every dc and dec 2-0 dc evenly = 66-72 dc. SIZE L-XL-XXL-XXXL: Work 1 dc in every dc and inc 1-3-1-3 dc evenly = 78-84-84-90 dc. ALL SIZES: READ ALL OF THE FOLLOWING SECTION BEFORE CONTINUING! WORK PATTERN AND DEC AT THE SAME TIME: PATTERN: Work 1 dc in every dc until 5-7-9-9-9-9 round with dc have been worked in total. Work PATTERN-2 - see explanation above. DECREASE: When piece measures 4 cm / 1½'', adjust so that next round is 1 round with dc, dec 6 dc evenly, repeat dec every 15-10-8-8-8-6 cm / 6"-4"-3"-3"-3"-2½" 2-3-4-4-4-5 more times = 48-48-48-54-54-54 dc. Fasten off when sleeve measures 46-45-45-44-44-43 cm / 18"-17 3/4"-17 3/4"-17 1/4"-17 1/4"-17". Work the other sleeve the same way. NECK EDGE: Worked back and forth from mid front. Beg from RS. Work in ch where the dc were worked (i.e. do not work over the ch skipped = 139-139-146-146-153-153 dc). Work 1 sc in each of the first 22-22-24-24-26-26 dc, * 1 hdc in each of the next ch 3, 1 dc in each of the next ch 3, 1 tr in each of the next 19 ch, 1 dc in each of the next ch 3, 1 hdc in each of the next 3 ch *, 1 sc in each of the next 33-33-36-36-39-39 ch, repeat from *-* 1 time, 1 sc in each of the last 22-22-24-24-26-26 ch. Work next row as follows: Work 1 sc in each of the first 26-26-28-28-30-30 sts, ** 1 hdc in each of the next 3 sts, 1 dc in each of the next 3 sts, * work the next 2 tr tog *, repeat from *-* 5 more times, 1 dc in each of the next 3 sts, 1 hdc in each of the next 3 sts **, 1 sc in each of the next 39-39-42-42-45-45 sts, repeat from **-** 1 more time, finish with 1 sc in each of the last 26-26-28-28-30-30 sts = 127-127-134-134-141-141 sts. Work 1 row with 1 sc in every st. Fasten off. ASSEMBLY: Sew the buttons on to the left front band. |
||||||||||||||||||||||||||||||||||
Diagram explanations |
||||||||||||||||||||||||||||||||||
|
||||||||||||||||||||||||||||||||||
|
||||||||||||||||||||||||||||||||||

|
||||||||||||||||||||||||||||||||||

|
||||||||||||||||||||||||||||||||||
|
Have you made this or any other of our designs? Tag your pictures in social media with #dropsdesign so we can see them! Do you need help with this pattern?You'll find tutorial videos, a Comments/Questions area and more by visiting the pattern on garnstudio.com. © 1982-2024 DROPS Design A/S. We reserve all rights. This document, including all its sub-sections, has copyrights. Read more about what you can do with our patterns at the bottom of each pattern on our site. |
||||||||||||||||||||||||||||||||||


With over 40 years in knitting and crochet design, DROPS Design offers one of the most extensive collections of free patterns on the internet - translated to 17 languages. As of today we count 304 catalogs and 11422 patterns - 11417 of which are translated into English (US/in).
We work hard to bring you the best knitting and crochet have to offer, inspiration and advice as well as great quality yarns at incredible prices! Would you like to use our patterns for other than personal use? You can read what you are allowed to do in the Copyright text at the bottom of all our patterns. Happy crafting!
Comments / Questions (97)
Buongiorno. Cliccando su "questo modello è stato corretto" escono le correzioni, ma c'è un problema. Una correzione (la prima del 08/09/2016) è inerente ad un lavoro ai ferri, parla di gettate e maglie diritte, mentre questo è un modello ad uncinetto.
22.07.2020 - 10:34DROPS Design answered:
Buongiorno Dea, grazie per la segnalazione, abbiamo provveduto all'eliminazione della correzione errata: era effettivamente riferita ad un altro modello. Buon lavoro!
22.07.2020 - 11:55Laatste toer van Tek. A1 - A4 De meerderingen van de 4 stokjes (na de 4 gehaakte stokjes) zitten er dan uiteindelijk totaal 8 stokjes in één 5-lossenboogje? (en dat dan verdeeld op 4 verschillende plekken in de toer) Sorry voor al mijn vragen maar ik probeer het patroon te snappen en vind het vest zo mooi.
23.06.2020 - 13:30DROPS Design answered:
Dag Ada,
Ja, als je meerdert, dan brei je het aantal stokjes die je moet meerderen als extra stokje in het boogje. Dus in een aantal boogjes zitten dan extra stokjes door het meerderen op die plek.
04.07.2020 - 16:56Tek. (A1-A4) de 3e rij van boven: A4 = 6 stokjes, A3 begint met 3 l, 1 v in het 2-l boogje vorige toer; dan 5-l boogjes die doorgaan in A2; A2 eindigt met 3 l en dan gaat A1 door met 2 l (dus weer een 5-l boogje) waarna je gelijk doorgaat met de 6 stokjes. 3 vragen: 1. Overgang A2 naar A1 wordt de 2-l boog van de vorige toer dan overgeslagen? 2. Links en rechts moeten toch gelijke voorpanden zijn? Hoe dan? 3. Hoeveel boogjes moet je na deze toer hebben?
23.06.2020 - 13:16DROPS Design answered:
Dag Ada,
Vraag 1: Ja het eerste stokje wordt ook overgeslagen en je haakt in het stokje daarna.
A.4 is de rechter voorbies en A.1 is de linker voorbies. Daartussen zit A.2/A.3
Dit hangt van je maat af; je herhaalt A.2 17-17-18-18-19-19 keer in de breedte. Dus dat aantal keer 3 boogjes plus de 3 boogjes van A.3
30.06.2020 - 17:57Hallo, Ik snap helemaal niets van de meerderingen aan het eind van de pas. Ik maak maat L. Ik snap hoe ik van 146 steken uit moet komen op 259 maar begrijp niet hoe ik de verdeling moet maken over de toer ervoor. Ik heb daar 58 boogjes tussen de 6 stokjes aan begin en einde van de toer (KLOPT DAT?) Hoop dat iemand mij kan helpen want ik ben al de hele avond aan het tobben.
23.06.2020 - 00:00DROPS Design answered:
Dag Ada,
Na het opzetten, de eerste toer en A.1 t/m A.4 in de hoogte, heb je 240 steken op de toer (omdat er meerderingen in het telpatroon verwerkt zijn). In de laatst toer plalats je dan markeerdraden in het werk en meerder je teglijkertijd zoals aangegeven 4 x 4 steken. Daar bovenop meerder je nog eens 3 steken verdeeld over de toer. (Deze 3 steken meerder je dus op dezelfde toer als de toer waar je markeerdraden plaatst en meerdert.)
Je hetbt 18 herhalingen van A.2 (3 boogjes), plus A.3, dan kom je op 57 boogjes in totaal. Hiermee bedoel ik de boogjes waarin de laatst toer 4 stokjes worden gehaakt.
04.07.2020 - 16:54Beste, Supermooi vest! Ik begrijp in de 2e toer van de pas het stukje waar ik de 6 lossen met die 3 bobbels moet maken niet (zowel in A3 als A2) Kunt u dat nog iets duidelijker uitleggen? Alvast bedankt! Groeten, Ada
16.06.2020 - 23:30DROPS Design answered:
Dag Ada,
De bobbel staat beschreven bij de symbolen; je haakt eerst 3 lossen, dan haak je een stokje om de lossenring, dan een halve vaste om dezelfde lossenring. Nu heb je 1 bobbel. Voor 3 bobbels herhaal je bovenstaande nog 2 keer.
18.06.2020 - 09:46Witam, czy jest możliwe wykonanie tego swetra włóczką z grupy C (dokładnie DROPS Alaska)? Czy taka zamiana ma w ogóle szansę się udać? :) Chciałabym zrobić gruby sweter, ale nie pasuje mi żaden fason przypisany do włóczek z grupy C :/ Dziękuję i pozdrawiam
28.12.2019 - 09:38DROPS Design answered:
Witaj Kasiu! Szydełkowa robótka jest bardziej zwarta niż ta wykonana na drutach, dlatego ten sweter wykonany z włóczki z grupy C może okazać się zbyt sztywny. Oczywiście możesz użyć grubszego szydełka, ale wtedy będzie to już całkiem inny wzór, opis ulegałby modyfikacji w całości. Popatrz na nasze najnowsze wzory, te które są teraz głosowane z kolekcji DROPS Wiosna&Lato 2020, albo poszukaj wzorów z całej naszej oferty, np. na angielskiej stronie, a jak coś ci się spodoba napisz, a przetłumaczymy wzór na polski w ciągu tygodnia. Serdecznie pozdrawiamy!
30.12.2019 - 00:19Jeg har et stort problem med, at finde udaf den sidste række i diagram A1 - A4, hvor der sættes mærketråde. For når jeg hækler 4 stm i hver bue, til jeg har 38 stm og kommer til udtagning er det så 8 stm i den næste bue Incl udtagning og så et mærke og så fortsætter med 44 stm, for hvis det er sådan, så har jeg ikke lm buer nok (jeg har 55 lmbuer) håber at I kan forklare mig det, for har trævlet op 7 gange.
08.12.2019 - 12:31DROPS Design answered:
Hei Kate! Hvilken størrelse hekler du? Om du hekler størrelse S eller M skal det være 54 luftmaskebuer når siste omgang skal hekles. Om du hekler størrelse L eller XL skal det være 57 luftmaskebuer, og om du hekler størrelse XXL eller XXXL skal det være 60 lufmaskebuer når siste omgang skal hekles. Lykke til!
09.12.2019 - 13:14Hejza, jeg har et stort problem, jeg kan ikke finde ud af 3 række i A2 og A3 diagram 169-32 til sweet mint cardigan, der hvor der skal hækles boble. Håber du /i kan hjælpe.
02.12.2019 - 20:32DROPS Design answered:
Hei Kate! Boblen hekles på rad 2 av A.2 og A.3, her kan du se hvordan boblen hekles. Lykke til!
03.12.2019 - 08:48I finished my cardigan! I am so happy. I followed all the instructions properly, but I must have misread something, because it\'s not sitting right on me. Size s. Falling off my shoulders with sleeve waaaay too low. imgur: vHJ1XQp
21.09.2019 - 11:27Ah, by looking at photos I could see it's a bit of a neck add on for the back. Then I ask which are the ch skipped? Also, the yoke is very wide on me. almost reaches my shoulder tips. Can I add another whole row of dc with dec to make the collar fit a bit tighter? What's a good dec rate? (size s)
06.09.2019 - 20:10DROPS Design answered:
Dear Mrs Brown, at the very beginning of yoke you crochet more chains than you need dc to avoid the cast on edge being too tight, when working neck edge later you will work only in the chains where you croheted 1 dc on the very first row on yoke. We are unfortunately not able to adjust every pattern to every single request, please contact the store where you bought the yarn for any individual assistance. Happy crocheting!
09.09.2019 - 08:02