
Popular categories
Looking for a yarn?


|
||||||||||||||||||||||||||||||||||
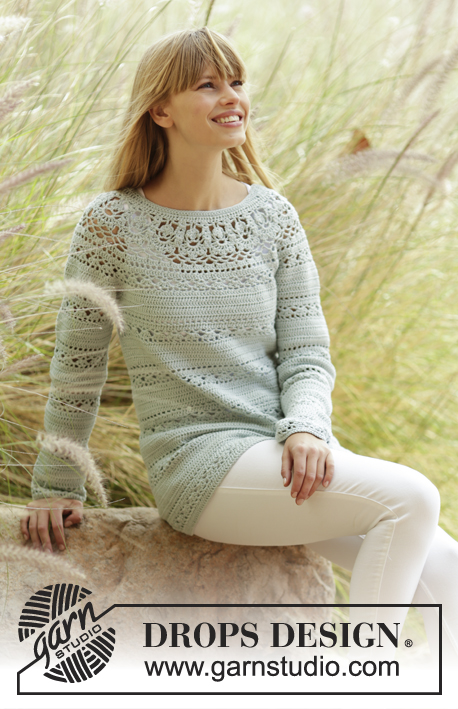
Sweet Mint Cardigan |
||||||||||||||||||||||||||||||||||
|
|
||||||||||||||||||||||||||||||||||
Crochet DROPS jacket with lace pattern and round yoke in ”Safran”. The piece is worked top down. Size: S - XXXL.
DROPS 169-32 |
||||||||||||||||||||||||||||||||||
|
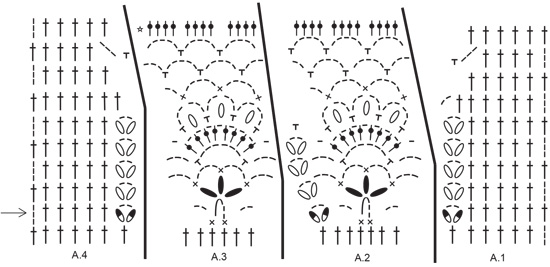
PATTERN: See diagrams A.1 to A.8. CROCHET INFO: On every dc row replace first dc with 3 ch. On every sc row replace first sc with 1 ch. Replace first dc at on every dc round with ch 3, finish the round with 1 sl st in 3rd ch from beg of round. Replace first sc at on every sc round with ch 1, finish the round with 1 sl st in first ch from beg of round. INCREASE TIP-1: Inc 1 dc by working 2 dc in same st. INCREASE TIP-2: Work until 2 dc/ch remain before marker, work 2 dc in/around next dc/ch (= 1 dc inc), work 1 dc in/around each of the next 2 dc/ch, markers is in the middle of these dc/ch, work 2 dc in/around next dc/ch (= 1 dc inc). Repeat inc at every marker. PATTERN-1 (applies to body): Work 1 dc in every dc until 6-8-10-10-10-10 rows have been worked, * work from RS: Work A.5 over the first 6 dc, A.6 over next dc, repeat A.7 until 6 dc remain, A.8 over the last 6 dc. When A.5 to A.8 have been worked 1 time vertically, work 6-8-10-10-10-10 rows with 1 dc in every dc *, repeat pattern from *-* until finished measurements. PATTERN-2 (applies to sleeve): * Work A.7 over all dc. When A.7 has been worked 1 time vertically, continue as follows: Work 6-8-10-10-10-10 rounds with 1 dc in every dc *, repeat from *-* until finished measurements. DECREASE TIP: Dec 1 dc by working the next 2 dc tog as follows: Work 1 dc but wait with last pull through (= 2 loops on hook), then work next dc but on last pull through, pull yarn through all 3 loops on hook. BUTTONHOLES: Make buttonholes on right band. 1 buttonhole = replace fourth dc from edge with 1 ch. On next row work band st as before (work 1 dc around ch). Work for buttonholes when piece measures: SIZE S: 2, 11, 20, 29, 38 and 47 cm SIZE M: 2, 11, 20, 29, 38 and 47 cm SIZE L: 2, 10, 18, 26, 34, 42 and 50 cm SIZE XL: 2, 10, 18, 26, 34, 42 and 50 cm SIZE XXL: 2, 11, 20, 29, 38, 47 and 55 cm SIZE XXXL: 2, 11, 20, 29, 38, 47 and 55 cm ---------------------------------------------------------- YOKE: Worked back and forth, top down. Work 163-163-172-172-180-180 ch on hook size 3.5 mm/E/4 with Safran. Work next row as follows: Work 1 dc in 4th ch from hook (= 2 dc) - READ CROCHET INFO, 1 dc in each of the next 5-5-0-0-1-1 ch, * skip ch 1, 1 dc in each of the next 6 ch *, repeat from *-* the entire row = 139-139-146-146-153-153 dc. Then work next row from WS as follows: Work A.4 over the first 7 dc (= right band), A.3 over the next 6 dc, repeat A.2 until 7 dc remain (= 17-17-18-18-19-19 times in width), finish with A.1 over the last 7 dc (= left band). Continue like this, i.e. work as follows from RS: A.1, A.2 17-17-18-18-19-19 times in total, A.3 and A.4. REMEMBER THE CROCHET GAUGE! Remember BUTTONHOLES - see explanation above. On last row in A.1-A.4 (= from WS) insert 8 markers and inc as follows: NOTE: Continue as shown in diagrams A.1-A.4. Work and inc like as follows AT THE SAME TIME inc in addition 0-3-3-9-3-3 dc evenly on the entire row – READ INCREASE TIP-1: Work 36-36-38-38-40-40 dc, insert 1 marker in piece, work 4 dc and inc 2-4-4-4-4-4 dc evenly (= right front piece), insert 1 marker, work 42-42-44-44-46-46 dc, insert 1 marker, work 4 dc and inc 2-4-4-4-4-4 dc evenly, insert 1 marker (= sleeve), work 56-56-60-60-64-64 dc, insert 1 marker, work 4 dc and inc 2-4-4-4-4-4 dc evenly, insert 1 marker (= back piece), work 42-42-44-44-46-46 dc, insert 1 marker, work 4 dc and inc 1-4-4-4-4-4 dc evenly, insert 1 marker (= sleeve), work 36-36-38-38-40-40 dc (= left front piece) = 235-247-259-265-271-271 dc on row. Move the markers upwards when working. Piece measures approx. 9 cm / 3½''. Work 0-0-0-0-2-2 row with 1 dc in every dc and inc 0-0-0-0-12-15 dc evenly on every row (= 0-0-0-0-24-30 dc in total) = 235-247-259-265-295-301 dc. Work A.5 to A.7 as follows (first row is from RS): Work A.5 over the first 6 dc (= left band), A.6 over next dc, repeat A.7 until 6 dc remain (= 37-39-41-42-47-48 times in width), finish with A.8 over the last 6 dc (= right band). On 2nd row (i.e. dc row) inc at every marker – READ INCREASE TIP-2 and inc 2-8-8-8-8-8 dc evenly on row (= 2 dc in at every marker and 2-8-8-8-8-8 dc inc evenly = 18-24-24-24-24-24 dc inc in total on row) = 253-271-283-289-319-325 dc. Now repeat A.7 40-43-45-46-51-52 times in width. Repeat inc (i.e. 2 dc inc at every marker and 2-8-8-8-8-8 dc inc evenly = 18-24-24-24-24-24 dc inc in total on row). On last row in A.5 to A.8 = 271-295-307-313-343-349 dc. * Work 1 row with 1 dc in every dc. Work 1 row with dc and inc 18-18-16-17-24-26 dc evenly *, repeat from *-* 1-1-2-3-2-3 times in total = 289-313-339-364-391-427 dc. Work 0-1-1-0-1-0 rows with 1 dc in every dc. Piece measures approx. 17-18-19-20-21-22 cm / 6¾''-7''-7½''-8''-8¼''-8¾''. On next row (= from RS), work as follows: Work 1 dc in each of the first 46-50-54-58-64-70 dc (= left front piece), work 8 ch, skip 60-64-69-73-75-79 dc from previous row (= sleeve), 1 dc in each of the next 77-85-93-102-113-129 dc (= back piece), 8 ch, skip 60-64-69-73-75-79 dc from previous round (= sleeve), 1 dc in each of the last 46-50-54-58-64-70 dc (= right front piece) = 185-201-217-234-257-285 dc/ch on row. Insert 1 marker in piece, NOW MEASURE PIECE FROM HERE. Work 1 row with 1 dc in every dc/ch. Then work PATTERN-1 from RS - see explanation above and dec 4-2-0-5-4-2 dc evenly in first row of dc- READ DECREASE TIP = 181-199-217-229-253-283 dc. When piece measures 12 cm / 4¾'', adjust so that next row is a row with dc, dec 6-12-12-6-6-6 dc evenly = 175-187-205-223-247-277 dc. Continue with pattern as before. When piece measures 19-20-21-22-23-24 cm / 7½''-8''-8¼''-8¾''-9''-9½'' – adjust so that next row is a row with dc, inc 12 dc evenly. Repeat inc every 3 cm / 1'' 5-5-5-5-6-6 more times = 247-259-277-295-331-361 dc. Work pattern as before until piece measures 44-45-46-47-48-49 cm / 17 1/4''-17 3/4''-18''-18½''-19''-19 1/4'' from marker. Fasten off. SLEEVE: Sleeve is worked in the round, top down. Beg by working mid under sleeve as follows: Work 1 sc in 5th ch of the 8 ch work in armhole on body, 3 ch (= 1 dc), work 1 dc in each of the next ch 3, work 1 dc in every dc over sleeve, work 1 dc in each of the remaining 4 ch under sleeve = 68-72-77-81-83-87 dc. Insert 1 marker thread mid under sleeve. Insert 1 marker in piece, NOW MEASURE PIECE FROM HERE. Leave marker in piece, move marker thread when working. SIZE S-M: Work 1 dc in every dc and dec 2-0 dc evenly = 66-72 dc. SIZE L-XL-XXL-XXXL: Work 1 dc in every dc and inc 1-3-1-3 dc evenly = 78-84-84-90 dc. ALL SIZES: READ ALL OF THE FOLLOWING SECTION BEFORE CONTINUING! WORK PATTERN AND DEC AT THE SAME TIME: PATTERN: Work 1 dc in every dc until 5-7-9-9-9-9 round with dc have been worked in total. Work PATTERN-2 - see explanation above. DECREASE: When piece measures 4 cm / 1½'', adjust so that next round is 1 round with dc, dec 6 dc evenly, repeat dec every 15-10-8-8-8-6 cm / 6"-4"-3"-3"-3"-2½" 2-3-4-4-4-5 more times = 48-48-48-54-54-54 dc. Fasten off when sleeve measures 46-45-45-44-44-43 cm / 18"-17 3/4"-17 3/4"-17 1/4"-17 1/4"-17". Work the other sleeve the same way. NECK EDGE: Worked back and forth from mid front. Beg from RS. Work in ch where the dc were worked (i.e. do not work over the ch skipped = 139-139-146-146-153-153 dc). Work 1 sc in each of the first 22-22-24-24-26-26 dc, * 1 hdc in each of the next ch 3, 1 dc in each of the next ch 3, 1 tr in each of the next 19 ch, 1 dc in each of the next ch 3, 1 hdc in each of the next 3 ch *, 1 sc in each of the next 33-33-36-36-39-39 ch, repeat from *-* 1 time, 1 sc in each of the last 22-22-24-24-26-26 ch. Work next row as follows: Work 1 sc in each of the first 26-26-28-28-30-30 sts, ** 1 hdc in each of the next 3 sts, 1 dc in each of the next 3 sts, * work the next 2 tr tog *, repeat from *-* 5 more times, 1 dc in each of the next 3 sts, 1 hdc in each of the next 3 sts **, 1 sc in each of the next 39-39-42-42-45-45 sts, repeat from **-** 1 more time, finish with 1 sc in each of the last 26-26-28-28-30-30 sts = 127-127-134-134-141-141 sts. Work 1 row with 1 sc in every st. Fasten off. ASSEMBLY: Sew the buttons on to the left front band. |
||||||||||||||||||||||||||||||||||
Diagram explanations |
||||||||||||||||||||||||||||||||||
|
||||||||||||||||||||||||||||||||||
|
||||||||||||||||||||||||||||||||||

|
||||||||||||||||||||||||||||||||||

|
||||||||||||||||||||||||||||||||||
|
Have you made this or any other of our designs? Tag your pictures in social media with #dropsdesign so we can see them! Do you need help with this pattern?You'll find tutorial videos, a Comments/Questions area and more by visiting the pattern on garnstudio.com. © 1982-2024 DROPS Design A/S. We reserve all rights. This document, including all its sub-sections, has copyrights. Read more about what you can do with our patterns at the bottom of each pattern on our site. |
||||||||||||||||||||||||||||||||||


With over 40 years in knitting and crochet design, DROPS Design offers one of the most extensive collections of free patterns on the internet - translated to 17 languages. As of today we count 304 catalogs and 11422 patterns - 11417 of which are translated into English (US/in).
We work hard to bring you the best knitting and crochet have to offer, inspiration and advice as well as great quality yarns at incredible prices! Would you like to use our patterns for other than personal use? You can read what you are allowed to do in the Copyright text at the bottom of all our patterns. Happy crafting!
Comments / Questions (97)
Danke für Ihre Antwort vom 2.04. Wann ist denn mit einer Reaktion des Design-Teams zu rechnen ? Freundliche Grüße !
13.04.2024 - 21:55Wederom een lastig patroon. In de diagrammen A1 t/m A4 tel ik verschil in het aantal toeren. A1 en A4 tel ik 10 toeren! A2 en A3 tel ik 11 toeren!
07.04.2024 - 14:35Ook ik heb een vraag over de “bobbel”. Hoe ik hem moet haken weet ik, maar hoe kom ik van de vorige steek naar de eerste bobbel. En van de laatste bobbel naar de volgende steek? Ik had namelijk ergens gelezen dat je vanaf de lossenboog moet beginnen met de bobbel.
07.04.2024 - 09:28DROPS Design answered:
Dag Nancy,
Vlak voor de bobbel haak je een vaste in de lossenboog van de vorige toer (dit is het symbool met het kruisje), de bobbel haakje ook in een lossenboogje en de vaste daarna haak je weer in het daaropvolgende lossenboogje.
07.04.2024 - 18:49Leider bin ich noch nicht weiter gekommen : A1 und A4 sollen doch symmetrisch sein, oder ? In Reihe 6 des Musters sind 2 Luftmaschen in A1 abgebildet, am Ende der Reihe in A4 nicht. Die findet man aber in A3. In der folgenden Reihe (beginnt in A4) wird die erste feste Masche dann dorthin plaziert. Am Ende der Reihe soll jedoch keine feste Masche in die 2 Luftmaschen von A1 gehäkelt werden ? Fröhliche Ostergrüße !
01.04.2024 - 11:27DROPS Design answered:
Liebe Christine, wir habe Ihre Fragen zum Design Team weitergeleitet, danke im voraus für Ihren Geduld.
02.04.2024 - 15:08Tut mir leid, aber alle bisherigen Erklärungen beantworten nicht meine Frage. Ich versuche es noch einmal : In REIHE 7 des Musters sitzt die ERSTE feste Masche in dem 2ER-Luftmaschenbogen der Vorrunde, wogegen die LETZTE feste Masche in A2 in einem 5ER-Luftmaschenbogen der Vorrunde plaziert ist. Das ist doch kein symmetrischer Übergang, oder ? Meine Frage betrifft also NICHT die 8.REIHE des Musters, die ist klar. Es geht um die PLAZIERUNG der FESTEN Maschen der 7.Reihe.
29.02.2024 - 18:45Danke für den Versuch, es ist aber immer noch nicht klargeworden, was ich meine. Die 8.Reihe, also die 7.Reihe des Musters beginnt laut Diagramm in A4. Die Übergänge von A4 nach A3 und am Ende der Reihe von A2 nach A1 werden jeweils mit 3 Luftmaschen gebildet. Aber um welche Luftmaschenbögen der Vorrunde ( also der 6. des Musters ) werden die erste ( in A3 ) und analog die letzte feste Masche ( in A2 ) gebildet ?? Schauen Sie bitte noch mal genau das Diagramm an !
29.02.2024 - 14:03DROPS Design answered:
Liebe Christine, bei der 7. Reihe sind es beidseitig 3 Luftmaschen: Anfang Ende A.3 und am Ende A.1 (nach der letzten fM in A.2)- so wird das Muster symmetrisch sein, bei der 8. Reihe endet A.1 mit 3 Luftmaschen + 1 feste Masche in den ersten Luftmaschenbogen A.2 (mit nur 3 Lm), und am Ende der Reihe häkeln Sie nach den 5 Luftmaschen (am Ende A.3) 1 feste Masche in den letzten Luftmaschenbogen in A.3 (mit nur 3 Lm), dan 3 Lm, 1 Stäbchen überspringen, 1 Stäbchen in den nächsten Stäbchen häkeln. Aber gerne können Sie auch das Muster genauso anders anpassen. Viel Spaß beim häkeln!
29.02.2024 - 16:25Wahrscheinlich war meine Frage zu unkonkret. In Reihe 8 ( beginnt in A4 ) geht es mir um die Übergänge von A4 nach A3 und am Ende der Reihe von A2 nach A1. Die erste feste Masche in A3 wird um einen 2er Luftmaschenbogen der Vorrunde gehäkelt, aber die letzte feste Masche in A2 um einen 5er Luftmaschenbogen der Vorrunde. Das ist doch nicht symmetrisch ! Bitte können Sie das noch mal aufklären ? Freundlichen Gruß !
28.02.2024 - 20:38DROPS Design answered:
Liebe Christine, bei der 7. Reihe beginnt A.2 mit 3 Lufmtaschen nach A.1 und endet A.3 mit 3 Luftmaschen vor A.4. Bei der 8. Reihe ist die feste Masche um diese Luftmaschenbogen gehäkelt. Viel Spaß beim Häkeln!
29.02.2024 - 08:03Danke für Ihre Antwort vom 16.02. und die Korrektur ! In Reihe 8 ist die letzte feste Masche in A2 nun um den 5er Luftmaschenbogen der Vorrunde, analog ist die erste feste Masche in A3 aber um den 2er Luftmaschenbogen der Vorrunde. Ist das so gedacht ?
27.02.2024 - 11:43DROPS Design answered:
Liebe Christine, die feste Masche am Ende A.1 wird um den 1. Luftmaschen Bogen von der vorigen Reihe (= A.2) gehäkelt und die feste Masche am Anfang A.4 wird um den letzten Luftmaschenbogen am ende A.3 gehäkelt. Viel Spaß beim häkeln!
27.02.2024 - 13:34Hej i uppdateringen står det sen stickas mönster 1 ,😳är det inte virkmönster???
21.02.2024 - 17:46Hallo, ich habe eine Frage zum Muster der Passe. Ist das wirklich so gedacht, daß die Übergänge von A4 nach A3 und A2 nach A1 nicht gleich sein sollen ? Bei den ersten Reihen klappt das noch. Aber in Reihe 8 ( bzw. 7. Reihe des Musters ) kommen nach den Stäbchen drei Luftmaschen, die in einer festen Masche um den Bogen der vorigen Reihe enden. Das Ende in A2 sind dann drei Luftmaschen und A1 beginnt mit zwei Luftmaschen. Fehlt dazwischen nicht etwas ? Viele Grüße !
15.02.2024 - 15:38DROPS Design answered:
Liebe Christine, ich werde Ihre Rückmeldung weiterleiten, und würde sagen daß man auch 2 Lm nach den Stäbchen in A.4 häkeln muss (so wird es mit A.1 symmetrisch). Viel Spaß beim häkeln!
16.02.2024 - 09:24