
Popular categories
Looking for a yarn?


|
|||||||||||||||||||||||||
Mercy |
|||||||||||||||||||||||||
|
|
|||||||||||||||||||||||||
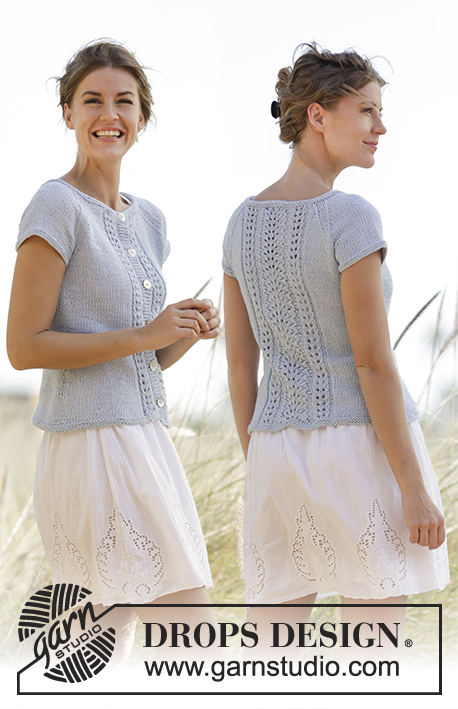
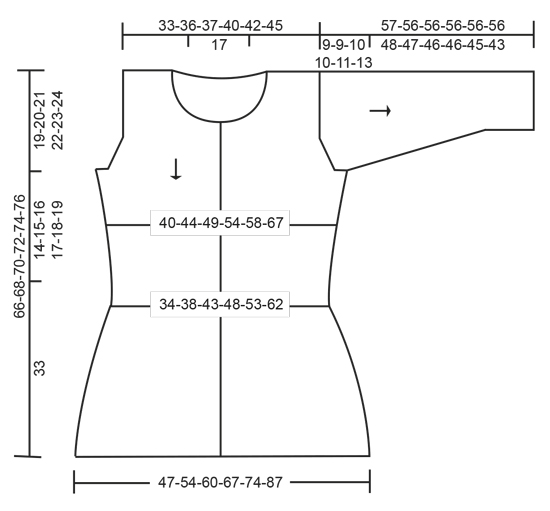
Knitted DROPS fitted jacket with leaf pattern, worked top down in “Cotton Light”. Size: S - XXXL.
DROPS 168-7 |
|||||||||||||||||||||||||
|
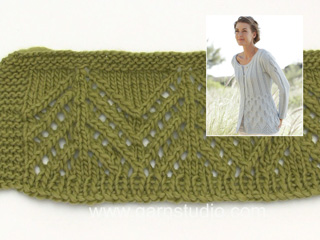
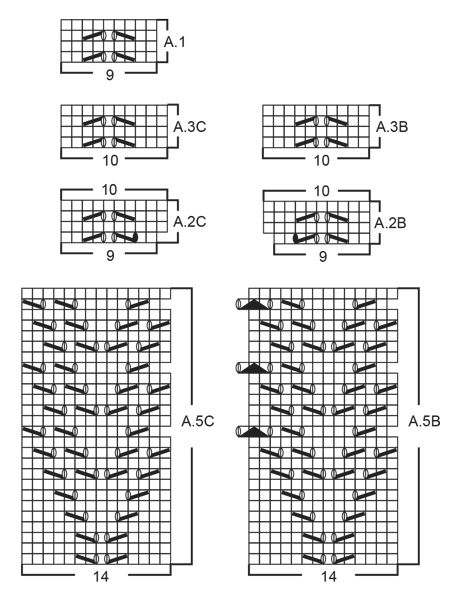
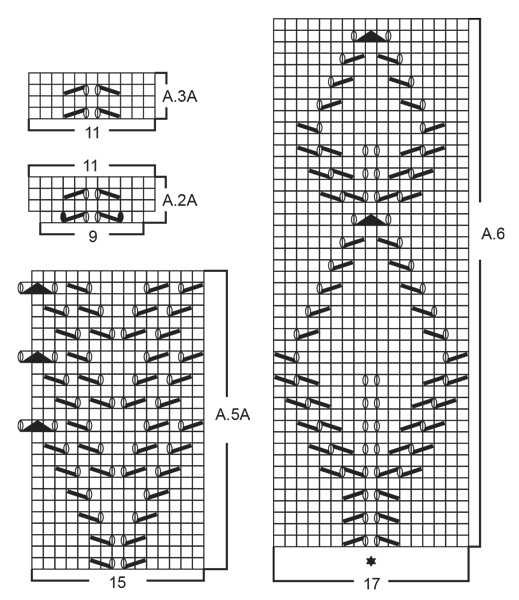
GARTER ST (back and forth): K all rows. 1 ridge = 2 rows K. GARTER ST (worked in the round): 1 ridge = 2 rounds. * K 1 round and P 1 round *, repeat from *-*. PATTERN: See diagrams A.1 to A.6. The diagrams show all rows in pattern seen from RS. INCREASE TIP (applies to inc for armhole on body): All inc are done from RS. Inc inside 2 edge sts in garter st by picking up yarn between 2 sts, slip yarn on needle and K yarn twisted to avoid hole (= 1 st inc). DECREASE TIP (applies to sides on body and mid under sleeve): All dec are done from RS! Dec 1 st on each side of marker as follows: Beg 2 sts before marker, K 2 tog, marker, slip 1 st as if to K, K 1, psso (= 2 sts dec). BUTTONHOLES: Dec for buttonholes on right band. 1 button hole = beg from WS on right front piece and K tog third and fourth st from edge and make 1 YO. Dec for first buttonhole on first row from WS after neck inc is done. Then dec the next 5-5-5-6-6-6 buttonholes every 7-7½-8-7-7½-8 cm downwards. ---------------------------------------------------------- JACKET: Worked top down, back and forth on circular needle. Beg with back piece, then work front pieces before slipping all parts tog and working in one piece until finished measurements. Work sleeves separately, top down. LEFT SHOULDER BACK (when garment is worn): Cast on 17-20-21-24-26-29 sts on circular needle size 3.5 mm with Cotton Light. K 1 row from WS and K 1 row from RS. Switch to circular needle size 4 mm, P from WS until 2 sts remain on row and finish with K 2 (= edge sts towards armhole). Work next row as follows from RS: 2 edge sts in GARTER ST – see explanation above (= edge sts against armhole), 6-0-1-4-6-0 sts stocking st, then work A.1 over the next 9-18-18-18-18-27 sts (= 1-2-2-2-2-3 repetitions of 9 sts). Continue pattern like this. When piece measures 2 cm, cast on 1 new st at the end of next row from RS. Work back from WS as before and then cast on 34 new sts for neck at the end of next row from RS = 52-55-56-59-61-64 sts on needle. Put piece aside and work right shoulder back. RIGHT SHOULDER BACK (when garment is worn): Cast on as on left shoulder back and K 1 row from WS and K 1 row from RS. Switch to circular needle size 4 mm, K the first 2 sts (= edge sts towards armhole) and P the rest of row. Work next row as follows from RS: Work A.1 over the first 9-18-18-18-18-27 sts (= 1-2-2-2-2-3 repetitions of 9 sts), work 6-0-1-4-6-0 stocking st and finish with 2 edge sts in garter st towards armhole. Continue pattern like this. When piece measures 2 cm, cast on 1 new st at the end of row from WS = 18-21-22-25-27-30 sts on needle. Work 1 row pattern back from RS. YOKE AT THE BACK: Slip sts from left and right shoulder on to same circular needle size 4 mm = 70-76-78-84-88-94 sts on needle. Continue pattern back and forth over all sts with 2 edge sts in garter st and 6-0-1-4-6-0 sts stocking st in each side. REMEMBER THE KNITTING TENSION. When piece measures 15-16-15-15-15-14 cm, work next row as follows from RS: 2 edge sts in garter st, 6-0-1-4-6-0 sts stocking st, work A.2A one time, work A.2B over the next 45-63-63-63-63-81 sts (= 5-7-7-7-7-9 repetitions of 9 sts), work 6-0-1-4-6-0 sts stocking st and finish with 2 edge sts in garter st. When A.2 has been worked one time vertically, there are 77-85-87-93-97-105 sts on needle. Continue with A.3A over A.2A and A.3B over A.2B the same way (there is now 1 st stocking st more between each eyelet row). AT THE SAME TIME when piece measures 17-18-17-17-17-16 cm, inc 1 st for armhole in each side – READ INCREASE TIP! Repeat inc every other row (i.e. every row from RS) 2-2-5-7-8-11 times in total – NOTE: Work inc sts in stocking st. On first row from RS after last inc cast on 2-2-3-3-5-7 new sts at the end of row for armhole. Repeat on next row from WS = 85-93-103-113-123-141 sts on needle. Put pieces aside and work front piece. RIGHT FRONT PIECE (when garment is worn): Cast on 17-20-21-24-26-29 sts on circular needle size 3.5 mm. K 1 row from WS and K 1 row from RS. Switch to circular needle size 4 mm, P from WS until 2 sts remain on row and finish with K 2 (= edge sts towards armhole). Work next row as follows from RS: 2 edge sts in GARTER ST – see explanation above (= edge sts against armhole), 6-0-1-4-6-0 sts stocking st, then work A.1 over the next 9-18-18-18-18-27 sts (= 1-2-2-2-2-3 repetitions of 9 sts). Continue pattern like this. When piece measures 5-5-5-7-7-7 cm, cast on new sts for neck at the end of every row from RS as follows: Cast on 1 st 4 times, 2 sts 3 times and 13 sts 1 time = 40-43-44-47-49-52 sts. Continue the pattern with 2 edge sts in garter st towards the armhole and 5 band sts in garter st towards mid front (there is now room for 3-4-4-4-4-5 repetitions of A.1). Remember BUTTONHOLES on band - see explanation above. When piece measures 15-16-15-15-15-14 cm, work next row as follows from RS: Work 2 edge sts in garter st, 6-0-1-4-6-0 sts stocking st, work A.2B over the next 27-36-36-36-36-45 sts (= 3-4-4-4-4-5 repetitions of 9 sts) and finish with 5 band sts in garter st towards mid front. When A.2B has been worked 1 time vertically, there are 43-47-48-51-53-57 sts on needle. Continue with A.3B over A.2B the same way (there is now 1 st stocking st more between each eyelet row). AT THE SAME TIME when piece measures 17-18-17-17-17-16 cm, inc 1 st for armhole in the side – READ INCREASE TIP! Repeat inc every other row (i.e. every row from RS) 2-2-5-7-8-11 times in total. On first row from WS after last inc cast on 2-2-3-3-5-7 new sts at the end of row for armhole = 47-51-56-61-66-75 sts on needle. Put the piece aside and work left front piece. LEFT FRONT PIECE (when garment is worn): Cast on as on right front piece. K 1 row from WS and K 1 row from RS. Switch to circular needle size 4 mm, K the first 2 sts (= edge sts towards armhole) and P the rest of row. Work next row as follows from RS: Work A.1 over the first 9-18-18-18-18-27 sts (= 1-2-2-2-2-3 repetitions of 9 sts), work 6-0-1-4-6-0 stocking st and finish with 2 edge sts in garter st towards armhole. Continue pattern like this and continue as on right front piece but cast on new sts for neck at the end of every row from WS (instead of every row from RS). Work pattern according to diagram A.2C (instead of A.2B) and continue pattern according to A.3C (instead of A.3B). Inc for armhole from RS and then cast on 2-2-3-3-5-7 new sts for armhole at the end of next row from RS. Work 1 row from WS as before. BODY: Now work all pieces tog from RS on circular needle size 4 mm as follows: Work sts from left front piece (= 47-51-56-61-66-75 sts), insert 1 marker, work sts from back piece (= 85-93-103-113-123-141 sts), insert 1 marker and work sts from right front piece (= 47-51-56-61-66-75 sts) = 179-195-215-235-255-291 sts on needle - NOW MEASURE FROM HERE! Continue back and forth with pattern according to diagram A.3 and stocking st as before and with 5 band sts in garter st in each side towards mid front. AT THE SAME TIME when piece measures 2 cm, dec 1 st on each side of both markers - READ DECREASE TIP (= 4 sts dec). Repeat dec in each side every 2-2-2½-2½-3-3½ cm 7-6-6-6-6-5 times in total = 151-171-191-211-231-271 sts. When piece measures 14-15-16-17-18-19 cm (entire piece measures approx. 33-35-37-39-41-43 cm from shoulder), remove the marker threads. Work next row as follows from RS: 5 band sts in garter st, work A.4A (= 11 sts), repeat A.4B over the next 120-140-160-180-200-240 sts (= 12-14-16-18-20-24 repetitions of 10 sts), work A.4C (= 10 sts) and finish with 5 band sts in garter st (sts worked in A.4 will now match with eyelets in A.3 on front and back piece). Continue pattern back and forth like this and inc as shown in diagram. When A.4 has been worked, there are 207-235-263-291-319-375 sts on needle. Work next row as follows from RS: 5 band sts in garter st, A.5A (= 15 sts), repeat A.5B over the next 168-196-224-252-280-336 sts (= 12-14-16-18-20-24 repetitions of 14 sts), work A.5C (= 14 sts) and finish with 5 band sts in garter st. When A.5 has been worked, piece measures approx. 65-67-69-71-73-75 cm from shoulder. Switch to circular needle size 3.5 mm and work 3 rows rib (= K 1 / P 1) with 5 band sts garter st and 1 K in each side towards mid front (seen from RS). Then loosely cast off sts with K over K and P over P. Jacket measures approx. 66-68-70-72-74-76 cm from shoulder. SLEEVE: Work sleeve cap back and forth on circular needle, then work sleeve in the round on double pointed needles until finished measurements. Cast on 23-25-27-31-33-37 sts on circular needle size 4 mm with Cotton Light. Insert 1 marker in the middle st on row. READ ALL OF THE FOLLOWING SECTION BEFORE CONTINUING: Work stocking st back and forth and cast on new sts for sleeve cap at the end of every row in each side as follows: Cast on 3 sts 1-1-2-5-4-3 times, 2 sts 7-8-6-1-1-0 times, 1 st 4-3-5-7-9-14 times and 2-2-3-3-5-7 sts 1 time = 69-73-79-85-89-97 sts on needle (piece measures approx. 9-9-10-10-11-13 cm). AT THE SAME TIME when piece measures 2 cm, work pattern according to diagram A.6 over the middle 17 sts (st with marker should match mid st in diagram – work the other sts in stocking st). When sleeve cap has been worked, switch to double pointed needles size 4 mm. Insert 1 marker thread at beg of round (= mid under sleeve) and continue in the round in stocking st and A.6 over the middle sts. When A.6 has been worked one time vertically, work A.1 over the middle 5 sts until finished measurements (continue the other sts in stocking st). AT THE SAME TIME when piece measures 12-12-13-13-14-16 cm, dec 2 sts mid under sleeve - READ DECREASE TIP. Repeat dec every 2½-2½-2-2-2-1½ cm 15-16-17-19-20-23 times in total = 39-41-45-47-49-51 sts. When sleeve measures 56-55-55-55-55-55-55 cm (NOTE: Shorter measurements in the larger sizes because of longer yoke) switch to double pointed needles size 3.5 mm. Work 2 ridges in GARTER ST in the round - see explanation above, and loosely cast off with K, sleeve measures approx 57-56-56-56-56-56 cm. Knit another sleeve the same way. ASSEMBLY: Sew shoulder seams inside cast-off edge. Place sleeve approx. ½ cm in under edge in garter st along armhole and fasten neatly so that edge in garter st shows. Repeat in the other side. NECK EDGE: Pick up from RS approx. 110 to 116 sts on circular needle size 3.5 mm with Cotton Light. K 1 row from WS, K 1 row from RS and K 1 row from WS before loosely casting off with K from RS. Sew the buttons on to the left band. |
|||||||||||||||||||||||||
Diagram explanations |
|||||||||||||||||||||||||
|
|||||||||||||||||||||||||
|
|||||||||||||||||||||||||
|
|||||||||||||||||||||||||

|
|||||||||||||||||||||||||
|
|||||||||||||||||||||||||
|
Have you made this or any other of our designs? Tag your pictures in social media with #dropsdesign so we can see them! Do you need help with this pattern?You'll find tutorial videos, a Comments/Questions area and more by visiting the pattern on garnstudio.com. © 1982-2024 DROPS Design A/S. We reserve all rights. This document, including all its sub-sections, has copyrights. Read more about what you can do with our patterns at the bottom of each pattern on our site. |
|||||||||||||||||||||||||


With over 40 years in knitting and crochet design, DROPS Design offers one of the most extensive collections of free patterns on the internet - translated to 17 languages. As of today we count 304 catalogues and 11422 patterns - 11422 of which are translated into English (UK/cm).
We work hard to bring you the best knitting and crochet have to offer, inspiration and advice as well as great quality yarns at incredible prices! Would you like to use our patterns for other than personal use? You can read what you are allowed to do in the Copyright text at the bottom of all our patterns. Happy crafting!
Comments / Questions (73)
Bonjour Je n'ai toujours pas de réponse. Je fais quoi avec mon travail inachevé?
22.06.2021 - 17:04DROPS Design answered:
Bonjour Mme Coulon, nous sommes désolés, nous n'avons eu aucun autre retour à présent sur la quantité pour ce modèle avec une tension correcte à la fois en largeur et en hauteur (quelque soit la taille des aiguilles) mais avons bien noté votre remarque. Bonne continuation!
23.06.2021 - 08:27Bonjour. Suite à votre réponse du 25 /05/21 J'ai bien achetée la laine du modèle en taille L 12 pelotes de drops cotton night 22 brun . Avec aiguille 4 .
10.06.2021 - 15:45Bonjour. Suite à votre réponse du 25 /05/21 J'ai bien achetée la laine du modèle en taille L 12 pelotes de drops cotton night 22 brun .
10.06.2021 - 15:43Bonjour . j'ai commandée ce model le 20 03 2021 en taille L donc 12 pelotes . je ne peut pas le finir il me manque de la laine pour 5cm de manche et le col .
22.05.2021 - 17:19DROPS Design answered:
Bonjour Mme Coulon, aviez-vous bien le bon échantillon en largeur mais aussi en hauteur? autrement dit 21 m x 28 rangs jersey = 10 x 10 cm avec les aiguilles 4?
25.05.2021 - 07:39Cortesemente si potrebbe avere la spiegazione cominciando dal basso verso l'alto?
30.03.2021 - 16:16DROPS Design answered:
Buonasera Marisa, questo modello è stato progettato per essere lavorato dall'alto in basso, ma sul nostro sito può trovare tanti altri modelli gratuiti lavorati dal basso verso l'alto. Buon lavoro!
30.03.2021 - 23:49Jag har stickat det här mönstret och med rätt garn. Jag stickade i S och det fattas 1 nystan. Jag har ett halvt varv innan resåren +resår kvar. (6 varv) Det har hänt mig med ett annat mönster från Drops för 2 veckor sen. Ska man behöva skicka efter +1 garn hela tiden?
24.02.2021 - 07:39DROPS Design answered:
Hej Gunilla, Vi har ikke fået nogle andre kommentarer om at der skal være for lidt garn til dette mønster. Vi takker for din information og skal se på garnforbruget. God weekend!
05.03.2021 - 13:29When starting the decrease on the sleeves do I measure from mid under sleeve and not from the cap? Thanks
12.10.2020 - 17:39DROPS Design answered:
Hi Pam, You measure from the top of the cap. Happy knitting!
13.10.2020 - 07:18Thank you for your prompt response to my previous question. I have another question... where i do the increases for the armhole (when the piece measures 18cm) I understand how to do the increase (after the first two edge stitches) but should I be doing an increase each side RS and WS over 6 rows?
15.09.2020 - 18:09DROPS Design answered:
Dear Mrs Dale, the increases for armholes (starting at 18 cm) are worked inside 2 garter stitches on each side - see DECREASE TIP at the beg of the pattern, in size M you work these a total of 2 times on every other row = 2 times on 2 right side row (separated by 1 WS row between both increases) = you increase 4 sts in total, 2 sts on each side. Then at the end of next RS row after last increase, cast on 2 sts at the end of the row (= RS row), turn and cast on 2 sts at the end of this row (WS) = you have now 93 sts (83 + 2x2 sts inc + 2 x 2 sts cast on). Happy knitting!
16.09.2020 - 09:18I have just started this pattern and would like to know on the yoke at the back where it says ‘when piece measures 15cm’ where am I measuring this from? Is it the top of the shoulder or the neckline? Thanks
14.09.2020 - 13:23DROPS Design answered:
Dear Pam Dale, mesure from the cast on row from one of both shoulders. Happy knitting!
14.09.2020 - 13:41Dit vest wordt boven naar onder gebreid. Moeten de telpatronen dan ook van boven naar onder geïnterpreteerd worden?
21.01.2020 - 17:46DROPS Design answered:
Dag Houthoofd,
Nee, de telpatronen lees je altijd van onder naar boven. (Hier is dus al rekening mee gehouden). Bij de meest gestelde vragen kun je ook informatie vinden over hoe je telpatronen leest.
26.01.2020 - 14:50