
Popular categories
Looking for a yarn?


|
|
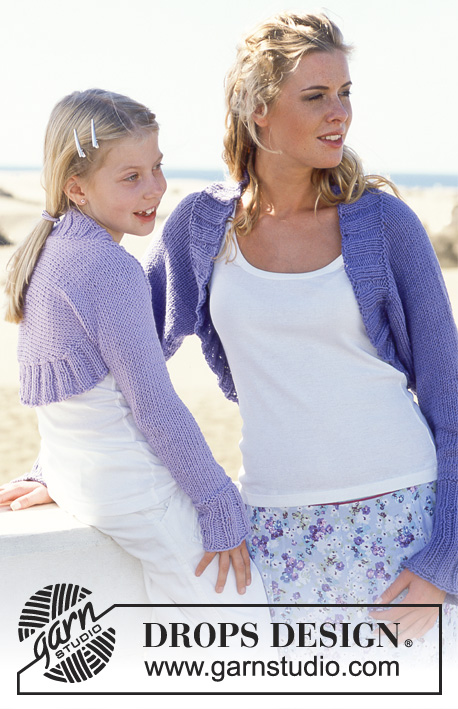
Mom and Me |
|
 |
 |
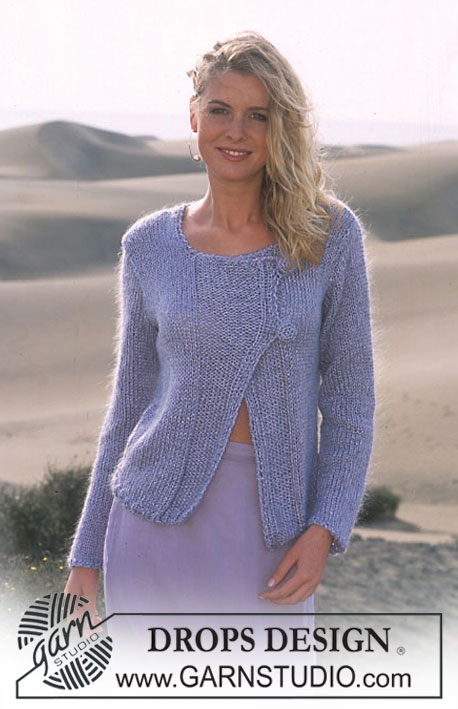
DROPS Shrug in Paris for Women and Girls
DROPS 89-13 |
|
|
WOMEN’S SIZES: Gauge: 17 sts x 22 rows on larger needles in stockinette st = 10 x 10 cm. Rib: * K 3, P 3 *, repeat * - *. Note on the diagram: The shrug is knit from cuff to cuff. The diagram shows the shrug after assembly – that is, with the sleeve seam sewn. The dotted line indicates the center back – the sloping line indicates the front edge. Right side: Loosely cast on 50-50-56-56-56 sts on larger needles. P 1 row (wrong side), then knit rib, keeping 1 edge st at each side in garter st. When the piece measures 12 cm dec all P 3 to P 2 = 42-42-47-47-47 sts. Continue the rib with K 3/P 2. When the piece measures 18 cm K 1 row (right side row), then K 1 row (wrong side), adjusting (inc/dec as needed) to 42-42-46-48-48 sts, then continue in stockinette st. When the piece measures 20-20-20-25-21 cm inc 1 st at each side every 3-2.5-2.5-2-2 cm a total of 12-14-14-15-17 times = 66-70-74-78-82 sts. After last inc the piece measures 53 cm, put 1 marker at each side – measure the piece from here. Now dec at one side of piece (= front) at the same time cast on new sts at the other side of piece (= back) as follows: At front edge: on 1st row bind off 3 sts, then bind off every other row: 3 sts 3 times and 2 sts 9-10-11-12-13 times, then every 4 rows: 1 st 3 times. At back edge: inc every other row: 2 sts 3 times and 1 st 5-6-7-6-9 times, then every 4 rows: 1 st 4-4-4-5-4 times. After all incs and decs there are 48-51-54-56-60 sts. When the piece measures 18-19-20-21-22 cm put 10 sts on a st holder from lower edge of back up toward the neck every other row 4 times = 8-11-14-16-20 sts remain on needles. The shrug is now knit to the center back (halfway). Place a new marker at center back of neck. Knit 1 row stockinette st over all sts on needles, then knit the other half, reversing shaping as follows: put 10 sts back on needles every other row 4 times = 48-51-54-56-60 sts. When sts are put back on needles pick up 1 st between the last st on needles the first st on st holder, K tog this st with the first st on st holder. This prevents a hole where the sts are returned to the needles. When the piece measures 5 cm from the marker in back of the neck inc/cast on for front (= the side of piece you previously bound off) every 4 rows: 1 st 3 times, then every other row: 2 sts 9-10-11-12-13 times and 3 sts 4 times. At the same time, when the piece measures 8 cm from the marker in back of the neck dec for back (= the side you previously increased) every 4 rows: 1 st 4-4-4-5-4 times, then every other row: 1 st 5-6-7-6-9 times and 2 sts 3 times. After all incs and decs are complete there are 66-70-74-78-82 sts. Put a marker at each side – measure the work from here. Now dec 1 st at each side every 3-2.5-2.5-2-2 cm a total of 12-14-14-15-17 times = 42-42-46-48-48 sts. When the piece measures 34 cm P 1 row (right side) and P 1 row (wrong side), adjusting (inc/dec as needed) to 42-42-47-47-47 sts. Now knit rib (= K 3/P 2) keeping 1 edge st at each side in garter st. When cuff measures 6 cm from the P rows inc all P 2 to P 3 = 50-50-56-56-56 sts. When cuff measures 18 cm from the P rows K 1 row (right side) and then bind off loosely. Assembly: Sew sleeve seams using edge sts as seam allowance, up to markers. Pick up sts around opening = 180-195-210-225-225 sts (divisible by 15) on smaller circular needles. If you pick up more or less sts, adjust on the 2nd row evenly distributed. Join and knit in the round as follows (seen from the right side): P 1 row and K 1 row, then knit rib (= K 3/P 2). When edge measures 2 cm inc every 3rd P 2 to P 3 = 192-208-224-240-240 sts. Repeat inc when edge measures 5 and 8 cm, so that each P 2 is now P 3 = 216-234-252-270-270 sts. Bind off loosely in rib. GIRLS’ SIZES: Sizes: 5/6 years - 7/8 years - 9/10 years - 11/12 years -13/14 years Finished measurements: Wrist to center back: 54-59-64-68-72 cm [21.25" - 23.25" - 25.25" - 26.75" - 28.25"] Underarm to center back: 17-18-19-20-21 cm [6.75" - 7" - 7.5" - 7-⅞" - 8.25"] Materials: DROPS PARIS from Garnstudio 250-250-250-300-300 gr nr 05, light lilac DROPS 5 mm [US 8] needles, or sizes needed to obtain correct gauge. DROPS 4.5 mm [US 7] circular needles (for rib edge), or sizes needed to obtain correct gauge. Gauge: 17 sts x 22 rows on larger needles in stockinette st = 10 x 10 cm. Rib: * K 3, P 3 *, repeat * - *. Note on the diagram: The shrug is knit from cuff to cuff. The diagram shows the shrug after assembly – that is, with the sleeve seam sewn. The dotted line indicates the center back – the sloping line indicates the front edge. Right side: Loosely cast on 38-44-44-50-50 sts on larger needles. P 1 row (wrong side), then continue in rib, keeping 1 edge st at each side in garter st. When the piece measures 6 cm dec all P 3 to P 2 = 32-37-37-42-42 sts. Continue the rib with K 3/P 2. When the piece measures 10 cm K 1 row (right side) and K 1 row (wrong side), decreasing evenly distributed to 28-30-32-32-34 sts, then continue in stockinette st. When the piece measures 13-14-13-15-15 cm inc 1 st at each side every 3-3-3.5-3-3 cm a total of 9-10-10-12-13 times = 46-50-52-56-60 sts. After last inc the piece measures approx. 37-41-45-48-51 cm, put 1 marker at each side – measure the piece from here. Now dec at one side of piece (= front) at the same time cast on new sts at the other side of piece (= back) as follows: At front edge: on 1st row bind off 3 sts, then bind off every other row: 2 sts 5-6-6-7-8 times and 1 st 10-10-11-11-11 times. At back edge: inc every other row: 2 sts 2-3-4-5-5 times and then every 4 rows: 1 st 5-5-5-5-6 times. After all decs and incs are complete there are 32-36-39-43-46 sts. When the piece measures 14-15-16-17-18 cm put sts onto a st holder from lower edge of back up toward the neck every other row: 8-9-10-11-11 sts 3 times = 8-9-9-10-13 sts remain on needles. The shrug is now knit to the center back (halfway). Place a new marker at center back of neck. Knit 1 row stockinette st over all sts on needles, then knit the other half, reversing shaping as follows: Put 8-9-10-11-11 sts back on needles every other row 3 times = 32-36-39-43-46 sts. When sts are put back on needles pick up 1 st between the last st on needles the first st on st holder, K tog this st with the first st on st holder. This prevents a hole where the sts are returned to the needles. When the piece measures 3 cm from the marker in back of the neck inc for front (= the side you previously bound off) every other row: 1 st 10-10-11-11-11 times, 2 sts 5-6-6-7-8 times and 3 sts 1 time. At the same time when the piece measures 6 cm from the marker in back of the neck dec for back (= the side you previously increased) every 4 rows: 1 st 5-5-5-5-6 times and then every other row: 2 sts 2-3-4-5-5 times. After all incs and decs are complete 46-50-52-56-60 sts. Put 1 marker at each side – measure the piece from here. Now dec 1 st at each side every 3-3-3.5-3-3 cm a total of 9-10-10-12-13 times = 28-30-32-32-34 sts. When the piece measures 26-30-34-37-40 cm, P 1 row (right side), then P 1 row (wrong side), increasing to 32-37-37-42-42 sts. Now knit rib (= K 3/ P 2), keeping 1 edge st at each side in garter st. When cuff measures 4 cm from the P rows inc all P 2 to P 3 = 38-44-44-50-50 sts. When cuff measures 10 cm from the P rows P 1 row (wrong side) and then bind off loosely. Assembly: Sew sleeve seams using edge sts as seam allowance, up to markers. Pick up sts around opening = 135-150-165-180-180 sts (divisible by 15) on smaller circular needles. If you pick up more or less sts, adjust on the 2nd row evenly distributed. Join and knit in the round as follows (seen from the right side): P 1 row and K 1 row, then knit rib (= K 3/P 2). When edge measures 2 cm inc every 3rd P 2 to P 3 = 144-160-176-192-192 sts. Repeat inc when edge measures 5 and 8 cm, so that each P 2 is now P 3 = 162-180-198-216-216 sts. Bind off loosely in rib. |
|

|
|
|
Have you made this or any other of our designs? Tag your pictures in social media with #dropsdesign so we can see them! Do you need help with this pattern?You'll find tutorial videos, a Comments/Questions area and more by visiting the pattern on garnstudio.com. © 1982-2024 DROPS Design A/S. We reserve all rights. This document, including all its sub-sections, has copyrights. Read more about what you can do with our patterns at the bottom of each pattern on our site. |
|


With over 40 years in knitting and crochet design, DROPS Design offers one of the most extensive collections of free patterns on the internet - translated to 17 languages. As of today we count 304 catalogs and 11422 patterns - 11417 of which are translated into English (US/in).
We work hard to bring you the best knitting and crochet have to offer, inspiration and advice as well as great quality yarns at incredible prices! Would you like to use our patterns for other than personal use? You can read what you are allowed to do in the Copyright text at the bottom of all our patterns. Happy crafting!
Comments / Questions (55)
Liebes Strickteam Was bedeutet Hinterseite unten? Mit welche Seite beginne ich,mit der rechten oder linken Seite, die Maschen auf die Hilfnadeln zu heben oder zu stricken?L.G.Alexa
25.01.2013 - 23:24DROPS Design answered:
Liebe Alexa, das bedeutet in der hinteren Mitte nach unten zu. Sie können jeweils die Hin-R stricken, bis noch 10 M übrig sind und diese dann auf die Hilfsnadel legen und dann wenden.
27.01.2013 - 16:16Nach Abketten + Aufnehmen hab ich 43 Maschen auf der Nadel. Ich muss da anfangen zu stricken wo ich zugenommen hab, 11 Maschen stricken- die auf eine Hilfsnadel legen und die Reihe zuende stricken- dann umdrehen und nur noch alle auf der Hauptnadel stricken?
23.01.2013 - 09:50DROPS Design answered:
Hallo Sonja – ich nehme an, Sie stricken Größe XL und da werden 11 M stillgelegt, das ist richtig. Zur Technik der verkürzten Reihen können Sie auch unser Video anschauen.
27.01.2013 - 16:26Hallo, Wenn die rechte Seite zu mir zeigt, ist meine Zusammenseite links, d. h. dort müssen die Maschen auf eine Hilfsnadel?! Fange ich links an zu stricken, lege dann 11 auf eine Hilfsnadel und Stricke dann weiter? also wieder zurück, 11 bleiben drauf und 10 kommen dazu? Zum schluß müsste ich dann 41 maschen auf der Hilfsnadel haben und 2 auf der Haupt?! Irgendwie versteh ich nur Bahnhof.....sorry.....
21.01.2013 - 19:54DROPS Design answered:
Liebe Sonja, ich bin nicht sicher ob ich ihre Frage richtig verstanden habe. Sie sind in der hinteren Mitte? Dort werden 4 x 10 M auf eine Hilfsnadel oder einen Hilfsfaden stillgelegt, es bleiben also 8-11-14-16-20 M. Dann strickt man gegengleich weiter. Bitte melden Sie sich wieder, wenn das nicht ihre Frage war.
22.01.2013 - 09:16I think this is a simply lovely shrug, but goodness I wish the pattern were easier to read, alittle more direction if you will. Haven't started it for fear of terrible frustration, such a shame as its gorgeous
04.08.2012 - 04:22Yessika Cabrera wrote:
Hola estoy haciendo el bolero para una niña de 8 años pero la verdad es que ya no entendi muy bien el patron podia darme mas detallado que es lo que prosigue al terminar los aumentos
10.07.2012 - 05:49Wenn in der Anleitung steht bei jeder zweiten Reihe werden Maschen abgekettet heißt das dann das ich Rechts maschen Abkette dann eine Links und die nächste Rechts keine Maschen abketten? Oder ist mit jeder 2 Reihe einfach nur gemeint das man immer auf Rechts abkettet. Danke
12.05.2012 - 15:40DROPS Design answered:
Jede 2. Reihe= in einer Reihe abketten, in einer Reihe nicht. Also in jeder Hinreihe z.B. bedeutet in jeder 2. Reihe.
14.05.2012 - 14:53Hélène Dumont wrote:
Bonjour! Je suis encore confuse. Je mettais pourtant les mailles en attente côté dos. La différence est que je partais de la fin du rang endroit (côté dos). En partant du début envers, les mailles seront symétrique? Est-ce que je tricote les mailles à l'env juste avant de les mettre en attente? Est-ce que ça donne l'effet d'une pince? Si vous avez une photo ou d'autres détails, pouvez-vous me les envoyer? Merci !
09.05.2012 - 18:41DROPS Design answered:
Bonsoir Hélène, vous continuez en effet "miroir" la 2ème partie, ainsi, le dos doit rester du même côté, vous reprenez les mailles tous les 2 rangs comme vous les avez mises en attente. Le dos doit rester côté dos pour la 2ème moitié. Pour toute aide personnalisée, n'hésitez pas à vous adresser à votre magasin ou au forum DROPS.
09.05.2012 - 20:52Hélène Dumont wrote:
J'ai peur de ne pas avoir compris comment mettre les mailles en attente et de les reprendre au milieu dos. J'ai mis de côté les mailles, (8m x3), jusqu'à ce qu'il me reste 8 m. Ensuite un rang envers sur les 8 m. Ensuite, ces 8 m end, en ajoutant les 8 m en attente suivantes (et les autres aux 2 rangs). Quand je continue le tricot, j'ai l'impression que le sens des mailles n'est pas symétrique. Merci beaucoup.
03.05.2012 - 18:41DROPS Design answered:
Bonjour Hélène, pour la 1ère partie, vous mettez en attente les mailles du dos tous les rangs en début de rang sur l'envers, pour la 2ème partie, vous mettez les mailles en attente en attente pour le dos, en fin de rang sur l'endroit. Bon tricot !
04.05.2012 - 14:24Ik heb problem met deel van het patron-meisje- zet vanaf een hoogte van 15 cm st op 1 draad op het rugpand- hoeveel st opde nald heb ik 36st-aan de halskant in elke 2e nald 3x9=9st op de nld.wat moet ik doen met 3x9st.mijn dank.
16.02.2012 - 22:38DROPS Design answered:
Hoi. Je plaatst de 3 keer 9 st (= 27 st) op de hulpnld/draad en houdt 9 st over op de breinld. Ter info: kies "vraag" onder categorie dan zien wij sneller de vraag en kan beantwoorden zoals nu.
17.02.2012 - 12:20Die Maschen auf der Hilfsnadel werden nach und nach wieder auf die Nadel gelegt und danach wird mit allen Maschen weitergestrickt. Es gibt keine Naht. Die ganze Arbeit wird an einem Stück gestrickt.
08.12.2011 - 09:28