Lady Ascot

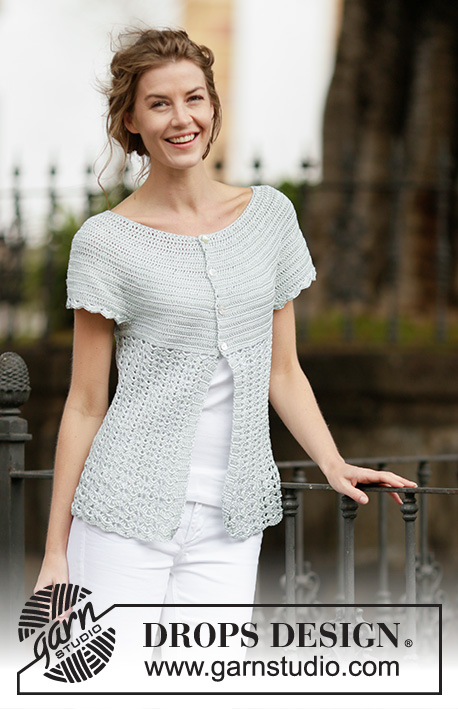
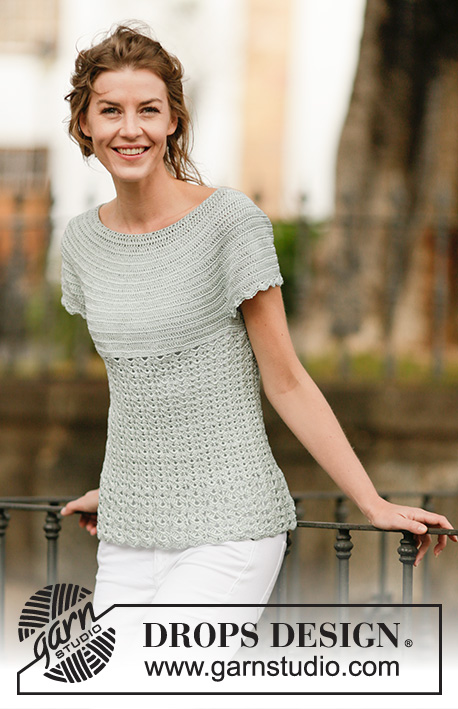
Crochet DROPS top with fan pattern and round yoke, worked top down in ”Cotton Viscose”. Size: S - XXXL.

DROPS 162-26
DROPS design: Pattern no n-171
Yarn group A
----------------------------------------------------------
Size: S - M - L - XL - XXL - XXXL
Finished measurements:
Bust: 84-92-100-110-122-134 cm / 33''-36¼''-39 3/8''-43 3/8''-48''-52¾''
Full length: 58-60-62-64-66-68 cm / 22¾''-23 5/8''-24 3/8''-25¼''-26''-26¾''

Materials:
DROPS COTTON VISCOSE from Garnstudio
400-450-500-550-600-650 g color no 29, light gray green

DROPS Hook size 3.5 mm/E/4 - or size needed to get 22 dc x 12 rows = 4'' x 4'' (10 x 10 cm), and 3 repetition of 3rd and 4th round in A.1 = width 9 cm / 3½''.

-------------------------------------------------------

Alternative Yarn – See how to change yarns here
Yarn Groups A to F – Use the same pattern and change the yarn here
Yarn usage using an alternative yarn – Use our yarn converter here

-------------------------------------------------------

Pattern instructions

NOTE: This pattern is written in American English. All measurements in charts are in cm. For conversion from inches to cm - click here. There are different terms for crocheting in American and British English. If this pattern includes crochet, click for "crochet terms" here. For this pattern in British English, please click here.
PATTERN:
See diagrams A.1-A.2.

CROCHET INFO-1:
Replace first dc on every row with dc with ch 3, finish row with 1 sl st in 3rd ch.

CROCHET INFO-2:
Beg every round with 3 ch and finish round with 1 sl st in 3rd ch.

INCREASE TIP:
Inc 1 dc by working 2 dc in 1 dc.
----------------------------------------------------------

TOP:
Worked top down from mid back. Work 133-137-142-147-152-157 ch on hook size 3.5 mm/E/4 with Cotton Viscose and form a ring with 1 sl st in first ch. Work next round as follows: 3 ch (= 1 dc), 1 dc in first ch from ch-ring, * skip ch 1, 1 dc in each of the next 5 ch *, repeat from *-* until 0-4-3-2-1-0 ch remain, 1 dc in each of the last 0-4-3-2-1-0 ch = 112-116-120-124-128-132 dc. Then work piece back and forth. Work every row tog at the end of row with 1 sl st in first ch on row - READ CROCHET INFO-1. Turn piece. Work 1 row with 1 dc in every dc AT THE SAME TIME inc 28 dc evenly (i.e. inc 1 dc after approx. every 4th dc) – READ INCREASE TIP = 140-144-148-152-156-160 dc. Insert 12 markers in the piece as follows: Work 17-18-19-20-21-22 dc (= half back piece) AT THE SAME TIME inc 1-0-0-2-2-1 dc evenly, insert first marker, * work 4 dc, insert next marker *, repeat from *-* 1 more time, work 20 dc, insert next marker, * work 4 dc, insert next marker *, repeat from *-* 1 more time, work 34-36-38-40-42-44 dc (= front piece) AT THE SAME TIME inc 2-0-0-4-4-2 dc evenly, insert next marker, * work 4 dc, insert next marker *, repeat from *-* 1 more time, work 20 dc, insert next marker, * work 4 dc, insert next marker *, repeat from *-* 1 more time, work 17-18-19-20-21-22 dc (= half back piece) AT THE SAME TIME inc 1-0-0-2-2-1 dc evenly = 144-144-148-160-164-164 dc.

REMEMBER THE CROCHET GAUGE! On next row from RS, inc as follows: Inc 1 dc on each side of every marker (= 24 dc inc), repeat inc on every row from RS 1-4-5-7-8-10 times in total, then inc before every marker (= 12 dc inc), repeat inc on every row from RS 9-6-6-4-4-3 times in total = 276-312-340-376-404-440 dc. Piece measures approx. 18-18-20-20-22-23 cm / 7"-7"-8"-8"-8 3/4"-9". Work next row as follows: 36-43-48-54-59-66 dc (= half back piece), work 12 ch (insert a marker in the middle of these new sts = under sleeve), skip 66-70-74-80-84-88 dc from previous row (= sleeve), work 72-86-96-108-118-132 dc (= front piece), work 12 ch (insert a marker in the middle of these new sts = under sleeve), skip 66-70-74-80-84-88 dc from previous row and work 36-43-48-54-59-66 dc (= half back piece) = 168-196-216-240-260-288 dc/ch (= 84-98-108-120-130-144 dc/ch on back piece and front piece). Insert 1 marker in piece. NOW MEASURE PIECE FROM HERE! Work 1 row with 1 dc in every dc and 1 dc in every ch under sleeve while AT THE SAME TIME inc 18-8-6-0-10-6 dc evenly = 186-204-222-240-270-294 dc. Work 1 row with 1 dc in every dc. Now work piece in the round without turning.

FAN PATTERN:
Work 1st-3rd round in A.1 31-34-37-40-45-49 times - READ CROCHET INFO-2. Then repeat 3rd round until piece measures approx. 29-31-31-33-31-31 cm / 11½"-12 1/4"-12 1/4"-13"-12 1/4"-12 1/4". Now work 4th round until piece measures approx. 40-42-43-45-45-45 cm / 15 3/4"-16½"-17"-17 3/4"-17 3/4"-17 3/4". Fasten off.

SLEEVE EDGE:
Beg by working mid under sleeve as follows: Work 1 sc in 6th ch of the 12 ch worked in armhole on body. Work 3 ch (= 1 dc). Then work 1 dc in each of the next ch 6, work 1 dc in dc-row where ch for sleeve were worked, 1 dc in the next 66-70-74-80-84-88 dc (= over sleeve) AT THE SAME TIME inc 0-4-0-2-6-2 dc evenly, work 1 dc in dc-row where ch for sleeve were worked, work 1 dc in each of the remaining 5 ch under sleeve = 80-88-88-96-104-104 dc. Then work A.2 10-11-11-12-13-13 times in total. Fasten off when A.2 has been worked 1 time vertically. Work the other sleeve edge the same way.

Diagram

All measurements in charts are in cm.

symbols = ch
symbols = sc
symbols = dc in st
symbols = tr in st
symbols = beg here
symbols = 3 dc around ch-space
symbols = 3 tr around ch-space
symbols = 4 dc around ch-space
symbols = dc around ch-space
diagram
diagram
Do you have a question? See a list of frequently asked questions (FAQ)

Knitting tension is what determines the final measurements of your work, and is usually measured per 10 x 10 cm. It is provided like so: number of stitches in width x number of rows in height - eg: 19 stitches x 26 rows = 10 x 10 cm.

The knitting tension is very individual; some people knit/crochet loosely while others work tightly. You adjust the knitting tension with the needle size, which is why the suggested needle size only serve as a guide! You need to adjust this (up or down) to ensure that YOUR knitting tension matches the knitting tension provided in the pattern. If you work with a different knitting tension than provided you will have a different yarn consumption, and your work will have different measurements than what the pattern suggests.

The knitting tension also determines which yarns can replace each other. As long as you achieve the same knitting tension you can replace one yarn with another.

See DROPS lesson: How to measure your tension/gauge

See DROPS video: How to make a gauge tension swatch

The required amount of yarn is provided in grams, eg: 450 g. To calculate how many balls you’ll need you first need to know how many grams are in 1 ball (25g, 50g or 100g). This information is available if you click on the individual yarn quality on our pages. Divide the amount required with the amount of each ball. For example, if each ball is 50g (the most common amount), the calculation will be as follows: 450 / 50 = 9 balls.

The important thing when changing from one yarn to another is that the knitting/crochet tension remains the same. This is so that the measurements of the finished piece will be the same as on the sketch provided. It is easier to achieve the same knitting tension using yarns from the same yarn group. It is also possible to work with multiple strands of a thinner yarn to achieve the knitting tension of a thicker one. Please try our yarn converter. We recommend you to always work a test swatch.

Please NOTE: when changing yarn the garment might have a different look and feel to the garment in the photo, due to individual properties and qualities of each yarn.

See DROPS lesson: Can I use a different yarn than the one mentioned in the pattern?

All our yarns are categorised into yarn groups (from A to F) according to thickness and knitting tension – group A contains the thinnest yarns and group F the thickest. This makes it easier for you to find alternative yarns to our patterns, should you wish to switch yarn. All yarns within the same group have a similar knitting tension and can easily replace each other. However, different yarn qualities have different structures and properties which will give the finished work a unique look and feel.

Click here for an overview of the yarns in each yarn group

At the top of all our patterns you’ll find a link to our yarn converter, which is a helpful tool should you wish to use a different yarn than suggested. By filling in the yarn quality you wish to replace, the amount (in your size) and number of strands, the converter will present good alternative yarns with the same knitting tension. Additionally it will tell you how much you’ll require in the new qualities and whether you’ll need to work with multiple strands. Most skeins are 50g (some are 25g or 100g).

If the pattern is worked with multiple colours, every colour will have to be converted separately. Similarly, if the pattern is worked with several strands of different yarns (for example 1 strand Alpaca and 1 strand Kid-Silk) you will have to find alternatives for each, individually.

Click here to see our yarn converter

Since different yarns have different qualities and textures we have chosen to keep the original yarn in our patterns. However, you can easily find options among our available qualities by using our yarn converter, or simply pick a yarn from the same yarn group.

It is possible that some retailers still have discontinued yarns in stock, or that someone has a few skeins at home that they would like to find patterns for.

The yarn converter will provide both alternative yarn as well as required amount in the new quality.

If you think it's hard to decide what size to make, it can be a good idea to measure a garment you own already and like the size of. Then you can pick the size by comparing those measures with the ones available in the pattern's size chart.

You'll find the size chart at the bottom of the pattern.

See DROPS lesson: How to read size chart

The needle size provided in the pattern serves only as a guide, the important thing is to follow the knitting tension. And since knitting tension is very individual, you will have to adjust the needle size to ensure that YOUR tension is the same as in the pattern – maybe you’ll have to adjust 1, or even 2 needle sizes, up or down to achieve the correct tension. For this, we recommend that you work test swatches.

Should you work with a different knitting tension than the one provided, the measurements of the finished garment might deviate from the measurement sketch.

See DROPS lesson: How to measure your tension/gauge

See DROPS video: How to make a gauge tension swatch

Working a garment top-down provides more flexibility and room for personal adjustment. For example it is easier to try the garment on while working, as well as making adjustments to length of yoke and shoulder caps.

The instructions are carefully explaining every step, in the correct order. Diagrams are adjusted to the knitting direction and are worked as usual.

The diagram depicts all rows/rounds, and every stitch seen from the right side. It is read from bottom to top, from right to left. 1 square = 1 stitch.

When working back and forth, every other row is worked from the right side and every other row is worked from the wrong side. When working from the wrong side, the diagram will have to be worked reversed: from left to right, knit stitches are purled, purl stitches are knit etc.

When working in the round every round is worked from the right side and the diagram are worked from right to left on all rounds.

See DROPS lesson: How to read knitting diagrams

The diagram depicts all rows/rounds, and every stitch seen from the right side. It is worked from bottom to top, from right to left.

When working back and forth every other row is worked from the right side: from right to left and every other row is worked from the wrong side: from left to right.

When working in the round, every row in the diagram are worked from the right side, from right to left.

When working a circular diagram you start in the middle and work your way outwards, counter clockwise, row by row.

The rows usually start with a given number of chain stitches (equivalent to the height of the following stitch), this will either be depicted in the diagram or explained in the pattern.

See DROPS lesson: How to read crochet diagrams

Instructions for working several diagrams after each other on the same row/round, will often be written like so: “work A.1, A.2, A.3 a total of 0-0-2-3-4 times". This means you work A.1 once, then A.2 is worked once, and A.3 is repeated (in width) the number of times provided for your size – in this case like so: S = 0 times, M = 0 times, L=2 times, XL= 3 times and XXL = 4 times.

The diagrams are worked as usual: begin with the first row in A.1, then work the first row in A.2 etc.

See DROPS lesson: How to read knitting diagrams

See DROPS lesson: How to read crochet diagrams

The total width of the garment (from wrist-to-wrist) will be larger in the larger sizes, despite the actual sleeves being shorter. The larger sizes have longer sleeve caps and wider shoulders, so there will be a good fit in all sizes.

The measurement sketch/schematic drawing provides information regarding the full length of the garment. If it’s a jumper or a jacket the length is measured from the highest point on the shoulder (usually closest to the neckline), and straight down to the bottom of the garment. It is NOT measured from the tip of shoulder. Similarly, the length of yoke is measured from the highest point on the shoulder and down to where yoke is split into body and sleeves.

See DROPS lesson: How to read a schematic drawing

Diagrams are often repeated on the round or in height. 1 repeat is the diagram the way it appears in the pattern. If it says to work 5 repeats of A.1 in the round, then you work A.1 a total of 5 times after/next to each other in the round. If it says to work 2 repeats of A.1 vertically/in height you work the entire diagram once, then begin again at the start and work the entire diagram one more time.

Chain stitches are slightly narrower than other stitches and to avoid working the cast-on edge too tight, we simply chain more stitches to begin with. The stitch count will be adjusted on the following row to fit the pattern and measurement sketch.

The rib edge is more elastic and will contract slightly compared to, for example, stocking stitch. By increasing before the rib edge, you avoid a visible difference in width between the rib edge and the rest of the body.

It’s very easy to cast off too tightly, and by making yarn overs while casting off (and simultaneously casting these off) you avoid a too tight cast off edge.

See DROPS video: How to bind off with yarn overs (yo)

To achieve an even increase (or decrease) you can increase on, for example: every 3rd and 4th row alternately, like so: work 2 rows and increase on the 3rd row, work 3 rows and increase on the 4th. Repeat this until the increase is complete.

See DROPS lesson: Increase or decrease 1 st on every 3rd and 4th row alternately

Should you prefer to work in the round instead of back and forth, you may of course adjust the pattern. You’ll need to add steeks mid-front (usually 5 stitches), and follow the instructions. When you would normally turn and work from the wrong side, simply work across the steek and continue in the round. At the end you’ll cut the piece open, pick up stitches to work bands, and cover the cut edges.

See DROPS video: How to knit steeks and cut open

Should you prefer to work back and forth instead of in the round, you may of course adjust the pattern so you work the pieces separately and then assemble them at the end. Divide the stitches for the body in 2, add 1 edge stitch in each side (for sewing) and work the front and back pieces separately.

See DROPS lesson: Can I adapt a pattern for circular needles into straight needles?

Pattern repeats can vary slightly in the different sizes, in order to get the correct proportions. If you’re not working the exact same size as the garment in the photo, yours might deviate slightly. This has been carefully developed and adjusted so that the complete impression of the garment is the same in all sizes.

Make sure to follow instructions and diagrams for your size!

If you have found a pattern you like which is available in women’s size it’s not very difficult to convert it to men’s size. The biggest difference will be the length of sleeves and body. Start working on the women size that you think would fit across the chest. The additional length will be worked right before you cast off for the armhole/sleeve cap. If the pattern is worked top-down you can add the length right after the armhole or before the first decrease on sleeve.

Regarding additional yarn amount, this will depend on how much length you add, but it is better with a skein too many than too few.

All yarns will have excess fibres (from production) that might come off as lint or shedding. Brushed yarns (ie hairier yarns) have more of these loose, excess fibres, causing more shedding.

Shedding also depends on what is worn under or over the garment, and whether this pulls at the yarn fibres. It’s therefore not possible to guarantee that there will be no shedding

Below are some tips on how to get the best result when working with hairier yarns:

1. When the garment is finished (before you wash it) shake it vigorously so the looser hairs come off. NOTE: do NOT use a lint roller, brush or any method that pulls at the yarn.

2. Place the garment in a plastic bag and put it in your freezer - the temperature will cause the fibres to become less attached to each other, and excess fibres will come off easier.

3. Leave in the freezer for a few hours before taking it out and shaking it again.

4. Wash the garment according to the instructions on the yarn label.

Pilling is a natural process that happens to even the most exclusive of fibers. It's a natural sign of wear and tear that is hard to avoid, and that is most visible in high friction areas of your garment like a sweater's arms and cuffs.

You can make your garment look as new by removing the pilling, using a fabric comb or a pill/lint remover.

Still can't find the answer you need? Then scroll down and leave your question so one of our experts can try to help you. This will be done normally within 5 to 10 working days.
In the meantime, you can read the questions and answers that others have left to this pattern or join the DROPS Workshop on Facebook to get help from fellow knitters/crocheters!

You might also like...

Post a comment to pattern DROPS 162-26

We would love to hear what you have to say about this pattern!

If you want to leave a question, please make sure you select the correct category in the form below, to speed up the answering process. Required fields are marked *.

Comments / Questions (108)

country flag Maria wrote:

Could you reconsider writing your patterns in a more understandable way? It would be much easier not to get lost in a one big text if you just wrote like this: Row 1:... Row 2:... Now it's very easy to get lost and get confused at which point I am...

03.04.2020 - 14:12

DROPS Design answered:

Dear Maria, the DROPS patterns are knitted and crocheted by thousands and thousands of people  around the world. We understand however that in certain countries, with different knitting/crochet traditions than Scandinavia, our patterns might be written in a way that differs from what some are used to. But of course we want everyone to understand our patterns, so that’s why we have created an extensive library of tutorial videos as well as step by step lessons that explain how to follow the techniques we use and how to read the diagrams in our patterns. Give them a try!

03.04.2020 - 14:33

country flag Fleur Høg wrote:

Jeg forstår simpelthen ikke diagrammet A1 og så beskrivelsen, ifht billedet af trøjen. Det er teknisk umuligt at hækle række 1 igen efter række 3, så blir mønsteret ikke over hinanden. Og på billedet ligner det at nederst er der skiftevis række 3 og 4. Og ikke KUN 4,som der står skrevet. Min hæklefadthed passer perfekt, og målene passer, men mønsteret begynder midt på mit bryst og ikke under, og jeg har en kort krop. Må indrømme at det er lidt en underlig opskrift. 🤔

27.01.2020 - 21:13

DROPS Design answered:

Hei Fleur. Du skal ikke hekle 1. omgang etter 3. omgang. Det er kun 3. omgang som gjentas til arb måler ca 29-31-31-33-31-31 cm. Man ser på bildet at viftemønstrer er litt tettere på "mellompartiet" da viftemønster består av 1 stav + 1 stavgruppe (3 staver + 2 luftmasker + 3 staver om sammen luftmaskebue). Mens viftemønstret i A.4 er større (viftemønstret består av 1 dobbeltstav + 1 dobbeltstavgruppe (3 dobbeltstaver + 2 luftmasker + 3 dobbeltstaver om sammen luftmaskebue). Deretter hekles 4.omgang til A.1 til arbeidet måler ca 40-42-43-45-45-45 cm. mvh DROPS design

10.02.2020 - 13:55

country flag Pascale Repoussard wrote:

Pouvez-vous m'envoyer le diagramme du pull svp? merci

15.10.2019 - 16:53

DROPS Design answered:

Bonjour Mme Repoussard, tous les diagrammes de ce modèle sont déjà en ligne, vous trouverez ici comment lire des diagrammes crochet. Bon crochet!

15.10.2019 - 17:34

country flag Ineke Van Limbeek wrote:

Hoeveel steken moet ik nu meerdere in de 2e toer. Er staat 28 gelijkmatig, maar jullie geven noch meer meerderingen aan. Er staat ong. iedere 4 sokjes, maar blijft dit zo, ook met het plaatsen van de markeerders.

22.07.2019 - 14:54

DROPS Design answered:

Dag Ineke,

Je meerdert inderdaad 28 steken in de 2e. De meerderingen die daarna beschreven staan komen in de volgende toer, wanneer je de markeerdraden plaatst.

23.07.2019 - 12:10

country flag Fernanda wrote:

Een vraag over het telpatroon: de tweede, derde en vierde toer, doen we steeds een stokje en daarna de groepjes, een stokje en een groepje, of starten we de toer met het ene stokje en daarna alleen maar de groepjes van drie (dubbele)-twee lossen-drie (dubbele)stokjes?

15.07.2019 - 19:01

DROPS Design answered:

Dag Fernanda,

Het stokje is ook steeds onderdeel van de herhaling, dus het stokje, het groepje, het stokje, het groepje, enzovoort.

23.07.2019 - 11:14

country flag Fabie wrote:

Merci, j'ai enfin compris l'aller/retours simplement en crochetant, je trouve ce modèle joli, milles merci pour vos modèles.

13.07.2019 - 18:11

country flag Fabie wrote:

Bonjour, aler/retours suppose donc que ce modèle a une partie du dos ouverte ?

28.06.2019 - 16:20

DROPS Design answered:

Bonjour Fabie, on crochète en allers et retours en terminant chaque rang par 1 maille coulée dans la 1ère m du rang, on va ainsi crocheter alternativement sur l'endroit et sur l'envers, mais en joignant les rangs = tours, on n'aura ni ouverture dos ni couture. Bon crochet!

01.07.2019 - 06:40

country flag Gabriela wrote:

Hi, why we need to do this decrease of the ch-amount by skipping of ch ? Thanks Work next round as follows: 3 ch (= 1 dc), 1 dc in first ch from ch-ring, * skip ch 1, 1 dc in each of the next 5 ch *, repeat from *-* until 0-4-3-2-1-0 ch remain, 1 dc in each of the last 0-4-3-2-1-0 ch = 112-116-120-124-128-132 dc. Then work piece back and forth

27.06.2019 - 12:24

DROPS Design answered:

Dear Gabriela, this is to avoid the fundation chain being too tight - read more here. Happy knitting!

27.06.2019 - 14:40

country flag Mette wrote:

Viftemønster A1 har jeg hæklet den første række med fm og 4 lm....Hvor fortsætter jeg videre i mønsteret næste tække? Synes ikke helt, det er så overskueligt.

08.05.2019 - 19:59

DROPS Design answered:

Hei Mette. Ja, det stemmer: etter at du har heklet 1. rad i diagrammet hele omgangen rundt begynner du på neste rad i diagrammet. Altså du hekler 1 stav om den første luftmaskebuen, 3 staver + 2 luftmasker + 3 staver om neste luftmaskebue osv. Du kan lese mer om hvordan å lese heklediagrammer her. God fornøyelse

10.05.2019 - 08:54

country flag Rianne wrote:

Hallo, ik heb een vraag over de tweede alinea. Ik heb al 1 toer gemeeerderd aan beide kanten van de 12 markeerdeers, nu moet ik 9 toeren vóór de markeerder meerderen, maar doordat elke toer het werk moet worden gekeerd vraag ik me af of deze meerdering dan afwisselend links en rechts moet gebeuren (van ‘buitenaf’ gezien) of elke keer aan dezelfde kant van de markeerder zit (van ‘buitenaf’ gezien), doordat het aan de goede kant meerderen wordt genoemd. Mvg

03.05.2019 - 11:22

DROPS Design answered:

Dag Rianne,

Je meerdert dan inderdaad vóór elke markeerdraad (dus 12 keer op de toer) en alleen als je op de goede kant aan het haken bent.

05.05.2019 - 17:35