DROPS Muskat uni colour 100% Cotton |
3.90 CAD /50g |
Order |
Clicking the ORDER button will redirect you to Wool Warehouse Direct Ltd website
The yarn cost is calculated from the pattern’s smallest size and the yarn’s cheapest product type. Looking for an even better price? You might find it on the DROPS Deals!
-------------------------------------------------------
Alternative Yarn – See how to change yarns here
Yarn Groups A to F – Use the same pattern and change the yarn here
Yarn usage using an alternative yarn – Use our yarn converter here
-------------------------------------------------------
DROPS Muskat uni colour 100% Cotton 3.90 CAD /50g Order |
Clicking the ORDER button will redirect you to Wool Warehouse Direct Ltd website
The yarn cost is calculated from the pattern’s smallest size and the yarn’s cheapest product type. Looking for an even better price? You might find it on the DROPS Deals!
= K | |
= P | |
= 1 YO between 2 sts | |
= K 2 tog | |
= slip 1 st as if to K, K 1, psso | |
= P 2 tog |
Each of our patterns has specific tutorial videos to help you.
These step-by-step tutorials might also help you:
Why is the knitting/crochet tension so important?
Knitting tension is what determines the final measurements of your work, and is usually measured per 10 x 10 cm. It is provided like so: number of stitches in width x number of rows in height - eg: 19 stitches x 26 rows = 10 x 10 cm.
The knitting tension is very individual; some people knit/crochet loosely while others work tightly. You adjust the knitting tension with the needle size, which is why the suggested needle size only serve as a guide! You need to adjust this (up or down) to ensure that YOUR knitting tension matches the knitting tension provided in the pattern. If you work with a different knitting tension than provided you will have a different yarn consumption, and your work will have different measurements than what the pattern suggests.
The knitting tension also determines which yarns can replace each other. As long as you achieve the same knitting tension you can replace one yarn with another.
See DROPS lesson: How to measure your tension/gauge
See DROPS video: How to make a gauge tension swatch
How do I know how many balls of yarn I need?
The required amount of yarn is provided in grams, eg: 450 g. To calculate how many balls you’ll need you first need to know how many grams are in 1 ball (25g, 50g or 100g). This information is available if you click on the individual yarn quality on our pages. Divide the amount required with the amount of each ball. For example, if each ball is 50g (the most common amount), the calculation will be as follows: 450 / 50 = 9 balls.
Can I use a different yarn than what the pattern suggests?
The important thing when changing from one yarn to another is that the knitting/crochet tension remains the same. This is so that the measurements of the finished piece will be the same as on the sketch provided. It is easier to achieve the same knitting tension using yarns from the same yarn group. It is also possible to work with multiple strands of a thinner yarn to achieve the knitting tension of a thicker one. Please try our yarn converter. We recommend you to always work a test swatch.
Please NOTE: when changing yarn the garment might have a different look and feel to the garment in the photo, due to individual properties and qualities of each yarn.
See DROPS lesson: Can I use a different yarn than the one mentioned in the pattern?
What are the yarn groups?
All our yarns are categorised into yarn groups (from A to F) according to thickness and knitting tension – group A contains the thinnest yarns and group F the thickest. This makes it easier for you to find alternative yarns to our patterns, should you wish to switch yarn. All yarns within the same group have a similar knitting tension and can easily replace each other. However, different yarn qualities have different structures and properties which will give the finished work a unique look and feel.
How do I use the yarn converter?
At the top of all our patterns you’ll find a link to our yarn converter, which is a helpful tool should you wish to use a different yarn than suggested. By filling in the yarn quality you wish to replace, the amount (in your size) and number of strands, the converter will present good alternative yarns with the same knitting tension. Additionally it will tell you how much you’ll require in the new qualities and whether you’ll need to work with multiple strands. Most skeins are 50g (some are 25g or 100g).
If the pattern is worked with multiple colours, every colour will have to be converted separately. Similarly, if the pattern is worked with several strands of different yarns (for example 1 strand Alpaca and 1 strand Kid-Silk) you will have to find alternatives for each, individually.
Why do you show discontinued yarns in the patterns?
Since different yarns have different qualities and textures we have chosen to keep the original yarn in our patterns. However, you can easily find options among our available qualities by using our yarn converter, or simply pick a yarn from the same yarn group.
It is possible that some retailers still have discontinued yarns in stock, or that someone has a few skeins at home that they would like to find patterns for.
The yarn converter will provide both alternative yarn as well as required amount in the new quality.
What size should I knit?
If you think it's hard to decide what size to make, it can be a good idea to measure a garment you own already and like the size of. Then you can pick the size by comparing those measures with the ones available in the pattern's size chart.
You'll find the size chart at the bottom of the pattern.
See DROPS lesson: How to read size chart
Why do I get the wrong knitting tension with the suggested needle size?
The needle size provided in the pattern serves only as a guide, the important thing is to follow the knitting tension. And since knitting tension is very individual, you will have to adjust the needle size to ensure that YOUR tension is the same as in the pattern – maybe you’ll have to adjust 1, or even 2 needle sizes, up or down to achieve the correct tension. For this, we recommend that you work test swatches.
Should you work with a different knitting tension than the one provided, the measurements of the finished garment might deviate from the measurement sketch.
See DROPS lesson: How to measure your tension/gauge
See DROPS video: How to make a gauge tension swatch
Why is the pattern worked top-down?
Working a garment top-down provides more flexibility and room for personal adjustment. For example it is easier to try the garment on while working, as well as making adjustments to length of yoke and shoulder caps.
The instructions are carefully explaining every step, in the correct order. Diagrams are adjusted to the knitting direction and are worked as usual.
How do I work according to a knitting diagram?
The diagram depicts all rows/rounds, and every stitch seen from the right side. It is read from bottom to top, from right to left. 1 square = 1 stitch.
When working back and forth, every other row is worked from the right side and every other row is worked from the wrong side. When working from the wrong side, the diagram will have to be worked reversed: from left to right, knit stitches are purled, purl stitches are knit etc.
When working in the round every round is worked from the right side and the diagram are worked from right to left on all rounds.
See DROPS lesson: How to read knitting diagrams
How do I work according to a crochet diagram?
The diagram depicts all rows/rounds, and every stitch seen from the right side. It is worked from bottom to top, from right to left.
When working back and forth every other row is worked from the right side: from right to left and every other row is worked from the wrong side: from left to right.
When working in the round, every row in the diagram are worked from the right side, from right to left.
When working a circular diagram you start in the middle and work your way outwards, counter clockwise, row by row.
The rows usually start with a given number of chain stitches (equivalent to the height of the following stitch), this will either be depicted in the diagram or explained in the pattern.
See DROPS lesson: How to read crochet diagrams
How do I work several diagrams simultaneously on the same row/round?
Instructions for working several diagrams after each other on the same row/round, will often be written like so: “work A.1, A.2, A.3 a total of 0-0-2-3-4 times". This means you work A.1 once, then A.2 is worked once, and A.3 is repeated (in width) the number of times provided for your size – in this case like so: S = 0 times, M = 0 times, L=2 times, XL= 3 times and XXL = 4 times.
The diagrams are worked as usual: begin with the first row in A.1, then work the first row in A.2 etc.
See DROPS lesson: How to read knitting diagrams
See DROPS lesson: How to read crochet diagrams
Why are the sleeves shorter in larger sizes?
The total width of the garment (from wrist-to-wrist) will be larger in the larger sizes, despite the actual sleeves being shorter. The larger sizes have longer sleeve caps and wider shoulders, so there will be a good fit in all sizes.
Where on the garment is the length measured?
The measurement sketch/schematic drawing provides information regarding the full length of the garment. If it’s a jumper or a jacket the length is measured from the highest point on the shoulder (usually closest to the neckline), and straight down to the bottom of the garment. It is NOT measured from the tip of shoulder. Similarly, the length of yoke is measured from the highest point on the shoulder and down to where yoke is split into body and sleeves.
See DROPS lesson: How to read a schematic drawing
What is a repeat?
Diagrams are often repeated on the round or in height. 1 repeat is the diagram the way it appears in the pattern. If it says to work 5 repeats of A.1 in the round, then you work A.1 a total of 5 times after/next to each other in the round. If it says to work 2 repeats of A.1 vertically/in height you work the entire diagram once, then begin again at the start and work the entire diagram one more time.
Why does the piece start with more chain stitches than it’s worked with?
Chain stitches are slightly narrower than other stitches and to avoid working the cast-on edge too tight, we simply chain more stitches to begin with. The stitch count will be adjusted on the following row to fit the pattern and measurement sketch.
Why increase before the rib edge when the piece is worked top-down?
The rib edge is more elastic and will contract slightly compared to, for example, stocking stitch. By increasing before the rib edge, you avoid a visible difference in width between the rib edge and the rest of the body.
Why increase in the cast-off edge?
It’s very easy to cast off too tightly, and by making yarn overs while casting off (and simultaneously casting these off) you avoid a too tight cast off edge.
See DROPS video: How to bind off with yarn overs (yo)
How do I increase/decrease on every 3rd and 4th row/round alternately?
To achieve an even increase (or decrease) you can increase on, for example: every 3rd and 4th row alternately, like so: work 2 rows and increase on the 3rd row, work 3 rows and increase on the 4th. Repeat this until the increase is complete.
See DROPS lesson: Increase or decrease 1 st on every 3rd and 4th row alternately
How can I work a jacket in the round instead of back and forth?
Should you prefer to work in the round instead of back and forth, you may of course adjust the pattern. You’ll need to add steeks mid-front (usually 5 stitches), and follow the instructions. When you would normally turn and work from the wrong side, simply work across the steek and continue in the round. At the end you’ll cut the piece open, pick up stitches to work bands, and cover the cut edges.
See DROPS video: How to knit steeks and cut open
Can I work a jumper back and forth instead of in the round?
Should you prefer to work back and forth instead of in the round, you may of course adjust the pattern so you work the pieces separately and then assemble them at the end. Divide the stitches for the body in 2, add 1 edge stitch in each side (for sewing) and work the front and back pieces separately.
See DROPS lesson: Can I adapt a pattern for circular needles into straight needles?
Why is the pattern slightly different than what I see in the photo?
Pattern repeats can vary slightly in the different sizes, in order to get the correct proportions. If you’re not working the exact same size as the garment in the photo, yours might deviate slightly. This has been carefully developed and adjusted so that the complete impression of the garment is the same in all sizes.
Make sure to follow instructions and diagrams for your size!
How do I make a women’s size garment into a men’s size one?
If you have found a pattern you like which is available in women’s size it’s not very difficult to convert it to men’s size. The biggest difference will be the length of sleeves and body. Start working on the women size that you think would fit across the chest. The additional length will be worked right before you cast off for the armhole/sleeve cap. If the pattern is worked top-down you can add the length right after the armhole or before the first decrease on sleeve.
Regarding additional yarn amount, this will depend on how much length you add, but it is better with a skein too many than too few.
How do I prevent a hairy garment from shedding?
All yarns will have excess fibres (from production) that might come off as lint or shedding. Brushed yarns (ie hairier yarns) have more of these loose, excess fibres, causing more shedding.
Shedding also depends on what is worn under or over the garment, and whether this pulls at the yarn fibres. It’s therefore not possible to guarantee that there will be no shedding
Below are some tips on how to get the best result when working with hairier yarns:
1. When the garment is finished (before you wash it) shake it vigorously so the looser hairs come off. NOTE: do NOT use a lint roller, brush or any method that pulls at the yarn.
2. Place the garment in a plastic bag and put it in your freezer - the temperature will cause the fibres to become less attached to each other, and excess fibres will come off easier.
3. Leave in the freezer for a few hours before taking it out and shaking it again.
4. Wash the garment according to the instructions on the yarn label.
Why does my garment pill?
Pilling is a natural process that happens to even the most exclusive of fibers. It's a natural sign of wear and tear that is hard to avoid, and that is most visible in high friction areas of your garment like a sweater's arms and cuffs.
You can make your garment look as new by removing the pilling, using a fabric comb or a pill/lint remover.
Florentina |
|||||||||||||||||||
|
|||||||||||||||||||
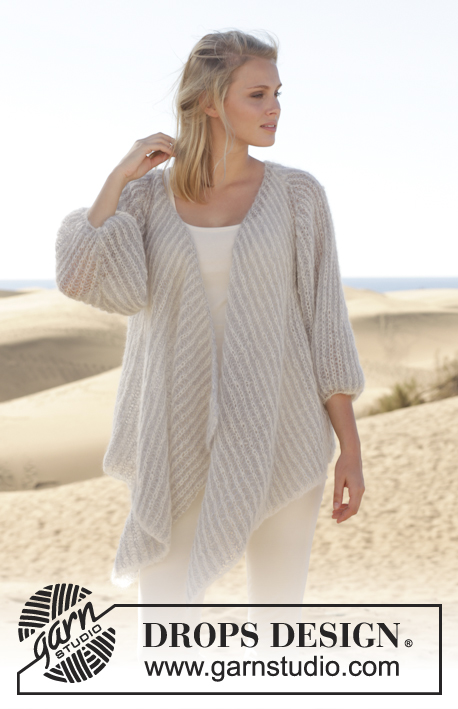
Knitted DROPS jumper with lace pattern and raglan in ”Muskat”. Size: S - XXXL.
DROPS 152-18 |
|||||||||||||||||||
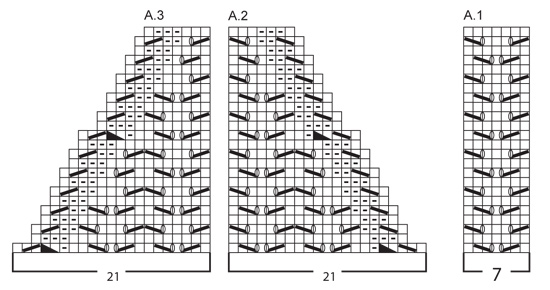
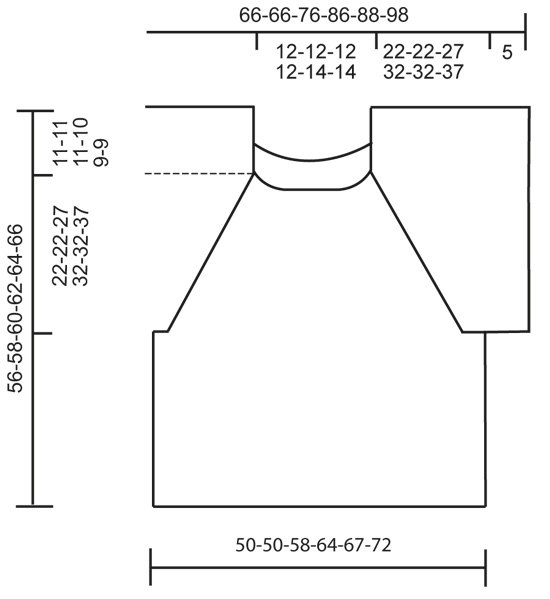
GARTER ST (in the round on circular needle): * K 1 round and P 1 round *, repeat from *-*. 1 ridge = 2 rounds. PATTERN: See diagrams A.1-A.3. INCREASE TIP: Inc 1 st by getting yarn between 2 sts from previous round - K this st twisted, i.e. work in back loop of st instead of front to avoid holes. RAGLAN BODY: Dec as follows before marker: Beg 4 sts before marker, P 2, K 2 tog (= 1 st dec). Dec as follows after marker: Beg on 1st st after marker, slip 1 st as if to K, K 1, psso, P 2 (= 1 st dec). ---------------------------------------------------------- BODY: Worked in the round on circular needle. Cast on 212-212-244-268-280-304 sts on circular needle size 3.5 mm / US 4 with Muskat. Work 3 ridges in GARTER ST - see explanation above. Then switch to circular needle size 4 mm / US 6 and work as follows from mid back: Stockinette st over the next 46-46-54-60-63-69 sts (= back piece), A.1 (= 7 sts) over the next 14 sts, stockinette st over the next 92-92-108-120-126-138 sts (= front piece), A.1 over the next 14 sts, stockinette st over the next 46-46-54-60-63-69 m (= back piece). Continue in stockinette st, pattern according to diagram A.1 in each side until piece measures 23-25-22-21-23-20 cm / 9"-9 3/4"-8 3/4"-8 1/4"-9"-8". REMEMBER THE GAUGE! On next round bind off for armholes in each side as follows: Work until the 2 repetitions in left side and bind off the 14 sts over A.1, work stockinette st over all sts on front piece, and bind off the 14 sts over A.1 in right side, work the rest of row and put piece aside (= 28 sts in total bind off) = 92-92-108-120-126-138 sts on back and front piece = 184-184-216-240-252-276 sts in total remain on needle. SLEEVE: Worked in the round on circular needle. Cast on 133-133-147-161-154-168 sts on circular needle size 3.5 mm / US 4 with Muskat. Work 3 ridges in garter st - see explanation above. Insert a marker at beg of round = mid under sleeve. Then switch to circular needle size 4 mm / US 6 and work pattern as follows: A.1 (= 7 sts) over all sts on round = 19-19-21-23-22-24 repetitions on round. Continue like this with pattern until piece measures 5 cm / 2'' from cast-on edge. NOTE! Stop after a round with stockinette st that is after a round like 3rd row in A.1 (i.e after round 4, 8, 12 etc), AT THE SAME TIME on this round bind off one whole repetition of A.1 on each side of marker (= 14 sts bind off in total mid under sleeve) = 119-119-133-147-140-154 sts remain on needle. Put piece aside and Make another sleeve. YOKE: Read all of the following section before continuing! Slip sleeves on to same circular needle as body where armholes were bound off = 422-422-482-534-532-584 sts, insert 1 marker in all transitions between body and sleeves (= 4 markers). Continue like this on next round: 46-46-54-60-63-69 sts in stockinette st (= back piece), insert a marker here, A.2 (= 21 sts), A.1 11-11-13-15-14-16 times in total, A.3 (= 21 sts), insert a marker here, stockinette st over the next 92-92-108-120-126-138 (= front piece), insert a marker here, A.2 (= 21 sts), A.1 11-11-13-15-14-16 times in total, A.3 (= 21 sts), insert a marker here, 46-46-54-60-63-69 sts stockinette st (= back piece), AT THE SAME TIME beg dec for RAGLAN BODY on body – see explanation above = 4 sts dec. Repeat the same dec every other round 30-30-37-44-44-51 more times, 31-31-38-45-45-52 times in total, AT THE SAME TIME continue working pattern with dec for raglan on sleeves. NOTE! When A.2 and A.3 have been worked 1 time vertically, continue with the same dec in pattern on sleeves and the same dec for raglan on body as before. When all dec are done, 154-154-154-146-144-136 sts remain on needle. Then work as follows on next round from mid back: Continue as before with stockinette st over sts on back piece, and pattern over left sleeve. Work stockinette st over the 30-30-32-30-36-34 sts on front piece before slipping front piece on a stitch holder. Then work an elevation back and forth in neck as follows: On the next 6 rows continue with pattern over sleeves, stockinette st on back piece and dec as before, AT THE SAME TIME work an elevation in the back of neck as follows: Reduce no of sts worked as follows: Work until 3 sts remain on row, turn, work until 3 sts remain, turn, work until 6 sts remain, turn, work until 6 sts remain, turn, work until 9 sts remain, turn, work until 9 sts remain. Then slip sts from stitch holder back on needle, switch to circular needle size 3.5 mm / US 4 and work 3 ridges in the round over all sts, AT THE SAME TIME on 1st round on edge in garter st dec 11-11-11-12-10-2 sts evenly on needle = 143-143-143-134-134-134 sts remain on needle. Loosely bind off. ASSEMBLY: Sew the openings under the sleeves tog. |
|||||||||||||||||||
Diagram explanations |
|||||||||||||||||||
|
|||||||||||||||||||
Have you made this or any other of our designs? Tag your pictures in social media with #dropsdesign so we can see them! Do you need help with this pattern?You'll find tutorial videos, a Comments/Questions area and more by visiting the pattern on garnstudio.com. © 1982-2024 DROPS Design A/S. We reserve all rights. This document, including all its sub-sections, has copyrights. Read more about what you can do with our patterns at the bottom of each pattern on our site. |
With over 40 years in knitting and crochet design, DROPS Design offers one of the most extensive collections of free patterns on the internet - translated to 17 languages. As of today we count 304 catalogs and 11422 patterns - 11417 of which are translated into English (US/in).
We work hard to bring you the best knitting and crochet have to offer, inspiration and advice as well as great quality yarns at incredible prices! Would you like to use our patterns for other than personal use? You can read what you are allowed to do in the Copyright text at the bottom of all our patterns. Happy crafting!
Comments / Questions (85)
Elise wrote:
Bonjour, pouvez vous me d'écrire les mailles à faire pour le diagramme A1? Je fais une maille endroit, deux mailles ensemble, un jeté, une maille endroit, un jeté, un surjet et une maille endroit et je me retrouve avec 8 mailles au lieu de 7. Merci ^^
12.04.2020 - 17:33DROPS Design answered:
Bonjour Élise, c'est bien ainsi que se tricote le 1er rang de A.1, je cite: une maille endroit (= 1 m), deux mailles ensemble (= 1 m), un jeté (= 1 m), une maille endroit (= 1 m), un jeté (= 1 m), un surjet (= 1 m) et une maille endroit (= 1 m) = vous devez avoir ainsi bien 7 m. Bon tricot!
14.04.2020 - 11:42Myriam29 wrote:
Bonjour, Pouvez-vous m'aider concernant les diminutions au niveau de l'empiècement. J'ai réalisé A2 et A3, jusqu'ici tout allait bien. Pour la suite, je ne comprends pas comment réaliser les diminutions dans le point fantaisie des manches, pouvez-vous m'expliquer comment les faire. Je vous en remercie.
15.12.2019 - 21:03DROPS Design answered:
Bonjour Myriam29, les diminutions des manches (raglan) se font comme indiqué dans A.2 et A.3, vous diminuez après 1 m end au début de la manche (= début de A.2) et vous diminuez avant la m endroit à la fin de A.3 (= fin de A.3). Entre temps, vous continuez le point ajouré comme avant, comme dans A.2 et A.3 = le nombre de jetés du point ajouré doit toujours être compensé par le même nombre de diminutions (sans celle du raglan). Bon tricot!
16.12.2019 - 08:59Gitte Stieper wrote:
Der er en fejl der ikke er blevet rettet i den danske opskrift. fra denne sætning i bærestykket og ned er masketallene anderledes på andre sprog: Når alle indtagninger er færdige er der 174-174-178-174-172-168 m tilbage på p.
06.10.2015 - 19:47Pavla wrote:
Hi I'm just finishing and have 154 sts if i work elevation over 6 rows with decreasing and than dec. 11 sts it is not 143 sts. and if I knit in pattern over sleeves do I dec only at begining of sleeve thank you Pavla
04.10.2015 - 16:04DROPS Design answered:
Dear Pavla, on sleeve you work A.2 (dec at beg of sleeve), repeat A.1 and A.3 (dec at the end of sleeve) - after the short rows, you work again over all sts and on first round dec 11 sts evenly (154-11=143sts) for the neck edge. Happy knitting!
05.10.2015 - 09:54Karen Christensen wrote:
Der skal stå A2 og ikke At i min anden kommentar
24.09.2015 - 12:11Karen Christensen wrote:
Hej Jeg er lidt forvirret og håber I kan hjælpe . Jeg kan ikke finde ud af hvad det er for nogle indtagninger jeg skal lave i ærmerne, efter At og A 3 er færdig en gang i højden , skal jeg bare starte forfra med At og A3? Skal omgang 25 så hedde 1 ret , løft en af en ret løft masken over, 2 vrang sammen, 1 vrang 1 ret og derefter så A1. Men hvis man bare gentager A2 og A3 over alle 104 omgange kommer man til at ha for lidt masker til sidst M. V. H Karen
24.09.2015 - 12:09DROPS Design answered:
Hej Karen, Jo men du strikker indtagningerne i hver side ifølge diagrammerne. Spørg også gerne din lokale DROPS forhandler! God fornøjelse!
01.10.2015 - 15:25Chedoz wrote:
Merci a vous je vais essayer! Donc je pense après les 6 rangs raccourci va falloir des augmentations car avant les rangs raccourcis j'ai 154 mailles et après les rangs raccourcis il faut repartir 11 diminutions. 154 - 11 = 143. Bon je vais essayer et merci vraiment!
07.05.2015 - 21:50Chedoz wrote:
Pour la ré-hausse, il faut juste tricote le dis en jersey jusqu'à qu'il reste 3 mailles puis tourner le travail et idem! Ou alors il y a quelque chose de spécial a faire? De plus, je pense que s'il faut continuer les diminutions sur les 6 rangs suivants il ne reste pas 143 mailles tout a la fin! Il est super ce modèle mais la fin est compliqué du moins je ne comprends pas vu que la rehausse j'ai jamais fait 😕
07.05.2015 - 11:02DROPS Design answered:
Continuez les diminutions du raglan sur les 6 rangs raccourcis, puis tricotez 1 rang endroit sur toutes les mailles en ajustant des diminutions pour ajuster à 143 m. Bon tricot!
07.05.2015 - 15:42Chedoz wrote:
Merci pour votre réponse! Pour la ré-hausse j'ai cherche sur votre site mais pas trouver la manière de faire! Il y a juste a tricoter en jersey jusqu'à qu'il reste 3 mailles du dos et tourner le travail Merci a vous
07.05.2015 - 10:49DROPS Design answered:
Bonjour Mme Chedoz, la ré-hausse consiste à tricoter des rangs raccourcis (= plus de rangs côté dos que devant). Continuez à partir du devant (après les mailles de l'encolure devant en attente) et tricotez jusqu'à ce qu'il reste 3 m à la fin du rang (de l'autre côté du devant), tournez et tricotez le rang retour jusqu'à ce qu'il reste 3 m de l'autre côté du devant (= 3 m non tricotées de chaque côté de l'encolure) et continuez ainsi en laissant 3 m en plus à chaque fois. Bon tricot!
07.05.2015 - 15:41Chedoz wrote:
Bonsoir, Besoin de vos lumières Dans la partie empiècement après les diminutions je ne comprends pas cette partie: "Tricoter ensuite ainsi le tour suivant a partir du milieu du dos: continuer comme avant les mailles du dos en jersey (LA AVEC DIMINUTION OU SANS???) et la manche gauche en point fantaisie (LA PAREIL AVEC LES DIMINUTIONS OU SANS??)" ou a lors c'est le rang retour???
06.05.2015 - 22:56DROPS Design answered:
Bonjour Mme Chedoz, Continuez les diminutions comme avant, dans le jersey et dans le point fantaisie des manches sur ce tour et sur les rangs suivants pour la ré-hausse de l'encolure dos. Bon tricot!
07.05.2015 - 09:32