
Popular categories
Looking for a yarn?


|
|
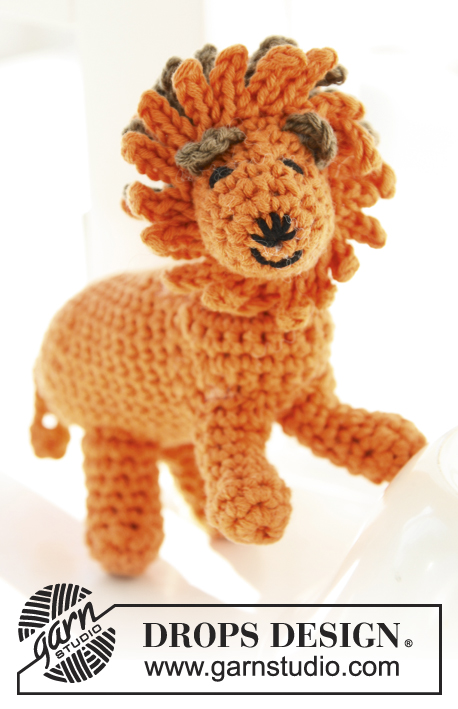
Mufasa |
|
 |
 |
Crochet lion in DROPS Safran or DROPS Paris
DROPS Children 24-10 |
|
|
FILLING TIP: Gradually fill some cotton wool in the animal when working. CROCHET TIP: Beg every dc round with 1 ch (this does not replace first dc) and finish with 1 sl st in first dc from beg of round. Turn every dc row with 1 ch - this ch does not replace first dc on row. DECREASE TIP: Dec 1 dc by working 2 sts tog. This is done as follows: Insert hook in first st and pull thread through, insert hook in next st and pull thread through, make 1 YO and pull thread through all 3 sts on hook. ---------------------------------------------------------- SMALL LION: Piece is worked from back of body and to and with head. Then work fur around the head, ears, legs and tail separately and fasten. READ FILLING TIP! BODY AND HEAD: Work 4 ch on hook size 3 mm with orange and form a ring with 1 sl st in first ch. READ CROCHET TIP! ROUND 1: Work 6 dc in ch-ring - round beg mid under on lion. ROUND 2: Work 2 dc in every dc = 12 dc. ROUND 3: Work * 1 dc in first dc, 2 dc in next dc *, repeat from *-* the entire round = 18 dc. ROUND 4: Work * 1 dc in each of the first 2 dc, 2 dc in next dc *, repeat from *-* the entire round = 24 dc. ROUND 5-14: Work 1 dc in every dc. Then work 1 dc in each of the first 10 dc, turn piece with 1 ch - now work back and forth in one for chest. ROW 15 (WS): Skip the first 2 dc, work 1 dc in each of the next 16 dc, turn with 1 ch. ROW 16 (RS): Skip the first 2 dc, work 1 dc in each of the next 13 dc, turn with 1 ch. ROW 17 (WS): Skip the first 2 dc, work 1 dc in each of the next 10 dc, turn with 1 ch. ROW 18 (RS): Skip the first 2 dc, work 1 dc in each of the next 7 dc, turn with 1 ch. ROW 19 (WS): Skip the first 2 dc, work 1 dc in each of the next 4 dc, turn with 1 ch. ROW 20 (RS): Skip first dc, then work 7 dc, turn with 1 ch. ROW 21 (WS): Skip first dc, then work 10 dc, turn with 1 ch. ROW 22 (RS): Skip first dc, then work 13 dc, turn with 1 ch. ROW 23 (WS): Skip first dc, then work 16 dc, turn with 1 ch, then work in the round again. ROUND 24: Work 22 dc the entire round (now rounds beg mid on top of neck). ROUND 25: Work the first 8 dc tog 2 by 2 – READ DECREASE TIP! Then work 1 dc in each of the next 6 dc, then work the last 8 dc tog 2 by 2 = 14 dc. ROUND 26: Work 2 dc in each of the first 3 dc, then 1 dc in each of the next 8 dc and 2 dc in each of the last 3 dc = 20 dc, then work 1 dc in each of the first 9 dc, turn with 1 ch – now work back and forth in one for head. ROW 27 (WS): Skip the first 2 dc, work 1 dc in each of the next 15 dc, turn with 1 ch. ROW 28 (RS): Skip the first 2 dc, work 1 dc in each of the next 12 dc, turn with 1 ch. ROW 29 (WS): Skip the first 2 dc, work 1 dc in each of the next 9 dc, turn with 1 ch. ROW 30 (RS): Skip the first 2 dc, work 1 dc in each of the next 6 dc, turn with 1 ch. ROW 31 (WS): Skip the first 2 dc, work 1 dc in each of the next 3 dc, turn with 1 ch. ROW 32 (RS): Skip first dc, then work 6 dc, turn with 1 ch. ROW 33 (WS): Skip first dc, then work 9 dc, turn with 1 ch. ROW 34 (RS): Skip first dc, then work 12 dc, turn with 1 ch. ROW 35 (WS): Skip first dc, then work 15 dc, turn with 1 ch, then work in the round again. ROUND 36: Work 21 dc in the round. ROUND 37: Work 1 dc in every dc – insert 1 marker in this round (marks where the mane is worked later). ROUND 38: Work 1 dc in every dc. ROUND 39: * Work the first 2 dc tog, then 1 dc in next dc *, repeat from *-* the entire round = 14 dc. ROUND 40: Work 1 dc in every dc. ROUND 41: Work 1 dc in every dc while at the same time dec 4 dc evenly = 10 dc. ROUND 42: Work 1 dc in every dc. ROUND 43: Work 2 and 2 dc tog the entire round, cut the yarn, baste it around the opening at the front of snout and tighten tog. HIND LEGS: Work 4 ch with orange and form a ring with 1 sl st in first ch. ROUND 1: Work 6 dc in ch-ring. ROUND 2: Work 2 dc in every dc = 12 dc. ROUND 3: Work 1 dc in each of the first 3 dc, then work the next 6 dc tog 2 by 2 – SEE DECREASE TIP, then work 1 dc in each of the last 3 dc = 9 dc. ROUND 4-6: Work 1 dc in every dc. ROUND 7: Work 2 dc in first dc, 1 dc in each of the next 7 dc and 2 dc in last dc = 11 dc. ROUND 8: Work 2 dc in first dc, 1 dc in each of the next 9 dc and 2 dc in last dc = 13 dc. Fasten off. Work another hind leg. Fill them with some cotton wool and fasten to the back of body with the paws pointing forwards. FORE LEGS: Work 4 ch with orange and form a ring with 1 sl st in first ch. ROUND 1: Work 5 dc in ch-ring. ROUND 2: Work 2 dc in every dc = 10 dc. ROUND 3: Work 1 dc in each of the first 2 dc, then work the next 6 dc tog 2 by 2 – SEE DECREASE TIP, then work 1 dc in each of the last 2 dc = 7 dc. ROUND 4-6: Work 1 dc in every dc. ROUND 7: Work 2 dc in first dc, 1 dc in each of the next 5 dc and 2 dc in last dc = 9 dc. ROUND 8: Work 2 dc in first dc, 1 dc in each of the next 7 dc and 2 dc in last dc = 11 dc. Fasten off. Work another fore leg. Fill them with some cotton wool and fasten to the front of body with the paws pointing forwards. TAIL: Work 10 ch with orange, turn and work 2 tr in 3rd ch from hook, then work 2 ch, fasten with 1 sl st in same ch where the 2 tr was worked, then work 1 dc in each of the last 7 ch. Fasten off and fasten the tail to the back of body so that it hangs down. MANE ON HEAD: ROW 1: Work with orange as follows in the 37th round around the head: 1 dc in first dc, * 5 ch, then 1 sl st in 2nd ch from hook and 1 sl st in each of the last 3 ch, fasten with 1 dc in next dc on round *, repeat from *-* around the whole head, fasten off. ROW 2: Now only work along the upper half of head, beg in the side, 2 rounds behind the previous round worked. Work with light brown as follows: 1 dc in first dc, * 5 ch, then 1 sl st in 2nd ch from hook and 1 sl st in each of the last 3 ch, fasten with 1 dc in next dc on round *, repeat from *-* around the other side of head, fasten off. ROW 3: Work in 2nd row behind the previous row worked, now work with orange the same way as on 2nd row. EARS: Work 4 ch with light brown, then work 1 tr in the first ch made, fasten off. Work another ear and sew them on top of the head. Embroider eyes, snout and mouth with black. ---------------------------------------------------------- LARGE LION: Work as small lion, but on hook size 4 mm with Paris. Replace orange with light yellow and replace light brown with dark beige. |
|
|
Have you made this or any other of our designs? Tag your pictures in social media with #dropsdesign so we can see them! Do you need help with this pattern?You'll find tutorial videos, a Comments/Questions area and more by visiting the pattern on garnstudio.com. © 1982-2024 DROPS Design A/S. We reserve all rights. This document, including all its sub-sections, has copyrights. Read more about what you can do with our patterns at the bottom of each pattern on our site. |
|


With over 40 years in knitting and crochet design, DROPS Design offers one of the most extensive collections of free patterns on the internet - translated to 17 languages. As of today we count 304 catalogues and 11422 patterns - 11422 of which are translated into English (UK/cm).
We work hard to bring you the best knitting and crochet have to offer, inspiration and advice as well as great quality yarns at incredible prices! Would you like to use our patterns for other than personal use? You can read what you are allowed to do in the Copyright text at the bottom of all our patterns. Happy crafting!
Comments / Questions (13)
Gibt es zu dem Löwen auch eine Video Anleitung
18.05.2014 - 11:08Jeg kan ikke komme videre fra række 14 til 15, jeg har 10fm. og jeg skal springe 2fm. over og hækle 16 fm. men jeg har jo kun 10 fm.
13.05.2014 - 17:13DROPS Design answered:
Hej Herdis. Du skulle gerne have 24 fm efter 4. omg. Derefter haekler du 1 fm i hver fm til og med omg 14, og derefter kan du gaa videre som beskrevet.
15.05.2014 - 16:25Oppskriften på disse dyrene er svært vanskelig og forstå. når det står: hekle fram og tilbake et stykke, skal man da hekle noen rader virkålig, eller fortsette å følge nr på oppskrifta? f.eks fra omg 14 og rett til rad 15.eller skal man hekle noen rader mellom der som ikke er nummerert?
09.01.2014 - 13:23DROPS Design answered:
Hei Stine. Du skal fölge opskriften, men du hekler (fra omg 15) frem og tilbage og ikke rundt. Fra omg 24 hekler du rundt igen.
09.01.2014 - 16:24