
Popular categories
Looking for a yarn?


|
||||||||||
Springfield |
||||||||||
 |
 |
|||||||||
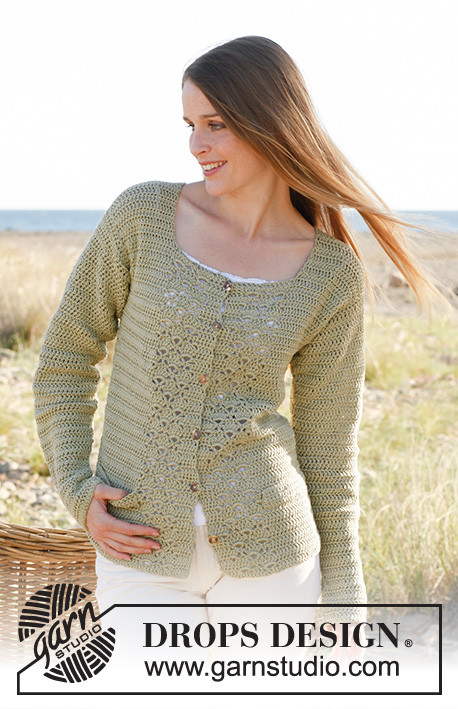
Crochet DROPS jacket in ”Muskat”. Size: S - XXXL
DROPS 147-11 |
||||||||||
|
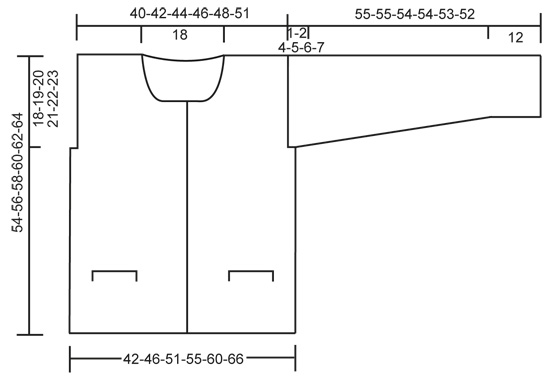
CROCHET INFO: Replace first dc on every row with 3 ch and finish every row with 1 dc in 3rd ch from beg of previous row. BAND PATTERN: See diagrams A.1 and A.2. -------------------------------------------------------- BACK PIECE: Read US/UK above! With Muskat ch 89-96-106-116-126-139 on hook size 4 mm / G/6. Turn and work as follows: 1 sc in 2nd ch from hook, then work 1 sc in each of the next 2-4-4-4-4-2 ch, * skip ch 1, work 1 sc in each of the next 4 ch *, repeat from *-* the entire row = 72-78-86-94-102-112 sc (this first row was worked from WS, first ch on row = 1 sc). Continue with 1 dc in every sc - READ CROCHET INFO. Then continue with 1 dc in each dc. When piece measures 36-37-38-39-40-41 cm / 14¼"-14½"-15"-14¼"-15¾"-16⅛", dec for armhole by working sl sts over the first 2-3-6-8-10-13 dc on row, then work 1 sl st + 3 ch in next dc, then dc until 2-3-6-8-10-13 dc remain, turn piece. There are now 68-72-74-78-82-86 dc on row. Continue to work back and forth over these until piece measures 52-54-56-58-60-62 cm / 20½"-21¼"-22"-22¾"-23⅝"-24⅜", now work 2 rows only over the first 19-21-22-24-26-28 dc in one side for shoulder. Cut the yarn. Then work 2 rows with dc over 19-21-22-24-26-28 dc on the other shoulder (the middle 30 dc = neck). RIGHT FRONT PIECE: With Muskat ch 49-52-57-62-67-74 on hook size 4 mm / G/6. Turn and work 1 sc in 2nd ch from hook, then work 1 sc in each of the next 2-5-5-5-5-2 ch, * skip ch 1, work 1 sc in each of the next 4 ch *, repeat from *-* the entire row = 40-43-47-51-55-60 sc (this first row was worked from WS, first ch = 1 sc). Turn and continue as follows: Diagram A.1 over the first 19 sc – beg with row marked with an arrow, continue with 1 dc in each of the last 21-24-28-32-36-41 sc. Continue like this upwards - i.e. repeat the top 4 rows in diagram over the outermost 19 sts towards mid front and dc over the other sts. When piece measures 36-37-38-39-40-41 cm / 14¼"-14½"-15"-14¼"-15¾"-16⅛", the outermost 2-3-6-8-10-13 dc towards the armhole are no longer worked. Continue the pattern as before (there are now 19-21-22-24-26-28 dc after diagram A.1). When piece measures 44-46-47-49-50-51 cm / 17¼"-18"-18½"-19¼"-19¾"-20", the outermost 19 sts towards mid front are no longer worked (i.e. diagram A.1) = 19-21-22-24-26-28 dc remain on row. Continue back and forth with dc over these until piece measures 54-56-58-60-62-64 cm / 21¼"-22"-22¾"-23⅝"-24⅜"-25¼", cut the yarn. LEFT FRONT PIECE: Work as right but reversed, i.e. after 1 row with sc work as follows: 21-24-28-32-36-41 dc, then A.2 over the last 19 sts towards mid front. SLEEVE: To get the same texture as on body, work the sleeve back and forth and sew it tog when finished. Work 45-47-50-52-55-57 ch on hook size 4 mm / G/6 with Muskat. Turn and work 1 sc in 2nd ch from hook. Then work 1 sc in each of the next 3-5-3-5-3-5 ch, * skip ch 1, work 1 sc in each of the next 4 ch *, repeat from *-* the entire row = 37-39-41-43-45-47 sc (this first row was worked from WS, first ch = 1 sc). Turn and continue with 1 dc in every st upwards. When piece measures 12 cm / 4¾", inc 1 dc in each side by working 2 dc in first and last dc. Repeat inc 11-12-12-13-14-14 more times: SIZE S: Alternately every 3rd and 4th row, Size M and L: Every 3rd row. SIZE XL: Alternately every other and 3rd row. Size XXL and XXXL: Every other row. After all inc there are 61-65-67-71-75-77 dc on row. When piece measures 54-53-50-49-47-45 cm / 21¼"-21"-19¾"-19¼"-18½"-17¾" (shorter measurements in the larger sizes because of wider shoulders), insert 1 marker in the side (this marks how far up the sleeve is sewn tog). Continue with dc until piece measures 55-55-54-54-53-52 cm / 21½"-21½"-21¼"-21¼"-21"-20½", cut the yarn. POCKET EDGES (for decoration): With Muskat ch 20-20-22-22-24-24 LOOSELY on hook size 4 mm / G/6 . Turn, skip 1 ch and work 1 sc in each of the remaining 19-19-21-21-23-23 ch. Continue back and forth with sc until edge measures 3 cm / 1⅛", cut the yarn. Work another pocket edge. ASSEMBLY: Sew all seams edge to edge to avoid a chunky seam. Sew shoulder seams and side seams. Then sew sleeve seams up to marker and sew in the sleeves. Sew 1 pocket edge on each front piece (sew at the bottom by the cast on edge and along the sides) – they should be placed approx. 10-10-11-11-12-12 cm / 4"-4"-4⅜"-4⅜"-4¾"-4¾" from bottom edge and directly inside the lace pattern on bands. Sew 6 buttons on to left band. Sew the first 1 cm / ⅜" from neck dec - and approx. 0.5 cm / ¼" in from mid front, distribute the other 5 buttons evenly down the band. Button through sts on the right side. |
||||||||||
Diagram explanations |
||||||||||
|
||||||||||

|
||||||||||
|
||||||||||
|
Have you made this or any other of our designs? Tag your pictures in social media with #dropsdesign so we can see them! Do you need help with this pattern?You'll find tutorial videos, a Comments/Questions area and more by visiting the pattern on garnstudio.com. © 1982-2024 DROPS Design A/S. We reserve all rights. This document, including all its sub-sections, has copyrights. Read more about what you can do with our patterns at the bottom of each pattern on our site. |
||||||||||


With over 40 years in knitting and crochet design, DROPS Design offers one of the most extensive collections of free patterns on the internet - translated to 17 languages. As of today we count 304 catalogs and 11422 patterns - 11417 of which are translated into English (US/in).
We work hard to bring you the best knitting and crochet have to offer, inspiration and advice as well as great quality yarns at incredible prices! Would you like to use our patterns for other than personal use? You can read what you are allowed to do in the Copyright text at the bottom of all our patterns. Happy crafting!
Comments / Questions (28)
I just finished all parts, now want to sew up. finding the two fronts are shorter, from the armhole dec to the shoulder? both are exactly the same... is this meant to be like this, or did I make a miscalculation somewhere? I used measurements for Medium, am not using same stitch style, I am using one sc row, one dc row, but followed the measurement lengths and adjusted my pattern stitch to follow exactly.
26.08.2018 - 20:54DROPS Design answered:
Dear Clair, It is most likely that by not using the same stich style, the gauge became slightly different even if you used the measurements. We hope you will be able to find a way to finish your project.
30.08.2018 - 13:18Hi, Can you tell me if the swatch size and stitch is in English or American English?
12.12.2017 - 09:57DROPS Design answered:
Dear Mrs Belchamber, you will find informations about gauge under tab "Materials" - choose the appropriate crochet terminology by selecting correct language: English (UK/cm) or English (US/inch) below the picture. Happy crocheting!
12.12.2017 - 10:28I am confused with the wording in the first line and throughout pattern. "skip ch 1, work 1 sc in each of the next 4 ch" ....... Does that mean skip the next ch then work 4 single crochets or does it mean skip 1 chain, chain 1, 4 single crochets. Hope that makes sense. It is in the pattern a lot so I don't dare start until I understand what it means. Thank you so much!
04.12.2017 - 03:49DROPS Design answered:
Dear Mrs Hale, you skip next chain, then work a total of 4 single crochets = you will have worked 4 sc over 5 ch (first of these 5 ch has been skipped). Happy crocheting!
04.12.2017 - 10:32Grazie mille per la risposta. Mi scuso, non mi è possibile eliminare il nome del filato. Approfitto per un altro Vostro consiglio, pensavo di fare la catenella di avvio con un uncinetto di mezzo numero più grande per dare morbidezza al bordo, è conveniente o meglio usare lo stesso uncinetto per tutto il lavoro?
25.08.2017 - 18:51DROPS Design answered:
Buonasera Anita, se ha la mano un po' stretta, può avviare con un uncinetto più grande, altrimenti usi quello indicato. Buon lavoro!
25.08.2017 - 20:13Salve, per la giacchina stousando il filato Lana lanedi Bertagna Filati che consiglia ferri n 3,5 o 4. A me piace usare un uncinetto un po' più grande, con il 4 e mezzo 10cm corrispondono a 15 m e il lavoro risulta abbastanza morbido. Vorrei provare con uncinetto 5 e diviene ancora più morbido (adattando n di maglie e righe), ma credo che una giacca debba essere un pochino rigida. Prima di procedere chiedo consiglio a Voi esperti (ho una mano abbastanza regolare). Grazie
25.08.2017 - 16:29DROPS Design answered:
Buongiorno Anita. Generalmente è meglio lavorare in modo che il capo sia un po' sostenuto. Le chiediamo cortesemente di chiedere in questa sede, consigli solo su filati Drops. Grazie e buon lavoro!
25.08.2017 - 17:07Sandy wrote:
Where can I find the size chart?
05.04.2014 - 22:14DROPS Design answered:
Dear Sandy, you will find at the bottom of the pattern a measurement chart, all measures are in cm and taken flat from side to side. Compare these to one of a similar garment you like the shape and size to find the matching size. Happy crocheting!
07.04.2014 - 09:53Monica wrote:
Me gustan mucho sus patrones, pero no se que significa LD - LR. Por favor aclarenme esto ya que me gustaria hacer este cardigan pero no entiendo ese vocablo. Muchas gracias
04.04.2014 - 21:16DROPS Design answered:
Hola Monica. LD - lado derecho de la labor, LR - lado revés de la labor., también tienes un glosario (en el apartado "Tips y Ayuda") . Allí te viene esta información.
07.04.2014 - 09:42Bonjour la photo du modèle représente une bande de boutonnage simple le dessin du modèle est représenté avec une bande de boutonnage croisée merci pour tous vos modèles gabi
25.01.2013 - 10:49DROPS Design answered:
Bonjour Gabi, un nouveau schéma a été publié. Les bandes de boutonnage sont droites. Bon crochet !
28.01.2013 - 10:07Wunderschöne Häkeljacke! Ich würde die Frontbordüre auch an den Ärmeln oder als Manschette einsetzen. Namensvorschlag: Sommergrün, grüne Wiese, Reseda,
03.01.2013 - 14:27Wil ik maken, prachtig model.
29.12.2012 - 09:55