
Popular categories
Looking for a yarn?


|
||||||||||
My honey |
||||||||||
 |
 |
|||||||||
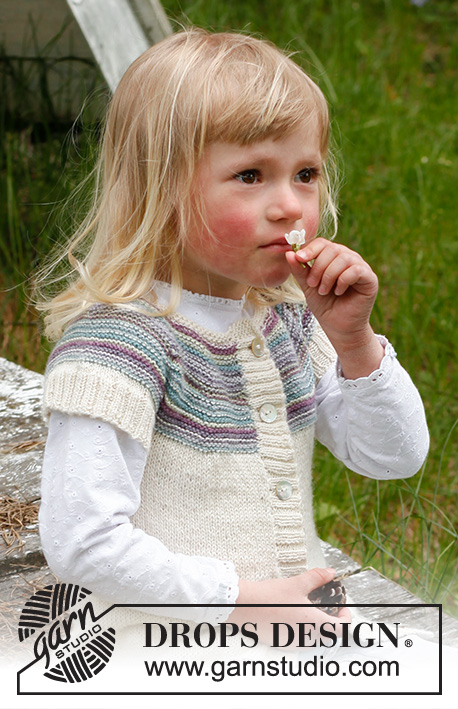
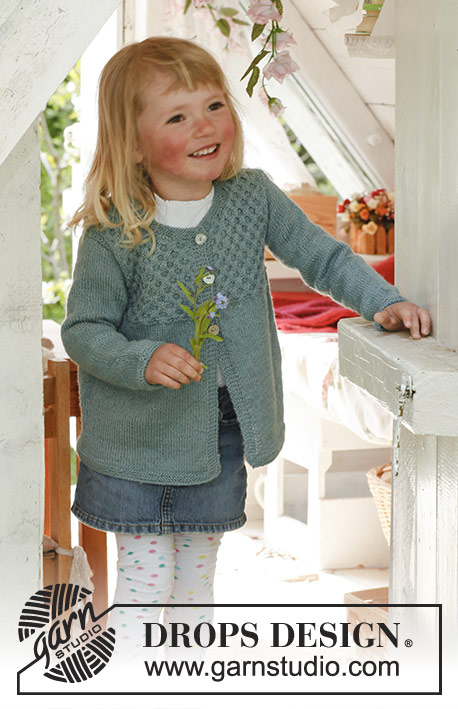
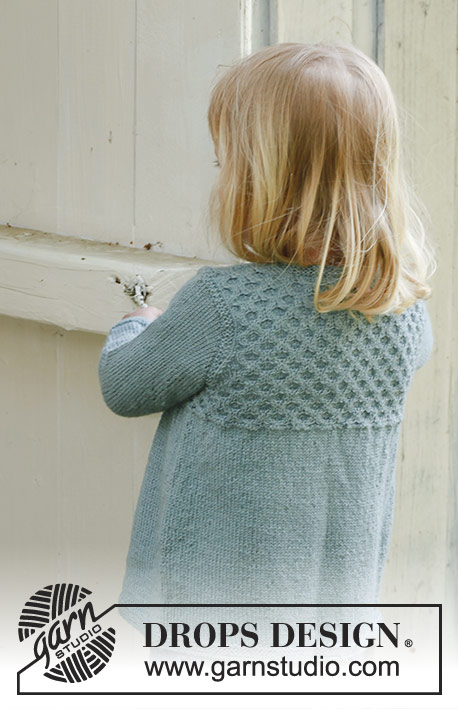
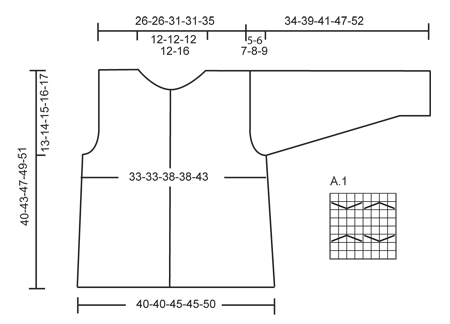
Knitted jacket with honeycomb pattern in DROPS Alpaca. Size children 3 to 12 years.
DROPS Children 23-19 |
||||||||||
|
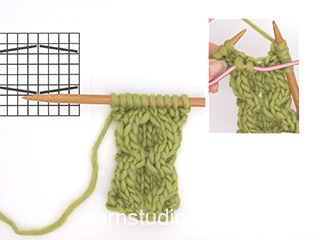
GARTER ST (back and forth on needle): K all rows. 1 ridge = 2 rows K. GARTER ST (in the round): 1 ridge = 2 rounds * K 1 round and P 1 round *, repeat from *-*. PATTERN: See diagram A-1. Diagram shows the pattern from RS. BUTTON HOLES: Cast off for button holes on right band. 1 button hole = cast off 3rd st from mid front. On next row cast on 1 new st over the cast off st. Cast off for button holes when piece measures: Size 3/4: 21, 27 and 33 cm Size 5/6: 24, 30 and 36 cm Size 7/8: 25, 30, 35 and 40 cm Size 9/10: 27, 32, 37 and 42 cm Size 11/12: 29, 34, 39 and 44 cm DECREASE TIP (applies to armholes): All dec are done from RS. Dec inside 3 sts in garter st. Work sts that do not fit A.1 in stocking st. Dec after 3 sts in garter st as follows: Slip 1 st as if to K, K 1, psso. Dec before 3 sts in garter st as follows: K 2 tog. --------------------------------------------------------- JACKET: Worked back and forth on circular needle. Cast on 202-202-226-226-250 sts on circular needle size 3 mm with Alpaca. P 1 row from WS. Then work 6 rows in garter st - see explanation above. REMEMBER THE KNITTING TENSION! Then work in stocking st but work the 5 outermost sts (= band) in each side in garter st until finished measurements. When piece measures 24-26-28-29-30 cm, work 2 rows in garter st AT THE SAME TIME on 1st row inc 34-34-42-42-50 sts evenly = 236-236-268-268-300 sts on needle. Work next row from RS as follows: 5 sts in garter st, K 1, A-1 over the next 224-224-256-256-288 sts, finish with K 1 and 5 sts in garter st. Remember to cast off for button holes - see explanation above. Insert 2 markers in the piece; 62-62-70-70-78 sts in from each side (back piece = 112-112-128-128-144 sts). When piece measures 27-29-32-33-34 cm, work 2 rows in garter st over 8 sts on each side of markers, work the other sts as before. On next row cast off 4 sts on each side of every marker and finish each part separately. BACK PIECE: = 104-104-120-120-136 sts. Work as follows from RS: 3 sts in garter st, K 1, work diagram A-1 over the next 96-96-112-112-128 sts, finish with K 1 and 3 sts in garter st. Dec for armholes in each side every other row as follows - read DECREASE TIP: 1 st 8 times = 88-88-104-104-120 sts. When piece measures 38-41-45-47-49 cm, cast off the middle 40-40-40-40-56 sts for neck = 24-24-32-32-32 sts remain on each shoulder. Finish each part separately. Cast off when piece measures 40-43-47-49-51 cm. RIGHT FRONT PIECE: = 58-58-66-66-74 sts. Work as follows from RS: 5 sts in garter st, K 1, A.1 over the next 48-48-56-56-64 sts, finish with K 1 and 3 sts in garter st. Dec for armhole in the side as on back piece. Remember to cast off for button holes. AT THE SAME TIME when piece measures 34-37-41-43-45 cm, insert 14-14-14-14-22 sts towards mid front on a stitch holder. Then cast off for neck every other row as follows: 2 sts 4 times, and 1 st 4 times – work the sts that do not fit A-1 in stocking st. After all cast offs, 24-24-32-32-32 sts remain on shoulder. Cast off when piece measures 40-43-47-49-51 cm. LEFT FRONT PIECE: Work as right front piece but reversed. SLEEVE: Worked in the round on double pointed needles. Cast on 44-48-48-52-52 sts on double pointed needles size 3 mm with Alpaca. Insert a marker at the beg of round. Work 6 rounds in garter st, then work in stocking st until finished measurements. When piece measures 5 cm, inc 1 st on each side of marker, repeat every 3½-4-3½-4½-4 cm a total of 7-7-8-8-9 times = 58-62-64-68-70 sts. When piece measures 29-33-34-39-43 cm, cast off 3 sts on each side of marker, now work piece back and forth. Then cast off for sleeve cap in each side at beg of every row as follows: 2 sts 3 times and 1 st 0-1-3-5-6 times, then cast off 2 sts in each side until piece measures 33-38-40-46-51 cm, cast off 3 sts 1 time in each side. Cast off the remaining sts, piece measures approx. 34-39-41-47-52 cm. ASSEMBLY: Sew the shoulder seams. Sew in sleeves. Sew the buttons on to left front piece. NECK EDGE: Knit up 74 to 94 sts (incl sts on stitch holders) around the neck on circular needle size 3 mm. Work 6 rows in garter st. Cast off. |
||||||||||
Diagram explanations |
||||||||||
|
||||||||||
|
||||||||||
|
Have you made this or any other of our designs? Tag your pictures in social media with #dropsdesign so we can see them! Do you need help with this pattern?You'll find tutorial videos, a Comments/Questions area and more by visiting the pattern on garnstudio.com. © 1982-2024 DROPS Design A/S. We reserve all rights. This document, including all its sub-sections, has copyrights. Read more about what you can do with our patterns at the bottom of each pattern on our site. |
||||||||||


With over 40 years in knitting and crochet design, DROPS Design offers one of the most extensive collections of free patterns on the internet - translated to 17 languages. As of today we count 304 catalogues and 11422 patterns - 11422 of which are translated into English (UK/cm).
We work hard to bring you the best knitting and crochet have to offer, inspiration and advice as well as great quality yarns at incredible prices! Would you like to use our patterns for other than personal use? You can read what you are allowed to do in the Copyright text at the bottom of all our patterns. Happy crafting!
Comments / Questions (138)
I need to watch the tutorial for the honeycomb pattern but I don’t get any audio . I have checked my YouTube settings and audio should be playing. Any suggestions???
28.10.2023 - 18:22DROPS Design answered:
Dear Sharon, our video tutorials are the same for all languages so they have no audio. Happy knitting!
29.10.2023 - 18:52Hallo, ich möchte anstelle dem Wabenmuster ein Lochmuster stricken. Für die Grösse 3/4 muss ich nach 24 cm 34 M aufnehmen (da das Muster sich zusammenzieht). Mit einem Lochmuster fällt das Aufnehmen weg nehme ich an. Dann stimmen die Abnehmen für das Armloch nicht mehr, oder? Können Sie mir eine Tipp geben?
16.09.2023 - 12:11DROPS Design answered:
Liebe Frau Gysel, man muss hier vor dem Wabenmuster zunehmen, damit die Breite mit Warenmuster gleich wie glatt rechts wird; mit einem Lochmuster brauchen Sie wahrscheinlich nicht zuzunehmen, sonnt würde die Passe viel zu weit. Viel Spaß beim stricken!
18.09.2023 - 08:10Kann die angegebene Maschenzahl von 202 wirklich passen für eine 2/3 jährige? Kommt mir viel zu viel vor. Maschenprobe stimmt . Lg
02.03.2023 - 20:20DROPS Design answered:
Liebe Frau Buchholz, dieses Modell beginnt mit der Größe 3 Jahren - passenden Maßen finden Sie bei der Maßskizze, messen Sie eine ähnliche Jacke, die das Mädchen passt und vergleichen Sie alle Maßen - so wissen Sie ob es passen kann oder nicht - hier finden Sie alle unsere Jacken für 2 Jahren, vielleicht kann Ihnen eine davon inspirieren. Viel Spaß beim stricken!
03.03.2023 - 09:04Bonjour je ne sais pas tricoter avec des aiguilles pointes doubles puis je faire autrement ? Merci d’avance pour votre réponse
07.01.2023 - 18:08DROPS Design answered:
Bonjour Mme Giner, cette leçon va vous permettre d'adapter les manches pour les tricoter sur aiguilles droites. Bon tricot!
09.01.2023 - 09:21Bonjour. J'ai une question concernant l\encolure. Si je comprends bien, il faut reprendre le mailles en attente, relever les mailles au dessus, puis celle du dos, et enfin celle de l'autre côté en terminant par les dernières mailles en attente.\r\nEst-ce bien ça ? Est-ce qu\'il vaut mieux avoir cousu les épaules avant de relever les mailles ? Merci beaucoup de votre aide ! Sara
11.11.2022 - 18:59DROPS Design answered:
Bonjour Sara, tout à fait, vous avez raison, il vaut mieux coudre les épaules avant. Bon tricot!
14.11.2022 - 10:54Bonjour, pour le devant droit, j'ai mis les 14 mailles côté milieu devant ( âge 7/8 ans) sur un arrêt de mailles. A quoi correspond ce "milieu devant"? si ce n'est pas l'encolure??? Merci de m'éclairer.
06.11.2022 - 10:12DROPS Design answered:
Bonjour Catherine, ce sont bien les mailles côté encolure (qui se trouvent au milieu devant) dont il s'agit. Bon tricot!
07.11.2022 - 10:19I need help… I am trying to knit the LEFT FRONT PIECE of the pattern for Drops children 23-19. I cannot figure out how to reverse the pattern. If you could explain a few of the rows it would be very helpful. I have tried repeatedly, and cannot seem to maintain the pattern. Thank you so much for your help!
05.11.2022 - 04:43DROPS Design answered:
Dear Marj, for example, if the right front starts with 5 stitches in garter stitch for the edge, in the left front you start with the 3 stitches in garter stitch for the side. That is, 3 stitches in garter stitch, knit 1, 48....64 stitches in A.1, knit 1 and work 5 stitches in garter stitch. A.1 is worked the same as before. Happy knitting!
07.11.2022 - 00:18Hallo, ich wüsste gern, ob ich das Modell my honey alternativ mit Love you #9 oder Safran stricken kann. Die Maschenproben passen, und ich könnte dann doch mit der gleichen Maschenzahl Arbeiten, oder? Und wo liegt der Unterschied außer der Lauflänge bei den alternativen Garnen? Kann ich bei Nichtgefallen das Garn auch zurücksenden? Lieben Dank vorab für eine Info :)
11.06.2022 - 16:07DROPS Design answered:
Liebe Frau Stegemann, gerne können Sie DROPS Loves You #9 oder Safran anstatt Alpaca stricken - benutzen Sie den Garnumrechner, so bekommen Sie die neue Garnmenge. Viel Spaß beim stricken!
15.06.2022 - 14:47Er i gang med str. 3-4 år. Synes ærmerne bliver for snævre og alt for lange!
05.05.2022 - 11:48I don't understand what to do with the stitches placed on a stitch holder on the fronts. See below "insert 14-14-14-14-22 sts towards mid front on a stitch holder. Then cast off for neck every other row as follows: 2 sts 4 times, and 1 st 4 times – work the sts that do not fit A-1 in stocking st. After all cast offs, 24-24-32-32-32 sts remain on shoulder. Cast off when piece measures 40-43-47-49-51 cm."
07.12.2021 - 23:46DROPS Design answered:
Dear Mrs Humphreys, these stitches will be worked afterwards for the neck edge, when you will pick up 74 to 94 sts around neck, this number includes the stitches slipped on a stitch holder on both front pieces. Happy knitting!
08.12.2021 - 08:05