DROPS Alpaca
DROPS Alpaca
100% Alpaca
from 3.40 £ /50g
DROPS Kid-Silk
DROPS Kid-Silk
75% Mohair, 25% Silk
from 4.60 £ /25g
Get the yarn to make this pattern from 51.40£.

The yarn cost is calculated from the pattern’s smallest size and the yarn’s cheapest product type. Looking for an even better price? You might find it on the DROPS Deals!

DROPS Super Sale

Parker

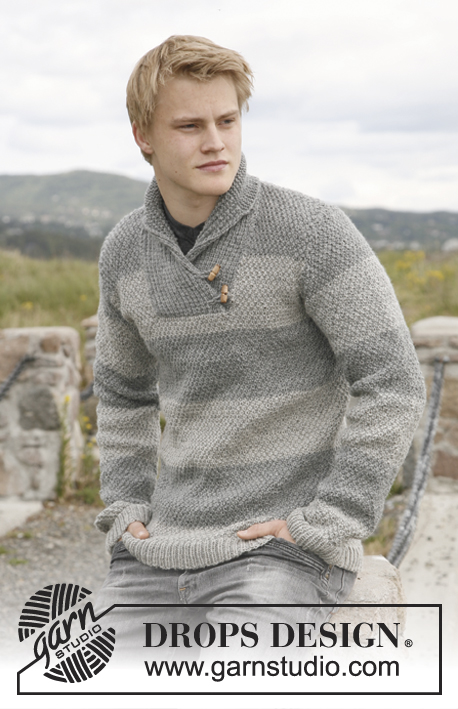
Knitter sweater for men with shawl collar, in DROPS Alpaca and DROPS Kid-Silk. Size: S to XXXL.

DROPS 135-45
DROPS design: Pattern no Z-585
Yarn group A
----------------------------------------------------------
Size: S - M - L - XL - XXL - XXXL

Materials: DROPS ALPACA from Garnstudio
Colour no 9020m, light pearl grey:
350-350-400-450-500-550 g
And use: DROPS KID-SILK from Garnstudio
Colour no 01, off white:
150-150-175-200-225-250 g

DROPS STRAIGHT AND CIRCULAR NEEDLE (60 cm) 5.5 mm – or size needed to get 18 sts x 24 rows in pattern with 1 thread Alpaca and 1 thread Kid-Silk = 10 x 10 cm.
----------------------------------------------------------

-------------------------------------------------------

Alternative Yarn – See how to change yarns here
Yarn Groups A to F – Use the same pattern and change the yarn here
Yarn usage using an alternative yarn – Use our yarn converter here

-------------------------------------------------------

DROPS Alpaca
DROPS Alpaca
100% Alpaca
from 3.40 £ /50g
DROPS Kid-Silk
DROPS Kid-Silk
75% Mohair, 25% Silk
from 4.60 £ /25g
Get the yarn to make this pattern from 51.40£.

The yarn cost is calculated from the pattern’s smallest size and the yarn’s cheapest product type. Looking for an even better price? You might find it on the DROPS Deals!

Pattern instructions

NOTE: This pattern is written in British English. All measurements in charts are in cm. For conversion from cm to inches - click here. There are different terms for crocheting in British and American English. If this pattern includes crochet, click for "crochet terms" here. For this pattern in American English, please click here.
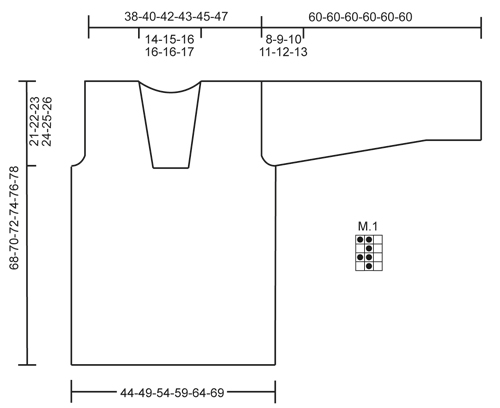
PATTERN:
See diagram M.1 – diagram shows pattern from RS.
----------------------------------------------------------

FRONT PIECE:
Worked back and forth on needle.
Cast on 94-105-115-126-136-147 sts (includes 1 edge st in each side) on needle size 5.5 mm with 1 thread Alpaca + 1 thread Kid-Silk. Work as follows (from RS): * K 3, K 2 tog, K 2 *, repeat from *-* until 3-0-3-0-3-0 sts remain, K these sts = 81-90-99-108-117-126 sts.
Work next row from WS as follows: K 1 edge st * P 1, K 2 *, repeat from *-* until 2 sts remain, P 1 and K 1 edge st. Then work diagram M.1 over all sts, with 1 edge st in each side worked K on all rows (diagram M.1 starts and ends with 1 K st, seen from RS, before edge st in each side). When piece measures approx. 47-48-49-50-51-52 cm, work next row as follows from RS: Cast off 4 sts for armhole, work 26-30-34-38-42-46 sts in diagram M.1 as before (= left front piece), cast off 21-22-23-24-25-26 sts for neck, and work the rest of row in diagram M.1 as before (= 30-34-38-42-46-50 sts). Turn and cast off 4 sts for armhole, work the rest of row = 26-30-34-38-42-46 sts remain on right front piece. Slip sts in the left side on a stitch holder.

RIGHT SIDE:
Continue to work diagram M.1 over sts on needle, while at the same time casting off for armhole at the beg of every row from the side: 3 sts 0-0-1-1-2-2 times, 2 sts 0-1-1-2-2-3 times and 1 st 2-3-3-4-4-5 times. AT THE SAME TIME when piece measures 54-55-56-57-58-59 cm, dec 1 st towards the neck, repeat dec when piece measures 60-61-62-63-64-65 cm. After all cast offs and dec are done, 22-23-24-25-26-27 sts remain on needle. Cast off when piece measures 68-70-72-74-76-78 cm.

LEFT SIDE:
Slip the stitches on the stitch holder back on needle and work as right side but reversed.

BACK PIECE:
Cast on and work as on front piece until piece measures 47-48-49-50-51-52 cm. Now cast off for armholes at beg of every row in each side: 4 sts 1 time, 3 sts 0-0-1-1-2-2 times, 2 sts 0-1-1-2-2-3 times and 1 st 2-3-3-4-4-5 times = 69-72-75-78-81-84 sts. When piece measures 66-68-70-72-74-76 cm, cast off the middle 25-26-27-28-29-30 sts for neck. Work each shoulder (= 22-23-24-25-26-27 sts) separately until piece measures 68-70-72-74-76-78 cm, cast off.

SLEEVE:
Worked back and forth on needle.
Cast on 57-57-60-60-63-66 sts (includes 1 edge st in each side) on needle size 5.5 mm with 1 thread Alpaca + 1 thread Kid-Silk.
K 1 row from RS while at the same time dec 6 sts evenly = 51-51-54-54-57-60 sts. Work next row from WS as follows: K 1 edge st * P 1, K 2 *, repeat from *-* until 2 sts remain, finish with P 1 and K 1 edge st. Then work diagram M.1 over all sts, with 1 edge st in each side worked K on all rows. (Diagram M.1 starts and ends with K 1, seen from RS, before edge st in each side.) When piece measures 12 cm, inc 1 st in each side inside edge st. Repeat inc every 4½-4½-4½-3-3-3 cm a total of 9-9-9-12-12-12 times = 69-69-72-78-81-84 sts – work the inc sts gradually in diagram M.1. When piece measures 52-51-50-49-48-47 cm (shorter measurements in the larger sizes because of longer sleeve cap and broader shoulder width) cast off at beg of every row in each side: 4 sts 1 time, 2 sts 3 times and 1 st 2-4-5-6-8-9 times. Then cast off 2 sts in each side until piece measures 59 cm, then cast off 3 sts 1 time in each side. Cast off, the piece measures approx. 60 cm in all sizes.

ASSEMBLY:
Sew the shoulder seams.

SHAWL COLLAR:
Beg mid front on left side of sts cast off for neck. Knit up on circular needle size 5.5 mm with 1 thread Alpaca and 1 thread Kid-Silk: 38 to 45 sts up to shoulder, then knit up 26 to 32 sts in the back of neck, and finally 38 to 45 sts down along left side of neck dec = 102 to 122 sts (do not knit up where sts were dec in front of neck).
K 1 row from WS while AT THE SAME TIME inc no of sts to 128-134-140-146-152-158. Then work rib as follows (from RS): 2 sts worked K on all rows, * K 1, P 2 *, repeat from *-* and finish with K 1 and 2 sts worked K on all rows. Continue like this until collar measures approx. 5 cm. Now inc 1 st in each of the middle 12 P-sections, seen from RS (= back of neck) = 140-146-152-158-164-170 sts. Continue with K over K and P over P until collar measures approx. 11-11-12-12-13-13 cm - adjust so that next row is from RS. Work 4 rows in stocking st over all sts, then cast off all sts with K from RS. The outermost edge is supposed to roll.
Place the collar double (right side over left side) at the bottom of neck opening and sew it to the neck line through both layers.

MORE ASSEMBLY:
Sew in sleeves and sew under arm and side seams in one inside 1 edge st.

Diagram

symbols = K from RS, P from WS
symbols = P from RS, K from WS
diagram
Do you have a question? See a list of frequently asked questions (FAQ)

Knitting tension is what determines the final measurements of your work, and is usually measured per 10 x 10 cm. It is provided like so: number of stitches in width x number of rows in height - eg: 19 stitches x 26 rows = 10 x 10 cm.

The knitting tension is very individual; some people knit/crochet loosely while others work tightly. You adjust the knitting tension with the needle size, which is why the suggested needle size is only meant as a guide! You need to adjust this (up or down) to ensure that YOUR knitting tension matches the knitting tension provided in the pattern. If you work with a different knitting tension than provided you will have a different yarn consumption, and your work will have different measurements than what the pattern suggests.

The knitting tension also determines which yarns can replace each other. As long as you achieve the same knitting tension you can replace one yarn with another.

See DROPS lesson: How to measure your tension/gauge

See DROPS video: How to make a gauge tension swatch

The required amount of yarn is provided in grams, eg: 450 g. To calculate how many balls you’ll need you first need to know how many grams are in 1 ball (25g, 50g or 100g). This information is available if you click on the individual yarn quality on our pages. Divide the amount required with the amount of each ball. For example, if each ball is 50g (the most common amount), the calculation will be as follows: 450 / 50 = 9 balls.

The important thing when changing from one yarn to another is that the knitting/crochet tension remains the same. This is so that the measurements of the finished piece will be the same as on the sketch provided. It is easier to achieve the same knitting tension using yarns from the same yarn group. It is also possible to work with multiple strands of a thinner yarn to achieve the knitting tension of a thicker one. Please try our yarn converter. We recommend you to always work a test swatch.

Please NOTE: when changing yarn the garment might have a different look and feel to the garment in the photo, due to individual properties and qualities of each yarn.

See DROPS lesson: Can I use a different yarn than the one mentioned in the pattern?

All our yarns are categorised into yarn groups (from A to F) according to thickness and knitting tension – group A contains the thinnest yarns and group F the thickest. This makes it easier for you to find alternative yarns to our patterns, should you wish to switch yarn. All yarns within the same group have a similar knitting tension and can easily replace each other. However, different yarn qualities have different structures and properties which will give the finished work a unique look and feel.

Click here for an overview of the yarns in each yarn group

At the top of all our patterns you’ll find a link to our yarn calculator, which is a helpful tool should you wish to use a different yarn than suggested. By filling in the yarn quality you wish to replace, the amount (in your size) and number of strands, the calculator will present good alternative yarns with the same knitting tension. Additionally it will tell you how much you’ll require in the new qualities and whether you’ll need to work with multiple strands. Most skeins are 50g (some are 25g or 100g).

If the pattern is worked with multiple colours, every colour will have to be calculated separately. Similarly, if the pattern is worked with several strands of different yarns (for example 1 strand Alpaca and 1 strand Kid-Silk) you will have to find alternatives for each, individually.

Click here to see our yarn calculator

Since different yarns have different qualities and textures we have chosen to keep the original yarn in our patterns. However, you can easily find options among our available qualities by using our yarn calculator, or simply pick a yarn from the same yarn group.

It is possible that some retailers still have discontinued yarns in stock, or that someone has a few skeins at home that they would like to find patterns for.

The yarn calculator will provide both alternative yarn as well as required amount in the new quality.

If you think it's hard to decide what size to make, it can be a good idea to measure a garment you own already and like the size of. Then you can pick the size by comparing those measures with the ones available in the pattern's size chart.

You'll find the size chart at the bottom of the pattern.

See DROPS lesson: How to read size chart

The needle size provided in the pattern serves only as a guide, the important thing is to follow the knitting tension. And since knitting tension is very individual, you will have to adjust the needle size to ensure that YOUR tension is the same as in the pattern – maybe you’ll have to adjust 1, or even 2 needle sizes, up or down to achieve the correct tension. For this, we recommend that you work test swatches.

Should you work with a different knitting tension than the one provided, the measurements of the finished garment might deviate from the measurement sketch.

See DROPS lesson: How to measure your tension/gauge

See DROPS video: How to make a tension/gauge swatch

Working a garment top-down provides more flexibility and room for personal adjustment. For example it is easier to try the garment on while working, as well as making adjustments to length of yoke and shoulder caps.

The instructions are carefully explaining every step, in the correct order. Diagrams are adjusted to the knitting direction and are worked as usual.

The diagram depicts all rows/rounds, and every stitch seen from the right side. It is read from bottom to top, from right to left. 1 square = 1 stitch.

When working back and forth, every other row is worked from the right side and every other row is worked from the wrong side. When working from the wrong side, the diagram will have to be worked reversed: from left to right, knit stitches are purled, purl stitches are knit etc.

When working in the round every round is worked from the right side and the diagram are worked from right to left on all rounds.

See DROPS lesson: How to read knitting diagrams

The diagram depicts all rows/rounds, and every stitch seen from the right side. It is worked from bottom to top, from right to left.

When working back and forth every other row is worked from the right side: from right to left and every other row is worked from the wrong side: from left to right.

When working in the round, every row in the diagram are worked from the right side, from right to left.

When working a circular diagram you start in the middle and work your way outwards, counter clockwise, row by row.

The rows usually start with a given number of chain stitches (equivalent to the height of the following stitch), this will either be depicted in the diagram or explained in the pattern.

See DROPS lesson: How to read crochet diagrams

Instructions for working several diagrams after each other on the same row/round, will often be written like so: “work A.1, A.2, A.3 a total of 0-0-2-3-4 times". This means you work A.1 once, then A.2 is worked once, and A.3 is repeated (in width) the number of times provided for your size – in this case like so: S = 0 times, M = 0 times, L=2 times, XL= 3 times and XXL = 4 times.

The diagrams are worked as usual: begin with the first row in A.1, then work the first row in A.2 etc.

See DROPS lesson: How to read knitting diagrams

See DROPS lesson: How to read crochet diagrams

The total width of the garment (from wrist-to-wrist) will be larger in the larger sizes, despite the actual sleeves being shorter. The larger sizes have longer sleeve caps and wider shoulders, so there will be a good fit in all sizes.

The measurement sketch/schematic drawing provides information regarding the full length of the garment. If it’s a jumper or a jacket the length is measured from the highest point on the shoulder closest to the neckline, and straight down to the bottom of the garment. It is NOT measured from the tip of shoulder. Similarly, the length of yoke is measured from the highest point on the shoulder and down to where yoke is split into body and sleeves.

On a jacket measures are never taken along bands, unless specifically stated. Always measure inside band stitches when measuring the length.

See DROPS lesson: How to read a schematic drawing

Diagrams are often repeated on the round or in height. 1 repeat is the diagram the way it appears in the pattern. If it says to work 5 repeats of A.1 in the round, then you work A.1 a total of 5 times after/next to each other in the round. If it says to work 2 repeats of A.1 vertically/in height you work the entire diagram once, then begin again at the start and work the entire diagram one more time.

Chain stitches are slightly narrower than other stitches and to avoid working the cast-on edge too tight, we simply chain more stitches to begin with. The stitch count will be adjusted on the following row to fit the pattern and measurement sketch.

The rib edge is more elastic and will contract slightly compared to, for example, stocking stitch. By increasing before the rib edge, you avoid a visible difference in width between the rib edge and the rest of the body.

It’s very easy to cast off too tightly, and by making yarn overs while casting off (and simultaneously casting these off) you avoid a too tight cast off edge.

See DROPS video: How to bind off with yarn overs (yo)

To achieve an even increase (or decrease) you can increase on, for example: every 3rd and 4th row alternately, like so: work 2 rows and increase on the 3rd row, work 3 rows and increase on the 4th. Repeat this until the increase is complete.

See DROPS lesson: Increase or decrease 1 st on every 3rd and 4th row alternately

Should you prefer to work in the round instead of back and forth, you may of course adjust the pattern. You’ll need to add steeks mid-front (usually 5 stitches), and follow the instructions. When you would normally turn and work from the wrong side, simply work across the steek and continue in the round. At the end you’ll cut the piece open, pick up stitches to work bands, and cover the cut edges.

See DROPS video: How to knit steeks and cut open

Should you prefer to work back and forth instead of in the round, you may of course adjust the pattern so you work the pieces separately and then assemble them at the end. Divide the stitches for the body in 2, add 1 edge stitch in each side (for sewing) and work the front and back pieces separately.

See DROPS lesson: Can I adapt a pattern for circular needles into straight needles?

Pattern repeats can vary slightly in the different sizes, in order to get the correct proportions. If you’re not working the exact same size as the garment in the photo, yours might deviate slightly. This has been carefully developed and adjusted so that the complete impression of the garment is the same in all sizes.

Make sure to follow instructions and diagrams for your size!

If you have found a pattern you like which is available in women’s size it’s not very difficult to convert it to men’s size. The biggest difference will be the length of sleeves and body. Start working on the women size that you think would fit across the chest. The additional length will be worked right before you cast off for the armhole/sleeve cap. If the pattern is worked top-down you can add the length right after the armhole or before the first decrease on sleeve.

Regarding additional yarn amount, this will depend on how much length you add, but it is better with a skein too many than too few.

All yarns will have excess fibres (from production) that might come off as lint or shedding. Brushed yarns (ie hairier yarns) have more of these loose, excess fibres, causing more shedding.

Shedding also depends on what is worn under or over the garment, and whether this pulls at the yarn fibres. It’s therefore not possible to guarantee that there will be no shedding

Below are some tips on how to get the best result when working with hairier yarns:

1. When the garment is finished (before you wash it) shake it vigorously so the looser hairs come off. NOTE: do NOT use a lint roller, brush or any method that pulls at the yarn.

2. Place the garment in a plastic bag and put it in your freezer - the temperature will cause the fibres to become less attached to each other, and excess fibres will come off easier.

3. Leave in the freezer for a few hours before taking it out and shaking it again.

4. Wash the garment according to the instructions on the yarn label.

Pilling is a natural process that happens to even the most exclusive of fibers. It's a natural sign of wear and tear that is hard to avoid, and that is most visible in high friction areas of your garment like a sweater's arms and cuffs.

You can make your garment look as new by removing the pilling, using a fabric comb or a pill/lint remover.

Still can't find the answer you need? Then scroll down and leave your question so one of our experts can try to help you. This will be done normally within 5 to 10 working days.
In the meantime, you can read the questions and answers that others have left to this pattern or join the DROPS Workshop on Facebook to get help from fellow knitters/crocheters!

You might also like...

Post a comment to pattern DROPS 135-45

We would love to hear what you have to say about this pattern!

If you want to leave a question, please make sure you select the correct category in the form below, to speed up the answering process. Required fields are marked *.

Comments / Questions (100)

country flag Iris wrote:

Vielen Dank für die schnelle Antwort. Ich habe meinen Fehler beheben können und kann dem Strickmuster nun gut folgen. Iris

30.09.2019 - 22:32

country flag Iris wrote:

Hallo, ich möchte dieses Modell in XL nacharbeiten. Die ersten beiden Reihen klappten. Ab der 3. Reihe verschiebt sich bei mir das Muster. Ich habe die 108 Maschen. Davon sind 2 Randmaschen. Es bleiben so 106 Maschen bei mir für das Muster übrig. Das ist aber nicht durch 3 teilbar, habe somit immer 1 Masche zuviel. Was mache ich möglicherweise falsch? Danke

29.09.2019 - 20:20

DROPS Design answered:

Liebe Iris, so wird M.1 gestrickt (Hinreihen): 1 Randmasche, (1 M re, 1 M li, 1 M re) x 35 (= über die nächsten 105 Maschen, die erste Masche in M.1 stricken (= 1 M re) - so wird das Muster auf beiden Seiten symetrisch-, und 1 Randmasche. Rückreihe (=2. Reihe): 1 Randmasche, 1 M li, (2 M re, 1 M li) x 35, 1 Randmasche. Viel Spaß beim stricken!

30.09.2019 - 11:34

country flag Adelaida wrote:

Is there something like a full tutorial or something? I'm having trouble to understand the diagram part and I really want to make this pattern

28.08.2019 - 09:53

DROPS Design answered:

Dear Adelaida, you will find here how to read diagrams , ie on row 1 work from RS: K1, p1, K1 - on row 2, work K2, P1 - repeat these 2 rows. Happy knitting!

28.08.2019 - 12:22

country flag Rolf Günther wrote:

Diese Anleitung ist mir viel zu kompliziert. Ich wollte einen Pullover stricken und keine Rechenaufgabe lösen. wieviel Maschen muss ich für den Kragenausschnitt abketten? Wievil für die Armöffnungen?

01.07.2019 - 20:52

DROPS Design answered:

Lieber Herr Günther, je nach der Größe wird es unterchiedlich sein, für den Halsausschnitt werden die mittleren 21-22-23-24-25-26 M. abgekettet + 1 M nach 54-59 cm (siehe Größe für die richtige Länge) dann für das Armoch sollen Sie so abketten: 0-0-1-1-2-2 Mal 3 M., 0-1-1-2-2-3 Mal 2 M., 2-3-3-4-4-5 Mal und 1 M = es sind nur noch 22-23-24-25-26-27 M für den Schulter übrig. Viel Spaß beim stricken!

02.07.2019 - 09:10

country flag Susan May wrote:

I am finally putting my sweater together and am a little confused about your instruction on the collar. You talk about not picking up sts where sts were dec in front of neck. I don’t see where you decreased on the front piece of my instructions?

17.02.2019 - 21:54

DROPS Design answered:

Dear Susan, you should pick up the stitches for the collar from where you cast off the stitches for the neck opening. I hope this helps. Happy Knitting!

17.02.2019 - 22:22

country flag Nicole Haas wrote:

Dank voor uw antwoord, maar heb blijkbaar toch nog verheldering nodig. Ik moet na het opzetten en breien van de boord 117 steken hebben. De beschrijving:Brei dan telpatroon M.1 over alle st, met 1 kant st in ribbelst aan iedere kant (telpatroon M.1 begint en eindigt met 1 rechte st, gezien aan de goede kant, naast de kant st aan iedere kant). Volgens mijn berekening moet ik gewoon aan elke kant een kantsteek breien en aan het einde van elke naald 1 recht voor de kantsteek. Klopt dat?

11.11.2018 - 12:59

DROPS Design answered:

Dag Nicole,

Na de eerste paragraaf van het voorpand heb je 117 steken op de naald in jouw maat. Daarna brei je telkens 1 kantsteek aan elke kant. Aan het einde van een naald aan de goede kant brei je voor de kantsteek nog 1 steek recht en aan het einde van de verkeerde kant brei je voor de kantsteek nog 1 steek averecht.

11.11.2018 - 13:25

country flag Nicole Haas wrote:

Goedendag, Ik heb de diverse vragen en antwoorden goed bestudeerd en -met excuses) toch heb ik nog een vraag. telpatroon M1 bestaat uit een veelvoud van 3 + 2 kantsteken, maar ik kom dan niet uit met mijn 117 steken. Of moet ik 119 steken hebben =39*M1+ 2 kantsteken? Alvast dank voor uw antwoord. Met vriendelijke groet, Nicole

10.11.2018 - 11:30

DROPS Design answered:

Dag Nicole,

Het aangegeven aantal steken dat je op moet zetten is al inclusief de kantsteken. Dus als er staat dat je ijvoorbeeld 115 op moet zetten voor maat L, moet je 115 steken opzetten.

Het patroon dat je in de eerste naald van het voorpand breit is een herhaling van 7 steken plus 0 of plus 3. Je begint dan gelijk met de eerste steek te breien, dus je negeert het feit dat het een kansteek is. In de naald daarna begin en eindig je wel met een kantsteek, zoals aangegeven in de beschrijving.

11.11.2018 - 12:43

country flag Johanne Bouchard wrote:

Bonjour, je ne comprends pas pourquoi les deux laines différentes ne sont pas de la même quantité???? Et est-ce que l'on peut faire ce chandail en utilisant seulement la laine Drops Alpaca et si oui, prenons nous la quantité inscrite pour cette laine ou nous devons ajouter la quantité de l'autre laine, soit celle de la laine Kid silk?

20.08.2018 - 03:50

DROPS Design answered:

Bonjour Mme Bouchard, c'est tout à fait exact: Alpaga fait environ 167 m pour 50 g alors que Kid-Silk fait environ 200 m pour 25 g, raison pour laquelle le poids sera différent pour chacune de ces 2 pelotes. Vous pouvez choisir de le tricoter avec 2 fils Alpaca si vous préférez. Vous trouverez ici toutes les infos utiles sur les alternatives. Bon tricot!

03.09.2018 - 14:55

country flag Marie wrote:

Très beau modèle. Pensez-vous qu'il est possible d'adapter le patron à la grandeur petit-femme? Si oui, comment procéder? Merci et bonne journée!

16.05.2018 - 15:00

DROPS Design answered:

Bonjour Marie, vous trouverez la version femme de ce modèle ici. Bon tricot!

16.05.2018 - 15:23

NANCY wrote:

LA CHOMPA PARA VARÓN ESTA MUY BONITO, PIENSO TEJER UNO SIMILAR PARA MI ESPOSO... MUCHAS GRACIAS POR LOS PATRONES... TIENEN TUTORIALES EN YOUTUBE?

17.11.2017 - 02:19