DROPS Muskat uni colour 100% Cotton |
1.85 £ /50g |
Order |
Clicking the ORDER button will redirect you to Wool Warehouse Direct Ltd website
The yarn cost is calculated from the pattern’s smallest size and the yarn’s cheapest product type. Looking for an even better price? You might find it on the DROPS Deals!
-------------------------------------------------------
Alternative Yarn – See how to change yarns here
Yarn Groups A to F – Use the same pattern and change the yarn here
Yarn usage using an alternative yarn – Use our yarn converter here
-------------------------------------------------------
DROPS Muskat uni colour 100% Cotton 1.85 £ /50g Order |
Clicking the ORDER button will redirect you to Wool Warehouse Direct Ltd website
The yarn cost is calculated from the pattern’s smallest size and the yarn’s cheapest product type. Looking for an even better price? You might find it on the DROPS Deals!
= light beige | |
= lilac | |
= beige | |
= light brown | |
= natural | |
= peach | |
= K from RS, P from WS | |
= K from WS | |
= 1 yo | |
= from RS: K2 tog | |
= from RS: K3 tog | |
= from RS: K4 tog |
Each of our patterns has specific tutorial videos to help you.
These step-by-step tutorials might also help you:
Why is the knitting/crochet tension so important?
Knitting tension is what determines the final measurements of your work, and is usually measured per 10 x 10 cm. It is provided like so: number of stitches in width x number of rows in height - eg: 19 stitches x 26 rows = 10 x 10 cm.
The knitting tension is very individual; some people knit/crochet loosely while others work tightly. You adjust the knitting tension with the needle size, which is why the suggested needle size is only meant as a guide! You need to adjust this (up or down) to ensure that YOUR knitting tension matches the knitting tension provided in the pattern. If you work with a different knitting tension than provided you will have a different yarn consumption, and your work will have different measurements than what the pattern suggests.
The knitting tension also determines which yarns can replace each other. As long as you achieve the same knitting tension you can replace one yarn with another.
See DROPS lesson: How to measure your tension/gauge
See DROPS video: How to make a gauge tension swatch
How do I know how many balls of yarn I need?
The required amount of yarn is provided in grams, eg: 450 g. To calculate how many balls you’ll need you first need to know how many grams are in 1 ball (25g, 50g or 100g). This information is available if you click on the individual yarn quality on our pages. Divide the amount required with the amount of each ball. For example, if each ball is 50g (the most common amount), the calculation will be as follows: 450 / 50 = 9 balls.
Can I use a different yarn than what the pattern suggests?
The important thing when changing from one yarn to another is that the knitting/crochet tension remains the same. This is so that the measurements of the finished piece will be the same as on the sketch provided. It is easier to achieve the same knitting tension using yarns from the same yarn group. It is also possible to work with multiple strands of a thinner yarn to achieve the knitting tension of a thicker one. Please try our yarn converter. We recommend you to always work a test swatch.
Please NOTE: when changing yarn the garment might have a different look and feel to the garment in the photo, due to individual properties and qualities of each yarn.
See DROPS lesson: Can I use a different yarn than the one mentioned in the pattern?
What are the yarn groups?
All our yarns are categorised into yarn groups (from A to F) according to thickness and knitting tension – group A contains the thinnest yarns and group F the thickest. This makes it easier for you to find alternative yarns to our patterns, should you wish to switch yarn. All yarns within the same group have a similar knitting tension and can easily replace each other. However, different yarn qualities have different structures and properties which will give the finished work a unique look and feel.
How do I use the yarn calculator?
At the top of all our patterns you’ll find a link to our yarn calculator, which is a helpful tool should you wish to use a different yarn than suggested. By filling in the yarn quality you wish to replace, the amount (in your size) and number of strands, the calculator will present good alternative yarns with the same knitting tension. Additionally it will tell you how much you’ll require in the new qualities and whether you’ll need to work with multiple strands. Most skeins are 50g (some are 25g or 100g).
If the pattern is worked with multiple colours, every colour will have to be calculated separately. Similarly, if the pattern is worked with several strands of different yarns (for example 1 strand Alpaca and 1 strand Kid-Silk) you will have to find alternatives for each, individually.
Why do you show discontinued yarns in the patterns?
Since different yarns have different qualities and textures we have chosen to keep the original yarn in our patterns. However, you can easily find options among our available qualities by using our yarn calculator, or simply pick a yarn from the same yarn group.
It is possible that some retailers still have discontinued yarns in stock, or that someone has a few skeins at home that they would like to find patterns for.
The yarn calculator will provide both alternative yarn as well as required amount in the new quality.
What size should I knit?
If you think it's hard to decide what size to make, it can be a good idea to measure a garment you own already and like the size of. Then you can pick the size by comparing those measures with the ones available in the pattern's size chart.
You'll find the size chart at the bottom of the pattern.
See DROPS lesson: How to read size chart
Why do I get the wrong knitting tension with the suggested needle size?
The needle size provided in the pattern serves only as a guide, the important thing is to follow the knitting tension. And since knitting tension is very individual, you will have to adjust the needle size to ensure that YOUR tension is the same as in the pattern – maybe you’ll have to adjust 1, or even 2 needle sizes, up or down to achieve the correct tension. For this, we recommend that you work test swatches.
Should you work with a different knitting tension than the one provided, the measurements of the finished garment might deviate from the measurement sketch.
See DROPS lesson: How to measure your tension/gauge
See DROPS video: How to make a tension/gauge swatch
Why is the pattern worked top-down?
Working a garment top-down provides more flexibility and room for personal adjustment. For example it is easier to try the garment on while working, as well as making adjustments to length of yoke and shoulder caps.
The instructions are carefully explaining every step, in the correct order. Diagrams are adjusted to the knitting direction and are worked as usual.
How do I work according to a knitting diagram?
The diagram depicts all rows/rounds, and every stitch seen from the right side. It is read from bottom to top, from right to left. 1 square = 1 stitch.
When working back and forth, every other row is worked from the right side and every other row is worked from the wrong side. When working from the wrong side, the diagram will have to be worked reversed: from left to right, knit stitches are purled, purl stitches are knit etc.
When working in the round every round is worked from the right side and the diagram are worked from right to left on all rounds.
See DROPS lesson: How to read knitting diagrams
How do I work according to a crochet diagram?
The diagram depicts all rows/rounds, and every stitch seen from the right side. It is worked from bottom to top, from right to left.
When working back and forth every other row is worked from the right side: from right to left and every other row is worked from the wrong side: from left to right.
When working in the round, every row in the diagram are worked from the right side, from right to left.
When working a circular diagram you start in the middle and work your way outwards, counter clockwise, row by row.
The rows usually start with a given number of chain stitches (equivalent to the height of the following stitch), this will either be depicted in the diagram or explained in the pattern.
See DROPS lesson: How to read crochet diagrams
How do I work several diagrams simultaneously on the same row/round?
Instructions for working several diagrams after each other on the same row/round, will often be written like so: “work A.1, A.2, A.3 a total of 0-0-2-3-4 times". This means you work A.1 once, then A.2 is worked once, and A.3 is repeated (in width) the number of times provided for your size – in this case like so: S = 0 times, M = 0 times, L=2 times, XL= 3 times and XXL = 4 times.
The diagrams are worked as usual: begin with the first row in A.1, then work the first row in A.2 etc.
See DROPS lesson: How to read knitting diagrams
See DROPS lesson: How to read crochet diagrams
Why are the sleeves shorter in larger sizes?
The total width of the garment (from wrist-to-wrist) will be larger in the larger sizes, despite the actual sleeves being shorter. The larger sizes have longer sleeve caps and wider shoulders, so there will be a good fit in all sizes.
Where on the garment is the length measured?
The measurement sketch/schematic drawing provides information regarding the full length of the garment. If it’s a jumper or a jacket the length is measured from the highest point on the shoulder closest to the neckline, and straight down to the bottom of the garment. It is NOT measured from the tip of shoulder. Similarly, the length of yoke is measured from the highest point on the shoulder and down to where yoke is split into body and sleeves.
On a jacket measures are never taken along bands, unless specifically stated. Always measure inside band stitches when measuring the length.
See DROPS lesson: How to read a schematic drawing
What is a repeat?
Diagrams are often repeated on the round or in height. 1 repeat is the diagram the way it appears in the pattern. If it says to work 5 repeats of A.1 in the round, then you work A.1 a total of 5 times after/next to each other in the round. If it says to work 2 repeats of A.1 vertically/in height you work the entire diagram once, then begin again at the start and work the entire diagram one more time.
Why does the piece start with more chain stitches than it’s worked with?
Chain stitches are slightly narrower than other stitches and to avoid working the cast-on edge too tight, we simply chain more stitches to begin with. The stitch count will be adjusted on the following row to fit the pattern and measurement sketch.
Why increase before the rib edge when the piece is worked top-down?
The rib edge is more elastic and will contract slightly compared to, for example, stocking stitch. By increasing before the rib edge, you avoid a visible difference in width between the rib edge and the rest of the body.
Why increase in the cast-off edge?
It’s very easy to cast off too tightly, and by making yarn overs while casting off (and simultaneously casting these off) you avoid a too tight cast off edge.
See DROPS video: How to bind off with yarn overs (yo)
How do I increase/decrease on every 3rd and 4th row/round alternately?
To achieve an even increase (or decrease) you can increase on, for example: every 3rd and 4th row alternately, like so: work 2 rows and increase on the 3rd row, work 3 rows and increase on the 4th. Repeat this until the increase is complete.
See DROPS lesson: Increase or decrease 1 st on every 3rd and 4th row alternately
How can I work a jacket in the round instead of back and forth?
Should you prefer to work in the round instead of back and forth, you may of course adjust the pattern. You’ll need to add steeks mid-front (usually 5 stitches), and follow the instructions. When you would normally turn and work from the wrong side, simply work across the steek and continue in the round. At the end you’ll cut the piece open, pick up stitches to work bands, and cover the cut edges.
See DROPS video: How to knit steeks and cut open
Can I work a jumper back and forth instead of in the round?
Should you prefer to work back and forth instead of in the round, you may of course adjust the pattern so you work the pieces separately and then assemble them at the end. Divide the stitches for the body in 2, add 1 edge stitch in each side (for sewing) and work the front and back pieces separately.
See DROPS lesson: Can I adapt a pattern for circular needles into straight needles?
Why is the pattern slightly different than what I see in the photo?
Pattern repeats can vary slightly in the different sizes, in order to get the correct proportions. If you’re not working the exact same size as the garment in the photo, yours might deviate slightly. This has been carefully developed and adjusted so that the complete impression of the garment is the same in all sizes.
Make sure to follow instructions and diagrams for your size!
How do I make a women’s size garment into a men’s size one?
If you have found a pattern you like which is available in women’s size it’s not very difficult to convert it to men’s size. The biggest difference will be the length of sleeves and body. Start working on the women size that you think would fit across the chest. The additional length will be worked right before you cast off for the armhole/sleeve cap. If the pattern is worked top-down you can add the length right after the armhole or before the first decrease on sleeve.
Regarding additional yarn amount, this will depend on how much length you add, but it is better with a skein too many than too few.
How do I prevent a hairy garment from shedding?
All yarns will have excess fibres (from production) that might come off as lint or shedding. Brushed yarns (ie hairier yarns) have more of these loose, excess fibres, causing more shedding.
Shedding also depends on what is worn under or over the garment, and whether this pulls at the yarn fibres. It’s therefore not possible to guarantee that there will be no shedding
Below are some tips on how to get the best result when working with hairier yarns:
1. When the garment is finished (before you wash it) shake it vigorously so the looser hairs come off. NOTE: do NOT use a lint roller, brush or any method that pulls at the yarn.
2. Place the garment in a plastic bag and put it in your freezer - the temperature will cause the fibres to become less attached to each other, and excess fibres will come off easier.
3. Leave in the freezer for a few hours before taking it out and shaking it again.
4. Wash the garment according to the instructions on the yarn label.
Why does my garment pill?
Pilling is a natural process that happens to even the most exclusive of fibers. It's a natural sign of wear and tear that is hard to avoid, and that is most visible in high friction areas of your garment like a sweater's arms and cuffs.
You can make your garment look as new by removing the pilling, using a fabric comb or a pill/lint remover.
DROPS 90-13 |
|||||||||||||||||||||||||||||||||||||
|
|||||||||||||||||||||||||||||||||||||
DROPS Long pullover in Muskat with wave pattern
DROPS 90-13 |
|||||||||||||||||||||||||||||||||||||
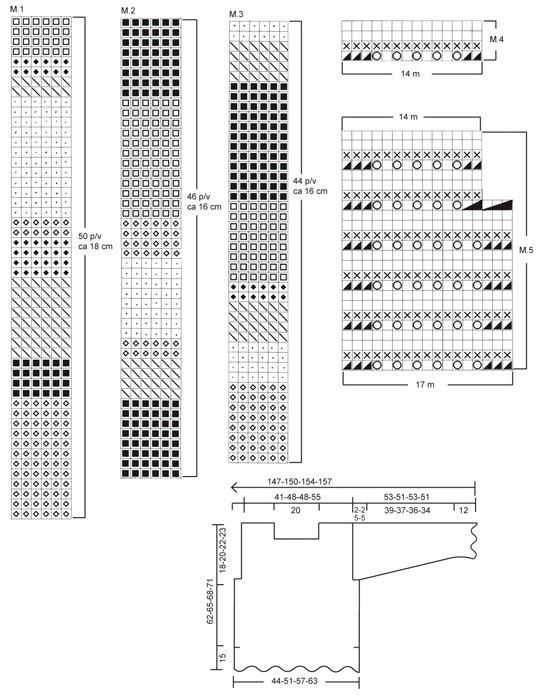
PULLOVER: Gauge: 21 sts x 28 rows in wave pattern = 10 x 10 cm. Stripe pattern for front/back: Adjust measurements for complete wave pattern repeats. 18 cm light beige, 4 rows dark beige, 7 cm lilac, 20 cm peach, then knit with natural white to finished dimensions. Stripe pattern-sleeve: See the charts for Patterns 1, 2 and 3. Knit Pattern 1 once, then Pattern 2 once, then Pattern 3 once, and then continue with natural to finished measurements. Wave pattern: See the charts for Patterns 4 and 5. The pattern is seen from the right side. Measuring tips: On account of the pattern and weight of the garment, make all measurements when the piece is held up. Otherwise, the garment will be too long when worn. Front: Cast on 93-107-119-133 sts around 2 needles with light beige (so that the cast-on edge will be elastic). Pull out one needle and knit 2 rows garter st. Then knit Pattern 4 (Wave pattern) following Stripe pattern for front/back – see instructions above. Establish pattern on the first row as follows (right side row): 4 sts in garter st (= edge of side split), 1-1-7-7 sts stockinette st, Pattern 4 over the following 84-98-98-112 sts, 0-0-6-6 sts stockinette st and 4 sts in garter st (= edge of side split). When the piece measures 15 cm end side split and cast on 1 new st at each side (edge st for seam allowance) = 95-109-121-135 sts. Establish pattern on the next row as follows (right side row): K 1 (edge st knit in garter st), 5-5-11-11 sts stockinette st, Pattern 4 over the following 84-98-98-112 sts, 4-4-10-10 sts stockinette st and K 1 (edge st knit in garter st). Continue as established until the piece measures 44-45-46-48 cm – read Measuring tips. Now bind off 4-4-10-10 sts at each side for armhole = 87-101-101-115 sts. Continue the pattern as before keeping 1 st at edge in garter st + 1 st in stockinette st at one side and 1 st at edge in garter st at the other side. When the piece measures 53-56-58-61 cm knit 4 rows with garter st over the center 47 sts (remaining sts knit in pattern as before), then bind off the center 43 sts for the neck = 22-29-29-36 sts remain on each shoulder. Continue in the pattern, keeping 2 sts in garter st at each neck edge – the sts that don’t fit in the pattern at each side of the neck should be knit in stockinette st. When the piece measures 62-65-68-71 cm – remember Measuring tips – bind off all sts. Back: Cast on and knit the same as the front. Bind off for armhole as on front and continue until piece measures 59-62-65-68 cm. Now knit 4 rows with garter st over the center 47 sts, then bind off the center 43 sts for the neck. Continue in pattern as on front, keeping 2 sts in garter st at each neck edge and the sts that don’t fit in the pattern in stockinette st. Bind off all sts when the piece measures 62-65-68-71 cm. Sleeve: Cast on 70-70-74-74 sts around 2 needles with light beige. Pull out one needle and knit 2 rows garter st. Then knit Pattern 5, following Stripe pattern-sleeve – see instructions above. Establish pattern on 1st row as follows (right side): K 1 (edge st knit in garter st throughout), 0-0-2-2 sts stockinette st, Pattern 5 over the following 68 sts, 0-0-2-2 sts stockinette st and K 1 (edge st knit in garter st throughout). When Pattern 5 has been knit one time there are 58-58-62-62 sts. Change to Pattern 4, keeping 1 edge st in garter st and 0-0-2-2 sts in stockinette st at each side. When the piece measures 12-14-14-16 cm inc 1 st at each side every 4-2.5-2-1.5 cm a total of 10-14-16-18 times = 78-86-94-98 sts – knit the increased sts in stockinette st until there are enough sts to knit in the pattern). When sleeve measures 51-49-48-46 cm (the larger sizes are shorter because of the larger drop in the shoulder) place a marker at each side (markers show where sleeves shall be sewn to Body) – remember Measuring tips. When the piece measures 51-49-51-49 cm bind off 5 sts at each side for sleeve cap every other row 2 times. Bind off remaining sts – adjust so that you do not bind off on rows with yarnovers, the piece measures approx. 53-51-53-51 cm. Assembly: Sew shoulder seams. Neckband: Pick up approx. 100-110 sts around the neck on short circular needles with natural. Join and knit garter st in the round – decreasing in each corner of front neck as follows: count 8 sts out from each corner in neck in each direction -- that is, 8 sts toward the center front and 8 sts up toward shoulder and put a marker in the 9th sts (= 4 markers). Now dec 1 st at each side of sts with marker every other row a total of 3 times by K 2 tog – do not dec sts on back neck corners = approx. 76-86 sts. When neckband measures 3 cm bind off all sts. Sew side seams using edge sts as seam allowance. Sew sleeve seams using edge sts as seam allowance up to the marker. Sew in sleeves using edge sts as seam allowance (the marker on sleeves should match up with the side seams on Body). |
|||||||||||||||||||||||||||||||||||||
Diagram explanations |
|||||||||||||||||||||||||||||||||||||
|
|||||||||||||||||||||||||||||||||||||
Have you made this or any other of our designs? Tag your pictures in social media with #dropsdesign so we can see them! Do you need help with this pattern?You'll find tutorial videos, a Comments/Questions area and more by visiting the pattern on garnstudio.com. © 1982-2024 DROPS Design A/S. We reserve all rights. This document, including all its sub-sections, has copyrights. Read more about what you can do with our patterns at the bottom of each pattern on our site. |
With over 40 years in knitting and crochet design, DROPS Design offers one of the most extensive collections of free patterns on the internet - translated to 17 languages. As of today we count 304 catalogues and 11422 patterns - 11422 of which are translated into English (UK/cm).
We work hard to bring you the best knitting and crochet have to offer, inspiration and advice as well as great quality yarns at incredible prices! Would you like to use our patterns for other than personal use? You can read what you are allowed to do in the Copyright text at the bottom of all our patterns. Happy crafting!
Comments / Questions (9)
Manuela wrote:
Quand on commence a tricoter le devant M4 point de vagues, pourquoi doit on tricoter 4 m au point mousse ainsi que 7 mailles jersey. C'est quoi la fente ? Pourquoi doit on recommencer a tricoter ces mailles au bord avant de faire M4 ? Merci
08.03.2023 - 18:59DROPS Design answered:
Bonjour Manuela, pour ce pull, on a une ouverture (fente) sur les côtes de 15 cm en bas du pull. On tricote 4 m point mousse de chaque côté pour la bordure de ces fentes, puis 7 m jersey avant M.4 et 6 m jersey après M.4 (pour que le motif soit symétrique) parce qu'on n' pas suffisamment de mailles pour tricoter 1 autre motif supplémentaire du point de vagues. Bon tricot!
09.03.2023 - 08:05Erna Dassonville wrote:
Bonjour, je souhaite tricoter ce pull en taille xl et avec 1 seule couleur, combien de pelotes dois-je commander
14.02.2023 - 13:59Schidlowski Regina wrote:
Hallo,die Farbe 05 entspricht nicht Hell lila sondern Puderrosa!Wie bekomme ich diese Farbe,möchte das Modell stricken. L.G.R.Schidlowski
02.09.2020 - 08:31DROPS Design answered:
Liebe Frau Schidlowski, dieses Modell wurde von schon einigen Jahren veröffentlicht und der Name von Farben wurden aktualisiert, gerne wird Ihnen Ihr DROPS Laden mit den Farben weiterhelfen. Viel Spaß beim stricken!
02.09.2020 - 08:43Mary Hester wrote:
How much yarn is needed to make this pattern in a solid color. Could you give the answer in yards, please.
12.01.2019 - 21:41DROPS Design answered:
Dear Mrs Hester, you will find required yarn in each size under the header, calculate the amount of balls required in each colour - 1 ball Muskat = 50 g/ approx. 109 yds - see shadecard. Should you need more informations please contact your DROPS store even per mail or telephone. Happy knitting!
14.01.2019 - 10:31Lauriena Clements wrote:
Just in case anyone else has the same question I had, here is what I found out from someone who has knit the pattern before. The "established pattern" rows only apply to the FIRST row of the pattern repeat. The row that has the yarn overs and knit 2 together. For the rest of the rows, work them as you would the rest of the stitches for that row, remembering to keep however many stitch s is says you need in garter stitch for the edge. For the split, that is 4 on either side.
30.05.2017 - 15:51Lauriena Clements wrote:
If I follow the pattern for the side split, the two edges look different. One edge has a column of knit stitches between the garter edge and the wave pattern, but the other does not. Am I doing something wrong? On the right side, 4 garter sts, 1 stockinette, 84 in Pattern 4, 0 stockinette, 4 garter. On the wrong side, 4 garter, 0 stockinette, 84 in Pattern 4, 1 stockinette, 4 garter.
28.05.2017 - 01:40DROPS Design answered:
Dear Mrs Clements, it might be easier to go to your store to show your piece (or take a picture and ask them per mail), as it looks right as you worked. Happy knitting!
29.05.2017 - 09:36Anneli Peippo wrote:
Hej Det står att man skall göra 4 varv med mörkbeige som färg 2 i randmönstret på fram- och bakstycke. Men i listan över garn finns inte mörkbeige med. När jag tittar på ärmarnas randning så ser det ut som att det skall vara beige, färg nummer 23 som färg 2 på fram- och bakstycke. Stämmer det? Kan ju vara bra att skriva ut även färgnummer inne i mönstret, eller i alla fall i diagrammen, så att det inte blir någon tveksamhet. Mvh Anneli
02.08.2015 - 20:03DROPS Design answered:
Hej Anneli, Det kan bara vara beige vi menar här. Lycka till!
03.08.2015 - 10:20Nellekejansen wrote:
Bij dit patroon staan het aantal steken niet bij het rugpand bescheven.
18.05.2013 - 16:29DROPS Design answered:
Er staat in het patroon: Zet op en brei zoals beschreven voor het voorpand. Dus je zet op zoals beschreven bij het voorpand: Zet 93-107-119-133 st op met 2 breinld en lichtbeige (dit is bedoeld om de opzetnld elastisch te maken).... enzo voort. Veel breiplezier!
21.05.2013 - 12:33Karina Pedersen wrote:
Når arb måler 44-45-46-48 cm - læs Måletips - lukkes der 4-4-10-10 m af i hver side til ærmegab = 87-101-101-115 m. Fortsæt Bølgemønst som før med 1 kantm ,1 m glatstrik i den ene side og 1 kantm i den anden side. Mit spørgsmål er så følgende : Skal man fortsat strikke ret over vrang over ALLE masker i p.2 i M.4 på resten af forstk, efter der er taget ind til ærmegab eller ?? Det fremgår ikke særlig tydeligt i opskriften ?! Vh Karina P
02.11.2012 - 08:07DROPS Design answered:
Ja du fortsætter bølgemønsteret til arb måler 53-56-osv hvor du da strikker 2 p retstrik ifølge opskriften
15.11.2012 - 12:17