
Popular categories
Looking for a yarn?


|
|||||||||||||
Frau Holle |
|||||||||||||
|
|
|||||||||||||
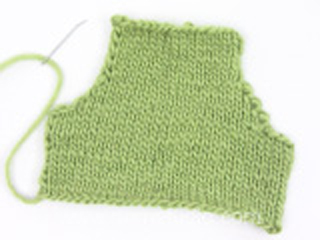
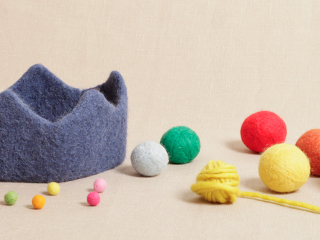
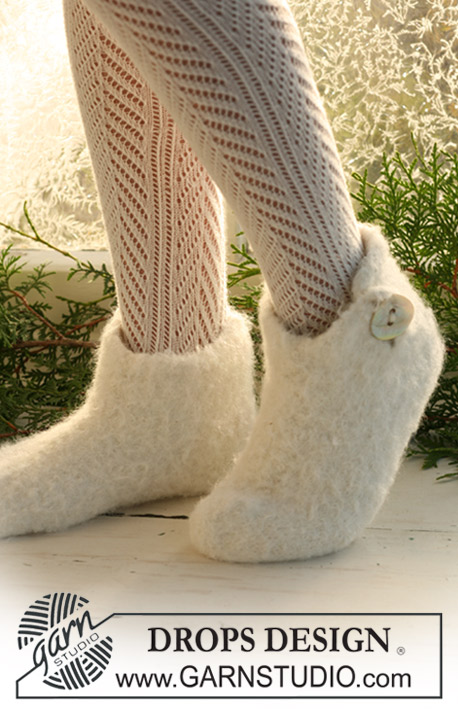
Felted DROPS slippers in 2 threads ”Alpaca”
DROPS 112-43 |
|||||||||||||
|
SLIPPERS: Worked in 1 piece with seams mid back and mid upper foot. Beg to knit at the mid back – see measuring chart below. LOOSELY cast on 76-80-86 sts on needle size 5.5 mm / US 9 with 2 threads Alpaca and work stockinette st back and forth on needle. REMEMBER THE KNITTING GAUGE! When piece measures 6-7-7 cm / 2⅜"-2¾"-2¾" continue to work on 16 sts only on the left of piece (seen from RS) – slip the remaining 60-64-70 sts on a stitch holder. Now work 7 cm / 2¾" stockinette st on the 16 sts and then bind off. This piece will be were you sew the buttons afterward. Slip the sts from stitch holder back on needle and cast on 16 new sts on the left side of piece (seen from RS). Now continue on all sts. When piece measures 8-9-9 cm / 3⅛"-3½"-3½" (from cast on row at the very beginning) work next row as follows from WS: work 4 sts, bind off 9 sts, work remaining sts on row. Cast on 9 new sts over the bind off sts on return row (= buttonhole). When piece measures 18-19.5-21.5 cm / 7"-7¾"-8½" bind off 4-4-5 sts each side, bind off in beg of following 2 rows = 68-72-76 sts. Now bind off at the beg of every row each side: 4 sts 2 times, and then at the beg of every other row each side: 1 st 8-9-10 times = 36-38-40 sts. Continue until piece measures 34-38-42 cm / 13⅜"-15"-16½", bind off loosely. Make 1 more slipper, but mirror it, i.e. when piece measures 6-7-7 cm / 2⅜"-2¾"-2¾" only work the first 16 sts on the right side of piece (seen from RS). ASSEMBLY: Fold slipper and sew tog mid back in outer loops of sts. Sew tog mid upper foot at the front in the same way. Felt slippers in washing machine – SEE BELOW. For the perfect fit, put slipper on while still wet to shape it into the right size. After felting sew on buttons to fit buttonholes. FELTING: To avoid the slippers felting tog during wash, attach a small plastic bag inside the top before putting them in the washing machine. Wash at 40C/104F with a detergent free of enzymes and optical bleach, with normal spin, but no pre-wash. After wash shape the slippers while still wet, and leave to dry – see above. If after felting the slippers are too big, wash them again, if they are too small, leave them to soak and then shape them into the right size. At subsequent washes wash the slippers at a wool programme. AFTER FELTING: If the piece is not felted enough and is too big: Wash the piece one more time in the washing machine while it is still wet add a terry towel that measures approx. 50 x 70 cm = 19¾" x 27½" - NOTE: Do not use a short program. If the piece has been felted too much and is too small: While the piece is still wet stretch it to the correct measurements, if the piece is dry, make sure to soak it first. Remember: All subsequent washes are as a normal wool garment. |
|||||||||||||
Diagram explanations |
|||||||||||||
|
|||||||||||||

|
|||||||||||||
|
Have you made this or any other of our designs? Tag your pictures in social media with #dropsdesign so we can see them! Do you need help with this pattern?You'll find tutorial videos, a Comments/Questions area and more by visiting the pattern on garnstudio.com. © 1982-2024 DROPS Design A/S. We reserve all rights. This document, including all its sub-sections, has copyrights. Read more about what you can do with our patterns at the bottom of each pattern on our site. |
|||||||||||||


With over 40 years in knitting and crochet design, DROPS Design offers one of the most extensive collections of free patterns on the internet - translated to 17 languages. As of today we count 304 catalogs and 11422 patterns - 11417 of which are translated into English (US/in).
We work hard to bring you the best knitting and crochet have to offer, inspiration and advice as well as great quality yarns at incredible prices! Would you like to use our patterns for other than personal use? You can read what you are allowed to do in the Copyright text at the bottom of all our patterns. Happy crafting!
Comments / Questions (59)
Mes pantoufles semble moins épaisse que les vôtres.Sont-elles tricotées avec 2 laines. merci
14.02.2015 - 20:33DROPS Design answered:
Bonjour Mme Piche, les chaussons sont tricotés avec 2 fils Alpaca sur la base de 16 m x 20 rangs jersey = 10 x 10 cm avant feutrage et environ 24 m x 29 rangs = 10 x 10 cm après feutrage. Cliquez ici pour en savoir plus sur le feutrage. Bon tricot!
16.02.2015 - 10:49Hallo, ik heb deze Kerstsloffen gebreid, maar snap niks vann de hiel .Hoe krijg ik knoop en het tegenbeleg goed , hoe krijg ik de knoop er op en waar moet dat stukje van 16 steken en 7 centimeter heen. Er staat niet een goede uitleg bij. Op de video komt het niet een voor.Zou de video aangepast kunnen worden?
23.11.2014 - 19:02DROPS Design answered:
Hoi Ineke. De video heeft niet de overlap/extra stukje voor het knoopje, maar verder is het principe hetzelfde. Leg het lapje voor je neer zoals de tekening onder. Je naait nu de A tegen de B (Hiel). Sluit ook de naad op de bovenkant (de schuine lijn aan beide kanten van C). Het beleg zit dan op de zijkant en na het vilten kan je de knoop erop naaien
27.11.2014 - 15:20I love these slippers, but I dont understand the 7cms on 16sts and the cast on 16st. I'm left with a very strange shape and one side the 16sts cast off leave a flap. also one lot of 16 sts is 7cm higher then the other. I must be reading this pattern wrong, please help.
09.11.2014 - 19:38DROPS Design answered:
See below - this part will be for button band and will come under the new casted on sts with buttonhole. Happy knitting!
10.11.2014 - 10:14Help please, which part of the slipper is the 7cms x 16sts that is cast off and the added on 16sts on the opposite side for, I have ended up with a very strange shape. I must be doing something very wrong. thanks
09.11.2014 - 19:09DROPS Design answered:
Dear Mrs Nesbitt, this part correspond to the button band where button will be then sewn. Work 7 cm st st over the last 16 sts seen from RS and cast off these sts. Work the remaining sts and cast on 16 sts at the end of row (towards the 16 sts x 7 cm) and work as stated, the buttonhole will be then opened in this part. Happy knitting!
10.11.2014 - 10:13I am unsure how to close the toe when assembling these slippers. Should I 1) skip the bind off and run the yarn through remaining stitches and pull tight to close OR 2) sew the bind-off edge closed from the fold at center sole to top foot seam OR 3) place the top foot seam at the center fold of sole and sew across. Which solution seems best? I do not see that the pattern includes instructions for closing the toe. Thanks for your help.
06.11.2014 - 21:58DROPS Design answered:
Dear Mrs Freeman, assembly says here to fold and sew tog ie as you say under 2) - For any individual assistance, remember you can get help from the DROPS store where you bought your yarn. Happy knitting!
07.11.2014 - 10:37Jeg vil så gerne købe det mønster, jeg har ikke noget printe med. Jeg betaler gerne for besværet. Tak Venligst Lene Pedersen.
24.08.2014 - 15:27DROPS Design answered:
Hej Lene. Du kan spörge din garnbutik om de vil hjaelpe dig, ellers kan du altid printe paa biblioteket
25.08.2014 - 13:52Komme leider mit der Beschreibung nicht klar.80M aufgenommen, 7cm hochgestrickt. Dann über äußersten 16M li. Seite??? 7cm gestrickt. Vorher restl. nachfolg. Maschen (64M??) auf Hilfsfaden stillgelegt Welche li..Seite ist gemeint? Dann wieder auf der linken Seite 16M anschlagen? Schuh. Unter dem Pfeil Strickrichtung ist ein Strich. Jedoch nur auf der einen Seite
27.10.2013 - 22:19DROPS Design answered:
Liebe Stefanie, ja genau, der Strich ist nur auf der linken Seite, dass ist dort, wo Sie den Schlitz einstricken, indem Sie zunächst 16 M abketten und dann wieder 16 M anschlagen. Die linke Seite ist wie abgebildet links wenn Sie das Strickstück von der Vorderseite anschauen.
29.10.2013 - 09:13Jeg har problemer kan ikke forstå hvordan den skal syes sammen ville gerne om der kunne være flere indformationer Med Venlig Hilsen Gitte Vad
16.09.2012 - 13:32DROPS Design answered:
Du syr bagpå langs hælen, se på skitsen hvordan du lægger den sammen. Og så syr du fra tåen og ovenpå foden og op til skaftet foran.
04.12.2012 - 14:41Du bretter ved "C" og syr sammen "A" mot "B". Deretter syr du fra der man starte å felle fram til spissen.
05.09.2011 - 09:23Hei! Kan du forklare nærmere hvordan vi monterer tøflene før toving? Jeg sitter her med et hull på ene siden av ankelen og andre siden er delt i to med en slags klaff.... er dette riktig?
02.09.2011 - 12:42