
Popular categories
Looking for a yarn?


|
|
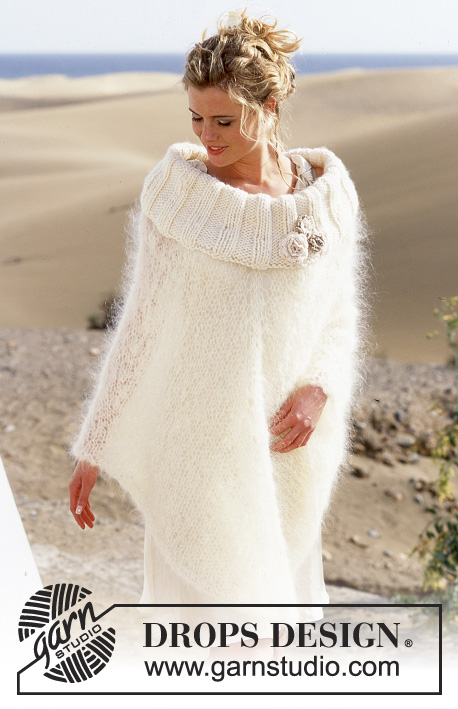
Beach Wedding |
|
 |
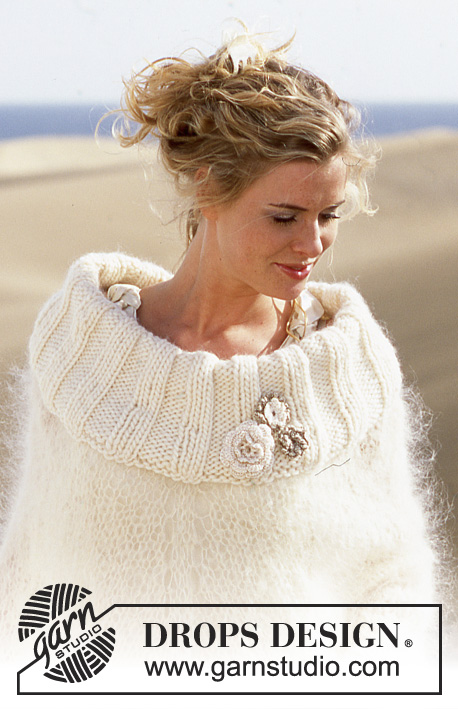 |
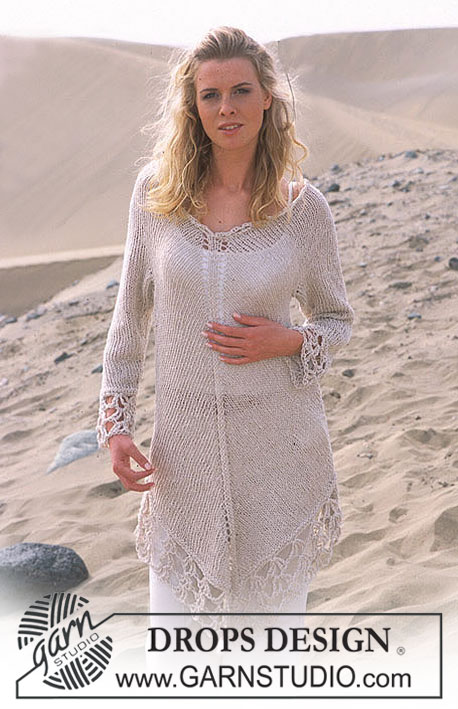
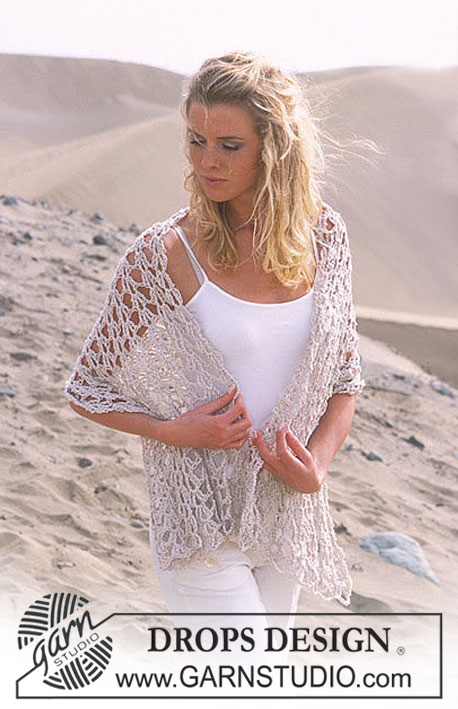
DROPS Poncho in Vienna or Melody and Snow, with crocheted flowers in Cotton Viscose
DROPS 89-25 |
|
|
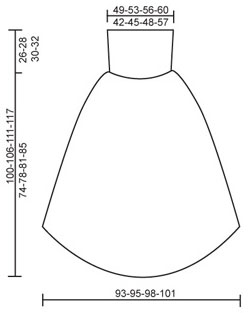
Gauge: Snow: 10 sts x 14 rows on smaller needles in stockinette st = 10 x 10 cm Vienna / Melody: 8 sts x 10 rows on larger needles in stockinette st = 10 x 10 cm Rib: * K 4, P 3 *, repeat * - *. Increasing tips (for front and back): Inc by making a yo at each side of the center 4 sts (in Size XL/XXL increase at each side of the center 3 sts) at center front and center back. Poncho: The poncho is knit from neck down. Loosely cast on 98-105-112-119 sts on smaller circular needles with Snow; join and place a marker at the join. P 1 row and then knit rib – see instructions above. When the piece measures 13-14-15-16 cm dec all K 4 to K 3 = 84-90-96-102 sts. Continue until piece measures 26-28-30-32 cm, then K 1 row, P 1 row. . Change to larger circular needles and Vienna or Melody and knit stockinette st, decreasing to 68-72-76-82 sts on the 1st row. On the next row put 4 markers in work as follows: * 1 marker (= shoulder), 17-18-19-20 sts, 1 marker (= center front or back) – in Size XL/XXL put the marker in the 21st st, 17-18-19-20 sts *, repeat * - *. Measure the work from here. Read entire next section before knitting: Inc center front and center back: Continue in stockinette st, and inc every 3 rows – see Increasing tips – a total of 21-22-23-24 times. Shoulder inc: Inc 1 st for each shoulder (alternately before and after the marker) every other row a total of 3 times. Side dec: When the piece measures 9-7-6-5 cm dec 1 st at each side (alternately before and after the marker) every 9-7-6-5 cm a total of 5-7-9-11 times. After all incs and decs are complete there are 148-152-156-162 sts. The poncho measures approx. 59-62-65-68 cm from neck and down along shoulders, and approx. 74-78-81-85 cm from neck and down center front. P 1 row (right side) and then bind off. So that the points will not roll, K 2 sts in each of the 2 sts at the center (in Size XL knit 2 sts in each st at each side of the center st) and bind off both sts. Crocheted flowers: Make 3 flowers for decoration on poncho. Large blossom: Ch 4 with natural Cotton Viscose and join into a ring with 1 sl st. 1st row: 1 sc in ring, * ch 2, 1 sc in ring *, repeat from * - * a total of 7 times and finish with ch 2 and 1 sl st in 1st sc at start of row = 8 ch-loops. 2nd row: ch 1, crochet as follows in each ch-loop: * 1 sc, 2 dc, 1 sc *, and finish with 1 sl st in first sc at start of row. Turn piece – blossom is completed from back side. 3rd row: ch 1, * 1 sc in sc from 1st row (crochet on back side of petal around sts from previous row, pull yarn tight), ch 3 *, repeat * - * a total of 8 times and finish with 1 sl st in 1st sc at start of row. 4th row: ch 1, crochet as follows in each ch-loop: * 1 sc, 4 dc, 1 sc *, and finish with 1 sl st in 1st sc at start of row. 5th row: ch 1, * 1 sc in sc from 3rd row (crochet on back side of the 2 petals around sts from previous row, pull yarn tight), ch 4 *, repeat * - * a total of 8 times and finish with 1 sl st in 1st sc at start of row. 6th row: ch 1, crochet as follows in each ch-loop: * 1 sc, 6 dc, 1 sc *, and finish with 1 sl st in 1st sc at start of row. Cut yarn and fasten. Medium blossom: Crochet a small blossom in natural Cotton Viscose as follows: Ch 4 and join into a ring with 1 sl st. 1st row: 1 sc in ring, * ch 5, 1 sc in ring *, repeat * - * a total of 15 times (the loops will fit tightly in the ring) and finish with ch 5 and 1 sl st in 1st sc at start of row = 16 ch-loops. Cut yarn and fasten. Then crochet a larger blossom in light beige Cotton Viscose as follows: Ch 5 and join into a ring with 1 sl st. 1st row: 1 sc in ring, * ch 10, 1 sc in ring *, repeat * - * a total of 19 times (the loops will fit tightly in the ring) and finish with ch 10 and 1 sl st in 1st sc at start of row = 20 ch-loops. Cut yarn and fasten. Lay the smaller natural blossom on the light beige blossom and sew together. Small blossom: Crochet the same as the larger blossom in the Medium blossom instructions. Sew flowers on the collar – see photo for placement. |
|
|
|
|
Have you made this or any other of our designs? Tag your pictures in social media with #dropsdesign so we can see them! Do you need help with this pattern?You'll find tutorial videos, a Comments/Questions area and more by visiting the pattern on garnstudio.com. © 1982-2024 DROPS Design A/S. We reserve all rights. This document, including all its sub-sections, has copyrights. Read more about what you can do with our patterns at the bottom of each pattern on our site. |
|


With over 40 years in knitting and crochet design, DROPS Design offers one of the most extensive collections of free patterns on the internet - translated to 17 languages. As of today we count 304 catalogs and 11422 patterns - 11417 of which are translated into English (US/in).
We work hard to bring you the best knitting and crochet have to offer, inspiration and advice as well as great quality yarns at incredible prices! Would you like to use our patterns for other than personal use? You can read what you are allowed to do in the Copyright text at the bottom of all our patterns. Happy crafting!
Comments / Questions (53)
Wird an den Schultern nur dreimal zugenommen und dann gar nicht mehr? Erfolgen die Zunahmen dann nur vorn und hinten mit insgesamt 4 Maschen in jeder 3. Runde?
11.09.2014 - 23:00DROPS Design answered:
Ja ganz genau!
12.09.2014 - 08:55Wieviel Wollknäuel brauche ich je Garn? Vienna? Eskimo?
16.08.2014 - 22:09DROPS Design answered:
Liebe Katja, die Mengenangaben finden Sie neben dem Foto. Allerdings wird Vienna jetzt aus dem Programm genommen, Sie müssen also schauen, ob Ihr Dropswolleladen noch Bestände hat oder Sie suchen sich ein Alternativgarn aus.
17.08.2014 - 12:30Bonjour Ce modèle me plait beaucoup, mais étant forte serait-il possible de l'avoir en taille au-dessus soit XXXL/XXXXL. Merci beaucoup
11.06.2014 - 19:05DROPS Design answered:
Bonjour Mme Triplet, ce modèle n'est disponible que jusqu'au XL/XXL, comparez les mesures du schéma avec un vêtement analogue que vous avez et qui vous va. Vous pouvez recalculer le modèle pour votre taille ou choisir un modèle plus récent disponible dans une taille plus grande. Bon tricot!
12.06.2014 - 08:42Bonjour, je ne comprends pas les explications, notamment la phrase concernant les positions des marqueurs sur le tricot pour faire ensuite les augmentations. Je suis bloquée pour continuer le tricot car ça ne colle pas. Je ne vois pas non plus à quoi correspondent les côtés. Merci de me donner quelques détails si c'est possible.
24.02.2014 - 17:08DROPS Design answered:
Bonjour Mme Millot, la phrase pour les marqueurs a été modifiée pour une meilleure compréhension: placez le 1er marqueur au début du tour, puis tricotez 17-20 m (cf taille ), placez le 2ème marqueur (dans la 4ème taille, placez le dans la m suiv = 21ème m), puis tricotez encore 17-20 m, placez le 3ème marqueur, puis encore 17-20 m et placez le dernier marqueur (dans la 21ème m en taille XL/XXL). Vous avez ainsi 4 marqueurs espacés de 17-18-19-20 m. Bon tricot!
25.02.2014 - 09:28Bonjour, je suis dans la réalisation du Poncho, et arrive à la partie jersey. En me plongeant dans les explications d'augmentation et de diminution je ne comprends pas comment en partant des 68 mailles on arrivent au 148 finales ... Serait il possible de reprendre chacunes des étapes d'augmentation et de diminution avec le total de mailles ajoutées/enlevées. Merci beaucoup, Tricotement vôtre,
04.08.2013 - 17:28DROPS Design answered:
Bonjour Agathe, quand vous avez ajusté à 68 m, vous placez 4 marqueurs et augm. 21 x 4 m (1 m de chaque côté des marqueurs milieu devant et milieu dos) soit 84 augm. + 3 x 1 m avant/après le marqueur sur les côtés (=6 augm) et diminuez 5 x 1 m avant après le marqueur sur les côtés (= 10 dim) = 148 m. Bon tricot !
05.08.2013 - 09:39Je suis décu car la forme de ce poncho en bas n'est pas du tt la mm que sur la photo, mais plustot celle du dessin en trait en bas des explications et c'est loin d'etre aussi jolie que sur la photo ... y a t'il une couture à faire ou un séchage particulier pour obtenir la jolie forme de la photo ?
09.04.2013 - 09:39DROPS Design answered:
Bonjour Myriam, si vous avez bien les mesures du schéma, c'est bien le poncho en photo Le col est retourné sur l'envers et peut effectivement jouer sur les côtés. Vous pouvez effectivement le laver et le faire sécher aux mesures du schéma pour lui donner la forme finale. Bon tricot !
10.04.2013 - 08:59Bonjour, merci pour votre aide. par contre, pour les ajout de mailles, qd j'avais fait comme dans l'explication, cela fesait de gros trous pas tres jolis... alors j'ai refait en faisant la mèthode suivante : piquer avec l'aiguille gauche dans la maille entre les 2 aiguilles d'avant en arrière, ensuite je tricote cette maille à l'endroit mais en piquant non pas comme d'habitude mais en piquant dans le fil arrière de cette maille. et la je n'ai pas de trou et c'est bcp plus jolie.
05.04.2013 - 14:52Bonjour, j'ai débuté ce modèle que je trouve magnifique, par contre, j'ai peur de m'etre trompée : il faut tricoter la laine vienna en jersey (1 rang env, 1 rang end), mais vu que l'on est en circulaire, ne faut il pas tricoter que des mailles endroit sur chaque rang pour faire le dessin du jersey ? merci pour votre aide.
01.04.2013 - 17:49DROPS Design answered:
Bonjour Myriam, pour tricoter du jersey en rond, on tricote effectivement tous les rangs à l'endroit. Si vous tricotez 1 tour end, 1 tour env, vous obtenez du point mousse. Bon tricot !
02.04.2013 - 09:44I opskriften står der at man skal slå om på de midterste 4 masker, vil det sige at de 4 masker bliver til 8, og at man udtager med 8 masker på en omgang. Mvh Jette
12.11.2012 - 07:27DROPS Design answered:
Du skal tage ud ved at slå om på hver side af de 4 midterste m både foran og bagpå. Se også rettelsen! God fornøjelse!
12.11.2012 - 15:21Jeg har problemer når jeg tager ud, midt for og bag, ved at slå om. Hullerne bliver alt for store. Har jeg misforstået noget i opskriften?? Mvh Litta
15.03.2012 - 10:48DROPS Design answered:
Du kan altid lave hullerne mindre hvis du strikker omslaget drejet ret eller vrang, dvs du strikker i bagerste maskebue. Se gerne vores instruktionsvideo som viser drejet ret. God fornøjelse!
16.03.2012 - 15:33