
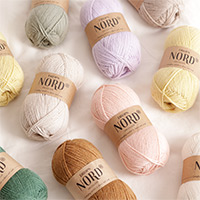
Popular categories
Looking for a yarn?


|
|||||||||||||||||||||||||||||||||||||
White Butterfly |
|||||||||||||||||||||||||||||||||||||
|
|
|||||||||||||||||||||||||||||||||||||
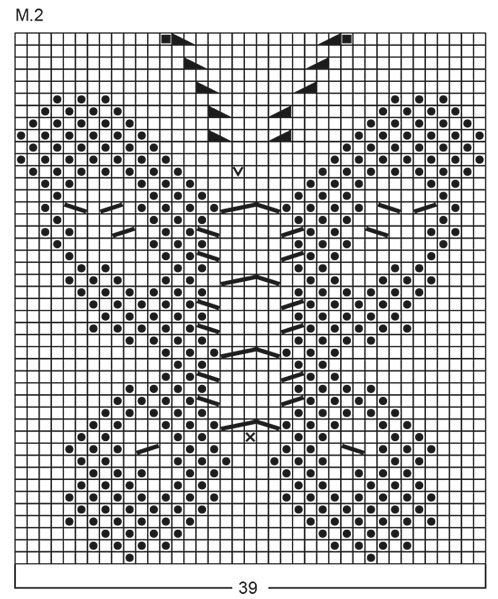
Sweater in Muskat with butterfly
DROPS Children 6-12 |
|||||||||||||||||||||||||||||||||||||
|
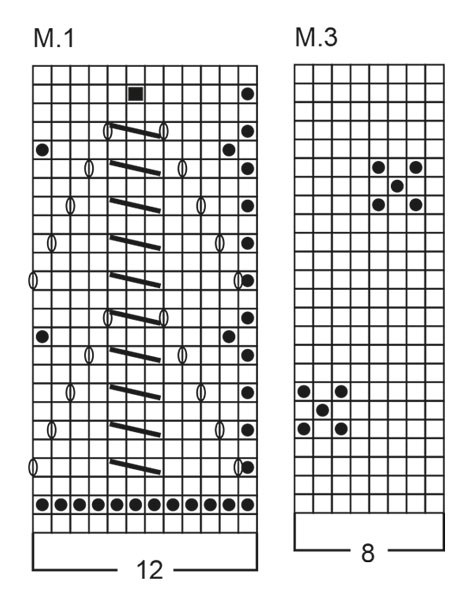
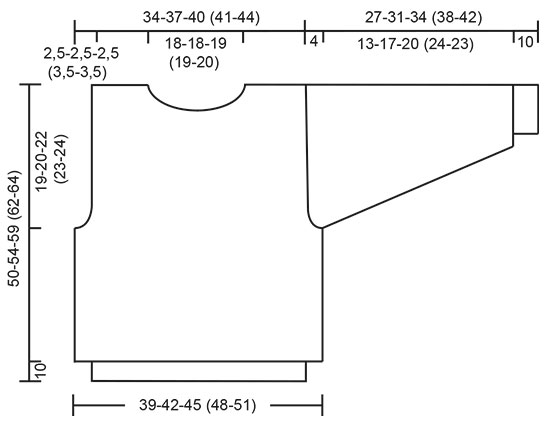
Gauge: 20 sts x 26 rows on needle 4 and stockinette st = 10 x 10 cm [4" x 4"]. Bobble: Knit 3 sts into 1 st, knit 3 rows stockinette st over these, on 4th row knit all sts together into 1 st. Pattern: See charts. (1 chart=1 repeat). The pattern is seen from the right side. BODY Cast on 156-168-180 (192-204) sts on smaller circular needles; join and place a marker at the join. Knit Pattern 1 - 1 repeat is approx. 10 cm [4"]. Change to larger circular needles and stockinette st, increasing 1 st on the 1st row = 157-169-181 (193-205) sts. Attach a second marker for the other side: 79-85-91 (97-103) sts front and 78-84-90 (96-102) sts back. When the work measures 22-24-26 (28-29) cm [8-⅝" - 9.5" - 10.25" (11" - 11-⅜")] knit Pattern 2 over the center 39 sts on the front (do not knit Pattern 2 on the back). At the same time, when the work measures 31-34-37 (39-40) cm [12.25" - 13-⅜" - 14.5" (15.25" - 15.75")], knit the next row as follows: bind off 1 st for armhole, work 77-83-89 (95-101) sts for the front, bind off 2 sts for armhole, work 76-82-88 (94-100) sts for the back, bind off 1 st for armhole. Knit the rest of the front and back separately. Front: = 77-83-89 (95-101) sts. Then bind off for armholes every other row: 2 sts 1-1-1 (2-2) times, dec 1 st 2 times = 69-75-81 (83-89) sts. After Pattern 2 continue knitting in stockinette st. When the work measures 45-49-54 (57-59) cm [17.75" - 19.25" - 21.25" (22.5" - 23.25")], bind off the center 29-29-31 (31-33) sts for the neck, and at the same time knit Pattern 3 on each side of the neck (be sure that the two sides are alike). Then bind off for the neck every other row: 2 sts 1 time, dec 1 st 2 times. Bind off all sts when the work measures 50-54-59 (62-64) cm [19.75" - 21.25" - 23.25" (24-⅜" - 25.25")]. Back: = 76-82-88 (94-100) sts. Bind off for armholes as on the front. When the work measures 45-49-54 (57-59) cm [17.75" - 19.25" - 21.25" (22.5" - 23.25")], knit Pattern 3. At the same time, when the work measures 48-52-57 (60-62) cm [18-⅞" - 20.5" - 22.5" (23-⅝" - 24-⅜")], bind off the center 34-34-36 (36-38) sts for the neck. Then dec 1 st at each neck edge on the next row. Bind off when the work measures 50-54-59 (62-64) cm [19.75" - 21.25" - 23.25" (24-⅜" - 25.25")]. Sleeves: Cast on 36-36-36 (36-48) sts on smaller double pointed needles; join and place a marker at the join. Knit Pattern 1 (approx. 10 cm [4"]). Change to larger double pointed needles, knit Pattern 3 (centering the pattern on the sleeve) and inc 4-4-8 (12-0) sts evenly distributed on the 1st row = 40-40-44 (48-48) sts. At the same time, after Pattern 1 inc 1 st each side of marker 18-20-22 (22-24) times: Size 3/4: alternately every and every 2nd row Sizes 5/6 + 7/8: every 2nd row Sizes 9/10 + 11/12: alternately every 2nd and 3rd row = 76-80-88 (92-96) sts (knit the increased sts into the pattern as you go along). When the work measures 23-27-30 (34-38) cm [9" - 10-⅝" - 11.75" (13-⅜" - 14-⅞")], bind off 3 sts each side of marker and knit the rest back and forth on needle. Then bind off on each side every other row: 4 sts 4 times, bind off all sts. The work measures approx. 27-31-34 (38-42) cm [10-⅝" - 12.25" - 13-⅜" (14-⅞" - 16.5")]. Assembly: Sew shoulder seams. Pick up approx. 80-96 sts around the neck on larger double pointed needles and knit 1 row stockinette st. At the same time knit 3 bobbles on each shoulder as follows: 1 bobble directly centered on the shoulder and 6 sts stockinette sts on each side to the next bobble (1 toward the front and 1 toward the back). Then purl 1 row, bind off. Crochet 1 row as follows: * 3 sc, ch 3, 1 sl st in the first ch st *. Sew on the sleeves. |
|||||||||||||||||||||||||||||||||||||
Diagram explanations |
|||||||||||||||||||||||||||||||||||||
|
|||||||||||||||||||||||||||||||||||||
|
|||||||||||||||||||||||||||||||||||||
|
|||||||||||||||||||||||||||||||||||||
|
|||||||||||||||||||||||||||||||||||||
|
Have you made this or any other of our designs? Tag your pictures in social media with #dropsdesign so we can see them! Do you need help with this pattern?You'll find tutorial videos, a Comments/Questions area and more by visiting the pattern on garnstudio.com. © 1982-2024 DROPS Design A/S. We reserve all rights. This document, including all its sub-sections, has copyrights. Read more about what you can do with our patterns at the bottom of each pattern on our site. |
|||||||||||||||||||||||||||||||||||||


With over 40 years in knitting and crochet design, DROPS Design offers one of the most extensive collections of free patterns on the internet - translated to 17 languages. As of today we count 304 catalogs and 11422 patterns - 11417 of which are translated into English (US/in).
We work hard to bring you the best knitting and crochet have to offer, inspiration and advice as well as great quality yarns at incredible prices! Would you like to use our patterns for other than personal use? You can read what you are allowed to do in the Copyright text at the bottom of all our patterns. Happy crafting!
Comments / Questions (33)
Kan der være en fejl i m2, ved snogningenrne. Forstår ikke ikke helt hvordan snogningenrne lave
21.07.2017 - 17:55DROPS Design answered:
Hei Gitte. Ja, her var det en feil ved fletten (M.2). Det skal være = 2 m på hj.p foran arb, 3 r, 2 r fra hj.p. Takk for at du gjorde oss oppmerksom på dette, feilen vil bli rettet så fort som mulig. God fornøyelse videre på genseren.
09.08.2017 - 10:00Worden bij de hoogtes die aangegeven worden het boord meegerekend, of vanaf het boord? Bv ik moet op 22 cm beginnen met het patroon. Is dat op 22cm totaal, of vanaf het boord ?
09.12.2016 - 20:39DROPS Design answered:
Hoi Sijke. Het is de totale hoogte inclusief het boord. Zo meten wij standaard - tenzij anders wordt aangegeven in het patroon
12.12.2016 - 15:22Tror det är fel på mönster 1, visst ska 2 m stickas tillsammans? sista raden på Diagram explanations( lyft 1 m 2 rm ,drag den lyftade över). På M2 är den fyllda rutan avigmaskor?
11.03.2016 - 11:29DROPS Design answered:
Hej Ann-Christine, M.1 nästsista raden är en bubbla - se förkl i mönstret. Lycka till!
11.03.2016 - 12:08Bonjour, J'ai terminé le modèle en 9/10ans mais je souhaiterais tricoter des manches courtes d'environ 7cm Pouvez vous me guider car j'ai demandé à mon revendeur sans résultat hélas Merci de votre aide Cordialement
15.07.2015 - 22:43DROPS Design answered:
Bonjour Claudine, vous pouvez vous inspirer d'un modèle similaire à manches courtes dans la même tension, ou monter le nombre de mailles correspondant à celui de la fin de la manche (après les augmentations), tricoter droit et faire ensuite l'arrondi de la manche (ajustez le nombre de mailles à monter si nécessaire en fonction du résultat souhaité en bas de la manche courte: point fantaisie (nbe de mailles multiple de 12) ou pas, etc...). Bon tricot!
27.07.2015 - 14:00Bonjour, je ne comprends pas le diagramme du papillon, sur la longueur centrale le schema se fait sur 5 mailles alors que sur la légende les explications se font sur 6 mailles.(ce qui represente la torsade centrale)
08.11.2014 - 20:02DROPS Design answered:
Bonjour Sandrine, au rang précédent juste avant la 1ère torsade du corps, on voit une croix (x) dans le diagramme, ce symbole indique qu'il faut augmenter 1 m pour tricoter ensuite la torsade centrale sur 6 m. Bon tricot!
10.11.2014 - 10:44Een telpatroonuitleg in het nederlands van dit patroon zou heel mooi zijn, is die er ook?
23.08.2014 - 12:45DROPS Design answered:
Hoi Bea. De Nederlandse vertaling van de symbolen van de teltekening staat onderaan het patroon onder "Nederlandse vertaling van het telpatroon:". Dit is standaard op alle oudere patronen totdat ik ze handmatig overzet. Ik heb het inmiddels ook gedaan bij dit patroon.
25.08.2014 - 13:59Dieser Pullover ist wunderschön, aber für welche Kindergröße?? Wäre nett wenn ich eine Antwort bekäme. mfg Doris
24.01.2014 - 22:23DROPS Design answered:
Liebe Doris, Sie sehen oben in der Anleitung ffür welches Alter der Pullover ist - wenn Sie die genauen cm-Angaben möchten, können Sie in der Schnittübersicht nachschauen.
27.01.2014 - 09:44Le modèle est super beau mais je ne peut pas le réaliser car le diagramme n'est pas net surtout le m1 donc impossible pour moi de le réaliser
11.12.2013 - 15:24DROPS Design answered:
Bonjour Mme Ennelin, un nouveau diagramme a été publié, merci. Bon tricot!
18.12.2013 - 10:35Hej: jeg er ved at strikke sommerfuglen med boble,kan ikke finde ud af om der skal være en pind mellem inden man strikker den næste række boble. kan jo ikke lave dem fra vrang siden :)
17.06.2013 - 14:11DROPS Design answered:
Hej Grethe. Du skal ikke strikke en pind i mellem.Du kan godt lave en boble paa vrangsiden, du gör det da spejlvendt. Dvs, du tager ud i en vr maske og strikker 3 m glat over disse (begynder da med vrang) og strikker vr sammen til 1 i den 4. pind.
19.06.2013 - 13:27Hei!Jeg jobber akkurat med den genser og syns at M1 ser man veldig dårlig!Kanskje det skulle være litt større? MvH Marina
07.06.2013 - 12:41