
Popular categories
Looking for a yarn?


|
|||||||||||||
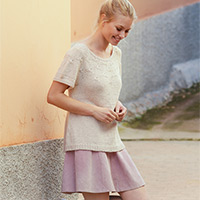
Daisy Fields Cardigan |
|||||||||||||
 |
 |
||||||||||||
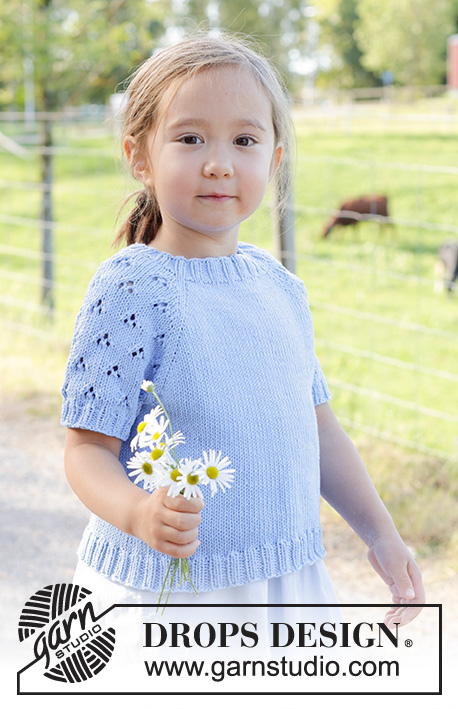
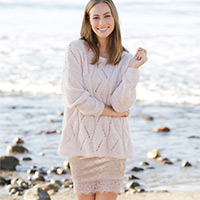
Knitted jacket for children in DROPS Muskat. The piece is worked top down with raglan, lace pattern on the sleeves and I-cord bands. Sizes 2 – 12 years.
DROPS Children 48-2 |
|||||||||||||
|
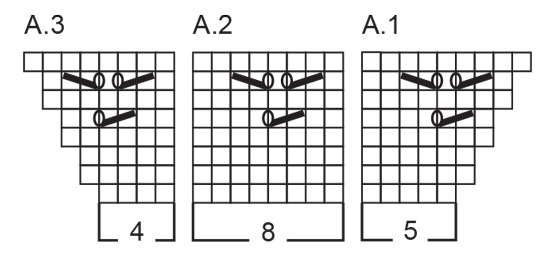
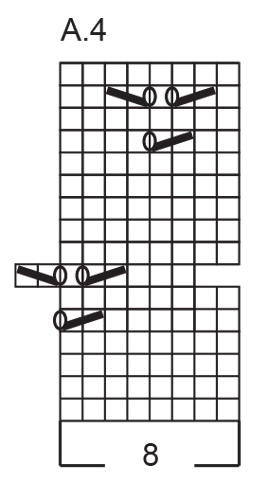
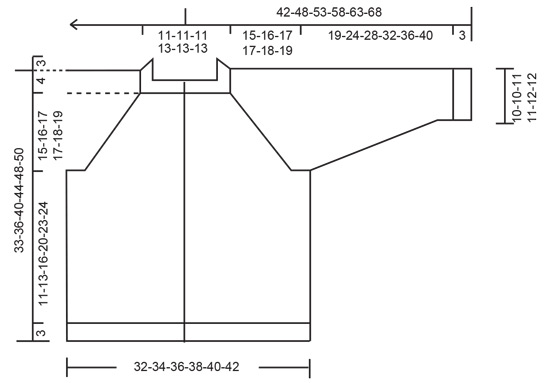
------------------------------------------------------- EXPLANATIONS FOR THE PATTERN: ------------------------------------------------------- GARTER STITCH (worked back and forth): Knit all rows. EDGE STITCHES (I-cord): WORK 2 EDGE STITCHES AT BEGINNING OF ROW: Slip 1 stitch purl-wise with the strand in front, knit 1. WORK 2 EDGE STITCHES AT END OF ROW: Work until there are 2 stitches left on the row, slip 1 stitch purl-wise with the strand in front, knit 1. Repeat at the beginning and end of each row. BUTTONHOLES: Work buttonholes on the right band (when the garment is worn). Work from the right side when there are 4 stitches left on the row as follows: Make 1 yarn over, knit 2 together, 2 edge stitches. On the next row (wrong side), knit the yarn over to leave a hole. The first buttonhole is worked on the first row after the neck. The other 5-5-5-6-6-6 buttonholes are then worked with 5-5½-6½-6-6½-7 cm = 2"-2⅛"-2½"-2⅜"-2½"-2¾" between each one. NOTE: The bottom buttonhole is worked in the transition between the stockinette stitch and rib. PATTERN: See diagrams A.1 to A.4. The diagrams show all rows in the pattern from the right side. RAGLAN: Increase 1 stitch before/after 2 knitted stitches in each transition between body and sleeves. The marker-threads sit between these 2 stitches. Increase 1 stitch by making 1 yarn over, which is purled twisted on the next row to avoid a hole. DECREASE TIP (for sleeves): Decrease 1 stitch on each side of the marker-thread as follows: Work until there are 3 stitches left before the marker-thread, knit 2 together, knit 2 (marker-thread sits between these 2 stitches), slip 1 stitch knit-wise, knit 1 and pass the slipped stitch over the knitted stitch (2 stitches decreased). ------------------------------------------------------- START THE PIECE HERE: ------------------------------------------------------- JACKET – SHORT OVERVIEW OF THE PIECE. The neck and yoke are worked back and forth with circular needle, from mid front and top down. The yoke is divided for body and sleeves and the body continued back and forth with circular needle. The sleeves are worked in the round with double pointed needles. NECK: Cast on 94-94-94-98-98-98 stitches with circular needle size 3 MM = US 2.5 and DROPS Muskat. Purl 1 row from the wrong side. Work as follows from the right side: 2 EDGE STITCHES – read description above, 4 GARTER STITCHES - read description above (= 6 band stitches), * knit 2, purl 2*, work from *-* until there are 8 stitches left, knit 2, work 4 garter stitches and 2 edge stitches (= 6 band stitches). Work this rib for approx. 3 cm = 1⅛", with the next row from the wrong side. YOKE: Change to circular needle size 4 MM = US 6. From the wrong side, insert 4 marker-threads and increase stitches as follows: Work 6 band stitches as before, purl 13-13-13-13-13-13 (front piece), insert 1 marker-thread, purl 16 and increase 3 stitches evenly spaced (sleeve), insert 1 marker-thread, purl 24-24-24-28-28-28 (back piece), insert 1 marker-thread, purl 16 and increase 3 stitches evenly spaced (sleeve), insert 1 marker-thread, purl 13-13-13-13-13-13 (front piece), 6 band stitches as before = 100-100-100-104-104-104 stitches. On the next row (right side) begin to increase for raglan and work diagrams A.1 to A.3 over the sleeve-stitches as follows: - remember the BUTTONHOLES – read description above. NOTE! When A.1 to A.3 is finished in height, work 1 more repeat of A.2 in width between A.1 and A.3. Work 6 band stitches, knit 12-12-12-12-12-12, increase 1 stitch for RAGLAN – read description above, knit 2 (marker-thread sits between these 2 stitches), increase 1 stitch for raglan, work A.1, A.2, A.3, increase 1 stitch for raglan, knit 2 (marker-thread sits between these 2 stitches), increase 1 stitch for raglan, knit 22-22-22-26-26-26, increase 1 stitch for raglan, knit 2 (marker-thread sits between these 2 stitches), increase 1 stitch for raglan, work A.1, A.2, A.3, increase 1 stitch for raglan, knit 2 (marker-thread sits between these 2 stitches), increase 1 stitch for raglan, knit 12-12-12-12-12-12, 6 band stitches. Continue with the bands, stockinette stitch on the front and back pieces, lace pattern on the sleeves and increase for raglan on each side of the 4 marker-threads every 2nd row a total of 9-9-7-8-8-7 times (including the first increase) = 172-172-156-168-168-160 stitches. Continue increasing every 2nd row but every 2nd increase is now only on the front and back pieces (4 increased stitches). I.e., increase on the front and back pieces every 2nd row, on the sleeves every 4th row. Increase like this 10-12-16-14-16-18 times on the front and back pieces (5-6-8-7-8-9 times on the sleeves). NOTE! The increases on the sleeves will not continue as shown in A.1 and A.3 because it is now increased on every 4th row. A.4 shows a repeat of the pattern, make sure it matches the established pattern. REMEMBER THE KNITTING GAUGE! After the last increase there are 232-244-252-252-264-268 stitches; you have increased 19-21-23-22-24-25 times on the front and back pieces and 14-15-15-15-16-16 times on the sleeves. Continue with the bands, stockinette stitch on the front and back pieces and lace pattern on the sleeves, without further increases, until the yoke measures 15-16-17-17-18-19 cm = 6"-6¼"-6¾"-6¾"-7"-7½", from the neck mid-front. Now divide for the body and sleeves as follows: Work the first 38-40-42-41-43-44 stitches as before (front piece), place the next 47-49-49-49-51-51 stitches on 1 thread for the sleeve, cast on 6-6-6-8-8-10 stitches (in side under sleeve), work 62-66-70-72-76-78 stockinette stitches (back piece), place the next 47-49-49-49-51-51 stitches on 1 thread for the sleeve, cast on 6-6-6-8-8-10 stitches (in side under sleeve), work the last 38-40-42-41-43-44 stitches as before (front piece). The body and sleeves are finished separately. The piece is now measured from here. BODY: = 150-158-166-170-178-186 stitches. Continue back and forth with stockinette stitch and 6 band stitches as before on each side. When the body measures 11-13-16-20-23-24 cm = 4⅜"-5⅛"-6¼"-8"-9"-9½" from the division, work 1 row from the right side and increase 16-16-16-20-20-20 stitches evenly spaced (do not increase over the bands) = 166-174-182-190-198-206 stitches. Change to circular needle size 3 MM = US 2.5 and work as follows from the wrong side: 6 band stitches, * purl 2, knit 2 *, work from *-* until there are 8 stitches left, knit 2, 6 band stitches. Continue this rib for 3 cm = 1⅛". Bind off with knit over knit and purl over purl when the piece measures 33-36-40-44-48-50 cm = 13"-14¼"-15¾"-17¼"-19"-19¾" from the shoulder. SLEEVES: Place the 47-49-49-49-51-51 stitches from the thread on the one side of the piece on double pointed needles size 4 MM = US 6 and knit up 1 stitch in each of the 6-6-6-8-8-10 stitches cast on under the sleeve = 53-55-55-57-59-61 stitches. Insert a marker-thread in the middle of the new stitches under the sleeve and allow it to follow your work onwards; it is used when decreasing under the sleeve. Start at the marker-thread and work pattern in the round according to A.4 – the stitches which do not fit into the pattern on each side under the sleeve are knitted. Make sure A.4 matches the established pattern from A.1-A.3. When the sleeve measures 2 cm =¾", decrease 1 stitch on each side of the marker-thread – read DECREASE TIP. Decrease like this every 3-4-5½-6-7-8 cm = 1⅛"-1½"-2⅛"-2⅜"-2¾"-3⅛" a total of 6-6-5-5-5-5 times = 41-43-45-47-49-51 stitches. Continue working until the sleeve measures 19-24-28-32-36-40 cm = 7½"-9½"-11"-12½"-14¼"-15¾" from the division (or to desired length. There is 3 cm = 1⅛" left). Knit 1 round and increase 7-5-7-5-7-5 stitches evenly spaced = 48-48-52-52-56-56 stitches. Change to double pointed needles size 3 MM = US 2.5 and work rib (knit 2, purl 2) for 3 cm = 1⅛". Bind off with rib. The sleeve measures approx. 22-27-31-35-39-43 cm = 8¾"-10⅝"-12¼"-13¾"-15¼"-17" from the division. Work the other sleeve in the same way. ASSEMBLY: Sew the buttons onto the left band. |
|||||||||||||
Diagram explanations |
|||||||||||||
|
|||||||||||||
|
|||||||||||||
|
|||||||||||||
|
|||||||||||||
|
Have you made this or any other of our designs? Tag your pictures in social media with #dropsdesign so we can see them! Do you need help with this pattern?You'll find tutorial videos, a Comments/Questions area and more by visiting the pattern on garnstudio.com. © 1982-2024 DROPS Design A/S. We reserve all rights. This document, including all its sub-sections, has copyrights. Read more about what you can do with our patterns at the bottom of each pattern on our site. |
|||||||||||||

With over 40 years in knitting and crochet design, DROPS Design offers one of the most extensive collections of free patterns on the internet - translated to 17 languages. As of today we count 304 catalogs and 11422 patterns - 11417 of which are translated into English (US/in).
We work hard to bring you the best knitting and crochet have to offer, inspiration and advice as well as great quality yarns at incredible prices! Would you like to use our patterns for other than personal use? You can read what you are allowed to do in the Copyright text at the bottom of all our patterns. Happy crafting!
Comments / Questions (12)
Na rozmiar 134/140 zużyłam ponad 350g włóczki
13.05.2024 - 22:42DROPS Design answered:
Witaj, ta sprawa jest już weryfikowana. Dziękujemy za informację. Pozdrawiamy!
14.05.2024 - 16:26De aangegeven hoeveelheid garen is echt te weinig, heb nu 2 bollen moeten bijbestellen voor maat 122/128 !
10.05.2024 - 16:38Garnmængden på opskriften passer ikke. Er startet på str.
05.05.2024 - 14:54Wykonuje rozmiar 134/140 i próbka jest zgodna. Nawet gdyby nie była, nie potrzebowałabym aż kilku motków wiecej. Widzę, że nie tylko ja mam taki problem.
25.04.2024 - 20:31DROPS Design answered:
Witaj, sprawdzimy to. Bardzo dziękujemy za zwrócenie uwagi na problem. Pozdrawiamy!
26.04.2024 - 08:23Kto wyliczał zapotrzebowanie na włóczke? Jestem dopiero po oddzieleniu oczek na rękawy, a już połowa 3 motka za mna. Ciekawe jak 4 motki mają mi starczyć na cały sweter!!
25.04.2024 - 10:36DROPS Design answered:
Witam, proszę napisać jaki rozmiar Pan/Pani wykonuje i czy wykonana próbka jest zgodna z próbką podaną we wzorze (chodzi mi zarówno o rozmiar drutów jak i liczbę oczek na 10 cm). Pozdrawiam!
25.04.2024 - 12:43Habe die kleinste Größe gestrickt und feststellen müssen, dass die angegebene Menge Garn bei Weitem nicht ausreicht. Statt 3 Knäuel (150 Gramm) habe ich 5 Knäuel (250 Gramm) benötigt, obwohl die Maschenprobe übereingestimmt hat.
19.04.2024 - 16:27Jak zacznę rząd 5. Schematu a4 od 6 oczek prawych, to motyw będzie przesunięty w stosunku do wcześniej wykonanych motywów
12.04.2024 - 10:22DROPS Design answered:
Witaj Aniu, schemat A.4 pokazuje jak motywy są rozmieszczone względem siebie. Zacznij przerabiać schemat tak aby pasował, kieruj się tym jak robótka wygląda i na tej podstawie oblicz sobie ile oczek na początku będzie dżersejem, dalej przerabiaj motywy jak wcześniej. Pozdrawiamy!
15.04.2024 - 13:02I need patterns that start at the base
12.04.2024 - 09:09Johtojen pitsineule on jotenkin sekavasti. Saisinko tarkennuksen miten jatkuu kun olen yhdesti kuvion neulonut
12.04.2024 - 08:27DROPS Design answered:
Hei, mallineule jatkuu kuten aiemmin, mutta neulot piirrosten A.1 ja A.3 mallikertojen välissä 2 piirroksen A.2 mallikertaa näin: A.1, A.2, A.2, A.3.
16.04.2024 - 17:23Rozmiar 134/140
11.04.2024 - 21:48DROPS Design answered:
Witaj Aniu, teraz będziesz musiała patrzeć na schemat A.4, aby dobrze rozmieścić motywy na rękawie. Nowy rząd schematów/motywów wykonujesz co 3-ci rząd (w każdym 3-cim rzędzie) na prawej stronie robótki. Odległość między motywami w rzędzie to 6 oczek w 1-szym rzędzie na prawej stronie i 3 oczka w kolejnym rzędzie na prawej stronie robótki. Możesz używać markerów, aby sobie pomóc rozmieścić motywy. Pozdrawiamy!
12.04.2024 - 08:29