DROPS Muskat
DROPS Muskat
100% Cotton
from 1.85 £ /50g
Get the yarn to make this pattern from 24.05£.

The yarn cost is calculated from the pattern’s smallest size and the yarn’s cheapest product type. Looking for an even better price? You might find it on the DROPS Deals!

DROPS SS24

Proserpina Dress

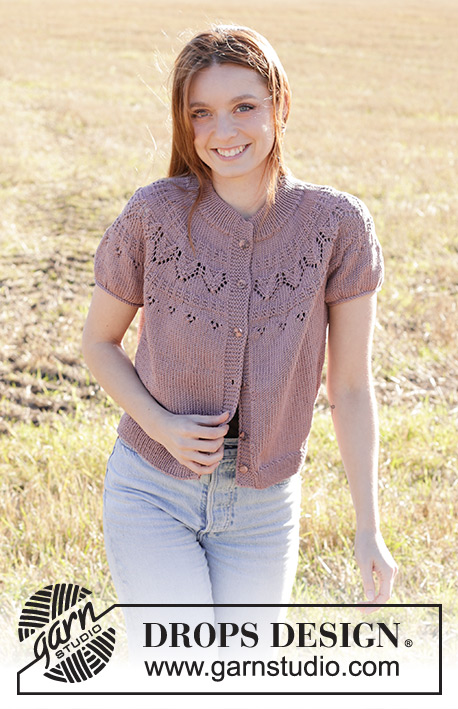
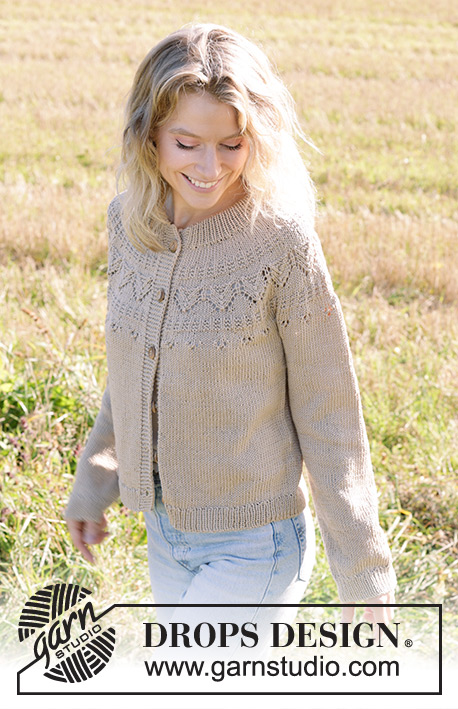
Knitted short-sleeved dress in DROPS Muskat. The piece is worked top down with round yoke, lace pattern and I-cord. Sizes S - XXXL.

DROPS 248-36
DROPS Design: Pattern r-830
Yarn group B
-------------------------------------------------------

SIZES:
S - M - L - XL - XXL - XXXL

YARN:
DROPS MUSKAT from Garnstudio (belongs to yarn group B)
650-700-800-850-950-1050 g colour 81, clay

NEEDLES:
DROPS CIRCULAR NEEDLES SIZE 4 MM: Length 40 cm and 80 cm.
DROPS CIRCULAR NEEDLES SIZE 3 MM: Length 40 cm and 80 cm.
DROPS DOUBLE POINTED NEEDLES SIZE 4 MM.
The technique MAGIC LOOP can be used – you then only need 80 cm circular needle in each size.

KNITTING TENSION:
21 stitches in width and 28 rows in height with stocking stitch = 10 x 10 cm.
NOTE: Needle size is only a guide. If you get too many stitches on 10 cm, change to a larger needle size. If you get too few stitches on 10 cm, change to a smaller needle size.

-------------------------------------------------------

Alternative Yarn – See how to change yarns here
Yarn Groups A to F – Use the same pattern and change the yarn here
Yarn usage using an alternative yarn – Use our yarn converter here

-------------------------------------------------------

DROPS Muskat
DROPS Muskat
100% Cotton
from 1.85 £ /50g
Get the yarn to make this pattern from 24.05£.

The yarn cost is calculated from the pattern’s smallest size and the yarn’s cheapest product type. Looking for an even better price? You might find it on the DROPS Deals!

Pattern instructions

NOTE: This pattern is written in British English. All measurements in charts are in cm. For conversion from cm to inches - click here. There are different terms for crocheting in British and American English. If this pattern includes crochet, click for "crochet terms" here. For this pattern in American English, please click here.
-------------------------------------------------------

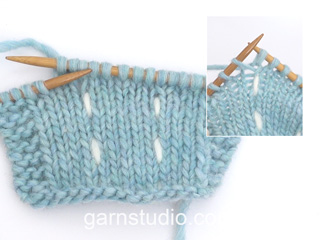
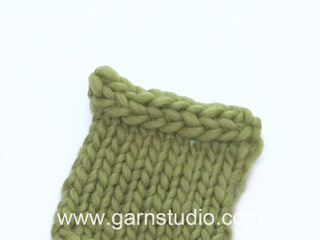
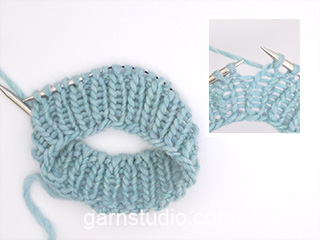
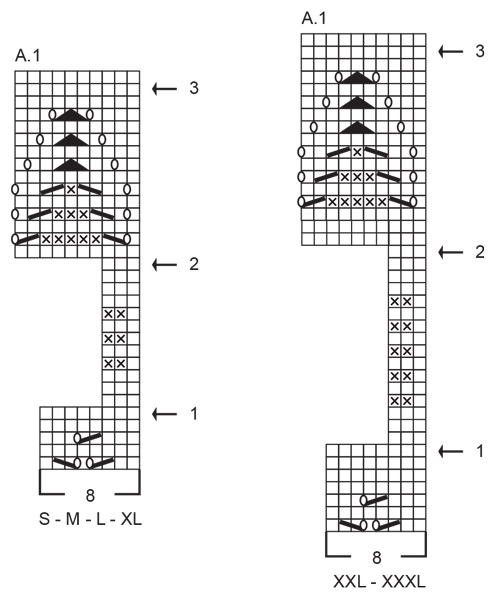
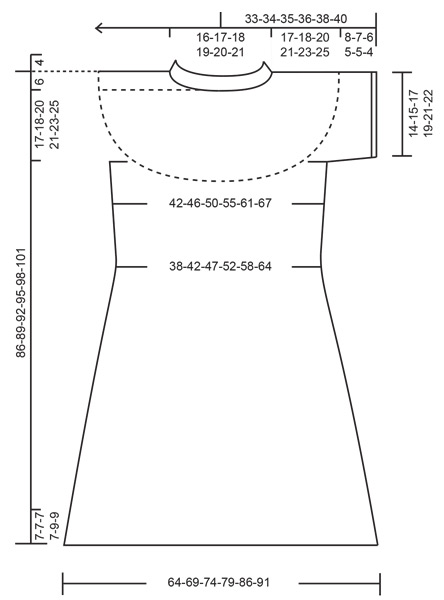
EXPLANATIONS FOR THE PATTERN:

-------------------------------------------------------

PATTERN:
See diagrams A.1 and A.2. Choose diagram for your size.

INCREASE TIP-1 (for round yoke):
To work out how to increase evenly, count the total number of stitches on the needle (e.g., 118 stitches) and divide by the number of increases to be made (e.g., 32) = 3.7.
In this example, increase by making 1 yarn over after approx. each 4th stitch. On the next round work the yarn overs twisted to avoid holes.

INCREASE TIP-2 (for incisions on body):
Increase 1 stitch before marker-threads-1 and 3 and after marker-threads-2 and 4 as follows.
BEFORE MARKER-THREAD:
Work to the marker-thread, knit 1 in the strand of the stitch lying 2 rounds below outermost stitch on the right needle.
AFTER MARKER-THREAD:
Knit 1 in the loop lying around the outermost stitch on the left needle (i.e., stitch from previous round).

INCREASE TIP-3 (for sides of body):
Increase in the same way as described under INCREASE TIP-2, increasing alternately before and after the marker, i.e., 1 stitch increased each time (do not increase on each side of the marker).

DECREASE TIP-1 (for incisions on body):
Decrease 1 stitch after marker-threads-1 and 3 and before marker-threads-2 and 4 as follows.
BEFORE MARKER-THREAD:
Slip 1 stitch knit-wise, knit 1, pass the slipped stitch over the knitted stitch.
AFTER MARKER-THREAD:
Work until there are 2 stitches left before the marker-thread, knit 2 together.

I-CORD:
At the end of the round, after the last stitch has been worked:
Cast on 3 new stitches on right needle from the right side.
Slip the 3 new stitches from the right to the left needle, with the working strand 3 stitches in on the left needle (when working, tighten the strand to form a small tube).
ROW 1 (right side):
Knit 2, knit the next 2 stitches twisted together.
ROW 2 (right side):
Pass the 3 stitches from the right needle onto the left needle, knit 2, knit the next 2 stitches twisted together.
Repeat ROW 2 until there are 3 stitches left on the right needle. Slip the 3 stitches from the right needle onto the left needle. Cast off.
Sew a small stitch to join the beginning and end of the I-cord.

-------------------------------------------------------

START THE PIECE HERE:

-------------------------------------------------------

DRESS - SHORT OVERVIEW OF THE PIECE:
The pattern uses both long and short circular needles; start with the length which fits the number of stitches and change when necessary.
The neck and yoke are worked in the round with circular needle, from mid back and top down. The yoke is divided for body and sleeves and the body is continued in the round. The sleeves are worked in the round.

NECK:
Cast on 118-122-126-130-134-138 stitches with circular needle size 4 mm and DROPS Muskat. Change to circular needle size 3 mm (casting on with a larger needle size gives an elastic cast-on edge). Knit 4 rounds (rolled-edge). Work rib in the round (knit 1, purl 1) for 4 cm. Insert 1 marker at the beginning of the round (mid-back). The yoke is measured from this marker.

YOKE:
Change to circular needle size 4 mm. Knit 1 round and increase 32-34-36-40-44-46 stitches evenly spaced – read INCREASE TIP-1 = 150-156-162-170-178-184 stitches.
Continue with stocking stitch. REMEMBER THE KNITTING TENSION!
When the yoke measures 3-4-5-5-6-7 cm from the marker, increase 34-36-38-46-54-64 stitches evenly spaced – remember INCREASE TIP-1 = 184-192-200-216-232-248 stitches. Work until the yoke measures 4-5-6-6-7-8 cm from the marker.
Now work PATTERN – read description above, with A.1 worked a total of 23-24-25-27-29-31 times on the round. Continue this pattern, AT THE SAME TIME on each round marked with an arrow in A.1, increase as follows – remember INCREASE TIP-1.
Arrow-1: Increase 32-39-46-51-56-58 stitches evenly spaced = 216-231-246-267-288-306 stitches.
Arrow-2: Increase 34-39-44-53-62-64 stitches evenly spaced = 250-270-290-320-350-370 stitches.
Arrow-3: Increase 26-30-38-44-38-50 stitches evenly spaced = 276-300-328-364-388-420 stitches.

When A.1 is finished the yoke measures approx. 15-16-17-17-20-21 cm from the marker.
Continue with stocking stitch until the yoke measures 17-18-20-21-23-25 cm.

Now divide for the body and sleeves: Knit 40-44-48-53-58-64 (half back piece), place the next 58-62-68-76-78-82 stitches on 1 thread for the sleeve, cast on 8-8-10-10-12-12 stitches (in side under sleeve), knit 80-88-96-106-116-128 (front piece), place the next 58-62-68-76-78-82 stitches on 1 thread for the sleeve, cast on 8-8-10-10-12-12 stitches (in side under sleeve), knit the last 40-44-48-53-58-64 stitches (half back piece).
The body and sleeves are finished separately. The piece is now measured from here!

BODY:
= 176-192-212-232-256-280 stitches. Insert 1 marker in each side, in the middle of the 8-8-10-10-12-12 stitches cast on under each sleeve. In addition, insert 4 marker-threads (start by one of the markers): Count 16-19-23-28-33-38 stitches, insert marker-thread-1 before the next stitch, count 56-58-60-60-62-64 stitches, insert marker-thread-2 before the next stitch, count 32-38-46-56-66-76 stitches, insert marker-thread-3 before the next stitch, count 56-58-60-60-62-64 stitches, insert marker-thread-4 before the next stitch. There are 16-19-23-28-33-38 stitches left on the round after marker-thread-4.
Allow the markers and marker-threads to follow your work onwards – they are used when decreasing and increasing.
Start by one marker and work stocking stitch in the round.

When the body measures 3-3-3-4-4-4 cm from the division, decrease 1 stitch after marker-threads-1 and 3 and before marker-threads-2 and 4 – read DECREASE TIP-1 (4 stitches decreased).
Decrease like this every 2½-2½-3-4-4-4 cm a total of 4-4-4-3-3-3 times = 160-176-196-220-244-268 stitches.

When the body measures 16-16-17-17-18-18 cm from the division, increase 1 stitch before marker-threads-1 and 3 and after marker-threads-2 and 4 – read INCREASE TIP-2 (4 increased stitches).
In addition, increase 1 stitch by the markers in each side – read INCREASE TIP-3 (2 stitches increased). A total of 6 increased stitches.
Increase like this every 2-2-2-2½-2-2½ cm a total of 18-19-19-18-19-18 times = 268-290-310-328-358-376 stitches.
Continue with stocking stitch until the body measures 56-58-59-61-60-61 cm from the division. Knit 1 round and increase 2-0-0-2-2-4 stitches evenly spaced = 270-290-310-330-360-380 stitches.
Work A.2, 27-29-31-33-36-38 times around the body. AT THE SAME TIME on the round marked with arrow-4 increase 0-1-2-0-0-1 stitches evenly spaced = 270-291-312-330-360-381 stitches. Cast off. The dress measures approx. 86-89-92-95-98-101 cm from the shoulder.

SLEEVES:
Place the 58-62-68-76-78-82 stitches from the thread on one side of the piece on circular needle/double pointed needles size 4 mm and knit up 1 stitch in each of the 8-8-10-10-12-12 stitches cast-on under the sleeve = 66-70-78-86-90-94 stitches.
Insert 1 marker in the middle of the 8-8-10-10-12-12 stitches under the sleeve.
Start by the marker and work stocking stitch in the round for 7-6-5-4-4-3 cm.
Knit 1 round and decrease 8-8-6-6-2-0 stitches evenly spaced = 58-62-72-80-88-94 stitches. Cast off with I-CORD – read description above.

Diagram

symbols = knit
symbols = purl
symbols = between 2 stitches make 1 yarn over, which is knitted on the next round (= hole)
symbols = knit 2 together
symbols = slip 1 stitch knit-wise, knit 1, pass the slipped stitch over the knitted stitch
symbols = slip 1 stitch knit-wise, knit 2 together, pass the slipped stitch over the knitted-together stitches
symbols = increase round
diagram
diagram
diagram

Each of our patterns has specific tutorial videos to help you.

Do you have a question? See a list of frequently asked questions (FAQ)

Knitting tension is what determines the final measurements of your work, and is usually measured per 10 x 10 cm. It is provided like so: number of stitches in width x number of rows in height - eg: 19 stitches x 26 rows = 10 x 10 cm.

The knitting tension is very individual; some people knit/crochet loosely while others work tightly. You adjust the knitting tension with the needle size, which is why the suggested needle size is only meant as a guide! You need to adjust this (up or down) to ensure that YOUR knitting tension matches the knitting tension provided in the pattern. If you work with a different knitting tension than provided you will have a different yarn consumption, and your work will have different measurements than what the pattern suggests.

The knitting tension also determines which yarns can replace each other. As long as you achieve the same knitting tension you can replace one yarn with another.

See DROPS lesson: How to measure your tension/gauge

See DROPS video: How to make a gauge tension swatch

The required amount of yarn is provided in grams, eg: 450 g. To calculate how many balls you’ll need you first need to know how many grams are in 1 ball (25g, 50g or 100g). This information is available if you click on the individual yarn quality on our pages. Divide the amount required with the amount of each ball. For example, if each ball is 50g (the most common amount), the calculation will be as follows: 450 / 50 = 9 balls.

The important thing when changing from one yarn to another is that the knitting/crochet tension remains the same. This is so that the measurements of the finished piece will be the same as on the sketch provided. It is easier to achieve the same knitting tension using yarns from the same yarn group. It is also possible to work with multiple strands of a thinner yarn to achieve the knitting tension of a thicker one. Please try our yarn converter. We recommend you to always work a test swatch.

Please NOTE: when changing yarn the garment might have a different look and feel to the garment in the photo, due to individual properties and qualities of each yarn.

See DROPS lesson: Can I use a different yarn than the one mentioned in the pattern?

All our yarns are categorised into yarn groups (from A to F) according to thickness and knitting tension – group A contains the thinnest yarns and group F the thickest. This makes it easier for you to find alternative yarns to our patterns, should you wish to switch yarn. All yarns within the same group have a similar knitting tension and can easily replace each other. However, different yarn qualities have different structures and properties which will give the finished work a unique look and feel.

Click here for an overview of the yarns in each yarn group

At the top of all our patterns you’ll find a link to our yarn calculator, which is a helpful tool should you wish to use a different yarn than suggested. By filling in the yarn quality you wish to replace, the amount (in your size) and number of strands, the calculator will present good alternative yarns with the same knitting tension. Additionally it will tell you how much you’ll require in the new qualities and whether you’ll need to work with multiple strands. Most skeins are 50g (some are 25g or 100g).

If the pattern is worked with multiple colours, every colour will have to be calculated separately. Similarly, if the pattern is worked with several strands of different yarns (for example 1 strand Alpaca and 1 strand Kid-Silk) you will have to find alternatives for each, individually.

Click here to see our yarn calculator

Since different yarns have different qualities and textures we have chosen to keep the original yarn in our patterns. However, you can easily find options among our available qualities by using our yarn calculator, or simply pick a yarn from the same yarn group.

It is possible that some retailers still have discontinued yarns in stock, or that someone has a few skeins at home that they would like to find patterns for.

The yarn calculator will provide both alternative yarn as well as required amount in the new quality.

If you think it's hard to decide what size to make, it can be a good idea to measure a garment you own already and like the size of. Then you can pick the size by comparing those measures with the ones available in the pattern's size chart.

You'll find the size chart at the bottom of the pattern.

See DROPS lesson: How to read size chart

The needle size provided in the pattern serves only as a guide, the important thing is to follow the knitting tension. And since knitting tension is very individual, you will have to adjust the needle size to ensure that YOUR tension is the same as in the pattern – maybe you’ll have to adjust 1, or even 2 needle sizes, up or down to achieve the correct tension. For this, we recommend that you work test swatches.

Should you work with a different knitting tension than the one provided, the measurements of the finished garment might deviate from the measurement sketch.

See DROPS lesson: How to measure your tension/gauge

See DROPS video: How to make a tension/gauge swatch

Working a garment top-down provides more flexibility and room for personal adjustment. For example it is easier to try the garment on while working, as well as making adjustments to length of yoke and shoulder caps.

The instructions are carefully explaining every step, in the correct order. Diagrams are adjusted to the knitting direction and are worked as usual.

The diagram depicts all rows/rounds, and every stitch seen from the right side. It is read from bottom to top, from right to left. 1 square = 1 stitch.

When working back and forth, every other row is worked from the right side and every other row is worked from the wrong side. When working from the wrong side, the diagram will have to be worked reversed: from left to right, knit stitches are purled, purl stitches are knit etc.

When working in the round every round is worked from the right side and the diagram are worked from right to left on all rounds.

See DROPS lesson: How to read knitting diagrams

The diagram depicts all rows/rounds, and every stitch seen from the right side. It is worked from bottom to top, from right to left.

When working back and forth every other row is worked from the right side: from right to left and every other row is worked from the wrong side: from left to right.

When working in the round, every row in the diagram are worked from the right side, from right to left.

When working a circular diagram you start in the middle and work your way outwards, counter clockwise, row by row.

The rows usually start with a given number of chain stitches (equivalent to the height of the following stitch), this will either be depicted in the diagram or explained in the pattern.

See DROPS lesson: How to read crochet diagrams

Instructions for working several diagrams after each other on the same row/round, will often be written like so: “work A.1, A.2, A.3 a total of 0-0-2-3-4 times". This means you work A.1 once, then A.2 is worked once, and A.3 is repeated (in width) the number of times provided for your size – in this case like so: S = 0 times, M = 0 times, L=2 times, XL= 3 times and XXL = 4 times.

The diagrams are worked as usual: begin with the first row in A.1, then work the first row in A.2 etc.

See DROPS lesson: How to read knitting diagrams

See DROPS lesson: How to read crochet diagrams

The total width of the garment (from wrist-to-wrist) will be larger in the larger sizes, despite the actual sleeves being shorter. The larger sizes have longer sleeve caps and wider shoulders, so there will be a good fit in all sizes.

The measurement sketch/schematic drawing provides information regarding the full length of the garment. If it’s a jumper or a jacket the length is measured from the highest point on the shoulder closest to the neckline, and straight down to the bottom of the garment. It is NOT measured from the tip of shoulder. Similarly, the length of yoke is measured from the highest point on the shoulder and down to where yoke is split into body and sleeves.

On a jacket measures are never taken along bands, unless specifically stated. Always measure inside band stitches when measuring the length.

See DROPS lesson: How to read a schematic drawing

Diagrams are often repeated on the round or in height. 1 repeat is the diagram the way it appears in the pattern. If it says to work 5 repeats of A.1 in the round, then you work A.1 a total of 5 times after/next to each other in the round. If it says to work 2 repeats of A.1 vertically/in height you work the entire diagram once, then begin again at the start and work the entire diagram one more time.

Chain stitches are slightly narrower than other stitches and to avoid working the cast-on edge too tight, we simply chain more stitches to begin with. The stitch count will be adjusted on the following row to fit the pattern and measurement sketch.

The rib edge is more elastic and will contract slightly compared to, for example, stocking stitch. By increasing before the rib edge, you avoid a visible difference in width between the rib edge and the rest of the body.

It’s very easy to cast off too tightly, and by making yarn overs while casting off (and simultaneously casting these off) you avoid a too tight cast off edge.

See DROPS video: How to bind off with yarn overs (yo)

To achieve an even increase (or decrease) you can increase on, for example: every 3rd and 4th row alternately, like so: work 2 rows and increase on the 3rd row, work 3 rows and increase on the 4th. Repeat this until the increase is complete.

See DROPS lesson: Increase or decrease 1 st on every 3rd and 4th row alternately

Should you prefer to work in the round instead of back and forth, you may of course adjust the pattern. You’ll need to add steeks mid-front (usually 5 stitches), and follow the instructions. When you would normally turn and work from the wrong side, simply work across the steek and continue in the round. At the end you’ll cut the piece open, pick up stitches to work bands, and cover the cut edges.

See DROPS video: How to knit steeks and cut open

Should you prefer to work back and forth instead of in the round, you may of course adjust the pattern so you work the pieces separately and then assemble them at the end. Divide the stitches for the body in 2, add 1 edge stitch in each side (for sewing) and work the front and back pieces separately.

See DROPS lesson: Can I adapt a pattern for circular needles into straight needles?

Pattern repeats can vary slightly in the different sizes, in order to get the correct proportions. If you’re not working the exact same size as the garment in the photo, yours might deviate slightly. This has been carefully developed and adjusted so that the complete impression of the garment is the same in all sizes.

Make sure to follow instructions and diagrams for your size!

If you have found a pattern you like which is available in women’s size it’s not very difficult to convert it to men’s size. The biggest difference will be the length of sleeves and body. Start working on the women size that you think would fit across the chest. The additional length will be worked right before you cast off for the armhole/sleeve cap. If the pattern is worked top-down you can add the length right after the armhole or before the first decrease on sleeve.

Regarding additional yarn amount, this will depend on how much length you add, but it is better with a skein too many than too few.

All yarns will have excess fibres (from production) that might come off as lint or shedding. Brushed yarns (ie hairier yarns) have more of these loose, excess fibres, causing more shedding.

Shedding also depends on what is worn under or over the garment, and whether this pulls at the yarn fibres. It’s therefore not possible to guarantee that there will be no shedding

Below are some tips on how to get the best result when working with hairier yarns:

1. When the garment is finished (before you wash it) shake it vigorously so the looser hairs come off. NOTE: do NOT use a lint roller, brush or any method that pulls at the yarn.

2. Place the garment in a plastic bag and put it in your freezer - the temperature will cause the fibres to become less attached to each other, and excess fibres will come off easier.

3. Leave in the freezer for a few hours before taking it out and shaking it again.

4. Wash the garment according to the instructions on the yarn label.

Pilling is a natural process that happens to even the most exclusive of fibers. It's a natural sign of wear and tear that is hard to avoid, and that is most visible in high friction areas of your garment like a sweater's arms and cuffs.

You can make your garment look as new by removing the pilling, using a fabric comb or a pill/lint remover.

Still can't find the answer you need? Then scroll down and leave your question so one of our experts can try to help you. This will be done normally within 5 to 10 working days.
In the meantime, you can read the questions and answers that others have left to this pattern or join the DROPS Workshop on Facebook to get help from fellow knitters/crocheters!

You might also like...

Post a comment to pattern DROPS 248-36

We would love to hear what you have to say about this pattern!

If you want to leave a question, please make sure you select the correct category in the form below, to speed up the answering process. Required fields are marked *.

Comments / Questions (14)

country flag Fiorella wrote:

Buongiorno Sto eseguendo questo vestito e volevo segnalarvi un errore nella descrizione. "quando il corpo misura 16 cm dalla divisione, DIMINUIRE (invece ci sono gli aumenti)

22.04.2024 - 12:20

country flag Anna wrote:

Varför syns inte diagrammen i det svenska mönstret?

13.04.2024 - 18:20

DROPS Design answered:

Hei Anna. Her manglet det et ord i diagramteksten, så derfor vistes ikke diagrammene. Det er nå ordnet. Tusen takk for at du informerte oss :) mvh DROPS Design

15.04.2024 - 13:48

country flag Fredrik wrote:

Hvordan er denne i S på noen som vanligvis bruker XS? Er den liten i størrelsen?

24.03.2024 - 18:59

DROPS Design answered:

Hej Fredrik, du finder måleskitsen på kjolen nederst i opskriften. Hvis du overholder strikkefastheden får du målene i måleskitsen :)

03.04.2024 - 15:26

country flag Fiorella wrote:

Buongiorno vorrei realizzare questo vestito per mia figlia, mi piace molto anche il colore, per non sbagliare vorrei chiedervi una conferma : nella descrizione vedo n. 81 gesso ma io trovo che n. 81 corrisponde a argilla, è questo? Grazie

20.03.2024 - 08:21

DROPS Design answered:

Buonasera Fiorella, abbiamo corretto il nome del colore: è il colore 81 di Muskat, argilla. Buon lavoro!

20.03.2024 - 18:28

country flag Karin wrote:

Scent of roses

21.01.2024 - 18:26

country flag Fernanda Kazic wrote:

Smultrondress!

20.01.2024 - 22:13

country flag Inga Heafey wrote:

Rambling Rose,

20.01.2024 - 18:53

country flag Sara wrote:

Cherry dress

20.01.2024 - 10:08

country flag Knitter wrote:

Summer flowers

19.01.2024 - 21:47

country flag Mariana wrote:

Rose hip

19.01.2024 - 20:01