
Popular categories
Looking for a yarn?


|
|||||||
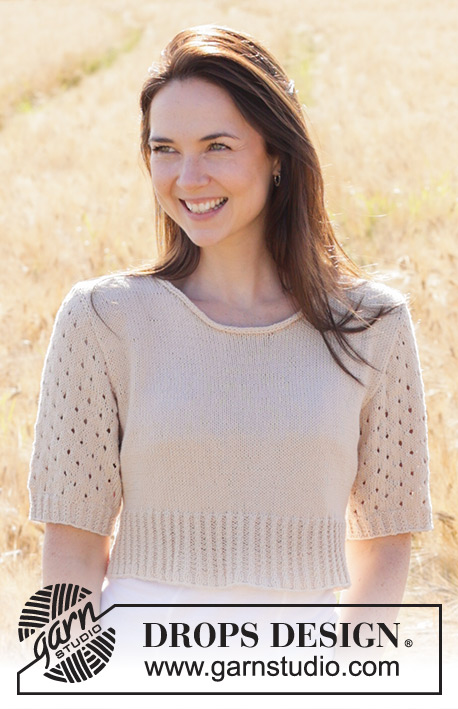
Dandelion Heart Cardigan |
|||||||
 |
 |
||||||
Knitted short-sleeved jacket in DROPS Belle. The piece is worked top down with raglan, relief-pattern and I-cord. Sizes S - XXXL.
DROPS 249-20 |
|||||||
|
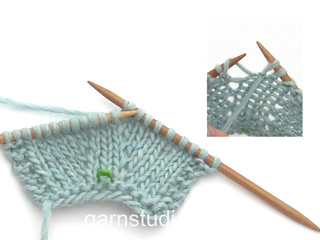
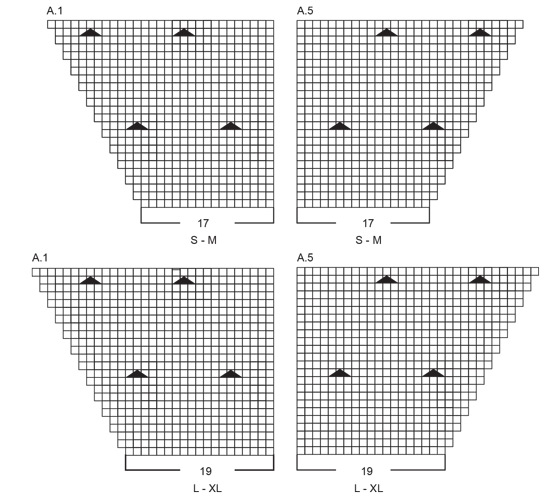
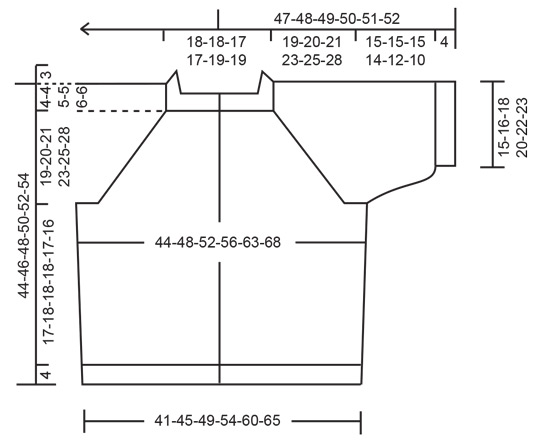
------------------------------------------------------- EXPLANATIONS FOR THE PATTERN: ------------------------------------------------------- GARTER STITCH (worked back and forth): Knit all rows. 1 ridge = knit 2 rows. BANDS WITH I-CORD: START OF ROW: Work the band as follows: Slip 1 stitch purl-wise, with yarn in front, knit 1, work 6 garter stitches. END OF ROW: Work the band as follows: Work until there are 8 stitches left on the row, work 6 garter stitches, slip 1 stitch purl-wise with yarn in front, knit 1. Work in the same way from both the right and wrong side. PATTERN: See diagrams A.1 to A.5. Choose diagram for your size. The diagrams show all rows in the pattern from the right side. RAGLAN: All increases are worked from the right side! Increase 1 stitch before/after 2 knitted stitches in each transition between body and sleeves (marker-thread sits between these 2 stitches). Increase 1 stitch by making 1 yarn over, which is worked twisted on the next row as follows. Then work the new stitches into the pattern on the front and back pieces and in stocking stitch on the sleeves. BEFORE MARKER-THREAD: Purl the back loop. No hole. AFTER MARKER-THREAD: Slip the yarn-over off the left needle and replace it the other way round (insert the left needle through the back when replacing it). Purl the front loop. No hole. DECREASE TIP-1 (for sides of body): Decrease 1 stitch on each side of the marker-thread: Start 4 stitches before the marker-thread, knit 2 together, work 4 stocking stitches (marker-thread sits between these 4 stitches), slip 1 stitch knit-wise, knit 1, pass the slipped stitch over the knitted stitch (2 decreased stitches). DECREASE TIP-2 (mid-under sleeve): Decrease 1 stitch on each side of the marker-thread as follows: Work until there are 3 stitches left before the marker-thread, knit 2 together, knit 2 (marker thread sits between these 2 stitches) slip 1 stitch knit-wise, knit 1, pass the slipped stitch over the knitted stitch (= 2 stitches decreased). BUTTONHOLES: Work buttonholes on the right band (when the garment is worn). Work from the right side when there are 5 stitches left on the row as follows: Make 1 yarn over, knit 2 together, knit 1, slip 1 stitch purl-wise with the strand in front, knit 1. On the next row (wrong side), knit the yarn over to leave a hole. The first buttonhole is worked on the first row after the neck. The other 4-4-5-5-5-5 buttonholes are then worked with approx. 9-9½-8-8-8½-9 cm between each one. The bottom buttonhole is worked in the transition between the stocking stitch and rib. ------------------------------------------------------- START THE PIECE HERE: ------------------------------------------------------- JACKET – SHORT OVERVIEW OF THE PIECE. The pattern uses both long and short circular needles; start with the length which fits the number of stitches and change when necessary. The neck and yoke are worked back and forth with circular needle, from mid front and top down. The yoke is divided for body and sleeves and the body continued back and forth with circular needle, while the sleeves wait. The sleeves are worked in the round, top down. NECK: Cast on 126-126-130-130-146-146 stitches with circular needle size 3 mm and DROPS Belle. Purl 1 row from the wrong side. Work as follows from the right side: 8 stitches according to BANDS WITH I-CORD – read above, * knit 2, purl 2 *, work from *-* until there are 10 stitches left, knit 2 and 8 stitches according to bands with I-cord. Continue this rib for 3 cm. Insert 1 marker inside the band. The yoke is measured from here. YOKE: Change to circular needle size 4 mm. Insert 4 marker-threads while working from the right side as follows: Work 8 band stitches as before, 17-17-17-17-21-21 stocking stitches and increase 1-1-3-3-1-1 stitches evenly spaced, insert 1 marker-thread before the next stitch (left front piece), work 20-20-20-20-24-24 stocking stitches and increase 0-0-2-2-2-2 stitches evenly spaced, insert 1 marker-thread before the next stitch (sleeve), work 36-36-40-40-40-40 stocking stitches and increase 1-1-1-1-3-3 stitches evenly spaced, insert 1 marker-thread before the next stitch (back piece), work 20-20-20-20-24-24 stocking stitches and increase 0-0-2-2-2-2 stitches evenly spaced, insert 1 marker-thread before the next stitch (sleeve), work 17-17-17-17-21-21 stocking stitches and increase 1-1-3-3-1-1 stitches evenly spaced, 8 band stitches as before (right front piece) – remember the BUTTONHOLES on the right band – read description above = 129-129-141-141-155-155 stitches. Each marker-thread sits between 2 knitted stitches from the rib (seen from the right side). Purl back from the wrong side with the 8 band stitches on each side worked as before. Now work PATTERN and increase for RAGLAN – read description above, i.e., work as follows from the right side: 8 band stitches as before, work A.1, increase for raglan on each side of the marker-thread (i.e., each side of 2 stocking stitches), work 18-18-20-20-24-24 stocking stitches (sleeve), increase for raglan on each side of the marker-thread, work A.2, A.3, A.4, increase for raglan on each side of the marker-thread, work 18-18-20-20-24-24 stocking stitches (sleeve), increase for raglan on each side of the marker-thread, work A.5, finish with 8 band stitches as before = 137-137-149-149-163-163 stitches. REMEMBER THE KNITTING TENSION! Continue this pattern back and forth, with A.1/A.5 on the front pieces, A.2/A.3/A.4 on the back piece, stocking stitch on the sleeves and 8 band stitches as before on each side. In addition, continue to increase for raglan on each side of all 4 marker-threads every 2nd row (each row from the right side) a total of 20-23-26-27-21-17 times, including the first increase = 289-313-349-357-323-291 stitches. NOTE: When the diagrams are finished in height, repeat them - making sure they are neatly above each other. Continue increasing for raglan, but every 2nd increase is only on the front and back pieces, i.e., increase on the front and back pieces every 2nd row and on the sleeves every 4th row (alternately 4 and 8 increased stitches). Increase like this 4-4-2-4-14-22 times on the front and back pieces (2-2-1-2-7-11 times on the sleeves). After the last increase there are 313-337-361-381-407-423 stitches and the yoke measures approx. 17-19-20-22-25-28 cm from the marker. In sizes XXL and XXXL The yoke is finished. In sizes S, M, L and XL continue working without further increases until the yoke measures 19-20-21-23 cm. Now divide for the body and sleeves: Work 51-54-57-60-66-70 stitches as before (front piece), place the next 62-68-74-78-80-80 stitches on 1 thread for the sleeve, cast on 6-8-10-14-16-20 stitches (in side under sleeve), work 87-93-99-105-115-123 stitches (back piece), place the next 62-68-74-78-80-80 stitches on 1 thread for the sleeve, cast on 6-8-10-14-16-20 stitches (in side under sleeve), work the last 51-54-57-60-66-70 stitches as before (front piece). The body and sleeves are finished separately. The piece is now measured from here! BODY: = 201-217-233-253-279-303 stitches. Insert 1 marker-thread 54-58-62-67-74-80 stitches in from each side, with 93-101-109-119-131-143 stitches between the marker-threads on the back piece. Allow the marker-threads to follow your work onwards – they are used when decreasing each side. Continue the pattern on the front and back pieces as far as possible under the sleeves, working the stitches which don’t fit into the pattern in stocking stitch. When the body measures 4 cm from the division, decrease 2 stitches on each side – read DECREASE TIP-1. Decrease like this every 4 cm a total of 3 times = 189-205-221-241-267-291 stitches (stitches which don’t fit into the pattern under sleeves are worked in stocking stitch). Work until the body measures 17-18-18-18-17-16 cm from the division. Knit 1 row from the right side and increase 17-21-21-25-27-27 stitches evenly spaced (bands worked as before and do not increase over the bands) = 206-226-242-266-294-318 stitches. Change to circular needle size 3 mm. Work as follows from the wrong side: 8 band stitches as before, * purl 2, knit 2 *, work from *-* until there are 10 stitches left, purl 2, 8 band stitches as before. Continue this rib for 4 cm. Cast off. The jacket measures approx. 44-46-48-50-52-54 cm from the shoulder. SLEEVES: Place the 62-68-74-78-80-80 stitches from the thread on one side of the piece on circular needle/double pointed needles size 4 mm and knit up 1 stitch in each of the 6-8-10-14-16-20 stitches cast-on under the sleeve = 68-76-84-92-96-100 stitches. Insert 1 marker-thread in the middle of the 6-8-10-14-16-20 stitches under the sleeve. Start by the marker-thread and work stocking stitch in the round. When the sleeve measures 2 cm from the division, decrease 2 stitches under the sleeve – read DECREASE TIP-2. Repeat the decrease when the sleeve measures 4 cm = 64-72-80-88-92-96 stitches. Work until the sleeve measures 15-15-15-14-12-10 cm from the division. There is 4 cm left. Try the jacket on and work to desired length before the rib. Knit 1 round and decrease 0-4-4-4-0-0 stitches evenly spaced = 64-68-76-84-92-96 stitches. Change to double pointed needles size 3 mm. Work rib (knit 2, purl 2) for 4 cm. Cast off a little loosely. The sleeve measures approx. 19-19-19-18-16-14 cm from the division. ASSEMBLY: Sew the buttons onto the left band. |
|||||||
Diagram explanations |
|||||||
|
|||||||
|
|||||||

|
|||||||

|
|||||||
|
|||||||
|
Have you made this or any other of our designs? Tag your pictures in social media with #dropsdesign so we can see them! Do you need help with this pattern?You'll find tutorial videos, a Comments/Questions area and more by visiting the pattern on garnstudio.com. © 1982-2024 DROPS Design A/S. We reserve all rights. This document, including all its sub-sections, has copyrights. Read more about what you can do with our patterns at the bottom of each pattern on our site. |
|||||||


With over 40 years in knitting and crochet design, DROPS Design offers one of the most extensive collections of free patterns on the internet - translated to 17 languages. As of today we count 304 catalogues and 11422 patterns - 11422 of which are translated into English (UK/cm).
We work hard to bring you the best knitting and crochet have to offer, inspiration and advice as well as great quality yarns at incredible prices! Would you like to use our patterns for other than personal use? You can read what you are allowed to do in the Copyright text at the bottom of all our patterns. Happy crafting!
Comments / Questions (16)
Kan bare ikke forstå det med i-cord..... der står "strik 1 maske ret, og 6 maske retstrik." Ovenpå står der "retstrik: strik ret på hver pind" Kan ikke forstå hvordan det skal strikkes.....
23.04.2024 - 07:00DROPS Design answered:
Hej Moira, prøv at se om du ikke kan finde en video som beskriver det du bliver usikker på: I-cord
23.04.2024 - 15:26Tolle Jacke und die Wolle dazu liegt auch schon vor mir. Leider verstehe ich die Anleitung zu der i-Cord Blende nicht. Ich hebe links ab, habe dann quasi 2 Fäden bei dieser Masche auf der Nadel. Wie stricke ich das in der Rückreihe? Gibt es dazu vielleicht ein Video bei Drops?
19.04.2024 - 12:36DROPS Design answered:
Liebe Ulli, in diesem Video zeigen wir, wie diese beiden Maschen am Anfang / am Ende der Reihe gestrickt werden (nun nehmen Sie hier keine Maschen zu wie im Video). Viel Spaß beim Stricken!
19.04.2024 - 14:53Ljuvlig! Nostalgisk sommarfeeling.
20.01.2024 - 13:25Vintage Hues
20.01.2024 - 09:55Bouton d'Or (=Gold Button=>buttercup)
19.01.2024 - 17:18Wildflower
19.01.2024 - 13:56Daisy-Mae
19.01.2024 - 06:22Wattle
18.01.2024 - 21:50Colour reminds me of Wattle flowers
18.01.2024 - 21:49Vanilla Dream
18.01.2024 - 19:56