DROPS Alpaca
DROPS Alpaca
100% Alpaca
from 3.40 £ /50g
DROPS Brushed Alpaca Silk
77% Alpaca, 23% Silk
from 2.90 £ /25g
Get the yarn to make this pattern from 28.60£.

The yarn cost is calculated from the pattern’s smallest size and the yarn’s cheapest product type. Looking for an even better price? You might find it on the DROPS Deals!

DROPS SS24

Sommervind

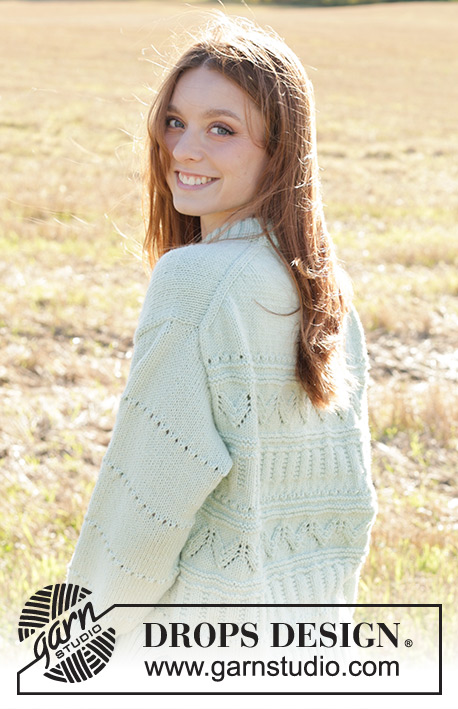
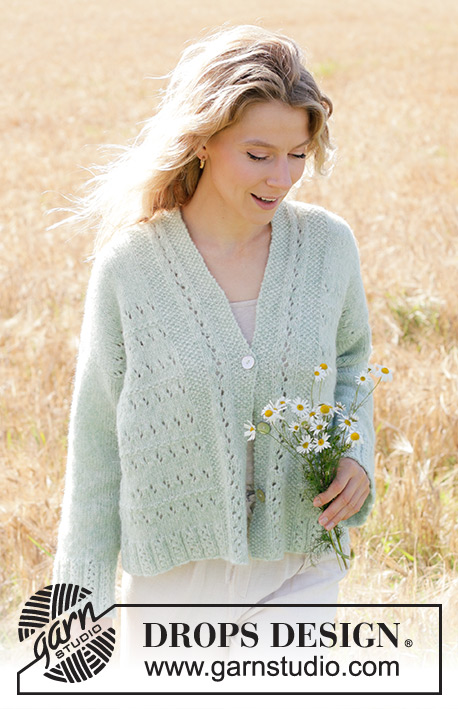
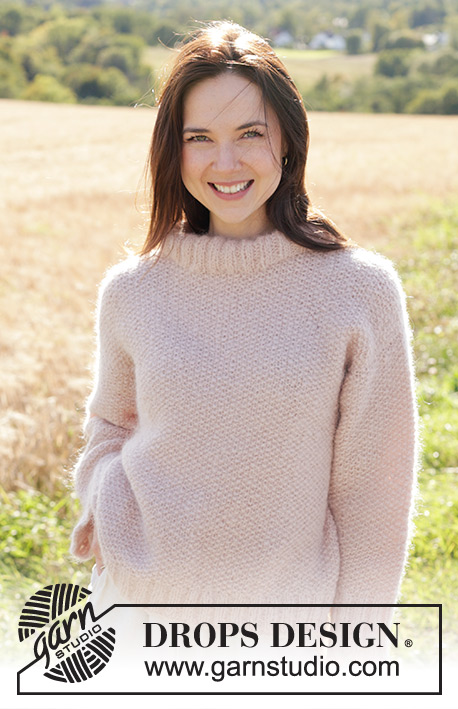
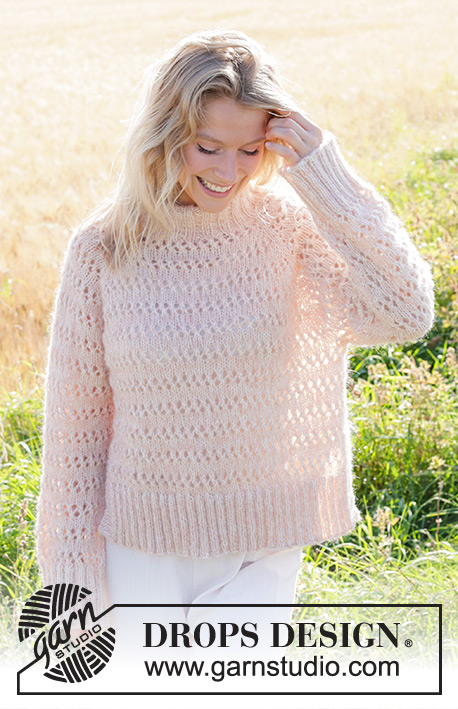
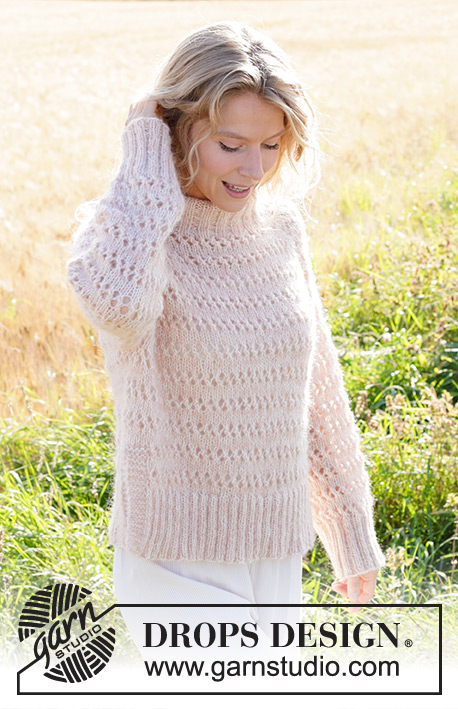
Knitted jumper in DROPS Alpaca and DROPS Brushed Alpaca Silk. The piece is worked top down with raglan, double neck, lace pattern and split in sides. Sizes S - XXXL.

DROPS 248-15
DROPS Design: Pattern z-1019
Yarn group A + C
-------------------------------------------------------

SIZES:
S - M - L - XL - XXL - XXXL

YARN:
DROPS ALPACA from Garnstudio (belongs to yarn group A)
250-250-300-300-350-350 g colour 100, off white
And use:
DROPS BRUSHED ALPACA SILK fra Garnstudio (belongs to yarn group C)
150-150-175-175-200-225 g colour 20, pink sand

NEEDLES:
DROPS CIRCULAR NEEDLES SIZE 5.5 MM: Length 40 cm and 80 cm.
DROPS CIRCULAR NEEDLES SIZE 4.5 MM: Length 40 cm and 80 cm.
DROPS DOUBLE POINTED NEEDLES SIZE 5.5 MM.
DROPS DOUBLE POINTED NEEDLES SIZE 4.5 MM.
The technique MAGIC LOOP can be used – you then only need 80 cm circular needle in each size.

KNITTING TENSION:
13 stitches in width and 17 rows in height with stocking stitch and 1 strand of each quality (2 strands) = 10 x 10 cm.
13 stitches in width and 22 rows in height with lace pattern (A.2) = 10 x 10 cm.
NOTE: Needle size is only a guide. If you get too many stitches on 10 cm, change to a larger needle size. If you get too few stitches on 10 cm, change to a smaller needle size.

-------------------------------------------------------

Alternative Yarn – See how to change yarns here
Yarn Groups A to F – Use the same pattern and change the yarn here
Yarn usage using an alternative yarn – Use our yarn converter here

-------------------------------------------------------

DROPS Alpaca
DROPS Alpaca
100% Alpaca
from 3.40 £ /50g
DROPS Brushed Alpaca Silk
77% Alpaca, 23% Silk
from 2.90 £ /25g
Get the yarn to make this pattern from 28.60£.

The yarn cost is calculated from the pattern’s smallest size and the yarn’s cheapest product type. Looking for an even better price? You might find it on the DROPS Deals!

Pattern instructions

NOTE: This pattern is written in British English. All measurements in charts are in cm. For conversion from cm to inches - click here. There are different terms for crocheting in British and American English. If this pattern includes crochet, click for "crochet terms" here. For this pattern in American English, please click here.
-------------------------------------------------------

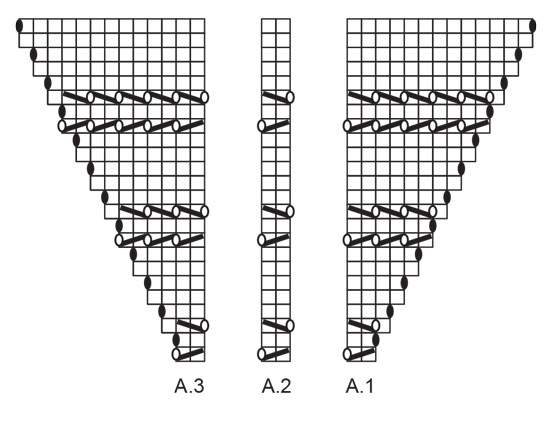
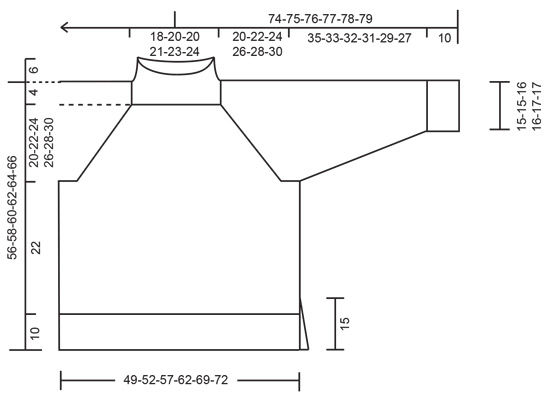
EXPLANATIONS FOR THE PATTERN:
-------------------------------------------------------
GARTER STITCH (worked in the round):
1 ridge = 2 rounds, i.e., knit 1 round and purl 1 round.

GARTER STITCH (worked back and forth):
Knit all rows.

PATTERN:
See diagrams A.1 to A.3. The diagrams show all rows in the pattern from the right side.

DECREASE TIP (for sleeves):
Decrease 1 stitch on each side of the marker-thread as follows: Work until there are 3 stitches left before the marker-thread, knit 2 together, knit 2 (marker-thread sits between these 2 stitches), slip 1 stitch knit-wise, knit 1 and pass the slipped stitch over the knitted stitch.

-------------------------------------------------------

START THE PIECE HERE:

-------------------------------------------------------

JUMPER – SHORT OVERVIEW OF THE PIECE:
The pattern uses both short and long circular needles; start with the length which fits the number of stitches and change when necessary.
The neck and yoke are worked in the round with circular needle, from the transition between the back piece and right sleeve and top down. When the yoke is finished, divide stitches into body and sleeves and the body is continued in the round, while the sleeves wait. Body is divided for splits and worked separately back and forth. The sleeves are then worked in the round, top down.

DOUBLE NECK:
Cast on 84-88-88-96-100-104 stitches with circular needle size 5.5 mm, 1 strand DROPS Alpaca and 1 strand DROPS Brushed Alpaca Silk. Change to circular needle size 4.5 mm (casting on with a larger needle makes the cast-on edge elastic). Work rib in the round (knit 2, purl 2) for 13 cm. The neck is later folded double to approx. 6 cm.

YOKE:
Change to circular needle size 5.5 mm. Knit 1 round and decrease 16-16-16-20-20-20 stitches evenly spaced = 68-72-72-76-80-84 stitches. Insert 1 marker; the yoke is measured from here.
Insert 4 marker-threads, without working the stitches as follows: Insert 1 marker-thread at the beginning of the round, count 10 stitches (sleeve), insert 1 marker-thread, count 24-26-26-28-30-32 stitches (front piece), insert 1 marker-thread, count 10 stitches (sleeve), insert 1 marker-thread, there are 24-26-26-28-30-32 stitches left (back piece).
REMEMBER THE KNITTING TENSION!
Now work pattern and increase for raglan. The increases for raglan are drawn in the diagram. Work the first round as follows: * Knit 1, A.1, A.2 over the next 4 stitches, A.3, knit 2 (marker sits between these 2 stitches), A.1, A.2 over the next 18-20-20-22-24-26 stitches, A.3, knit 1 *, work from *-* 1 more time. Continue working and increasing as shown in the diagrams every 2nd round. When the diagrams are finished you have increased 12 times for raglan = 164-168-168-172-176-180 stitches. Now continue as follows in the different sizes:

SIZES S and M:
Continue the lace pattern and increase as follows:
Increase every 2nd round 2-2 more times = 180-184 stitches. You have increased 14-14 times for raglan.
Increase every 4th round 3-4 times. You have increased a total of 17-18 times for raglan = 204-216 stitches.

SIZE L:
Continue the lace pattern and increase as follows:
Increase every 2nd round 4 more times = 200 stitches. You have increased 16 times for raglan.
Increase every 4th round 5 times. You have increased a total of 21 times for raglan = 240 stitches.

SIZES XL, XXL and XXXL:
Continue the lace pattern and increase as follows:
Increase every 2nd round 6-8-10 more times = 220-240-260 stitches. You have increased 18-20-22 times for raglan.
Increase every 4th round 3-1-0 times = 244-248-260 stitches.
Now the sleeve increases are finished.
Increase every 4th round on the front and back pieces 2-4-4 more times (4 stitches increased each increase-round). You have increased a total of 23-25-26 times for raglan on the front and back pieces and 21-21-22 times on the sleeves = 252-264-276 stitches.

ALL SIZES:
=204-216-240-252-264-276 stitches. Continue the pattern, without further increases, until the yoke measures 20-22-24-26-28-30 cm from the marker – and the next round is without holes.
Divide for the body and sleeves as follows:
Place the first 44-46-52-52-52-54 stitches on a thread for the sleeve, cast on 6-6-6-6-10-10 stitches (in side under sleeve), work 58-62-68-74-80-84 stitches (front piece), place the first 44-46-52-52-52-54 stitches on a thread for the sleeve, cast on 6-6-6-6-10-10 stitches (in side under sleeve), work the last 58-62-68-74-80-84 stitches (back piece). The body and sleeves are finished separately. The piece is now measured from here.

BODY:
= 128-136-148-160-180-188 stitches. Insert 1 marker-thread in the middle of the 6-6-6-6-10-10 stitches cast on under each sleeve (3-3-3-3-5-5 new stitches on each side of the marker-thread). Move the beginning of the round to 1 stitch after one of the marker-threads (i.e., between the 4th-4th-4th-4th-6th-6th and 5th-5th-5th-5th-7th-7th cast-on stitch, so the pattern on the body matches the yoke). Allow the marker-threads to follow your work onwards; they are used when working the splits.
Continue with A.2 in the round – making sure the pattern continues from the yoke. Work until the body measures 17 cm from the division in all sizes. Try the jumper on and work to desired length (there is approx. 15 cm left for the splits).
Work 10 GARTER STITCHES on each side – read description above, (i.e., 5 stitches on each side of each marker-thread). When you have worked 2 ridges over both set of 10 stitches, divide the piece at the marker-threads and finish each piece separately, back and forth.

FRONT PIECE:
= 64-68-74-80-90-94 stitches. Work pattern back and forth as before with 5 edge stitches in garter stitch on each side. When the front piece measures 22 cm – adjusting so there are at least 2 rows of stocking stitch after the last row of holes, work as follows from the right side:
5 garter stitches, knit 54-58-64-70-80-84 and increase 44-44-50-56-62-66 stitches evenly over these stitches, 5 garter stitches = 108-112-124-136-152-160 stitches. Change to circular needle size 4.5 mm. Purl 1 row with 5 garter stitches on each side. Now work rib (first row from the right side) as follows: 5 garter stitches, * knit 2, purl 2 *, work from *-* until there are 7 stitches left, knit 2 and 5 garter stitches. Continue this rib for 10 cm. Cast off – use needle size 5.5 mm for casting off. The jumper measures approx. 56-58-60-62-64-66 cm from the shoulder.

BACK PIECE:
Work in the same way as the front piece.

SLEEVES:
Place the 44-46-52-52-52-54 stitches from the thread on the one side of the piece on short circular needle/double pointed needles size 5.5 mm and knit up 1 stitch in each of the 6-6-6-6-10-10 stitches cast on under the sleeve = 50-52-58-58-62-64 stitches. Insert a marker-thread in the middle of the new stitches and allow it to follow your work onwards; it is used when decreasing under the sleeve.
Start at the marker-thread and work pattern in the round as follows: Knit 1, A.2 continued as before over the next 48-50-56-56-60-62 stitches, knit 1.
When the sleeve measures 4 cm from the division, decrease 1 stitch on each side of the marker-thread – read DECREASE TIP. Decrease like this every 5-4-3-3-2½-2 cm a total of 6-6-8-8-9-10 times = 38-40-42-42-44-44 stitches. The stitches which do not fit into the pattern are worked in stocking stitch. Continue working until the sleeve measures 35-33-32-31-29-27 cm from the division - adjusting so there are at least 2 rows of stocking stitch after the last row of holes (10 cm left to finished length). Knit 1 round and increase 18-20-22-22-24-24 stitches evenly spaced = 56-60-64-64-68-68 stitches. Change to double pointed needles size 4.5 mm. Work rib (knit 2, purl 2) for 10 cm. Cast off. The sleeve measures approx. 45-43-42-41-39-37 cm from the division.

ASSEMBLY:
Fold the neck double to the inside and sew down. To avoid the neck being tight and rolling outwards, it is important that the seam is elastic.

This pattern has been corrected.

Updated online: 01.03.2024
The yarn amount is updated in all sizes.

Diagram

symbols = knit from right side, purl from wrong side
symbols = between 2 stitches make 1 yarn over. When working in the round knit the yarn over on the next round, when working back and forth, purl the yarn over on the next row
symbols = knit 2 together
symbols = slip 1 stitch knit-wise, knit 1 and pass the slipped stitch over the knitted stitch
symbols = between 2 stitches make 1 yarn over which is knitted twisted on the next round to avoid a hole
diagram
diagram

Each of our patterns has specific tutorial videos to help you.

Do you have a question? See a list of frequently asked questions (FAQ)

Knitting tension is what determines the final measurements of your work, and is usually measured per 10 x 10 cm. It is provided like so: number of stitches in width x number of rows in height - eg: 19 stitches x 26 rows = 10 x 10 cm.

The knitting tension is very individual; some people knit/crochet loosely while others work tightly. You adjust the knitting tension with the needle size, which is why the suggested needle size is only meant as a guide! You need to adjust this (up or down) to ensure that YOUR knitting tension matches the knitting tension provided in the pattern. If you work with a different knitting tension than provided you will have a different yarn consumption, and your work will have different measurements than what the pattern suggests.

The knitting tension also determines which yarns can replace each other. As long as you achieve the same knitting tension you can replace one yarn with another.

See DROPS lesson: How to measure your tension/gauge

See DROPS video: How to make a gauge tension swatch

The required amount of yarn is provided in grams, eg: 450 g. To calculate how many balls you’ll need you first need to know how many grams are in 1 ball (25g, 50g or 100g). This information is available if you click on the individual yarn quality on our pages. Divide the amount required with the amount of each ball. For example, if each ball is 50g (the most common amount), the calculation will be as follows: 450 / 50 = 9 balls.

The important thing when changing from one yarn to another is that the knitting/crochet tension remains the same. This is so that the measurements of the finished piece will be the same as on the sketch provided. It is easier to achieve the same knitting tension using yarns from the same yarn group. It is also possible to work with multiple strands of a thinner yarn to achieve the knitting tension of a thicker one. Please try our yarn converter. We recommend you to always work a test swatch.

Please NOTE: when changing yarn the garment might have a different look and feel to the garment in the photo, due to individual properties and qualities of each yarn.

See DROPS lesson: Can I use a different yarn than the one mentioned in the pattern?

All our yarns are categorised into yarn groups (from A to F) according to thickness and knitting tension – group A contains the thinnest yarns and group F the thickest. This makes it easier for you to find alternative yarns to our patterns, should you wish to switch yarn. All yarns within the same group have a similar knitting tension and can easily replace each other. However, different yarn qualities have different structures and properties which will give the finished work a unique look and feel.

Click here for an overview of the yarns in each yarn group

At the top of all our patterns you’ll find a link to our yarn calculator, which is a helpful tool should you wish to use a different yarn than suggested. By filling in the yarn quality you wish to replace, the amount (in your size) and number of strands, the calculator will present good alternative yarns with the same knitting tension. Additionally it will tell you how much you’ll require in the new qualities and whether you’ll need to work with multiple strands. Most skeins are 50g (some are 25g or 100g).

If the pattern is worked with multiple colours, every colour will have to be calculated separately. Similarly, if the pattern is worked with several strands of different yarns (for example 1 strand Alpaca and 1 strand Kid-Silk) you will have to find alternatives for each, individually.

Click here to see our yarn calculator

Since different yarns have different qualities and textures we have chosen to keep the original yarn in our patterns. However, you can easily find options among our available qualities by using our yarn calculator, or simply pick a yarn from the same yarn group.

It is possible that some retailers still have discontinued yarns in stock, or that someone has a few skeins at home that they would like to find patterns for.

The yarn calculator will provide both alternative yarn as well as required amount in the new quality.

If you think it's hard to decide what size to make, it can be a good idea to measure a garment you own already and like the size of. Then you can pick the size by comparing those measures with the ones available in the pattern's size chart.

You'll find the size chart at the bottom of the pattern.

See DROPS lesson: How to read size chart

The needle size provided in the pattern serves only as a guide, the important thing is to follow the knitting tension. And since knitting tension is very individual, you will have to adjust the needle size to ensure that YOUR tension is the same as in the pattern – maybe you’ll have to adjust 1, or even 2 needle sizes, up or down to achieve the correct tension. For this, we recommend that you work test swatches.

Should you work with a different knitting tension than the one provided, the measurements of the finished garment might deviate from the measurement sketch.

See DROPS lesson: How to measure your tension/gauge

See DROPS video: How to make a tension/gauge swatch

Working a garment top-down provides more flexibility and room for personal adjustment. For example it is easier to try the garment on while working, as well as making adjustments to length of yoke and shoulder caps.

The instructions are carefully explaining every step, in the correct order. Diagrams are adjusted to the knitting direction and are worked as usual.

The diagram depicts all rows/rounds, and every stitch seen from the right side. It is read from bottom to top, from right to left. 1 square = 1 stitch.

When working back and forth, every other row is worked from the right side and every other row is worked from the wrong side. When working from the wrong side, the diagram will have to be worked reversed: from left to right, knit stitches are purled, purl stitches are knit etc.

When working in the round every round is worked from the right side and the diagram are worked from right to left on all rounds.

See DROPS lesson: How to read knitting diagrams

The diagram depicts all rows/rounds, and every stitch seen from the right side. It is worked from bottom to top, from right to left.

When working back and forth every other row is worked from the right side: from right to left and every other row is worked from the wrong side: from left to right.

When working in the round, every row in the diagram are worked from the right side, from right to left.

When working a circular diagram you start in the middle and work your way outwards, counter clockwise, row by row.

The rows usually start with a given number of chain stitches (equivalent to the height of the following stitch), this will either be depicted in the diagram or explained in the pattern.

See DROPS lesson: How to read crochet diagrams

Instructions for working several diagrams after each other on the same row/round, will often be written like so: “work A.1, A.2, A.3 a total of 0-0-2-3-4 times". This means you work A.1 once, then A.2 is worked once, and A.3 is repeated (in width) the number of times provided for your size – in this case like so: S = 0 times, M = 0 times, L=2 times, XL= 3 times and XXL = 4 times.

The diagrams are worked as usual: begin with the first row in A.1, then work the first row in A.2 etc.

See DROPS lesson: How to read knitting diagrams

See DROPS lesson: How to read crochet diagrams

The total width of the garment (from wrist-to-wrist) will be larger in the larger sizes, despite the actual sleeves being shorter. The larger sizes have longer sleeve caps and wider shoulders, so there will be a good fit in all sizes.

The measurement sketch/schematic drawing provides information regarding the full length of the garment. If it’s a jumper or a jacket the length is measured from the highest point on the shoulder closest to the neckline, and straight down to the bottom of the garment. It is NOT measured from the tip of shoulder. Similarly, the length of yoke is measured from the highest point on the shoulder and down to where yoke is split into body and sleeves.

On a jacket measures are never taken along bands, unless specifically stated. Always measure inside band stitches when measuring the length.

See DROPS lesson: How to read a schematic drawing

Diagrams are often repeated on the round or in height. 1 repeat is the diagram the way it appears in the pattern. If it says to work 5 repeats of A.1 in the round, then you work A.1 a total of 5 times after/next to each other in the round. If it says to work 2 repeats of A.1 vertically/in height you work the entire diagram once, then begin again at the start and work the entire diagram one more time.

Chain stitches are slightly narrower than other stitches and to avoid working the cast-on edge too tight, we simply chain more stitches to begin with. The stitch count will be adjusted on the following row to fit the pattern and measurement sketch.

The rib edge is more elastic and will contract slightly compared to, for example, stocking stitch. By increasing before the rib edge, you avoid a visible difference in width between the rib edge and the rest of the body.

It’s very easy to cast off too tightly, and by making yarn overs while casting off (and simultaneously casting these off) you avoid a too tight cast off edge.

See DROPS video: How to bind off with yarn overs (yo)

To achieve an even increase (or decrease) you can increase on, for example: every 3rd and 4th row alternately, like so: work 2 rows and increase on the 3rd row, work 3 rows and increase on the 4th. Repeat this until the increase is complete.

See DROPS lesson: Increase or decrease 1 st on every 3rd and 4th row alternately

Should you prefer to work in the round instead of back and forth, you may of course adjust the pattern. You’ll need to add steeks mid-front (usually 5 stitches), and follow the instructions. When you would normally turn and work from the wrong side, simply work across the steek and continue in the round. At the end you’ll cut the piece open, pick up stitches to work bands, and cover the cut edges.

See DROPS video: How to knit steeks and cut open

Should you prefer to work back and forth instead of in the round, you may of course adjust the pattern so you work the pieces separately and then assemble them at the end. Divide the stitches for the body in 2, add 1 edge stitch in each side (for sewing) and work the front and back pieces separately.

See DROPS lesson: Can I adapt a pattern for circular needles into straight needles?

Pattern repeats can vary slightly in the different sizes, in order to get the correct proportions. If you’re not working the exact same size as the garment in the photo, yours might deviate slightly. This has been carefully developed and adjusted so that the complete impression of the garment is the same in all sizes.

Make sure to follow instructions and diagrams for your size!

If you have found a pattern you like which is available in women’s size it’s not very difficult to convert it to men’s size. The biggest difference will be the length of sleeves and body. Start working on the women size that you think would fit across the chest. The additional length will be worked right before you cast off for the armhole/sleeve cap. If the pattern is worked top-down you can add the length right after the armhole or before the first decrease on sleeve.

Regarding additional yarn amount, this will depend on how much length you add, but it is better with a skein too many than too few.

All yarns will have excess fibres (from production) that might come off as lint or shedding. Brushed yarns (ie hairier yarns) have more of these loose, excess fibres, causing more shedding.

Shedding also depends on what is worn under or over the garment, and whether this pulls at the yarn fibres. It’s therefore not possible to guarantee that there will be no shedding

Below are some tips on how to get the best result when working with hairier yarns:

1. When the garment is finished (before you wash it) shake it vigorously so the looser hairs come off. NOTE: do NOT use a lint roller, brush or any method that pulls at the yarn.

2. Place the garment in a plastic bag and put it in your freezer - the temperature will cause the fibres to become less attached to each other, and excess fibres will come off easier.

3. Leave in the freezer for a few hours before taking it out and shaking it again.

4. Wash the garment according to the instructions on the yarn label.

Pilling is a natural process that happens to even the most exclusive of fibers. It's a natural sign of wear and tear that is hard to avoid, and that is most visible in high friction areas of your garment like a sweater's arms and cuffs.

You can make your garment look as new by removing the pilling, using a fabric comb or a pill/lint remover.

Still can't find the answer you need? Then scroll down and leave your question so one of our experts can try to help you. This will be done normally within 5 to 10 working days.
In the meantime, you can read the questions and answers that others have left to this pattern or join the DROPS Workshop on Facebook to get help from fellow knitters/crocheters!

You might also like...

Post a comment to pattern DROPS 248-15

We would love to hear what you have to say about this pattern!

If you want to leave a question, please make sure you select the correct category in the form below, to speed up the answering process. Required fields are marked *.

Comments / Questions (10)

country flag Cornelia wrote:

Liebes DropsTeam! Sind die Umschläge aus der Hinreihe in den jeweiligen Diagrammzeichnungen in der Rückreihe bereits berücksichtigt und eingezeichnet oder müssen sie in der Rückreihe entsprechend der Erklärungen zu den jeweiligen Diagrammen noch zusätzlich gestrickt werden?

18.04.2024 - 13:54

DROPS Design answered:

Liebe Cornelia, alle Reihen sind in den Diagramme gezeigt, so sind die Zunahmen (letztes Symbol) eine neue Masche bei der nächsten Runde. Viel Spaß beim Stricken!

18.04.2024 - 15:51

country flag Katja wrote:

Kann es sein, dass die Garnmengen/Anzahl Knäuel der beiden Garne vertauscht wurden? Die Lauflängen passen, so wie sie angegeben sind, nicht zusammen.

27.02.2024 - 00:26

DROPS Design answered:

Liebe Katja, Garnmenge für Brushed Alpaca Silk wird korrigiert, man braucht dh 150-150-175-175-200-225 g. Viel Spaß beim Stricken!

01.03.2024 - 09:20

country flag Ina Tech Christensen wrote:

Skøn bluse, men jeg er forvirret. I diagrammet 2. række, skal A1 starte med en maske, der slås om. A3 skal slutte med en maske, der slås om. I diagramforklaringen står, at omslaget skal foretages mellem 2 masker. Hvordan kan det lade sig gøre, når A1 og A3 hhv. starter og slutter med et omslag? Det giver jo 2 omslag lige efter hinanden uden en maske imellem?

25.02.2024 - 12:51

DROPS Design answered:

Hei Ina. A.1 og A.3 strikkes ikke rett etter hverandre, det er 2 rettmasker mellom disse diagrammene hver gang og det er mellom disse 2 rett maskene de 4 merke sitter. I f.eks str. S strikkes 1. omgang slik: 1. merke, strikk 1 maske rett, A.1, A.2 over de neste 4 maskene, A.3, 1 maske rett, 2.merket, 1 maske rett, A.1, A.2 over de neste 18 maskene, A.3, 1 maske rett, 3. merke, 1 maske rett, A.1, A.2 over de neste 4 maskene, A.3, 1 rett, 4. merke, 1 maske rett, A.1, A.2 over de neste 18 maskene, A.3, 1 maske rett. Og du er nå ved 1. merket igjen. mvh DROPS Design

04.03.2024 - 09:14

country flag Susanne wrote:

Hej, kan denne bluse strikkes i Melody ( gruppe D), med en enkelt tråd?

13.02.2024 - 12:07

DROPS Design answered:

Hej Susanne, ja det går helt fint at strikke den i en tråd DROPS Melody. Husk at følge strikkefastheden som står i opskriften for at få størrelsen ifølge måleskitsen :)

22.02.2024 - 11:35

country flag Merete wrote:

Hej. Passer garnforbruget / meter i opskriften. I alle størrelser er der mange flere meter Alpaca end Brushed Alpaca. F.eks til str. XL 1169 meter Alpaca og Brusched Alpaca kun 840 meter. Eller regner jeg forkert. Venlig hilsen Merete David ,Tyskland

07.02.2024 - 12:17

DROPS Design answered:

Hej Merete, tak for info - garnforbruget er opdateret :)

19.03.2024 - 15:05

country flag Lauryna wrote:

Sun catcher

22.01.2024 - 11:20

country flag Marisol wrote:

Me parece precioso y me encantaría hacerlo, voto por él!!! Un saludo

20.01.2024 - 23:27

country flag Melanie wrote:

Climbing Vines Pullover or Lattice Dreams

19.01.2024 - 09:19

country flag LOHR Frédérique wrote:

Vaporeux

18.01.2024 - 19:46

country flag Sarinna wrote:

Sunset Trellis

18.01.2024 - 18:39