
Popular categories
Looking for a yarn?


|
|||||||||||||||||||||||||||||||||||||||||||||||||||||||
Holiday Buddies |
|||||||||||||||||||||||||||||||||||||||||||||||||||||||
 |
 |
||||||||||||||||||||||||||||||||||||||||||||||||||||||
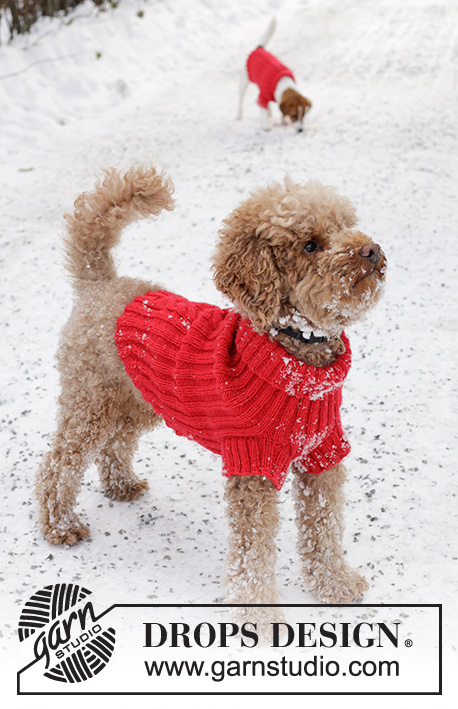
Knitted dog jumper in DROPS Karisma. The piece is worked from neck to tail, with rib and cables. Sizes XS - M. Theme: Christmas.
DROPS 245-31 |
|||||||||||||||||||||||||||||||||||||||||||||||||||||||
|
------------------------------------------------------- EXPLANATIONS FOR THE PATTERN: ------------------------------------------------------- PATTERN: See diagrams A.1 and A.2. The diagrams show all rows in the pattern from the right side. KNITTING TIP: When working short rows, to avoid holes where you previously turned, pick up the strand between the left and right needle, place it on the left needle and knit/purl it twisted together with the next stitch. This allows the rib to be is continued as before (knit 2, purl 3). ------------------------------------------------------- START THE PIECE HERE: ------------------------------------------------------- DOG JUMPER - SHORT OVERVIEW OF THE PIECE: The piece is worked from neck to tail. The neck and yoke are worked in the round with double pointed needles/circular needle. The yoke is divided for the front legs and the back and tummy worked separately back and forth, then rejoined and the body worked in the round. Short rows are worked at the end of the body, so the back is longer than the tummy, then an edge worked in the round. Finally, an edge is worked around the leg-openings. NECK: Cast on 64-84-104 stitches with double pointed needles/circular needle size 3.5 mm and colour red/wine red DROPS Karisma. Work rib in the round (knit 2, purl 2). Insert 1 marker at the beginning of the round. Work the rib for 4-6-8 cm (the neck is folded double later). Insert 1 new marker to measure the yoke from. YOKE: Insert 2 marker-threads mid-top of yoke as follows; Count 30-42-54 stitches and insert 1 marker-thread before the next stitch, count 18 stitches and insert 1 marker-thread before the next stitch. Now work as follows from the first marker: * Knit 2, purl 2 *, work from *-* until there are 2 stitches left before the first marker-thread, knit 2, work A.1 over the next 18 stitches, work from *-* to end of round. You have increased 6 stitches in A.1 (= 24 stitches between the marker-threads) and there are 70-90-110 stitches. Continue the rib and work the last round in A.1. Now increase stitches in the rib and work A.2 over A.1 as follows: * Knit 2, purl 1, make 1 yarn over, purl 1 *, work from *-* until there are 2 stitches left before the first marker-thread, knit 2, work A.2 over the next 24 stitches, work from *-* to end of round. On the next round, purl the yarn overs twisted = 81-106-131 stitches. Continue the new rib (knit 2, purl 3) and A.2. Work until the yoke measures 4-6-8 cm from the 2nd marker, adjusting so the next round is an odd round in the pattern (this allows you to continue cabling from the right side). Now divide for the front legs as follows: Cast off 2 stitches, work rib over the next 13-18-23 stitches (tummy), cast off 2 stitches. Place the 13-18-23 tummy-stitches on a stitch holder and work to end of round as before. BACK: = 64-84-104 stitches. Work rib and A.2 back and forth for a further 5-7-9 cm, with the last row worked from the right side. Cut the strand and place the stitches on a stitch holder. The back measures 9-13-17 cm from the 2nd marker. TUMMY: Place the 13-18-23 tummy-stitches on circular needle/double pointed needles size 3.5 mm. Work rib back and forth for a further 5½-7½-9½ cm - with the next row from the right side (the tummy is slightly longer than the back to give chest room). ROW 1 (right side): Work rib and cast on 2 stitches at the end of the row. Turn. ROW 2 (wrong side): Work rib and cast on 2 stitches at the end of the row = 17-22-27 stitches. The tummy measures approx. 6-8-10 cm from the division. BODY: Place the 64-84-104 back-stitches on the same needle(s) as the 17-22-27 tummy-stitches = 81-106-131 stitches. Begin before the 17-22-27 tummy-stitches (the same place as before you divided for the front legs). Continue the rib and A.2 in the round, knitting the 2 cast-on stitches on each side of the tummy. Work until the body measures 5-7-11 cm from the join (approx. 3 cm left before the tummy is finished in length) – adjusting so the next round is an odd round in A.2. Insert 1 marker-thread in the middle of A.2; the back is now measured from here. Now work short rows back and forth, so the back is 4-5-6 cm longer than the tummy. Place the first 17-22-27 tummy-stitches on a stitch holder. Turn, working as before from the wrong side. ROW 1 (wrong side): Work to end of row, turn, tighten the strand. ROW 2 (right side): Work until there are 3 stitches left on the row, turn, tighten the strand. ROW 3 (wrong side): Work until there are 3 stitches left on the row, turn, tighten the strand. ROW 4 (right side): Work until there are 2 stitches left before where you previously turned, turn, tighten the strand. ROW 5 (wrong side): Work until there are 2 stitches left before where you previously turned, turn, tighten the strand. Continue like this, turning when there are alternately 3 and 2 stitches left before the previous turn (the cabling in A.2 continues but do not cable on the last 2 short rows). When you have turned a total of 6-7-9 times on each side, there are 34-48-58 stitches un-turned on top of the back and the last row was from the wrong side. Turn and work from the right side as follows: Work rib and A.2 (without cabling) - read KNITTING TIP in explanations above. When you have reached the 17-22-27 tummy stitches, place them back on the needle(s). Begin the round from here (before the tummy). Work 1 round - remember KNITTING TIP. The piece measures approx. 4-5-6 cm from the marker-thread in A.2. Move the marker-thread here; the edge is measured from here. EDGE: Continue the rib as far as A.2 (24 back stitches), purl 3, knit 1, knit 2 together, purl 3, knit 2, purl 1, pick up the strand before the next stitch, place it twisted on the left needle and purl this stitch, purl 1, knit 2, purl 3, knit 2 together, knit 1, purl 3 (2 decreased stitches and 1 increased stitch), work the rib as before to the end of the round. This decreasing/increasing means the rib will now fit all the way round. Work rib (knit 2, purl 3) over all stitches until the edge measures 3 cm from the marker-thread. Cast off with rib. The jumper measures approx. 25-34-45 cm from cast-on to cast-off edge, measured along the back- LEG-OPENINGS: Use double pointed needles size 3.5 mm and DROPS Karisma. Knit up 36-44-56 stitches around one leg-opening (stitch number should be divisible by 4). Work rib (knit 2, purl 2) in the round for 3-4-5 cm. Cast off a little loosely with rib. Repeat around the other leg-opening. |
|||||||||||||||||||||||||||||||||||||||||||||||||||||||
Diagram explanations |
|||||||||||||||||||||||||||||||||||||||||||||||||||||||
|
|||||||||||||||||||||||||||||||||||||||||||||||||||||||

|
|||||||||||||||||||||||||||||||||||||||||||||||||||||||

|
|||||||||||||||||||||||||||||||||||||||||||||||||||||||
|
Have you made this or any other of our designs? Tag your pictures in social media with #dropsdesign so we can see them! Do you need help with this pattern?You'll find tutorial videos, a Comments/Questions area and more by visiting the pattern on garnstudio.com. © 1982-2024 DROPS Design A/S. We reserve all rights. This document, including all its sub-sections, has copyrights. Read more about what you can do with our patterns at the bottom of each pattern on our site. |
|||||||||||||||||||||||||||||||||||||||||||||||||||||||


With over 40 years in knitting and crochet design, DROPS Design offers one of the most extensive collections of free patterns on the internet - translated to 17 languages. As of today we count 304 catalogues and 11422 patterns - 11422 of which are translated into English (UK/cm).
We work hard to bring you the best knitting and crochet have to offer, inspiration and advice as well as great quality yarns at incredible prices! Would you like to use our patterns for other than personal use? You can read what you are allowed to do in the Copyright text at the bottom of all our patterns. Happy crafting!
Comments / Questions (2)
Takk for raskt svar. Da er neste spørsmål. Hvordan strikker jeg når jeg kommer til de to felte maskene til forben? Snu og strikke tilbake? Eller strikke over maskene så det blir et hull? Men da blir hullet veldig stramt? Jeg lurer veldig på denne deen av oppskriften. Hilsen Lill
06.02.2024 - 07:13DROPS Design answered:
Hei Lill, Etter du har felt av til forbena fortsetter du fram og tilbake, kun over maskene på ryggen, mens magemaskene er på hjelpepinnen. God fornøyelse!
07.02.2024 - 06:43Jeg forstår ikke denne oppskriften. Jeg har kommet til at det skal deles til forben og at 18 masker settes på en tråd. Hvordan skal jeg fortsette omgangen videre? Ved å klippe tråden og starte med ny tråd etter maskene som er satt på tråd? Eller å gå tilbake på pinnen? Veldig vanskelig å forstå oppskriften herfra….. hilsen Lill Pleym
05.02.2024 - 21:39DROPS Design answered:
Hei Lill, Du kan enten klippe tråden og fortsette etter maskene på hjelpepinnen, eller strikke maskene først før de settes på hjelpepinnen. Da har du tråden klar til å fortsette videre. God fornøyelse!
06.02.2024 - 06:49