
Popular categories
Looking for a yarn?


|
|||||||||||||||||||
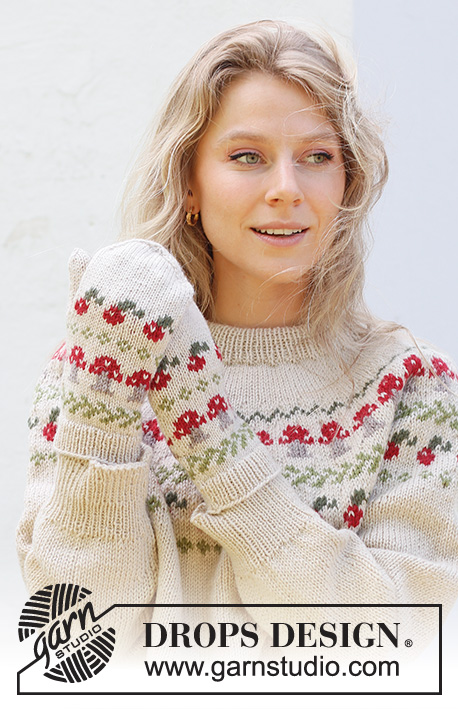
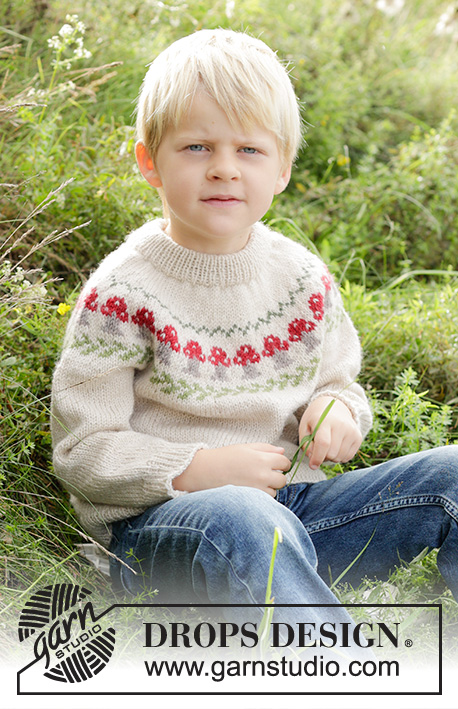
Mushroom Season Sweater |
|||||||||||||||||||
 |
 |
||||||||||||||||||
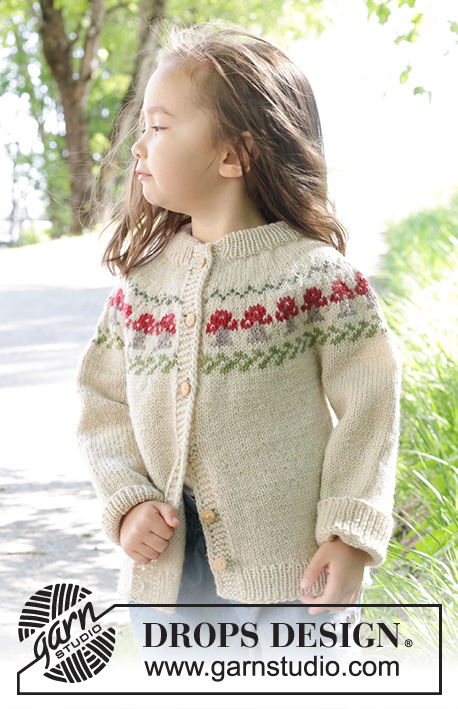
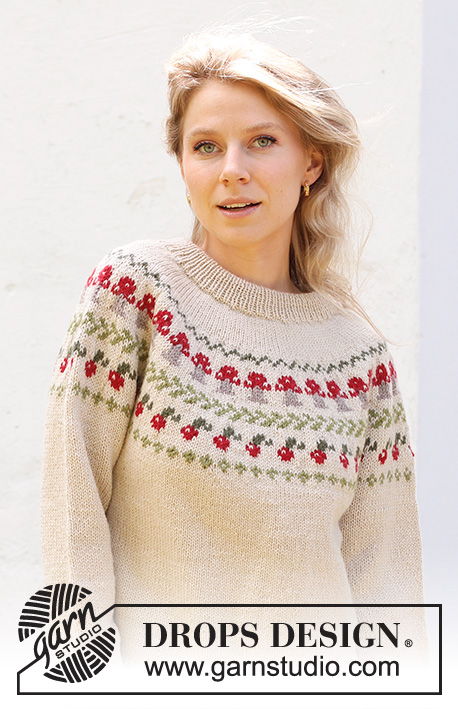
Knitted jumper in DROPS Karisma. The piece is worked top down with double neck, round yoke, coloured pattern with fungi and berries and split in sides. Sizes S - XXXL.
DROPS 245-11 |
|||||||||||||||||||
|
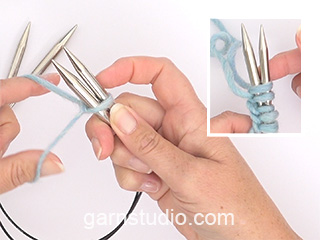
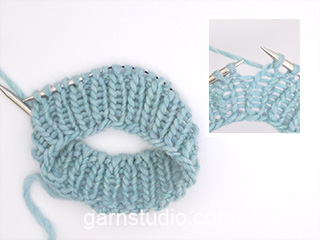
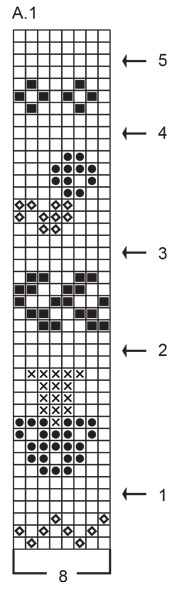
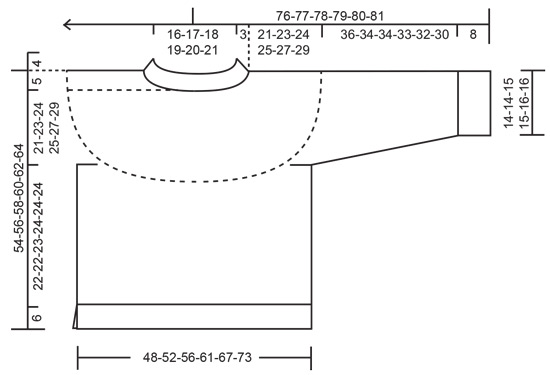
------------------------------------------------------- EXPLANATIONS FOR THE PATTERN: ------------------------------------------------------- GARTER STITCH (worked back and forth): Knit all rows. 1 ridge = knit 2 rows. ELEVATION: To make the jumper slightly higher at the back of the neck, you can work an elevation as described here. Skip this section if you do not want an elevation. Start from the right side and knit 16-17-18-19-20-21 stitches from the marker-thread at the beginning of the round, turn, tighten strand and purl 32-34-36-38-40-42 stitches back. Turn, tighten strand and knit 48-51-54-57-60-63 stitches, turn, tighten strand and purl 64-68-72-76-80-84 stitches back. Turn, tighten strand and knit 80-85-90-95-100-105 stitches, turn, tighten strand and purl 96-102-108-114-120-126 stitches back. Turn, tighten the strand and knit to marker-thread. PATTERN: See diagram A.1. The pattern is worked in stocking stitch. KNITTING TIP: To avoid the knitting tension losing its elasticity when working pattern it is important that the strands at the back are not tight. Use a size larger needle when working pattern if the piece becomes tight. INCREASE TIP (evenly spaced): Increase 1 stitch by making 1 yarn over which is worked twisted on the next row/round to avoid a hole. Then work the new stitches in stocking stitch. DECREASE TIP (for sleeves): Decrease 1 stitch on each side of the marker-thread as follows: Work until there are 3 stitches left before the marker-thread, knit 2 together, knit 2 (marker-thread sits between these 2 stitches), slip 1 stitch knit-wise, knit 1 and pass the slipped stitch over the knitted stitch (2 stitches decreased). ------------------------------------------------------- START THE PIECE HERE: ------------------------------------------------------- JUMPER – SHORT OVERVIEW OF THE PIECE: The neck and yoke are worked in the round with circular needle, from mid back and top down. The yoke is divided for the body and sleeves and the body is continued in the round with circular needle as far as the split. Then the front and back pieces are finished separately, back and forth. The sleeves are worked in the round with short circular needle/double pointed needles. DOUBLE NECK: Cast on 110-114-118-122-128-132 stitches with colour light beige DROPS Karisma, using short circular needles size 3 and 4.5 mm held together. Remove the needle size 4.5 mm keeping stitches on needle size 3 mm (this gives you an elastic cast-on edge). Work rib in the round (knit 1, purl 1) for 9 cm. Fold the neck double to the inside and work 1 more round of rib, working every 2nd stitch together with its corresponding stitch on the cast-on edge. You now have a double neck. YOKE: Change to circular needle size 4.5 mm. Insert 1 marker-thread at the beginning of the round – allow it to follow your work onwards. Knit 1 round and increase 26-28-30-32-36-40 stitches evenly spaced – read INCREASE TIP = 136-142-148-154-164-172 stitches. Insert 1 marker in the middle of the round (mid-front), the yoke is measured from this marker. You can now work an ELEVATION mid-back. If you do not want an elevation, continue as described below. Work stocking stitch in the round. REMEMBER THE KNITTING TENSION! When there are 2 rounds left before the yoke measures 4-5-5-6-6-7 cm from the marker, increase 40-42-44-46-52-52 stitches evenly spaced on the first round = 176-184-192-200-216-224 stitches. After the 2 rounds, work pattern at the same time continue increasing as explained below – read KNITTING TIP and PATTERN above. Work A.1 a total of 22-23-24-25-27-28 times around the yoke. AT THE SAME TIME, on each round with an arrow in the diagram, increase as follows: ARROW-1: Increase 40-48-48-48-56-56 stitches evenly spaced = 216-232-240-248-272-280 stitches. ARROW-2: Increase 32-40-40-40-48-48 stitches evenly spaced = 248-272-280-288-320-328 stitches. ARROW-3: Increase 24-24-32-32-32-40 stitches evenly spaced = 272-296-312-320-352-368 stitches. ARROW-4: Increase 16-16-24-24-24-32 stitches evenly spaced = 288-312-336-344-376-400 stitches. ARROW-5: Increase 4-4-12-4-4-12 stitches evenly spaced = 292-316-348-348-380-412 stitches. When A.1 is finished, continue with stocking stitch and colour light beige until the yoke measures 21-23-24-25-27-29 cm from the marker. DIVISION FOR BODY AND SLEEVE: Divide for the body and sleeves as follows: Knit 44-48-52-53-59-65 (half back piece), place the next 58-62-70-68-72-76 stitches on a thread for the sleeve, cast on 8-8-8-16-16-16 stitches (in side under sleeve), knit 88-96-104-106-118-130 (front piece), place the next 58-62-70-68-72-76 stitches on a thread for the sleeve, cast on 8-8-8-16-16-16 stitches (in side under sleeve), knit the last 44-48-52-53-59-65 stitches (half back piece). The body and sleeves are finished separately. The piece is now measured from here. BODY: = 192-208-224-244-268-292 stitches. Insert 1 marker-thread in the middle of the 8-8-8-16-16-16 stitches cast on under each sleeve. Allow the threads to follow your work onwards; they are used when dividing for the split in each side. Work stocking stitch in the round, using colour light beige, for a further 22-22-23-24-24-24 cm. Now divide the piece at each marker-thread and finish the back and front separately. BACK PIECE: = 96-104-112-122-134-146 stitches. Change to circular needle size 3 mm. Knit 1 row from the right side and increase 25-27-29-33-35-39 stitches evenly spaced = 121-131-141-155-169-185 stitches. Work the next row from the wrong side as follows: 1 GARTER STITCH – read explanation above, * purl 1, knit 1 *, work from *-* until there are 2 stitches left, purl 1 and 1 garter stitch. Continue this rib back and forth for 6 cm. Cast off a little loosely. The jumper measures approx. 54-56-58-60-62-64 cm from the shoulder. FRONT PIECE: = 96-104-112-122-134-146 stitches. Work in the same way as the back piece SLEEVES: Place the 58-62-70-68-72-76 stitches from the thread on the one side of the piece on short circular needle/double pointed needles size 4.5 mm and knit up 1 stitch in each of the 8-8-8-16-16-16 stitches cast on under the sleeve with colour light beige = 66-70-78-84-88-92 stitches. Insert a marker-thread in the middle of the 8-8-8-16-16-16 stitches under the sleeve. Allow the thread to follow your work onwards, it is used when decreasing under the sleeve. Start at the marker-thread and work stocking stitch in the round. When the sleeve measures 4-4-4-3-3-3 cm from the division, decrease 2 stitches mid-under the sleeve – read DECREASE TIP. Decrease like this every 5½-4½-3-2½-2-2 cm a total of 6-7-10-12-13-14 times = 54-56-58-60-62-64 stitches. Work until the sleeve measures 36-34-34-33-32-30 cm from the division (or to desired length. There is approx. 8 cm left). Change to double pointed needles size 3 mm. Knit 1 round and increase 20-22-22-24-24-26 stitches evenly spaced = 74-78-80-84-86-90 stitches. Work rib (knit 1, purl 1) for 8 cm. Cast off a little loosely. The sleeve measures approx. 44-42-42-41-40-38 cm from the division. Work the other sleeve in the same way. |
|||||||||||||||||||
Diagram explanations |
|||||||||||||||||||
|
|||||||||||||||||||
|
|||||||||||||||||||
|
|||||||||||||||||||
|
Have you made this or any other of our designs? Tag your pictures in social media with #dropsdesign so we can see them! Do you need help with this pattern?You'll find tutorial videos, a Comments/Questions area and more by visiting the pattern on garnstudio.com. © 1982-2024 DROPS Design A/S. We reserve all rights. This document, including all its sub-sections, has copyrights. Read more about what you can do with our patterns at the bottom of each pattern on our site. |
|||||||||||||||||||


With over 40 years in knitting and crochet design, DROPS Design offers one of the most extensive collections of free patterns on the internet - translated to 17 languages. As of today we count 304 catalogues and 11422 patterns - 11422 of which are translated into English (UK/cm).
We work hard to bring you the best knitting and crochet have to offer, inspiration and advice as well as great quality yarns at incredible prices! Would you like to use our patterns for other than personal use? You can read what you are allowed to do in the Copyright text at the bottom of all our patterns. Happy crafting!
Comments / Questions (4)
Hvordan skal udtagningsmaskerne indgå i mønster? De er almindeligvis tegnet ind i diagrammerne, så der han ses om næste mønster skal placeres i forhold til det foregående. På forhånd tak for hjælpen
21.03.2024 - 18:49DROPS Design answered:
Hej Tina, jo du strikker over alle masker i diagrammet, der tages ud hvor der ikke er mønster, og udtagningerne stemmer med at gå op i mønster rapporten :)
03.04.2024 - 12:07Bonjour, quand je prends un nouvelle pelote les mailles ne sont pas belles. Que faut-il faire ? Cordialement
13.02.2024 - 17:01DROPS Design answered:
Bonjour Mme Magnien, peut-être que cette vidéo peut vous aider? N'hésitez pas à contacter votre magasin, vous y recevrez d'autres astuces / conseils, même par mail ou téléphone. Bon tricot!
14.02.2024 - 07:51Super
25.12.2023 - 12:52Jak wyliczyć ilość potrzebnej włóczki
25.11.2023 - 14:38DROPS Design answered:
Witaj Mario, potrzebna ilość włóczki dla podanych rozmiarów jest określona we wzorze. Jeśli nie wiesz jaki rozmiar wybrać, zobacz TUTAJ. Pozdrawiamy!
27.11.2023 - 08:14