DROPS Air
DROPS Air
65% Alpaca, 28% Polyamide, 7% Wool
from 4.80 £ /50g
Get the yarn to make this pattern from 28.80£.

The yarn cost is calculated from the pattern’s smallest size and the yarn’s cheapest product type. Looking for an even better price? You might find it on the DROPS Deals!

DROPS SS24

Autumn Blaze

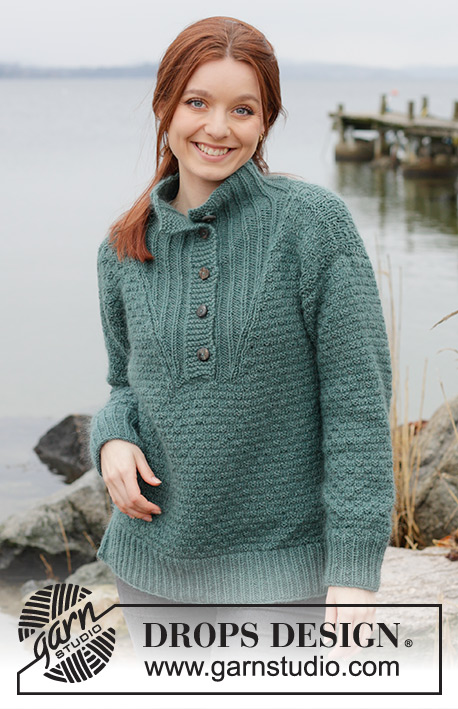
Knitted jumper in DROPS Air. The piece is worked bottom up with high neck, cables and split in sides. Sizes S - XXXL.

DROPS 245-17
DROPS Design: Pattern ai-452
Yarn group C or A + A
-------------------------------------------------------

SIZES:
S - M - L - XL - XXL - XXXL

YARN:
DROPS AIR from Garnstudio (belongs to yarn group C)
300-350-400-400-450-500 g colour 13, orange

BUTTONS:
DROPS BUTTONS NO 516: 5 items in all sizes

NEEDLES:
DROPS CIRCULAR NEEDLE SIZE 5.5 MM: Length 40 cm and 80 cm.
DROPS CIRCULAR NEEDLE SIZE 4 MM: Length 40 cm and 80 cm.
DROPS DOUBLE POINTED NEEDLES SIZE 5.5 MM.
DROPS DOUBLE POINTED NEEDLES SIZE 4 MM.
DROPS CABLE NEEDLE.
The technique MAGIC LOOP can be used – you then only need 80 cm circular needle in each size.

KNITTING TENSION:
16 stitches in width and 20 rows in height with stocking stitch = 10 x 10 cm.
NOTE: Needle size is only a guide. If you get too many stitches on 10 cm, change to a larger needle size. If you get too few stitches on 10 cm, change to a smaller needle size.

-------------------------------------------------------

Alternative Yarn – See how to change yarns here
Yarn Groups A to F – Use the same pattern and change the yarn here
Yarn usage using an alternative yarn – Use our yarn converter here

-------------------------------------------------------

DROPS Air
DROPS Air
65% Alpaca, 28% Polyamide, 7% Wool
from 4.80 £ /50g
Get the yarn to make this pattern from 28.80£.

The yarn cost is calculated from the pattern’s smallest size and the yarn’s cheapest product type. Looking for an even better price? You might find it on the DROPS Deals!

Pattern instructions

NOTE: This pattern is written in British English. All measurements in charts are in cm. For conversion from cm to inches - click here. There are different terms for crocheting in British and American English. If this pattern includes crochet, click for "crochet terms" here. For this pattern in American English, please click here.
-------------------------------------------------------

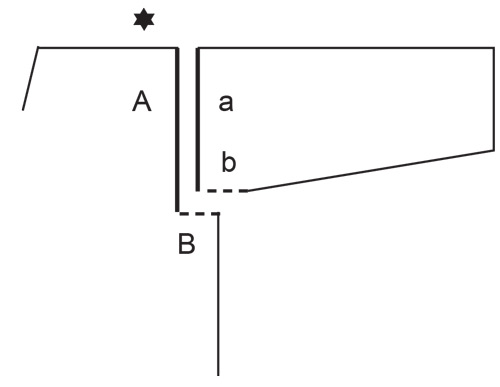
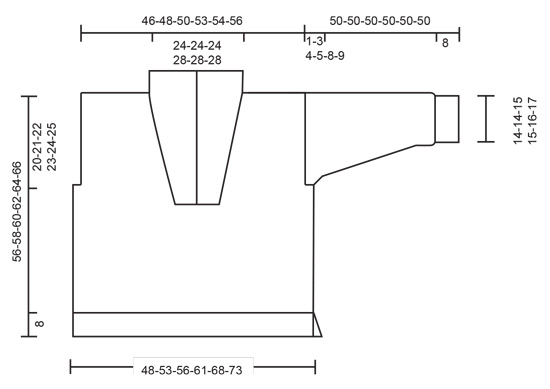
EXPLANATIONS FOR THE PATTERN:
-------------------------------------------------------

GARTER STITCH (worked back and forth):
Knit all rows.
1 ridge = knit 2 rows.

NECK DISPLACEMENT:
LEFT FRONT PIECE:
Decrease 1 stitch before 1 knitted stitch + A.2 and increase 1 stitch after A.2 + 2 knitted stitches as follows:
Work until there are 3 stitches left before A.2, knit 2 together, knit 1, A.2, knit 2, make 1 yarn over, work to end of row as before.

So the rib is not tight, increase 1 stitch without decreasing every 4th time. The yarn overs are worked twisted on the next row, then worked into the rib (knit 1, purl 3, seen from the right side).

i.e., increase and decrease as follows:

ROW 1: increase and decrease
ROWS 2-4: work as before
ROW 5: increase and decrease
ROWS 6-8: work as before
ROW 9: increase and decrease
ROW 10: work as before
ROW 11: increase
ROW 12: work as before

Repeat these 12 rows onwards.

RIGHT FRONT PIECE:
Increase 1 stitch before 2 knitted stitches + A.2 and decrease after A.2 + 2 knitted stitches as follows:
Work until there are 2 stitches left before A.2, make 1 yarn over, knit 2, A.2, knit 1, slip 1 stitch, knit 1, pass the slipped stitch over the knitted stitch, work to end of row as before.

Increase and decrease in the same way as on the left front piece.

BUTTONHOLES:
Work the buttonholes on the right band. 1 BUTTONHOLE = knit together the 3rd and 4th stitch from the edge and make 1 yarn over. On the next row knit the yarn over to leave a hole.
Work the buttonholes when the piece measures:
S: 34, 41, 48 and 55 cm
M: 36, 43, 50 and 57 cm
L: 38, 45, 52 and 59 cm
XL: 39, 47, 54 and 61 cm
XXL: 41, 49, 56 and 63 cm
XXXL: 43, 51, 58 and 65 cm
The last buttonhole is worked when the neck measures 6 cm.

INCREASE TIP (for sleeves):
Start 1 stitch before the marker thread, 1 yarn over, knit 2 (marker thread sits between these 2 stitches), 1 yarn over. On the next round knit the yarn overs twisted to avoid holes. Then work the new stitches in stocking stitch.

-------------------------------------------------------

START THE PIECE HERE:

-------------------------------------------------------

JUMPER – SHORT OVERVIEW OF THE PIECE:
The piece is worked bottom up in sections, back and forth, then sewn together. The neckline is worked by displacing stitches so there are increasing numbers of ribbed stitches towards mid-front and fewer stocking stitches towards the side. The sleeves are worked in the round, bottom up. The neck is worked to finish.

BACK PIECE:
Cast on 87-96-102-111-120-129 stitches with circular needle size 4 mm and DROPS Air. Purl 1 row from the wrong side, then work rib as follows:
Work 1 GARTER STITCH – read description above, * knit 1, purl 2 *, work from *-* until there are 2 stitches left, knit 1 and 1 garter stitch. Continue this rib back and forth for 8 cm. Knit 1 row from the right side and decrease 9-10-10-11-10-11 stitches evenly spaced = 78-86-92-100-110-118 stitches. Change to circular needle size 5.5 mm. Continue with stocking stitch and 1 garter stitch on each side. REMEMBER THE KNITTING TENSION!

When the piece measures 36-37-38-39-40-41 cm, cast off 2-5-6-8-12-14 stitches for the armholes at the beginning of the next 2 rows = 74-76-80-84-86-90 stitches.
Continue with stocking stitch and 1 garter stitch on each side.
When the piece measures 54-56-58-60-62-64 cm, cast off the middle 36-36-36-42-42-42 stitches for the neck and finish each shoulder separately. Cast off 1 stitch on the next row from the neck = 18-19-21-20-21-23 stitches. Continue with stocking stitch and 1 garter stitch on each side until the piece measures 56-58-60-62-64-66 cm. Cast off. Work the other shoulder in the same way.

FRONT PIECE:
Cast on 92-98-104-116-122-134 stitches with circular needle size 4 mm and DROPS Air. Purl 1 row from the wrong side, then work rib as follows:
1 garter stitch, * knit 1, purl 2 *, work from *-* over the first 21-24-27-33-36-42 stitches, knit 1, work A.1, knit 2, A.1, knit 2, A.1, * knit 1, purl 2 *, work from *-* over the next 21-24-27-33-36-42 stitches, knit 1 and 1 garter stitch. Continue this rib back and forth for 8 cm.

Change to circular needle size 5.5 mm. Work as follows from the right side: 1 garter stitch, 22-25-28-34-37-43 stitches in stocking stitch and decrease 1-0-0-2-0-2 stitches evenly over these stitches, A.2, knit 2, A.2, knit 2, A.2, 22-25-28-34-37-43 stitches in stocking stitch and decrease 1-0-0-2-0-2 stitches evenly spaced, 1 garter stitch = 90-98-104-112-122-130 stitches.
Continue the pattern, with 21-25-28-32-37-41 stitches in stocking stitch and 1 garter stitch on each side. REMEMBER THE KNITTING TENSION!

Work until the piece measures 35-36-37-38-39-40 cm. Now divide the piece and displace stitches for the neckline. Place the last 45-49-52-56-61-65 stitches on a thread and work the first 45-49-52-56-61-65 stitches:

LEFT FRONT PIECE:
Work first row from the right side as follows: 1 garter stitch, stocking stitch over the next 21-25-28-32-37-41 stitches, continue A.2, work 2 stitches in stocking stitch, purl 3, knit 1, 3 garter stitches and cast on 4 stitches at the end of the row = 49-53-56-60-65-69 stitches.

Work as follows from the wrong side: Work 7 garter stitches, purl 1, knit 3, purl 2, work A.2, work to the end of the row as before.

Continue this pattern and work NECK DISPLACEMENTS – read description above (in addition, cast off for the armhole – see below). Increase 1 stitch and decrease 1 stitch every 4th row (every 2nd row from the right side) 12-12-12-15-15-15 times in total. NOTE! And increase 1 extra stitch as described in NECK DISPLACEMENTS 4-4-4-5-5-5 times. Increasing numbers of rib stitches towards mid-front and fewer stocking stitches towards the side. Decrease and increase on each side of A.2. A.2 + 2 stocking stitches continue upwards and are displaced towards the shoulder.

AT THE SAME TIME, when the piece measures 36-37-38-39-40-41 cm cast off the first 2-5-6-8-12-14 stitches from the side for the armhole. When the neck displacements are finished there are 51-52-54-57-58-60 stitches. Continue working until the piece measures 55-57-59-61-63-65 cm. Decrease 6 stitches evenly over the cable in A.2 then cast off the first 18-19-21-20-21-23 stitches from the side = 27-27-27-31-31-31 stitches. Lay the piece to one side and work the right front piece.

RIGHT FRONT PIECE:
Cast on 4 stitches, place the 45-49-52-56-61-65 stitches back on the needle and work them as follows: 3 garter stitches, knit 1, purl 3, knit 2, work A.2, stocking stitch until there is 1 stitch left, 1 garter stitch = 49-53-56-60-65-69 stitches.
Work as follows from the wrong side:
1 garter stitch, 21-25-28-32-37-41 stitches in stocking stitch, A.2 as before, purl 2, knit 3, purl 1 and 7 garter stitches.

Continue this pattern and work NECK DISPLACEMENTS (remember to cast off for the armhole – see below). Increase 1 stitch and decrease 1 stitch every 4th row (every 2nd row from the right side) 12-12-12-15-15-15 times in total. NOTE! And increase 1 extra stitch as described in NECK DISPLACEMENTS 4-4-4-5-5-5 times. Increasing numbers of rib stitches towards mid-front and fewer stocking stitches towards the side. Decrease and increase on each side of A.2. A.2 + 2 stocking stitches continue upwards and are displaced towards the shoulder.
Remember the BUTTONHOLES – read description above.

AT THE SAME TIME, when the piece measures 36-37-38-39-40-41 cm cast off the first 2-5-6-8-12-14 stitches from the side for the armhole. When the neck displacements are finished there are 51-52-54-57-58-60 stitches. Continue working until the piece measures 55-57-59-61-63-65 cm. Decrease 6 stitches evenly over the cable in A.2 then cast off the first 18-19-21-20-21-23 stitches from the side = 27-27-27-31-31-31 stitches.

SLEEVES:
Cast on 45-45-48-48-51-54 stitches with double pointed needles size 4 mm. Knit 1 round, then work rib (knit 1, purl 2) in the round for 8 cm. Change to double pointed needles size 5.5 mm. Insert a marker at the beginning of the round = mid-under sleeve. Continue with stocking stitch. When the sleeve measures 11-12-11-12-10-13 cm, increase 1 stitch on each side of the marker-thread – read INCREASE TIP. Increase like this every 4-3-3-2½-2½-2 cm a total of 10-12-12-13-13-13 times = 65-69-72-74-77-80 stitches. When the sleeve measures 49-47-46-45-42-41 cm, work the sleeve cap back and forth (from mid-under sleeve) until the sleeve measures 50 cm in all sizes, i.e., a split of 1-3-4-5-8-9 cm at the top. Cast off. Work the other sleeve in the same way.

ASSEMBLY:
Sew the shoulder seams. Sew the sleeve cap to the armhole, then the split to the bottom of the armhole – see sketch. Sew the side seams, leaving a split of 8 cm at the bottom.

NECK:
Use circular needle size 4 mm and work the 27-27-27-31-31-31 stitches from the right front piece, knit up 37-37-37-45-45-45 stitches along the back piece and work the 27-27-27-31-31-31 stitches from the left front piece = 91-91-91-107-107-107 stitches. Work as follows from the wrong side: 7 band stitches in garter stitch, * purl 1, knit 3 *, work from *-* until there are 8 stitches left, purl 1 and 7 band stitches in garter stitch. Work this rib back and forth for 8 cm, cast off with knit over knit and purl over purl. Lay the right band over the left and sew together the opening at the bottom. Sew the buttons onto the left band.

This pattern has been corrected.

Updated online: 15.01.2024
Needle size has been updated to size 5,5 mm.

Diagram

symbols = Sleeve cap sewn to armhole: a to A and b to B
symbols = knit from right side, purl from wrong side
symbols = purl from right side, knit from wrong side
symbols = place 5 stitches on cable needle in front of piece, knit 5, knit 5 from cable needle
diagram
diagram
diagram

Each of our patterns has specific tutorial videos to help you.

Do you have a question? See a list of frequently asked questions (FAQ)

Knitting tension is what determines the final measurements of your work, and is usually measured per 10 x 10 cm. It is provided like so: number of stitches in width x number of rows in height - eg: 19 stitches x 26 rows = 10 x 10 cm.

The knitting tension is very individual; some people knit/crochet loosely while others work tightly. You adjust the knitting tension with the needle size, which is why the suggested needle size is only meant as a guide! You need to adjust this (up or down) to ensure that YOUR knitting tension matches the knitting tension provided in the pattern. If you work with a different knitting tension than provided you will have a different yarn consumption, and your work will have different measurements than what the pattern suggests.

The knitting tension also determines which yarns can replace each other. As long as you achieve the same knitting tension you can replace one yarn with another.

See DROPS lesson: How to measure your tension/gauge

See DROPS video: How to make a gauge tension swatch

The required amount of yarn is provided in grams, eg: 450 g. To calculate how many balls you’ll need you first need to know how many grams are in 1 ball (25g, 50g or 100g). This information is available if you click on the individual yarn quality on our pages. Divide the amount required with the amount of each ball. For example, if each ball is 50g (the most common amount), the calculation will be as follows: 450 / 50 = 9 balls.

The important thing when changing from one yarn to another is that the knitting/crochet tension remains the same. This is so that the measurements of the finished piece will be the same as on the sketch provided. It is easier to achieve the same knitting tension using yarns from the same yarn group. It is also possible to work with multiple strands of a thinner yarn to achieve the knitting tension of a thicker one. Please try our yarn converter. We recommend you to always work a test swatch.

Please NOTE: when changing yarn the garment might have a different look and feel to the garment in the photo, due to individual properties and qualities of each yarn.

See DROPS lesson: Can I use a different yarn than the one mentioned in the pattern?

All our yarns are categorised into yarn groups (from A to F) according to thickness and knitting tension – group A contains the thinnest yarns and group F the thickest. This makes it easier for you to find alternative yarns to our patterns, should you wish to switch yarn. All yarns within the same group have a similar knitting tension and can easily replace each other. However, different yarn qualities have different structures and properties which will give the finished work a unique look and feel.

Click here for an overview of the yarns in each yarn group

At the top of all our patterns you’ll find a link to our yarn calculator, which is a helpful tool should you wish to use a different yarn than suggested. By filling in the yarn quality you wish to replace, the amount (in your size) and number of strands, the calculator will present good alternative yarns with the same knitting tension. Additionally it will tell you how much you’ll require in the new qualities and whether you’ll need to work with multiple strands. Most skeins are 50g (some are 25g or 100g).

If the pattern is worked with multiple colours, every colour will have to be calculated separately. Similarly, if the pattern is worked with several strands of different yarns (for example 1 strand Alpaca and 1 strand Kid-Silk) you will have to find alternatives for each, individually.

Click here to see our yarn calculator

Since different yarns have different qualities and textures we have chosen to keep the original yarn in our patterns. However, you can easily find options among our available qualities by using our yarn calculator, or simply pick a yarn from the same yarn group.

It is possible that some retailers still have discontinued yarns in stock, or that someone has a few skeins at home that they would like to find patterns for.

The yarn calculator will provide both alternative yarn as well as required amount in the new quality.

If you think it's hard to decide what size to make, it can be a good idea to measure a garment you own already and like the size of. Then you can pick the size by comparing those measures with the ones available in the pattern's size chart.

You'll find the size chart at the bottom of the pattern.

See DROPS lesson: How to read size chart

The needle size provided in the pattern serves only as a guide, the important thing is to follow the knitting tension. And since knitting tension is very individual, you will have to adjust the needle size to ensure that YOUR tension is the same as in the pattern – maybe you’ll have to adjust 1, or even 2 needle sizes, up or down to achieve the correct tension. For this, we recommend that you work test swatches.

Should you work with a different knitting tension than the one provided, the measurements of the finished garment might deviate from the measurement sketch.

See DROPS lesson: How to measure your tension/gauge

See DROPS video: How to make a tension/gauge swatch

Working a garment top-down provides more flexibility and room for personal adjustment. For example it is easier to try the garment on while working, as well as making adjustments to length of yoke and shoulder caps.

The instructions are carefully explaining every step, in the correct order. Diagrams are adjusted to the knitting direction and are worked as usual.

The diagram depicts all rows/rounds, and every stitch seen from the right side. It is read from bottom to top, from right to left. 1 square = 1 stitch.

When working back and forth, every other row is worked from the right side and every other row is worked from the wrong side. When working from the wrong side, the diagram will have to be worked reversed: from left to right, knit stitches are purled, purl stitches are knit etc.

When working in the round every round is worked from the right side and the diagram are worked from right to left on all rounds.

See DROPS lesson: How to read knitting diagrams

The diagram depicts all rows/rounds, and every stitch seen from the right side. It is worked from bottom to top, from right to left.

When working back and forth every other row is worked from the right side: from right to left and every other row is worked from the wrong side: from left to right.

When working in the round, every row in the diagram are worked from the right side, from right to left.

When working a circular diagram you start in the middle and work your way outwards, counter clockwise, row by row.

The rows usually start with a given number of chain stitches (equivalent to the height of the following stitch), this will either be depicted in the diagram or explained in the pattern.

See DROPS lesson: How to read crochet diagrams

Instructions for working several diagrams after each other on the same row/round, will often be written like so: “work A.1, A.2, A.3 a total of 0-0-2-3-4 times". This means you work A.1 once, then A.2 is worked once, and A.3 is repeated (in width) the number of times provided for your size – in this case like so: S = 0 times, M = 0 times, L=2 times, XL= 3 times and XXL = 4 times.

The diagrams are worked as usual: begin with the first row in A.1, then work the first row in A.2 etc.

See DROPS lesson: How to read knitting diagrams

See DROPS lesson: How to read crochet diagrams

The total width of the garment (from wrist-to-wrist) will be larger in the larger sizes, despite the actual sleeves being shorter. The larger sizes have longer sleeve caps and wider shoulders, so there will be a good fit in all sizes.

The measurement sketch/schematic drawing provides information regarding the full length of the garment. If it’s a jumper or a jacket the length is measured from the highest point on the shoulder closest to the neckline, and straight down to the bottom of the garment. It is NOT measured from the tip of shoulder. Similarly, the length of yoke is measured from the highest point on the shoulder and down to where yoke is split into body and sleeves.

On a jacket measures are never taken along bands, unless specifically stated. Always measure inside band stitches when measuring the length.

See DROPS lesson: How to read a schematic drawing

Diagrams are often repeated on the round or in height. 1 repeat is the diagram the way it appears in the pattern. If it says to work 5 repeats of A.1 in the round, then you work A.1 a total of 5 times after/next to each other in the round. If it says to work 2 repeats of A.1 vertically/in height you work the entire diagram once, then begin again at the start and work the entire diagram one more time.

Chain stitches are slightly narrower than other stitches and to avoid working the cast-on edge too tight, we simply chain more stitches to begin with. The stitch count will be adjusted on the following row to fit the pattern and measurement sketch.

The rib edge is more elastic and will contract slightly compared to, for example, stocking stitch. By increasing before the rib edge, you avoid a visible difference in width between the rib edge and the rest of the body.

It’s very easy to cast off too tightly, and by making yarn overs while casting off (and simultaneously casting these off) you avoid a too tight cast off edge.

See DROPS video: How to bind off with yarn overs (yo)

To achieve an even increase (or decrease) you can increase on, for example: every 3rd and 4th row alternately, like so: work 2 rows and increase on the 3rd row, work 3 rows and increase on the 4th. Repeat this until the increase is complete.

See DROPS lesson: Increase or decrease 1 st on every 3rd and 4th row alternately

Should you prefer to work in the round instead of back and forth, you may of course adjust the pattern. You’ll need to add steeks mid-front (usually 5 stitches), and follow the instructions. When you would normally turn and work from the wrong side, simply work across the steek and continue in the round. At the end you’ll cut the piece open, pick up stitches to work bands, and cover the cut edges.

See DROPS video: How to knit steeks and cut open

Should you prefer to work back and forth instead of in the round, you may of course adjust the pattern so you work the pieces separately and then assemble them at the end. Divide the stitches for the body in 2, add 1 edge stitch in each side (for sewing) and work the front and back pieces separately.

See DROPS lesson: Can I adapt a pattern for circular needles into straight needles?

Pattern repeats can vary slightly in the different sizes, in order to get the correct proportions. If you’re not working the exact same size as the garment in the photo, yours might deviate slightly. This has been carefully developed and adjusted so that the complete impression of the garment is the same in all sizes.

Make sure to follow instructions and diagrams for your size!

If you have found a pattern you like which is available in women’s size it’s not very difficult to convert it to men’s size. The biggest difference will be the length of sleeves and body. Start working on the women size that you think would fit across the chest. The additional length will be worked right before you cast off for the armhole/sleeve cap. If the pattern is worked top-down you can add the length right after the armhole or before the first decrease on sleeve.

Regarding additional yarn amount, this will depend on how much length you add, but it is better with a skein too many than too few.

All yarns will have excess fibres (from production) that might come off as lint or shedding. Brushed yarns (ie hairier yarns) have more of these loose, excess fibres, causing more shedding.

Shedding also depends on what is worn under or over the garment, and whether this pulls at the yarn fibres. It’s therefore not possible to guarantee that there will be no shedding

Below are some tips on how to get the best result when working with hairier yarns:

1. When the garment is finished (before you wash it) shake it vigorously so the looser hairs come off. NOTE: do NOT use a lint roller, brush or any method that pulls at the yarn.

2. Place the garment in a plastic bag and put it in your freezer - the temperature will cause the fibres to become less attached to each other, and excess fibres will come off easier.

3. Leave in the freezer for a few hours before taking it out and shaking it again.

4. Wash the garment according to the instructions on the yarn label.

Pilling is a natural process that happens to even the most exclusive of fibers. It's a natural sign of wear and tear that is hard to avoid, and that is most visible in high friction areas of your garment like a sweater's arms and cuffs.

You can make your garment look as new by removing the pilling, using a fabric comb or a pill/lint remover.

Still can't find the answer you need? Then scroll down and leave your question so one of our experts can try to help you. This will be done normally within 5 to 10 working days.
In the meantime, you can read the questions and answers that others have left to this pattern or join the DROPS Workshop on Facebook to get help from fellow knitters/crocheters!

You might also like...

Post a comment to pattern DROPS 245-17

We would love to hear what you have to say about this pattern!

If you want to leave a question, please make sure you select the correct category in the form below, to speed up the answering process. Required fields are marked *.

Comments / Questions (10)

country flag Sue Millbank wrote:

I have come to a standstill with this pattern, at the point when the front divides and the neck displacement begins. I can understand how the decrease works at the sleeve side of the piece, but I can't understand how the section between the cable and the split in the middle work after casting on the extra 4 stitches at the end of the row (middle neck). Grateful for any advice.

25.04.2024 - 01:09

DROPS Design answered:

Dear Mrs Millbank, to displace the pattern, ie to increase to rib pattern at the beg of left front piece, you will decrease 1 stitch before K1 and A.2 and increase 1 st after A.2 + K2, ie at the transition between rib and A.2 to increase the rib pattern and decrease the cable pattern. Happy knitting!

25.04.2024 - 08:24

country flag Corrine Lawrence wrote:

Hi there I want to knit this jumper using Alpaca and Kid-Silk held together (both of which are from the yarn group A. Air is classed as 10 ply but Alpaca (5 ply) and Kid-Silk (2 ply) add up to only 7 ply. Will this be ok or will it throw out the pattern's tension/gauge? Would it be better to hold 2 strands of Kid-Silk and Alpaca (to give 9 ply)? Many thanks

14.03.2024 - 15:04

DROPS Design answered:

Dear Mrs Lawrence, you can replace 1 strand yarn group C (Air here) with 2 strands yarn group A (Alpaca + Kid-Silk), you should get same tension, but of course as these yarns are different the texture will be different too; See an example of this combination here. And remember (as always) to check your tension and adjust needle size if needed. Happy knitting!

14.03.2024 - 16:21

country flag Hanne wrote:

Jeg forstår ikke opskriften. Hva betyr A. 1 og A.2. Og finner ingen forklaring. Vennlig hilsen Hanne

13.03.2024 - 22:02

DROPS Design answered:

Hei Hanne, A.1 og A.2 er diagrammene som du finner på bunnen av oppskriften, med symbolforklaringer ved siden av hvert diagram. God fornøyelse!

14.03.2024 - 12:29

country flag Wilma Strijbosch wrote:

In telpatroon A2 staat volgens mij een fout. Het kabelen staat op naald 6, terwijl dat normaal gesproken een teruggaande naald is. Moet dit niet naald 7 zijn?

22.01.2024 - 20:25

DROPS Design answered:

Dag Wilma,

Ja, ik denk dat je gelijk hebt. Je zou de kabel 1 naald op kunnen schuiven, zodat je hij steeds aan de goede kant komt. Ik zal het doorgeven aan de ontwerpafdeling om na te kijken.

24.01.2024 - 09:49

country flag Christel wrote:

Zu Anfang wird 5,5 Rundnadel und 5,5 Nadelspiel angegeben. In der Anleitung werden Nadeln Nr. 5 verwendet. Ist die Maschenprobe dann mit Nr. 5 gestrickt? Toller Pullover.

13.01.2024 - 10:51

DROPS Design answered:

Liebe Christel, danke für den Hinweis, eine Korrektur erfogt, hier werden die Nadeln Nr 5,5 benutzt. Viel Spaß beim stricken!

15.01.2024 - 09:39

country flag Marleen Boumans wrote:

Bij het opnemen van de steken van het achterpand(om de hals te breien)heb ik last van de twee iets hogere schouderdelen. In de beschrijving staat niet dat je die steken ook moet opnemen.

07.11.2023 - 09:53

DROPS Design answered:

Dag Marleen,

In het schuine stukje van de schouder moet je inderdaad ook steken opnemen. Mocht er een hiaat ontstaan in de overgang van het rechte naar het schuine deel, dan kun je de draad tussen 2 steken opnemen en deze samen breien met de volgende steek.

13.11.2023 - 06:45

country flag Rosebel wrote:

I really want to knit this pattern but in DK/8piy yarn. To do this successfully should I make it 2 sizes bigger to allow for yarn weight difference?

10.10.2023 - 00:31

DROPS Design answered:

Dear Mrs Rosebel, this jumper is worked with a tension of 16 sts x 20 rows = 10 x 10 cm, if your tension is different, you have to make all your maths with the basis on your own tension - you can get helped from the measurement chart. Feel free to ask any assistance from the store where you bought the yarn. Happy knitting!

10.10.2023 - 09:14

country flag Lígia Rodrigues wrote:

Live Rust

07.08.2023 - 10:21

country flag Inger Holzmann wrote:

Twist my air

06.08.2023 - 12:16

country flag Dianne wrote:

Cross roads

04.08.2023 - 01:06