DROPS Air
DROPS Air
65% Alpaca, 28% Polyamide, 7% Wool
from 6.45 $ /50g
Get the yarn to make this pattern from 51.60$.

The yarn cost is calculated from the pattern’s smallest size and the yarn’s cheapest product type. Looking for an even better price? You might find it on the DROPS Deals!

DROPS SS24

Irish Hill

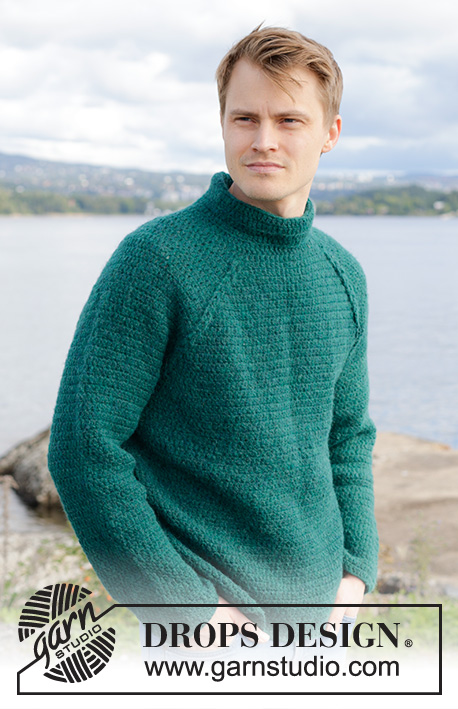
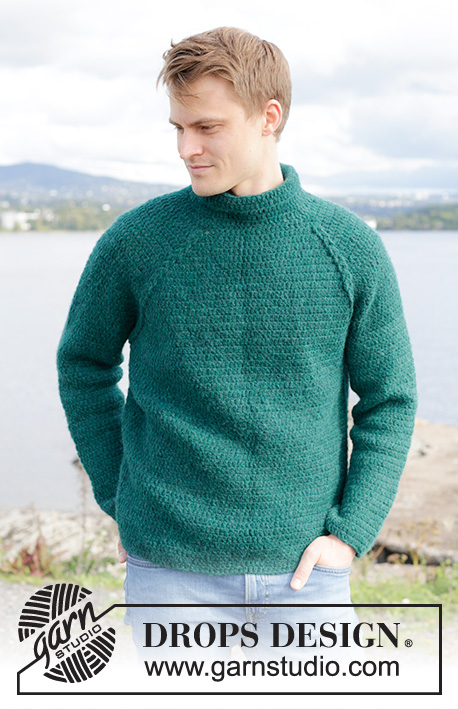
Crocheted sweater for men in DROPS Air. The piece is worked top down with raglan, cables and long sleeves. Size S - XXXL.

DROPS 246-5
DROPS Design: Pattern ai-468
Yarn group C or A + A
-------------------------------------------------------

SIZES:
S - M - L - XL - XXL – XXXL

Finished measurements:
Chest measurements: 98-102-112-122-132-146 cm = 38½"-40"-44"-48"-52"-57⅜"
Full length: 62-64-66-68-70-72 cm = 24⅜"-25¼"-26"-26¾"-27½"-28⅜"
All measurements in charts are in cm.

YARN:
DROPS AIR from Garnstudio (belongs to yarn group C)
400-450-500-550-600-650 g color 19, forest green

CROCHET HOOK:
DROPS CROCHET HOOK SIZE 5 MM = US H/8.

CROCHET GAUGE:
14 double crochets in width and 8.5 rows in height = 10 x 10 cm = 4" x 4".
Hook size is only a guide. If you get too many stitches on 10 cm = 4", change to a larger hook size. If you get too few stitches on 10 cm = 4", change to a smaller hook size.

-------------------------------------------------------

Alternative Yarn – See how to change yarns here
Yarn Groups A to F – Use the same pattern and change the yarn here
Yarn usage using an alternative yarn – Use our yarn converter here

-------------------------------------------------------

DROPS Air
DROPS Air
65% Alpaca, 28% Polyamide, 7% Wool
from 6.45 $ /50g
Get the yarn to make this pattern from 51.60$.

The yarn cost is calculated from the pattern’s smallest size and the yarn’s cheapest product type. Looking for an even better price? You might find it on the DROPS Deals!

Pattern instructions

NOTE: This pattern is written in American English. All measurements in charts are in cm. For conversion from inches to cm - click here. There are different terms for crocheting in American and British English. If this pattern includes crochet, click for "crochet terms" here. For this pattern in British English, please click here.
-------------------------------------------------------

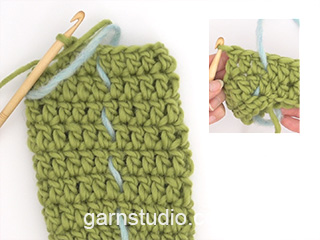
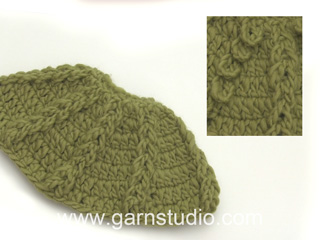
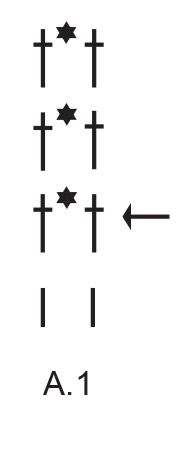
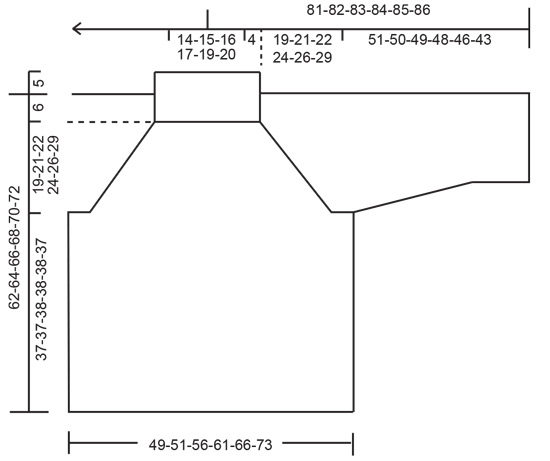
EXPLANATIONS FOR THE PATTERN:
-------------------------------------------------------

CHAIN STITCH:
If you work outermost on the hook the chain stitch will often be too tight; 1 chain stitch should be as long as 1 double crochet is wide.


CROCHET INFORMATION-1:
At the beginning of each round of half-double/double crochets work 2/3 chain stitches which replace the first half-double/double crochet. The round finishes with 1 slip stitch in the second/third chain stitch at the beginning of the round.

CROCHET INFORMATION-2 (working round and round):
On the body and sleeves you work in the round but without finishing at the end of each round; the beginning of the round will be displaced as you work. Round 1 is not finished in the normal way but the first double crochet at the beginning of round 2 is worked in the first double crochet on round 1. Then continue working 1 double crochet in each double crochet. On the sleeve, a marker-thread is inserted mid-under the sleeve between 2 stitches. On the body a marker-thread is inserted on the side, where the round started. Allow these threads to follow your work onwards, keeping them vertically in line on both the sleeve and the body. Lay the garment flat so you can check the markers are still in the correct position.
On the last round at the bottom of the body and sleeves, work as follows to prevent a jog at the end of the round: Work until there are 2 double crochets left, work 1 half-double crochet in the next double crochet, 1 double crochet in the last double crochet and finish the round with 1 slip stitch in the first double crochet at the beginning of the round.

PATTERN:
See diagram A.1.

RAGLAN:
Increase for raglan by working several double crochets in the first/last double crochet in A.1. The increased stitches are continued with double crochets.

DECREASE TIP-1 (sleeves):
The marker-thread sits between 2 double crochets under the sleeve. Decrease as follows on each side of the marker-thread: Work until there are 3 double crochets left before the marker-thread, work 2 double crochets together as follows:
* Make 1 yarn over, insert the hook into the next stitch, pick up the strand, make 1 yarn over and pull it through the first 2 loops on the hook *, work from *-* 1 more time, make 1 yarn over and pull it through all 3 loops on the hook (1 stitch decreased). Work 1 double crochet in each of the next 2 double crochets (marker-thread sits between these 2 stitches), repeat from *-* 1 more time.
DECREASE TIP-2 (neck):
Decrease by working 2 double crochets together as follows: * Make 1 yarn over, insert the hook into the next stitch, pick up the strand, make 1 yarn over and pull it through the first 2 loops on the hook *, work from *-* 1 more time, make 1 yarn over and pull it through all 3 loops on the hook (1 stitch decreased).

-------------------------------------------------------

START THE PIECE HERE:

-------------------------------------------------------

SWEATER - SHORT OVERVIEW OF THE PIECE:
The yoke is worked in the round, from mid-back and top down. The yoke is divided for the body and sleeves, which are then finished separately. The neck is worked in the round to finish.

YOKE:
Use crochet hook size 5 MM = US H/8 and DROPS Air. Read CHAIN STITCH in explanations above. Work 72-76-78-82-86-90 slightly loose chain stitches and form them into a ring with 1 slip stitch in the first chain stitch. Read CROCHET INFORMATION-1 and work 1 half-double crochet in each chain stitch = 72-76-78-82-86-90 half-double crochets. Continue in the round as follows: Work double crochets over the first 8-9-9-10-11-13 stitches (approx. half back piece), A.1 over the next 2 stitches (raglan), double crochets over the next 16 stitches (sleeve), A.1 over the next 2 stitches (raglan), double crochets over the next 16-18-19-21-23-26 stitches (front piece), A.1 over the next 2 stitches (raglan), double crochets over the next 16 stitches (sleeve), A.1 over the next 2 stitches (raglan), double crochets over the last 8-9-10-11-12-13 stitches (half back piece). Insert a marker in the middle of the round (mid-front), the yoke is measured from here.
Continue with double crochets and A.1, AT THE SAME TIME increase for RAGLAN on the first round – read description above, working as follows: Work to A.1 (between back piece and sleeve), work 3 double crochets in the first double crochet and 2 double crochets in the last double crochet in A.1, work to next A.1 (between sleeve and front piece), work 2 double crochets in the first double crochet and 3 double crochets in the last double crochet in A.1, work to next A.1 (between front piece and sleeve), work 3 double crochets in the first double crochet and 2 double crochets in the last double crochet in A.1, work to the next A.1 (between sleeve and back piece), work 2 double crochets in the first double crochet and 3 double crochets in the last double crochet in A.1, work to end of round.
4 stitches increased on the back and front pieces and 2 stitches increased on each sleeve = 12 increases on the round.
Repeat these increases every round for a total of 6-6-5-7-8-9 times = 144-148-138-166-182-200 double crochets.
REMEMBER THE CROCHET GAUGE!

Now increase just 2 stitches on the front and back pieces and continue the sleeve increases as before, working as follows:
Work to A.1 (between back piece and sleeve), work 2 double crochets in the first double crochet and 2 double crochets in the last double crochet in A.1, work to next A.1 (between sleeve and front piece), work 2 double crochets in the first double crochet and 2 double crochets in the last double crochet in A.1, work to next A.1 (between front piece and sleeve), work 2 double crochets in the first double crochet and 2 double crochets in the last double crochet in A.1, work to the next A.1 (between sleeve and back piece), work 2 double crochets in the first double crochet and 2 double crochets in the last double crochet in A.1, work to end of round.
2 stitches increased on the front and back pieces and 2 stitches increased on each sleeve = 8 increases on the round.
Repeat these increases every round 7-10-12-12-11-12 times, a total of 13-16-17-19-19-21 times on the front and back pieces and sleeves = 200-228-234-262-270-296 double crochets. The sleeve increases are finished.
Continue increasing on the front and back pieces 2-0-2-0-1-1 more times, a total of 15-16-19-19-20-22 times on the front and back pieces and 13-16-17-19-19-21 times on the sleeves = 208-228-242-262-274-300 double crochets.
Continue working as before without further increases until the yoke measures 19-21-22-24-26-29 cm = 7½"-8¼"-8¾"-9½"-10¼"-11⅜" from the marker.
Fasten the last stitch on the round with a marker or thread so it doesn’t unravel – the hook is now used to cable together the chain-stitch loops in each A.1.
Work as follows:
Insert the hook, from the right side, down into the first chain-stitch loop by the neck, pull the second chain-stitch loop through the first, insert the hook down into the 2nd chain-stitch loop and pull the third chain-stitch loop through the second. Continue like this until all the loops are cabled together. Repeat on all raglan-lines. Insert a marker or a thread in the last loop on each line so it doesn’t unravel.

Work the next round from where the round finished on the yoke as follows:
(The chain-stitch loops in A.1 are not counted in the stitch count; 1 double crochet is worked around the last chain-stitch loop in each cable so it doesn’t unravel and this double crochet is skipped on the next round):
Work double crochets over the first 29-31-33-36-39-44 double crochets, work 1 double crochet in the first double crochet in A.1, work 1 double crochet around the chain-stitch loop, 1 double crochet in the last double crochet in A.1, work 6-6-8-8-10-10 loose chain stitches (= under sleeve), skip the next 42-48-50-54-54-58 double crochets (= sleeve), work 1 double crochet in the first double crochet in A.1, work 1 double crochet around the chain-stitch loop, 1 double crochet in the last double crochet in A.1, work 1 double crochet in each of the next 58-62-67-73-79-88 double crochets, work 1 double crochet in the first double crochet in A.1, work 1 double crochet around the chain-stitch loop, 1 double crochet in the last double crochet in A.1, work 6-6-8-8-10-10 loose chain stitches (= under sleeve), skip the next 42-48-50-54-54-58 double crochets (= sleeve), work 1 double crochet in the first double crochet in A.1, work 1 double crochet around the chain-stitch loop, 1 double crochet in the last double crochet in A.1, work 1 double crochet in each of the last 29-31-34-37-40-44 double crochets. Cut and fasten the strand. The body and sleeves are finished separately.

BODY:
Start in the 3rd-3rd-4th-4th-5th-5th chain stitch worked under one sleeve. Fasten the strand and work 1 double crochet in this chain stitch, work 1 half-double crochet in the next chain stitch, work 1 double crochet in each of the remaining stitches. NOTE! Do not finish the round as usual - read CROCHET INFORMATION-2 = 136-144-158-170-186-204 double crochets. Work 1 double crochet in each double crochet until the piece measures 37-37-38-38-38-37 cm = 14½"-14½"-15"-15"-15"-14½" from the division - remember CROCHET INFORMATION-2 when working the last round. Cut and fasten the strand. The sweater measures approx. 62-64-66-68-70-72 cm = 24⅜"-25¼"-26"-26¾"-27½"-28⅜" from the shoulder.

SLEEVES:
Start in the 3rd-3rd-4th-4th-5th-5th chain stitch worked under one sleeve.
Fasten the strand and work 1 double crochet in this chain stitch, work 1 half-double crochet in the next chain stitch, work 1 double crochet in each of the next 0-0-1-1-2-2 chain stitches (1 chain stitch left), work 2 double crochets together as follows: work 1 double crochet in the last chain stitch but wait with the last yarn over and pull-through, work 1 double crochet like this in the transition between body and sleeve, make i yarn over and pull it through all 3 loops on the hook. This avoids a gap between the body and sleeve. Work 1 double crochet in each double crochet as far as the chain stitches under the sleeve, work 2 double crochets together in the transition between sleeve and body and work 1 double crochet in each of the remaining chain stitches - remember CROCHET INFORMATION-2 = 48-54-58-62-64-68 double crochets.
Work 1 double crochet in each double crochet until the sleeve measures 4-4-3-3-3-2 cm = 1½"-1½"-1⅛"-1⅛"-1⅛"-¾". Now start to decrease under the sleeve – read DECREASE TIP-1. Decrease every 8-5½-5-3½-3½-2½ cm = 3⅛"-2⅛"-2"-1¼"-1¼"-1" a total of 6-8-9-11-11-13 times = 36-38-40-40-42-42 stitches.
Work 1 double crochet in each double crochet until the sleeve measures 51-50-49-48-46-43 cm = 20"-19¾"-19¼"-19"-18"-17" - remember CROCHET INFORMATION-2 when working the last round.
Work the other sleeve in the same way.

DOUBLE NECK:
Use hook size 5 MM = US H/8 and DROPS Air. Start mid-back.
ROUND 1: Work 1 double crochet between each half-double crochet from round 1 on the yoke = 72-76-78-82-86-90 double crochets – read CROCHET INFORMATION-1.
ROUND 2: Work double crochets in the back loops of all stitches.
ROUND 3: Work double crochets (through both loops) of all stitches.
ROUND 4: Work double crochets in the back loops of all stitches.
ROUND 5: Work double crochets (through both loops) of all stitches.
ROUND 6: Work double crochets in the back loops of all stitches.
ROUNDS 7-9: Work double crochets (through both loops) of all stitches.
Cut the strand and pull it through the last loop.

ASSEMBLY:
Fold the neck double to the inside and sew down with a couple of stitches.

Diagram

All measurements in charts are in cm.

symbols = half-double crochet
symbols = start on this round; previous round already worked
symbols = 1 double crochet in stitch below
symbols = Work 10 chain stitches – remember CHAIN STITCH, work 1 slip stitch in the first of these 10 chain stitches to make a chain-stitch loop. Tighten the strand slightly before continuing.
diagram
diagram
Do you have a question? See a list of frequently asked questions (FAQ)

Knitting tension is what determines the final measurements of your work, and is usually measured per 10 x 10 cm. It is provided like so: number of stitches in width x number of rows in height - eg: 19 stitches x 26 rows = 10 x 10 cm.

The knitting tension is very individual; some people knit/crochet loosely while others work tightly. You adjust the knitting tension with the needle size, which is why the suggested needle size only serve as a guide! You need to adjust this (up or down) to ensure that YOUR knitting tension matches the knitting tension provided in the pattern. If you work with a different knitting tension than provided you will have a different yarn consumption, and your work will have different measurements than what the pattern suggests.

The knitting tension also determines which yarns can replace each other. As long as you achieve the same knitting tension you can replace one yarn with another.

See DROPS lesson: How to measure your tension/gauge

See DROPS video: How to make a gauge tension swatch

The required amount of yarn is provided in grams, eg: 450 g. To calculate how many balls you’ll need you first need to know how many grams are in 1 ball (25g, 50g or 100g). This information is available if you click on the individual yarn quality on our pages. Divide the amount required with the amount of each ball. For example, if each ball is 50g (the most common amount), the calculation will be as follows: 450 / 50 = 9 balls.

The important thing when changing from one yarn to another is that the knitting/crochet tension remains the same. This is so that the measurements of the finished piece will be the same as on the sketch provided. It is easier to achieve the same knitting tension using yarns from the same yarn group. It is also possible to work with multiple strands of a thinner yarn to achieve the knitting tension of a thicker one. Please try our yarn converter. We recommend you to always work a test swatch.

Please NOTE: when changing yarn the garment might have a different look and feel to the garment in the photo, due to individual properties and qualities of each yarn.

See DROPS lesson: Can I use a different yarn than the one mentioned in the pattern?

All our yarns are categorised into yarn groups (from A to F) according to thickness and knitting tension – group A contains the thinnest yarns and group F the thickest. This makes it easier for you to find alternative yarns to our patterns, should you wish to switch yarn. All yarns within the same group have a similar knitting tension and can easily replace each other. However, different yarn qualities have different structures and properties which will give the finished work a unique look and feel.

Click here for an overview of the yarns in each yarn group

At the top of all our patterns you’ll find a link to our yarn converter, which is a helpful tool should you wish to use a different yarn than suggested. By filling in the yarn quality you wish to replace, the amount (in your size) and number of strands, the converter will present good alternative yarns with the same knitting tension. Additionally it will tell you how much you’ll require in the new qualities and whether you’ll need to work with multiple strands. Most skeins are 50g (some are 25g or 100g).

If the pattern is worked with multiple colours, every colour will have to be converted separately. Similarly, if the pattern is worked with several strands of different yarns (for example 1 strand Alpaca and 1 strand Kid-Silk) you will have to find alternatives for each, individually.

Click here to see our yarn converter

Since different yarns have different qualities and textures we have chosen to keep the original yarn in our patterns. However, you can easily find options among our available qualities by using our yarn converter, or simply pick a yarn from the same yarn group.

It is possible that some retailers still have discontinued yarns in stock, or that someone has a few skeins at home that they would like to find patterns for.

The yarn converter will provide both alternative yarn as well as required amount in the new quality.

If you think it's hard to decide what size to make, it can be a good idea to measure a garment you own already and like the size of. Then you can pick the size by comparing those measures with the ones available in the pattern's size chart.

You'll find the size chart at the bottom of the pattern.

See DROPS lesson: How to read size chart

The needle size provided in the pattern serves only as a guide, the important thing is to follow the knitting tension. And since knitting tension is very individual, you will have to adjust the needle size to ensure that YOUR tension is the same as in the pattern – maybe you’ll have to adjust 1, or even 2 needle sizes, up or down to achieve the correct tension. For this, we recommend that you work test swatches.

Should you work with a different knitting tension than the one provided, the measurements of the finished garment might deviate from the measurement sketch.

See DROPS lesson: How to measure your tension/gauge

See DROPS video: How to make a gauge tension swatch

Working a garment top-down provides more flexibility and room for personal adjustment. For example it is easier to try the garment on while working, as well as making adjustments to length of yoke and shoulder caps.

The instructions are carefully explaining every step, in the correct order. Diagrams are adjusted to the knitting direction and are worked as usual.

The diagram depicts all rows/rounds, and every stitch seen from the right side. It is read from bottom to top, from right to left. 1 square = 1 stitch.

When working back and forth, every other row is worked from the right side and every other row is worked from the wrong side. When working from the wrong side, the diagram will have to be worked reversed: from left to right, knit stitches are purled, purl stitches are knit etc.

When working in the round every round is worked from the right side and the diagram are worked from right to left on all rounds.

See DROPS lesson: How to read knitting diagrams

The diagram depicts all rows/rounds, and every stitch seen from the right side. It is worked from bottom to top, from right to left.

When working back and forth every other row is worked from the right side: from right to left and every other row is worked from the wrong side: from left to right.

When working in the round, every row in the diagram are worked from the right side, from right to left.

When working a circular diagram you start in the middle and work your way outwards, counter clockwise, row by row.

The rows usually start with a given number of chain stitches (equivalent to the height of the following stitch), this will either be depicted in the diagram or explained in the pattern.

See DROPS lesson: How to read crochet diagrams

Instructions for working several diagrams after each other on the same row/round, will often be written like so: “work A.1, A.2, A.3 a total of 0-0-2-3-4 times". This means you work A.1 once, then A.2 is worked once, and A.3 is repeated (in width) the number of times provided for your size – in this case like so: S = 0 times, M = 0 times, L=2 times, XL= 3 times and XXL = 4 times.

The diagrams are worked as usual: begin with the first row in A.1, then work the first row in A.2 etc.

See DROPS lesson: How to read knitting diagrams

See DROPS lesson: How to read crochet diagrams

The total width of the garment (from wrist-to-wrist) will be larger in the larger sizes, despite the actual sleeves being shorter. The larger sizes have longer sleeve caps and wider shoulders, so there will be a good fit in all sizes.

The measurement sketch/schematic drawing provides information regarding the full length of the garment. If it’s a jumper or a jacket the length is measured from the highest point on the shoulder (usually closest to the neckline), and straight down to the bottom of the garment. It is NOT measured from the tip of shoulder. Similarly, the length of yoke is measured from the highest point on the shoulder and down to where yoke is split into body and sleeves.

See DROPS lesson: How to read a schematic drawing

Diagrams are often repeated on the round or in height. 1 repeat is the diagram the way it appears in the pattern. If it says to work 5 repeats of A.1 in the round, then you work A.1 a total of 5 times after/next to each other in the round. If it says to work 2 repeats of A.1 vertically/in height you work the entire diagram once, then begin again at the start and work the entire diagram one more time.

Chain stitches are slightly narrower than other stitches and to avoid working the cast-on edge too tight, we simply chain more stitches to begin with. The stitch count will be adjusted on the following row to fit the pattern and measurement sketch.

The rib edge is more elastic and will contract slightly compared to, for example, stocking stitch. By increasing before the rib edge, you avoid a visible difference in width between the rib edge and the rest of the body.

It’s very easy to cast off too tightly, and by making yarn overs while casting off (and simultaneously casting these off) you avoid a too tight cast off edge.

See DROPS video: How to bind off with yarn overs (yo)

To achieve an even increase (or decrease) you can increase on, for example: every 3rd and 4th row alternately, like so: work 2 rows and increase on the 3rd row, work 3 rows and increase on the 4th. Repeat this until the increase is complete.

See DROPS lesson: Increase or decrease 1 st on every 3rd and 4th row alternately

Should you prefer to work in the round instead of back and forth, you may of course adjust the pattern. You’ll need to add steeks mid-front (usually 5 stitches), and follow the instructions. When you would normally turn and work from the wrong side, simply work across the steek and continue in the round. At the end you’ll cut the piece open, pick up stitches to work bands, and cover the cut edges.

See DROPS video: How to knit steeks and cut open

Should you prefer to work back and forth instead of in the round, you may of course adjust the pattern so you work the pieces separately and then assemble them at the end. Divide the stitches for the body in 2, add 1 edge stitch in each side (for sewing) and work the front and back pieces separately.

See DROPS lesson: Can I adapt a pattern for circular needles into straight needles?

Pattern repeats can vary slightly in the different sizes, in order to get the correct proportions. If you’re not working the exact same size as the garment in the photo, yours might deviate slightly. This has been carefully developed and adjusted so that the complete impression of the garment is the same in all sizes.

Make sure to follow instructions and diagrams for your size!

If you have found a pattern you like which is available in women’s size it’s not very difficult to convert it to men’s size. The biggest difference will be the length of sleeves and body. Start working on the women size that you think would fit across the chest. The additional length will be worked right before you cast off for the armhole/sleeve cap. If the pattern is worked top-down you can add the length right after the armhole or before the first decrease on sleeve.

Regarding additional yarn amount, this will depend on how much length you add, but it is better with a skein too many than too few.

All yarns will have excess fibres (from production) that might come off as lint or shedding. Brushed yarns (ie hairier yarns) have more of these loose, excess fibres, causing more shedding.

Shedding also depends on what is worn under or over the garment, and whether this pulls at the yarn fibres. It’s therefore not possible to guarantee that there will be no shedding

Below are some tips on how to get the best result when working with hairier yarns:

1. When the garment is finished (before you wash it) shake it vigorously so the looser hairs come off. NOTE: do NOT use a lint roller, brush or any method that pulls at the yarn.

2. Place the garment in a plastic bag and put it in your freezer - the temperature will cause the fibres to become less attached to each other, and excess fibres will come off easier.

3. Leave in the freezer for a few hours before taking it out and shaking it again.

4. Wash the garment according to the instructions on the yarn label.

Pilling is a natural process that happens to even the most exclusive of fibers. It's a natural sign of wear and tear that is hard to avoid, and that is most visible in high friction areas of your garment like a sweater's arms and cuffs.

You can make your garment look as new by removing the pilling, using a fabric comb or a pill/lint remover.

Still can't find the answer you need? Then scroll down and leave your question so one of our experts can try to help you. This will be done normally within 5 to 10 working days.
In the meantime, you can read the questions and answers that others have left to this pattern or join the DROPS Workshop on Facebook to get help from fellow knitters/crocheters!

Post a comment to pattern DROPS 246-5

We would love to hear what you have to say about this pattern!

If you want to leave a question, please make sure you select the correct category in the form below, to speed up the answering process. Required fields are marked *.

Comments / Questions (2)

country flag CICI wrote:

Hallo liebes Team! Ich möchte den Pulli in der Größe L häkeln. Beim Passe schaut es so aus, als ob am Ende ein Fehler in dieser Größe ist: die Zunahme und die Anzahl der Runden für L ist kleiner als M und S --> 144-148-138 (= Größe L) -166-182-200 Stäbchen. Können Sie mir sagen, wie die Anleitung richtig geht? Danke

02.01.2024 - 09:45

DROPS Design answered:

Liebe Cici, so stimmt es auch, die Zunahmen sind noch nicht fertig, Sie haben nur 5 Mal genommmen (6 Mal in die 2 ersten Größen), dann nehmen Sie wie unter den nächsten Absatz zu. Am Ende der Passe sind es dann 242 Stäbchen in L. Viel Spaß beim häkeln!

02.01.2024 - 12:31

country flag Rezig wrote:

Bonjour je voudrais savoir quand le graphique A1 et les arceaux doit t'on commencer à les tricoter je suis bloquée pour la suite du patron merci d'avance de votre réponse

31.10.2023 - 11:12

DROPS Design answered:

Bonjour Mme Rezig, nous montrons dans cette vidéo comment crocheter ce type de points (suivez bien les explications sur le nombre de mailles, la vidéo a été faite pour un autre modèle similaire); elle montre ainsi comment crocheter les ronds de mailles en l'air de l'empiècement et comment les assembler ensuite en torsades à la fin de l'empiècement. Bon crochet!

31.10.2023 - 16:13