DROPS Karisma
DROPS Karisma
100% Wool
from 3.00 $ /50g
Get the yarn to make this pattern from 9.00$.

The yarn cost is calculated from the pattern’s smallest size and the yarn’s cheapest product type. Looking for an even better price? You might find it on the DROPS Deals!

DROPS SS24

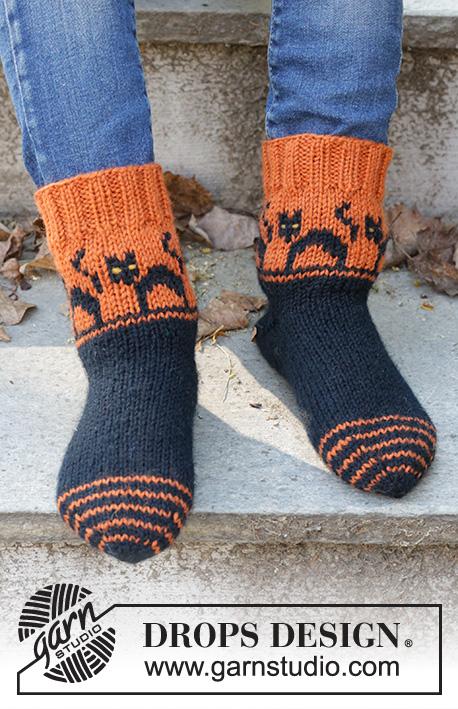
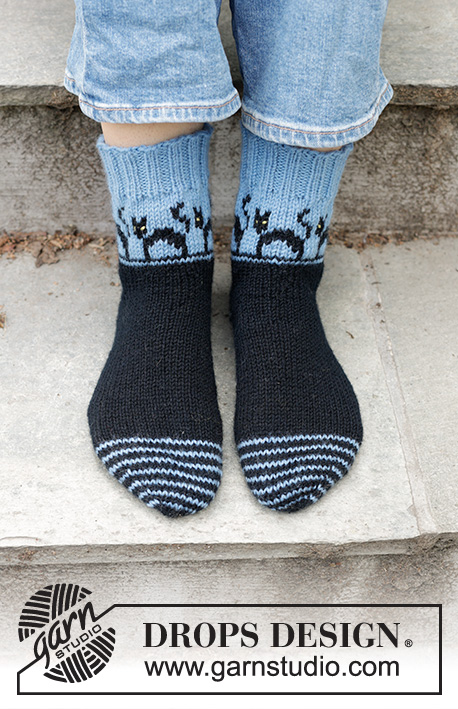
Spooky Evening Socks

Knitted socks in DROPS Karisma. The piece is worked from the toe upwards, with a multicolored pattern with cats and wedge heel. Sizes 35-43 = US 4 ½ - 12 1/2. Theme: Halloween.

DROPS 244-45
DROPS Design: Pattern u-957
Yarn group B
-------------------------------------------------------

SIZES:
Size in EU: 35/37 - 38/40 - 41/43
Size in US: 4 1/2/6 1/2 – 7 1/2/9 1/2 - 10 1/2/12 1/2
Foot-length: 22-24-27 cm = 8¾"-9½"-10⅝"
Leg-height approx.: 12 cm = 4¾"

YARN:
DROPS KARISMA from Garnstudio (belongs to yarn group B)
100-100-100 g color 05, black
50-50-50 g color 07, bright blue
And use:
A left-over of color yellow for eyes.

NEEDLES:
DROPS DOUBLE POINTED NEEDLES SIZE 3 MM = US 2.5.
DROPS DOUBLE POINTED NEEDLES SIZE 2.5 MM = US 1.5.

KNITTING GAUGE:
23 stitches in width and 32 rows in height with stockinette stitch/pattern A.1 = 10 x 10 cm = 4" x 4".
NOTE: Needle size is only a guide. If you get too many stitches on 10 cm = 4", change to a larger needle size. If you get too few stitches on 10 cm = 4", change to a smaller needle size.

-------------------------------------------------------

Alternative Yarn – See how to change yarns here
Yarn Groups A to F – Use the same pattern and change the yarn here
Yarn usage using an alternative yarn – Use our yarn converter here

-------------------------------------------------------

DROPS Karisma
DROPS Karisma
100% Wool
from 3.00 $ /50g
Get the yarn to make this pattern from 9.00$.

The yarn cost is calculated from the pattern’s smallest size and the yarn’s cheapest product type. Looking for an even better price? You might find it on the DROPS Deals!

Pattern instructions

NOTE: This pattern is written in American English. All measurements in charts are in cm. For conversion from inches to cm - click here. There are different terms for crocheting in American and British English. If this pattern includes crochet, click for "crochet terms" here. For this pattern in British English, please click here.
-------------------------------------------------------

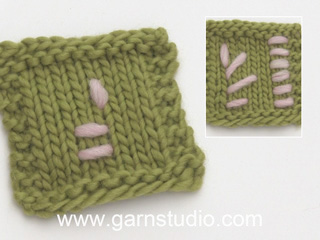
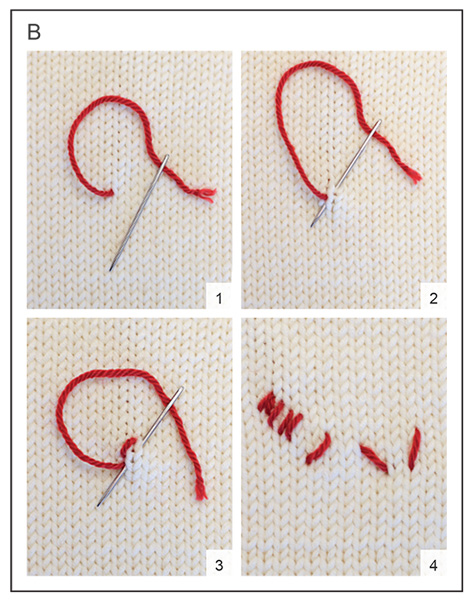
EXPLANATIONS FOR THE PATTERN:
-------------------------------------------------------

STRIPES:
* 2 rounds with color black, 1 round with color bright blue *, work from *-* until the piece measures 6-6-7 cm = 2⅜"-2⅜"-2¾" from the cast-on edge. Continue with color black.

INCREASE TIP (for toe):
Start 2 stitches before the marker, make 1 yarn over, knit 4 (marker sits in the middle of these 4 stitches), make 1 yarn over. Repeat at the other marker = 4 increased stitches on the round. On the next round knit the yarn overs twisted to avoid holes.

PATTERN:
See diagram A.1.

-------------------------------------------------------

START THE PIECE HERE:

-------------------------------------------------------

SOCKS - SHORT OVERVIEW OF THE PIECE:
The piece is worked in the round with double pointed needles from the toe up.

TOE:
Cast on 12 stitches with double pointed needles size 3 MM = US 2.5 and color black DROPS Karisma. Divide the stitches, with 3 stitches on each needle. Knit 1 round.
Insert 1 marker after the first 3 stitches and 1 marker before the last 3 stitches on the round (6 stitches between the markers and the round begins mid-under the foot).
Work stockinette stitch and STRIPES – read description above. AT THE SAME TIME, on the first round increase on each side of both markers – read INCREASE TIP (4 stitches increased). Increase like this every round 2-3-3 times in total, then every 2nd round 6-6-7 times = 44-48-52 stitches. Continue working without further increases until the piece measures 5-5-6 cm = 2"-2"-2⅜" from the cast-on edge. REMEMBER THE KNITTING GAUGE!

FOOT:
Continue in the round with stockinette stitch until the piece measures 16-17½-18½ cm = 6¼"-6⅞"-7⅛" from the cast-on edge (approx. 6-6½-7½ cm = 2⅜"-2½"-2⅞" left until the foot is finished).

WEDGE HEEL:
The round begins mid-under the foot. Insert 1 marker here.
Insert 1 marker-thread in each side, with 14-16-16 stitches on top of the foot and 30-32-36 heel stitches under the foot. Allow the marker and marker-threads to follow your work onwards.

Now work short rows back and forth for the heel, using color black as follows – working 1 stitch less on each row:
ROW 1 (right side): Work as far as the first marker-thread. Turn.
ROW 2 (wrong side): Slip 1 stitch purl-wise, purl to the 2nd marker-thread, turn.
ROW 3 (right side): Slip 1 stitch knit-wise, knit to 1 stitch before the previous turn on the right side, turn.
ROW 4 (wrong side): Slip 1 stitch purl-wise, purl to 1 stitch before the previous turn on the wrong side, turn.
Repeat rows 3 and 4 until you have 9-10-11 stitches un-worked on one side and 8-9-10 stitches un-worked on the other side; 13-13-15 stitches in the middle of the row and the last row worked from the wrong side, turn.
Work as follows from the right side: Slip 1 stitch knit-wise, knit to the marker under the foot.
The short rows are finished. Now work 2 rounds over all stitches as follows:

ROUND 1: To avoid a hole in the transition between stitches, knit to where you turned on the last row from the right side, * use the left needle and pick up the strand between the stitches on the left and right needle (1 new stitch), knit together the new stitch and the next stitch *, repeat from *-* to the first marker-thread (one side of the heel).
Knit to the next marker-thread (top of foot). Repeat from *-* but knit the new stitch and the next stitch twisted together, work from *-* until you have worked all the transitions (to the other side of the heel), knit to mid under the foot (marker).
ROUND 2: Knit.
Move the marker-threads so they are on each side of the middle 12-12-14 stitches mid-under the foot.

Now work short rows again as follows – working 1 more stitch on each row:
ROW 1 (right side): Knit as far as the first marker-thread, turn.
ROW 2 (wrong side): Slip 1 stitch purl-wise, purl to the second marker-thread, turn.
ROW 3 (right side): Slip 1 stitch knit-wise, knit to where you turned the previous time from the right side, use the left needle and pick up the strand between the stitches on the left and right needle (1 new stitch), knit together the new stitch and the next stitch, turn.
ROW 4 (wrong side): Slip 1 stitch purl-wise, purl to where you turned previously on the wrong side, use the left needle and pick up the strand between the stitches on the left and right needle (1 new stitch), purl twisted together the new stitch and the next stitch, turn.
Repeat rows 3 and 4 until there is 1 stitch left before the marker-thread on each side and the last row was from the wrong side, turn.
Work the next round as follows:
Knit over all stitches, closing the holes in each transition in the same way as before. Insert 1 marker. The leg is measured from here!

LEG:
= 44-48-52 stitches. The beginning of the round is mid-back of heel.
Work stockinette stitch in the round with color black until the leg measures 3 cm = 1⅛" from the marker. Knit 1 round and increase 11-7-14 stitches evenly spaced = 55-55-66 stitches.
Work diagram A.1, 5-5-6 times on the round.
When A.1 is finished, continue with color bright blue. Work until the leg measures 8 cm = 3⅛" from the marker (make sure you have at least 3 rounds of bright blue after the last black stitch in the diagram).
Knit 1 round and adjust the stitch count to 52-56-68 stitches. Change to double pointed needles size 2.5 MM = US 1.5. Work rib (knit 2, purl 2) for 4 cm = 1½". Bind off with rib.

ASSEMBLY:
Fold the toe, with 6 stitches both on top of and underneath the foot. Sew the cast-on edges together, it is neatest to use grafting stitch. Fasten the strand well.

EMBROIDERING:
Use a left-over color yellow and embroider 2 small flat stitches for the eyes on each cat - see diagram B.

Diagram

All measurements in charts are in cm.

symbols = color bright blue
symbols = color black
symbols = Flat stitch, Pictures 1-4
PICTURE 1: Insert the needle from the wrong side to the right side, where you wish the stitch to start.
PICTURE 2: Skip the distance you want and thread the needle down and up again to where you want the next flat stitch to start, pull the strand through.
PICTURE 3: Skip the distance you want and thread the needle down and up again to where you want the next flat stitch to start, pull the strand through.
Continue like this until you have enough stitches. Fasten the strand on the wrong side.
PICTURE 4: Flat stitches of different lengths and in different directions.
diagram
diagram

Each of our patterns has specific tutorial videos to help you.

Do you have a question? See a list of frequently asked questions (FAQ)

Knitting tension is what determines the final measurements of your work, and is usually measured per 10 x 10 cm. It is provided like so: number of stitches in width x number of rows in height - eg: 19 stitches x 26 rows = 10 x 10 cm.

The knitting tension is very individual; some people knit/crochet loosely while others work tightly. You adjust the knitting tension with the needle size, which is why the suggested needle size only serve as a guide! You need to adjust this (up or down) to ensure that YOUR knitting tension matches the knitting tension provided in the pattern. If you work with a different knitting tension than provided you will have a different yarn consumption, and your work will have different measurements than what the pattern suggests.

The knitting tension also determines which yarns can replace each other. As long as you achieve the same knitting tension you can replace one yarn with another.

See DROPS lesson: How to measure your tension/gauge

See DROPS video: How to make a gauge tension swatch

The required amount of yarn is provided in grams, eg: 450 g. To calculate how many balls you’ll need you first need to know how many grams are in 1 ball (25g, 50g or 100g). This information is available if you click on the individual yarn quality on our pages. Divide the amount required with the amount of each ball. For example, if each ball is 50g (the most common amount), the calculation will be as follows: 450 / 50 = 9 balls.

The important thing when changing from one yarn to another is that the knitting/crochet tension remains the same. This is so that the measurements of the finished piece will be the same as on the sketch provided. It is easier to achieve the same knitting tension using yarns from the same yarn group. It is also possible to work with multiple strands of a thinner yarn to achieve the knitting tension of a thicker one. Please try our yarn converter. We recommend you to always work a test swatch.

Please NOTE: when changing yarn the garment might have a different look and feel to the garment in the photo, due to individual properties and qualities of each yarn.

See DROPS lesson: Can I use a different yarn than the one mentioned in the pattern?

All our yarns are categorised into yarn groups (from A to F) according to thickness and knitting tension – group A contains the thinnest yarns and group F the thickest. This makes it easier for you to find alternative yarns to our patterns, should you wish to switch yarn. All yarns within the same group have a similar knitting tension and can easily replace each other. However, different yarn qualities have different structures and properties which will give the finished work a unique look and feel.

Click here for an overview of the yarns in each yarn group

At the top of all our patterns you’ll find a link to our yarn converter, which is a helpful tool should you wish to use a different yarn than suggested. By filling in the yarn quality you wish to replace, the amount (in your size) and number of strands, the converter will present good alternative yarns with the same knitting tension. Additionally it will tell you how much you’ll require in the new qualities and whether you’ll need to work with multiple strands. Most skeins are 50g (some are 25g or 100g).

If the pattern is worked with multiple colours, every colour will have to be converted separately. Similarly, if the pattern is worked with several strands of different yarns (for example 1 strand Alpaca and 1 strand Kid-Silk) you will have to find alternatives for each, individually.

Click here to see our yarn converter

Since different yarns have different qualities and textures we have chosen to keep the original yarn in our patterns. However, you can easily find options among our available qualities by using our yarn converter, or simply pick a yarn from the same yarn group.

It is possible that some retailers still have discontinued yarns in stock, or that someone has a few skeins at home that they would like to find patterns for.

The yarn converter will provide both alternative yarn as well as required amount in the new quality.

If you think it's hard to decide what size to make, it can be a good idea to measure a garment you own already and like the size of. Then you can pick the size by comparing those measures with the ones available in the pattern's size chart.

You'll find the size chart at the bottom of the pattern.

See DROPS lesson: How to read size chart

The needle size provided in the pattern serves only as a guide, the important thing is to follow the knitting tension. And since knitting tension is very individual, you will have to adjust the needle size to ensure that YOUR tension is the same as in the pattern – maybe you’ll have to adjust 1, or even 2 needle sizes, up or down to achieve the correct tension. For this, we recommend that you work test swatches.

Should you work with a different knitting tension than the one provided, the measurements of the finished garment might deviate from the measurement sketch.

See DROPS lesson: How to measure your tension/gauge

See DROPS video: How to make a gauge tension swatch

Working a garment top-down provides more flexibility and room for personal adjustment. For example it is easier to try the garment on while working, as well as making adjustments to length of yoke and shoulder caps.

The instructions are carefully explaining every step, in the correct order. Diagrams are adjusted to the knitting direction and are worked as usual.

The diagram depicts all rows/rounds, and every stitch seen from the right side. It is read from bottom to top, from right to left. 1 square = 1 stitch.

When working back and forth, every other row is worked from the right side and every other row is worked from the wrong side. When working from the wrong side, the diagram will have to be worked reversed: from left to right, knit stitches are purled, purl stitches are knit etc.

When working in the round every round is worked from the right side and the diagram are worked from right to left on all rounds.

See DROPS lesson: How to read knitting diagrams

The diagram depicts all rows/rounds, and every stitch seen from the right side. It is worked from bottom to top, from right to left.

When working back and forth every other row is worked from the right side: from right to left and every other row is worked from the wrong side: from left to right.

When working in the round, every row in the diagram are worked from the right side, from right to left.

When working a circular diagram you start in the middle and work your way outwards, counter clockwise, row by row.

The rows usually start with a given number of chain stitches (equivalent to the height of the following stitch), this will either be depicted in the diagram or explained in the pattern.

See DROPS lesson: How to read crochet diagrams

Instructions for working several diagrams after each other on the same row/round, will often be written like so: “work A.1, A.2, A.3 a total of 0-0-2-3-4 times". This means you work A.1 once, then A.2 is worked once, and A.3 is repeated (in width) the number of times provided for your size – in this case like so: S = 0 times, M = 0 times, L=2 times, XL= 3 times and XXL = 4 times.

The diagrams are worked as usual: begin with the first row in A.1, then work the first row in A.2 etc.

See DROPS lesson: How to read knitting diagrams

See DROPS lesson: How to read crochet diagrams

The total width of the garment (from wrist-to-wrist) will be larger in the larger sizes, despite the actual sleeves being shorter. The larger sizes have longer sleeve caps and wider shoulders, so there will be a good fit in all sizes.

The measurement sketch/schematic drawing provides information regarding the full length of the garment. If it’s a jumper or a jacket the length is measured from the highest point on the shoulder (usually closest to the neckline), and straight down to the bottom of the garment. It is NOT measured from the tip of shoulder. Similarly, the length of yoke is measured from the highest point on the shoulder and down to where yoke is split into body and sleeves.

See DROPS lesson: How to read a schematic drawing

Diagrams are often repeated on the round or in height. 1 repeat is the diagram the way it appears in the pattern. If it says to work 5 repeats of A.1 in the round, then you work A.1 a total of 5 times after/next to each other in the round. If it says to work 2 repeats of A.1 vertically/in height you work the entire diagram once, then begin again at the start and work the entire diagram one more time.

Chain stitches are slightly narrower than other stitches and to avoid working the cast-on edge too tight, we simply chain more stitches to begin with. The stitch count will be adjusted on the following row to fit the pattern and measurement sketch.

The rib edge is more elastic and will contract slightly compared to, for example, stocking stitch. By increasing before the rib edge, you avoid a visible difference in width between the rib edge and the rest of the body.

It’s very easy to cast off too tightly, and by making yarn overs while casting off (and simultaneously casting these off) you avoid a too tight cast off edge.

See DROPS video: How to bind off with yarn overs (yo)

To achieve an even increase (or decrease) you can increase on, for example: every 3rd and 4th row alternately, like so: work 2 rows and increase on the 3rd row, work 3 rows and increase on the 4th. Repeat this until the increase is complete.

See DROPS lesson: Increase or decrease 1 st on every 3rd and 4th row alternately

Should you prefer to work in the round instead of back and forth, you may of course adjust the pattern. You’ll need to add steeks mid-front (usually 5 stitches), and follow the instructions. When you would normally turn and work from the wrong side, simply work across the steek and continue in the round. At the end you’ll cut the piece open, pick up stitches to work bands, and cover the cut edges.

See DROPS video: How to knit steeks and cut open

Should you prefer to work back and forth instead of in the round, you may of course adjust the pattern so you work the pieces separately and then assemble them at the end. Divide the stitches for the body in 2, add 1 edge stitch in each side (for sewing) and work the front and back pieces separately.

See DROPS lesson: Can I adapt a pattern for circular needles into straight needles?

Pattern repeats can vary slightly in the different sizes, in order to get the correct proportions. If you’re not working the exact same size as the garment in the photo, yours might deviate slightly. This has been carefully developed and adjusted so that the complete impression of the garment is the same in all sizes.

Make sure to follow instructions and diagrams for your size!

If you have found a pattern you like which is available in women’s size it’s not very difficult to convert it to men’s size. The biggest difference will be the length of sleeves and body. Start working on the women size that you think would fit across the chest. The additional length will be worked right before you cast off for the armhole/sleeve cap. If the pattern is worked top-down you can add the length right after the armhole or before the first decrease on sleeve.

Regarding additional yarn amount, this will depend on how much length you add, but it is better with a skein too many than too few.

All yarns will have excess fibres (from production) that might come off as lint or shedding. Brushed yarns (ie hairier yarns) have more of these loose, excess fibres, causing more shedding.

Shedding also depends on what is worn under or over the garment, and whether this pulls at the yarn fibres. It’s therefore not possible to guarantee that there will be no shedding

Below are some tips on how to get the best result when working with hairier yarns:

1. When the garment is finished (before you wash it) shake it vigorously so the looser hairs come off. NOTE: do NOT use a lint roller, brush or any method that pulls at the yarn.

2. Place the garment in a plastic bag and put it in your freezer - the temperature will cause the fibres to become less attached to each other, and excess fibres will come off easier.

3. Leave in the freezer for a few hours before taking it out and shaking it again.

4. Wash the garment according to the instructions on the yarn label.

Pilling is a natural process that happens to even the most exclusive of fibers. It's a natural sign of wear and tear that is hard to avoid, and that is most visible in high friction areas of your garment like a sweater's arms and cuffs.

You can make your garment look as new by removing the pilling, using a fabric comb or a pill/lint remover.

Still can't find the answer you need? Then scroll down and leave your question so one of our experts can try to help you. This will be done normally within 5 to 10 working days.
In the meantime, you can read the questions and answers that others have left to this pattern or join the DROPS Workshop on Facebook to get help from fellow knitters/crocheters!

You might also like...

Post a comment to pattern DROPS 244-45

We would love to hear what you have to say about this pattern!

If you want to leave a question, please make sure you select the correct category in the form below, to speed up the answering process. Required fields are marked *.

Comments / Questions (3)

country flag Liesanne wrote:

Ik ben er al uit

18.01.2024 - 18:12

country flag Liesanne wrote:

Brei recht de volgende markeerdraad (bovenkant van de voet). Herhaal van *-* maar brei de nieuwe steek en de volgende steek gedraaid recht samen, brei van *-* tot u alle de overgangen heeft gebreid (tot de andere kant van de hiel), brei recht tot midden onder de voet (markeerdraad). Wat word hier bedoeld met alle overgangen breien? Gewoon alle steken breien over de voet tot aan de andere kant van de hiel? En dan naald 2 gewoon recht over alle steken?

18.01.2024 - 17:49

DROPS Design answered:

Dag Liesanne,

Op elke plek waar het werk gekeerd is (voor het maken van de hiel), is een overgang ontstaan en als je die normaal door breit zullen er gaatjes/hiaten ontstaan. Dit kun je oplossen door de draad tussen twee steken op te nemen en deze (gedraaid) samen te breien met de volgende steek. Lees het patroon goed om te kijken of je de steken gedraaid moet breien of niet.

21.01.2024 - 12:14

country flag Sam Lowrie wrote:

The pattern photo only includes the pictures of the socks, not the pattern. Same situation at 244-44. Thanks!

05.10.2023 - 18:04

DROPS Design answered:

Hi Sam, The pattern instructions are to the right and below the photo when you open the page. Happy crafting!

06.10.2023 - 06:42