
Popular categories
Looking for a yarn?


|
|
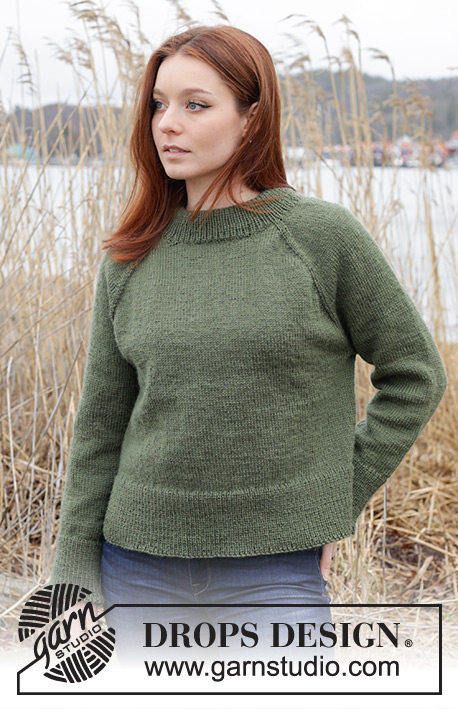
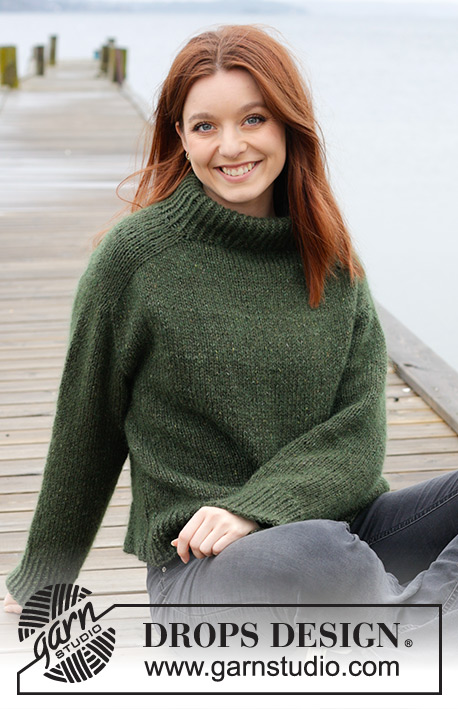
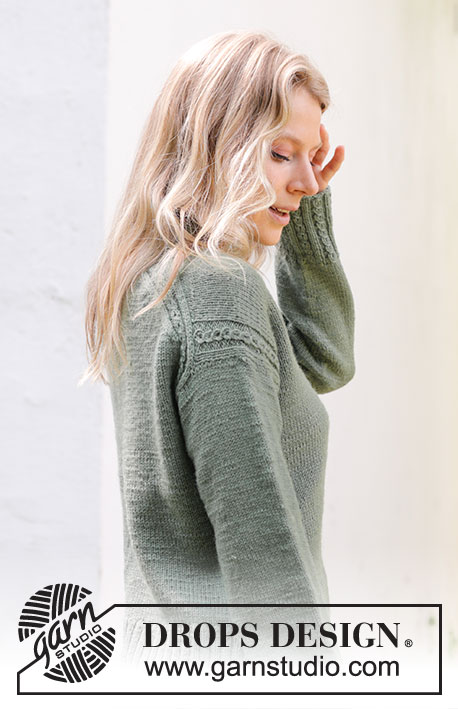
Sea Foam Sweater |
|
 |
 |
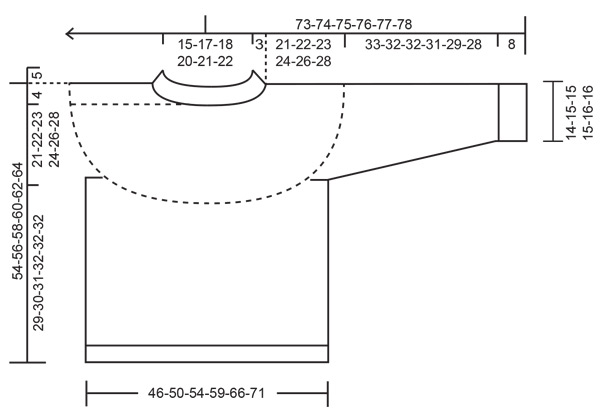
Crocheted sweater in DROPS Air. The piece is worked top down, with round yoke and double neck. Sizes S - XXXL.
DROPS 243-14 |
|
|
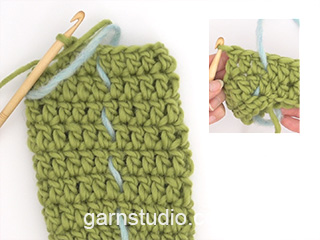
------------------------------------------------------- EXPLANATIONS FOR THE PATTERN: ------------------------------------------------------- INCREASE TIP (evenly spaced): Increase 1 double crochet by working 2 double crochets in the same stitch. To work out how to increase evenly, count the total number of stitches on the round (e.g., 69 stitches) and divide by the number of increases to be made (e.g., 11) = 6.27. In this example, increase in approx. each 6th stitch. CHAIN STITCH: If you work outermost on the hook the chain stitch will often be too tight; 1 chain stitch should be as long as 1 double crochet is wide. CROCHET INFORMATION-1 (working round and round): Work in the round without finishing each round: Insert 1 marker-thread at the beginning of the round so you can see where each round begins. On round 2 work the first double crochet in the 2nd chain stitch from the beginning of round 1, work all the half-double crochets as described in the text. Do not finish the round but work the first double crochet on the new round in the first double crochet on the previous round. Continue like this round and round. On the final round at the bottom of the body and sleeves, to avoid a «jump», work as follows: Work until there are 2 double crochets left on the round, work 1 half-double crochet in the next double crochet, 1 single crochet in the last double crochet and finish with 1 slip stitch in the first double crochet on the round. CROCHET INFORMATION-2 (for neck): At the beginning of each round of double crochets, work 3 chain stitches which replace the first double crochet. Finish the round with 1 slip stitch in the 3rd chain stitch at the beginning of the round. DECREASE TIP (for sleeves): When working in the round, the beginning of the round will be displaced as you continue working. Insert a marker-thread mid-under the sleeve, between 2 stitches, and allow it to follow your work onwards down the sleeve, adjusting the thread to keep it vertical. Lay the piece flat regularly, to make sure the marker-thread stays mid-under the sleeve as you decrease. Decrease on each side of 2 double crochets by the marker-thread as follows: Work until there are 3 double crochets left before the marker-thread, *make 1 yarn over, insert the hook through the next stitch, pick up the strand, make 1 yarn over and pull it through the first 2 loops on the hook *, work from *-* a total of 2 times, make 1 yarn over and pull it though all 3 loops on the hook, (1 stitch decreased). Work 1 double crochet in each of the next 2 double crochets (marker-thread sits between these 2 stitches), repeat from *-* 2 times in total, make 1 yarn over and pull it through all 3 loops on the hook (1 stitch decreased). You have decreased 2 stitches on the round. ------------------------------------------------------- START THE PIECE HERE: ------------------------------------------------------- SWEATER – SHORT OVERVIEW OF THE PIECE: The yoke is worked in the round, top down. The yoke is divided for body and sleeves and the body and sleeves continued separately in the round. The neck is worked to finish. YOKE: Work 67-70-73-77-80-84 CHAIN STITCHES – read description above, with hook size 5 MM = US H/8 and DROPS Air. Form them into a ring with 1 slip stitch in the first chain stitch. ROUND 1: Work 2 chain stitches (replaces the first half-double crochet), work 1 half-double crochet in each of the remaining chain stitches, work 2 half-double crochets around the 2 chain stitches at the beginning of the round = 69-72-75-79-82-86 half-double crochets. Insert 1 marker; the yoke is measured from here! Continue with double crochets. Read CROCHET INFORMATION before starting! ROUND 2: Work 1 double crochet in each half-double crochet and increase 11-18-25-31-38-44 double crochets evenly spaced - read INCREASE TIP = 80-90-100-110-120-130 double crochets. ROUND 3: Work 1 double crochet in each double crochet. ROUND 4: Work double crochets and increase 16-18-20-22-24-26 double crochets evenly spaced = 96-108-120-132-144-156 double crochets. ROUND 5: Work double crochets and increase 16-18-20-22-24-26 double crochets evenly spaced = 112-126-140-154-168-182 double crochets. REMEMBER THE CROCHET GAUGE! ROUND 6: Work double crochets and increase 16-18-20-22-24-26 double crochets evenly spaced = 128-144-160-176-192-208 double crochets. Continue as follows in the different sizes: SIZES S, M, L and XL: = 128-144-160-176 double crochets. ROUND 7: Work 1 double crochet in each double crochet. ROUND 8: Work double crochets and increase 16-18-20-22 double crochets evenly spaced. Work rounds 7-8, 2-2-2-2 more times = 176-198-220-242 double crochets. SIZES XXL and XXXL: = 192-208 double crochets. ROUND 7: Work 1 double crochet in each double crochet. ROUND 8: Work 1 double crochet in each double crochet. ROUND 9: Work double crochets and increase 24-26 double crochets evenly spaced. Work rounds 7-9, 2-2 more times = 264-286 double crochets. ALL SIZES: = 176-198-220-242-264-286 double crochets. Work 1 double crochet in each double crochet until the yoke measures 21-22-23-24-26-28 cm = 8¼"-8¾"-9"-9½"-10¼"-11" from the marker. Divide for the body and sleeves as follows: Work 26-28-31-35-39-43 double crochets, 1 half-double crochet (half back piece), work 11 chain stitches (under the sleeve), skip 34-40-45-49-51-54 double crochets for the sleeve, work 1 half-double crochet, 52-57-63-70-79-87 double crochets, 1 half-double crochet (front piece), work 11 chain stitches (under the sleeve), skip 34-40-45-49-51-54 double crochets for the sleeve, work 1 half-double crochets, 26-29-32-35-40-44 double crochets (half back piece). The body and sleeves are finished separately. BODY: = 130-140-152-166-184-200 stitches. Continue with 1 double crochet in each stitch (on round 1 work 1 double crochet in each of the 11 chain stitches under each sleeve) until the piece measures 29-30-31-32-32-32 cm = 11⅜"-11¾"-12¼"-12½"-12½"-12½" from the division - remember CROCHET INFORMATION-1 when finishing the last round. Cut and fasten the strand. The sweater measures approx. 54-56-58-60-62-64 cm = 21¼"-22"-22¾"-23⅝"-24⅜"-25¼" from the shoulder. SLEEVES: Work the 34-40-45-49-51-54 skipped stitches on one side of the piece as follows: Fasten the strand with 1 single crochet in the 6th of the 11 chain stitches worked under the sleeve, then 1 double crochet in each of the next 4 chain stitches, work 2 double crochets together as follows: work 1 double crochet in the last chain stitch but wait with the last yarn over and pull-through, work 1 double crochet in the same way through the half-double crochet in the transition between the body and sleeve, make 1 yarn over and pull it through all 3 loops on the hook – this avoids a large gap in the transition between the body and sleeves. Work 1 double crochet in each double crochet as far as the chain stitches on the other side, work 2 double crochets together in the same way in the transition and 1 double crochet in each of the last chain stitches = 45-51-56-60-62-65 stitches. Work round and round without finishing each round, in the same way as on the body, starting the next round by working 1 double crochet in the first single crochet on the previous round, then continuing round and round. Work 1 double crochet in each double crochet until the sleeve measures 3 cm = 1⅛" from the division. Now decrease 2 double crochets under the sleeve – read DECREASE TIP! Decrease like this every 11-5½-3½-2½-2½-2 cm = 4⅜"-2⅛"-1¼"-1"-1"-¾" a total of 3-5-7-9-9-10 times = 39-41-42-42-44-45 stitches. Work until the sleeve measures 33-32-32-31-29-28 cm = 13"-12½"-12½"-12¼"-11⅜"-11" (8 cm = 3⅛" left to finished length). Work 1 double crochet in the back loop of each double crochet on the round. Continue like this until the sleeve measures 41-40-40-39-37-36 cm = 16⅛"-15¾"-15¾"-15¼"-14½"-14¼" – remember CROCHET INFORMATION-1 when finishing the last round. Cut and fasten the strand. Work the other sleeve in the same way. DOUBLE NECK: Use crochet hook size 5 MM = US H/8 and DROPS Air. Fasten the strand with 1 slip stitch approx. mid-back. Read CROCHET INFORMATION-2 in explanations above. ROUND 1: Work 1 double crochet between each half-double crochet (from round 1) = 67-70-73-77-80-84 double crochets. ROUND 2: Work 1 double crochet in the back loop of each double crochet. ROUND 3: Work 1 double crochet in each double crochet (through both loops). ROUND 4: Work 1 double crochet in the back loop of each double crochet. ROUND 5: Work 1 double crochet in each double crochet (through both loops). ROUND 6: Work 1 double crochet in the back loop of each double crochet. ROUNDS 7-9: Work 1 double crochet in each double crochet (through both loops). Cut the strand, pull it through the last loop. Fold the neck double to the inside and fasten down with a couple of stitches. |
|
|
|
|
Have you made this or any other of our designs? Tag your pictures in social media with #dropsdesign so we can see them! Do you need help with this pattern?You'll find tutorial videos, a Comments/Questions area and more by visiting the pattern on garnstudio.com. © 1982-2024 DROPS Design A/S. We reserve all rights. This document, including all its sub-sections, has copyrights. Read more about what you can do with our patterns at the bottom of each pattern on our site. |
|


With over 40 years in knitting and crochet design, DROPS Design offers one of the most extensive collections of free patterns on the internet - translated to 17 languages. As of today we count 304 catalogs and 11422 patterns - 11417 of which are translated into English (US/in).
We work hard to bring you the best knitting and crochet have to offer, inspiration and advice as well as great quality yarns at incredible prices! Would you like to use our patterns for other than personal use? You can read what you are allowed to do in the Copyright text at the bottom of all our patterns. Happy crafting!
Comments / Questions (28)
Jeg har hekket ferdig hele bolen. Når jeg prøver den på buler det veldig ut øverst på ryggen der økningen ble gjort på bærestykket. Det skulle jo økes jevnt på omgangene, så det er jo like mange økninger bak på ryggen som på brystet… Skal det være sånn eller har jeg gjort noe feil? Videre nedover bolen virker det som den blir for trang igjen. Må uansett rekke opp igjen, og håper dere kan hjelpe meg med å få bærestykket riktig.
16.03.2024 - 01:04DROPS Design answered:
Hej Ingrid, hvilken størrelse hækler du? Ja udtagningerne sker jævnt fordelt hele vejen rundt. Buler den kun på ryggen?
19.03.2024 - 14:42Hello I’m having trouble starting the sleeves. Specifically, I don’t understand the instructions: “work 2 double crochets together as follows: work 1 double crochet in the last chain stitch but wait with the last yarn over and pull-through, work 1 double crochet in the same way through the half-double crochet in the transition between the body and sleeve, make 1 yarn over and pull it through all 3 loops on the hook.” Could you post a video for this part? Thank you!
21.01.2024 - 18:53DROPS Design answered:
Dear Heather, to avoid a hole at the transition between division, you will work 2 double crochet together working one of them in the first row worked on body and the other in the chain stitch under sleeve. Happy crocheting!
22.01.2024 - 10:22Hi, do you have a sizing chart so I can work out what size to make eg XL bust would be xxx
08.01.2024 - 22:47DROPS Design answered:
Hi Sharon, There is a size chart at the bottom of the pattern, with all the measurements for each size. Happy crafting!
09.01.2024 - 06:43I am not sure how much yarn do I need for this project for a Medium size? I am not sure if 350 is grams, yards or meters...
20.12.2023 - 22:05DROPS Design answered:
Dear Sara, the requested amount of yarn is always given in grams, so that if you need (in M ) 350 g DROPS Air / 50 g a ball = 7 balls - read more about DROPS Air here. Happy crocheting!
21.12.2023 - 08:32In de nederlandse tekst staat : Haak toeren 7-9, 2-2 keer = 264-286 stokjes. Maar dan kom ik niet uit. In het Noorse patroon staat : Hekle som 7.-9.omgang totalt 3-3 ganger. Det er 264-286 staver på omgangen. Moet ik de Noorse tekst aanhouden?
19.12.2023 - 13:40DROPS Design answered:
Dag Simone,
Je hebt gelijk, je moet de toeren in totaal 3 keer haken. Dus er moet staan nog 2 keer. Ik zal het aanpassen in de Nederlandse tekst!
10.01.2024 - 09:56Merci beaucoup pour votre réponse rapide. Oui, je crochète Air et je n'arrive pas à trouver le n° de crochet qui corresponde au nombre de rangs et au nombre de brides indiqués . Dois-je privilégier le crochet qui correspond au nombre de rangs ou celui qui correspond au nombre de brides ? Je vous remercie. Bonne journée!
13.12.2023 - 10:04DROPS Design answered:
Bonjour Mme Bou, il vous faut le bon échantillon en largeur pour avoir les bonnes mesures conformes au schéma; s'il est différent en hauteur, vous pourrez ajuster en tricotant des tours en plus/en moins lors de l'empiècement notamment. Vous crochetez peut-être très lâche, l'idée est de vraiment avoir les 14 brides x 8,5 rangs = 10 x10 cm pour avoir le bon résultat. Retrouvez plus d'explications ici. Bon crochet!
13.12.2023 - 16:18Bonjour, merci pour ce beau modèle. J'ai un problème avec l'échantillon: j'ai essayé au crochet n°5 puis n°4 , n°3,5 et j'en suis au n° 3 sans parvenir à avoir 14 brides pour 10cm de largeur. Avec le crochet n°3 , 10cm= 12 brides . En hauteur, 9 rangs pour 10cm. Pouvez-vous me conseiller sur la taille de crochet à choisir ? Merci beaucoup. Bonne journée !
12.12.2023 - 18:45DROPS Design answered:
Bonjour Mme Bou, crochetez-vous DROPS Air? Car c'est une tension assez usuelle pour cette laine; si vous crochetez une autre laine qui n'est pas de la même épaisseur que Air (autre que du groupe de fils C), vous aurez peut-être plus de mal à obtenir la bonne tension et il vous faudra alors recalculer le modèle en fonction de votre propre tension ou bien vous retourner sur un modèle correspondant à votre tension. Bon crochet!
13.12.2023 - 07:50Robię 7 rząd i zauważyłam, że karczek nie rozkłada się zupełnie na płasko. Oczka łańcuszka robione na początku wyznaczyły wielkość okręgu, później stopniowo były dodawane słupki, ale mam wrażenie, że jest ich za dużo i całość nie mieści się dookoła okręgu. Jakby materiału było za dużo. Próbka wyszła dobrze i myślę że zachowałam takie samo naprężenie nici w trakcie robótki. Czy później sweter się wyprostuje, czy spróbować od nowa?
10.12.2023 - 03:43DROPS Design answered:
Witaj Zuzanno, możesz teraz zblokować (uprać i wysuszyć) wykonany fragment ubrania. Jak okaże się za szeroki to sprujesz. Powodzenia!
11.12.2023 - 08:08Hvor mange nøgler garn skal jeg bruge til en str M-L?
09.12.2023 - 19:46DROPS Design answered:
Hei Emma. Garnmengden til de ulike str. finner du under MATERIALER øverst i oppskriften (350 gram/7 nøster i str. M og 400/8 nøster gram i str. L) ved bruk av DROPS Air. mvh DROPS Design
11.12.2023 - 11:23Har precis virkat klart denna fina tröja. Jag undrar om man kan tvätta den i tvättmaskin och isånnafall vilken grad?
24.11.2023 - 10:35DROPS Design answered:
Hej Lova, DROPS Air anbefaler vi håndvask 30 grader! Hvis du vil vaske i maskinen, så skal de vaskes separat og på uldprogram (max 30grader) og det er på eget ansvar, prøv at vaske en strikkeprøve inden du vasker blusen.
24.11.2023 - 15:07