
Popular categories
Looking for a yarn?


|
|||||||
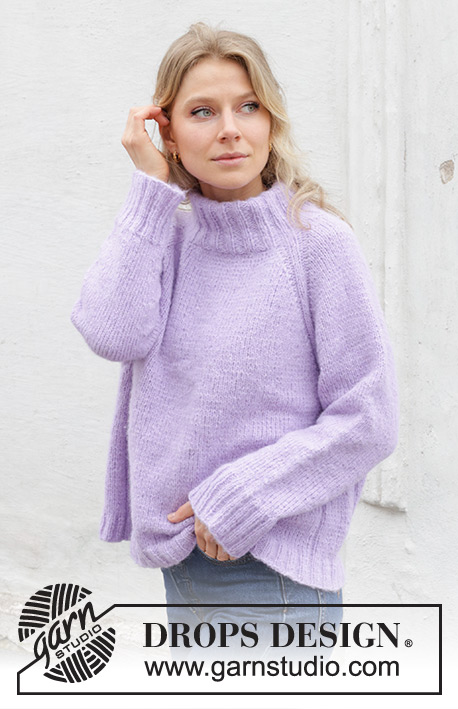
Winter Iris Sweater |
|||||||
 |
 |
||||||
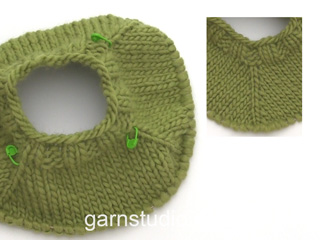
Knitted jumper in DROPS Air. The piece is worked top down with raglan and high, double neck. Sizes XS - XXL.
DROPS 243-12 |
|||||||
|
------------------------------------------------------- EXPLANATIONS FOR THE PATTERN: ------------------------------------------------------- PATTERN: See diagram A.1. RAGLAN: Increase 1 stitch before/after A.1, in each transition between the body and sleeves. Increase by making 1 yarn over which is worked as follows on the next round: BEFORE A.1: Slip the yarn over off the left needle and replace it the other way round (insert the left needle in the back when replacing it). Knit the front loop – no hole. AFTER A.1: Knit the back loop - no hole. DECREASE TIP (for sleeves): Decrease 1 stitch on either side of the marker-stitch as follows: Work until there are 3 stitches left before the marker-stitch, knit 2 together, knit 3 (marker-stitch is the middle of these 3 stitches), slip 1 stitch knit-wise, knit 1 and pass the slipped stitch over the knitted stitch. ------------------------------------------------------- START THE PIECE HERE: ------------------------------------------------------- JUMPER – SHORT OVERVIEW OF THE PIECE: The neck and yoke are worked in the round with circular needle, from mid back and top down. The yoke is divided for body and sleeves and the body is continued in the round with circular needle. The sleeves are worked with short circular needle/double pointed needles, top down. DOUBLE NECK: Cast on 72-80-80-88-88-96 stitches with circular needle size 5 mm and DROPS Air. Knit 1 round. Change to circular needle size 4 mm and work rib (purl 2, knit 2) in the round for 16 cm. The neck must be later folded twice and sewn so that the neck edge will be approx. 8 cm. Work the next round as follows: Work A.1, knit 6 and increase 1 stitch (= 7 sleeve stitches), A.1, knit 18-22-22-26-26-30 and increase 5-7-7-7-9-11 stitches evenly spaced (= 23-29-29-33-35-41 stitches on the front piece), A.1, knit 6 and increase 1 stitch (= 7 sleeve stitches), A.1, knit the last 18-22-22-26-26-30 stitches and increase 5-7-7-7-9-11 stitches evenly spaced (= 23-29-29-33-35-41 stitches on the back piece) = 84-96-96-104-108-120 stitches. Insert 1 marker at the beginning of the round; the yoke is measured from this marker! YOKE: Change to circular needle size 5 mm. Work as follows: A.1, knit 7 (sleeve), A.1, knit 23-29-29-33-35-41 (front piece), A.1, knit 7 (sleeve), A.1, knit 23-29-29-33-35-41 (back piece). Continue in the round and increase for raglan every 2nd round a total of 18-20-23-24-25-27 times = 228-256-280-296-308-336 stitches. REMEMBER THE KNITTING TENSION! The sleeve increases are finished. Continue to increase for raglan on the front and back pieces 2-1-1-1-2-3 more times (= 18-20-23-24-25-27 stitches increased on each side of the sleeves and 20-21-24-25-27-30 stitches increased on each side of the front and back pieces) = 236-260-284-300-316-348 stitches. Continue with stocking stitch and A.1, without further increases, until the yoke measures 20-20-22-24-26-28 cm from the marker after the neck. Now divide for the body and sleeves: Work 3 stitches in A.1 as before (belong to the back piece), place the next 49-53-59-61-63-67 stitches on a thread for the sleeve, cast on 9-9-9-11-11-11 stitches (in side under sleeve), work the next 69-77-83-89-95-107 stitches (front piece), place the next 49-53-59-61-63-67 stitches on a thread for the sleeve, cast on 9-9-9-11-11-11 stitches (in side under sleeve), work the last 66-74-80-86-92-104 stitches (rest of back piece). Finish the body and sleeves separately. The piece is now measured from here! BODY: = 156-172-184-200-212-236 stitches. Continue in the round with stocking stitch, knit over knit and purl over purl over A.1 (the new stitches under the sleeves are worked in stocking stitch). When the body measures 24-26-26-26-26-26 cm from the division, work as follows: * Purl 2, knit 1 (stitches from A.1), knit 9-9-9-11-11-11 and increase 3-3-3-5-5-5 stitches evenly spaced (= 12-12-12-16-16-16 stitches), knit 1, purl 2 (stitches from A.1), knit 63-71-77-83-89-101 and increase 11-11-13-15-17-17 stitches evenly spaced (= 74-82-90-98-106-118 stitches) *, work from *-* 1 more time = 184-200-216-240-256-280 stitches. Change to circular needle size 4 mm. Work rib (purl 2, knit 2) for 4 cm. Cast off with knit over knit and purl over purl. The jumper measures approx. 52-54-56-58-60-62 cm from the shoulder. SLEEVES: Place the 49-53-59-61-63-67 stitches from the thread on the one side of the piece on short circular needle/double pointed needles size 5 mm and knit up 1 stitch in each of the 9-9-9-11-11-11 stitches cast on under the sleeve = 58-62-68-72-74-78 stitches. Insert a marker in the middle stitch of the new stitches under the sleeve. Allow the marker to follow your work onwards; it is used when decreasing under the sleeve. Continue with stocking stitch in the round. When the sleeve measures 4 cm, decrease 1 stitch on each side of the marker – read DECREASE TIP. Decrease like this every 6-5-3½-2½-2½-2 cm a total of 5-6-8-9-9-10 times = 48-50-52-54-56-58 stitches. Continue working until the sleeve measures 33-32-31-29-28-26 cm. Knit 1 round and increase 8-6-8-10-8-10 stitches evenly spaced = 56-56-60-64-64-68 stitches. Change to double pointed needles size 4 mm and work rib (knit 2, purl 2) for 9 cm. Cast off with knit over knit and purl over purl. Work the other sleeve in the same way. ASSEMBLY: Fold the neck double to the inside and sew down. To avoid the neck being tight and rolling outwards, it is important that the seam is elastic. |
|||||||
Diagram explanations |
|||||||
|
|||||||

|
|||||||

|
|||||||
|
Have you made this or any other of our designs? Tag your pictures in social media with #dropsdesign so we can see them! Do you need help with this pattern?You'll find tutorial videos, a Comments/Questions area and more by visiting the pattern on garnstudio.com. © 1982-2024 DROPS Design A/S. We reserve all rights. This document, including all its sub-sections, has copyrights. Read more about what you can do with our patterns at the bottom of each pattern on our site. |
|||||||


With over 40 years in knitting and crochet design, DROPS Design offers one of the most extensive collections of free patterns on the internet - translated to 17 languages. As of today we count 304 catalogues and 11422 patterns - 11422 of which are translated into English (UK/cm).
We work hard to bring you the best knitting and crochet have to offer, inspiration and advice as well as great quality yarns at incredible prices! Would you like to use our patterns for other than personal use? You can read what you are allowed to do in the Copyright text at the bottom of all our patterns. Happy crafting!
Comments / Questions (8)
Ik heb verkeerd gelezen, waardoor mijn boordsteek nu (2x recht, 2x averecht) is. Moet ik het breiwerk nu weer uithalen of kan ik het breischema nu nog steeds volgen?
19.04.2024 - 07:59DROPS Design answered:
Dag Celine,
Je kunt het breischema aanhouden, maar ik weet niet of de boord van de hals dan in jouw geval mooi doorloopt in de raganlijn. En verder: als je ook op de manchetten en de boord van de panden dezelfde boordsteek wilt hebben, zorg er dan voor dat het aantal steken, vlak voordat je met de boord begint, deelbaar is door 4.
19.04.2024 - 20:04Sto lavorando una tg XS ma non mi trovo con le lunghezze indicate: sprone 20cm+corpo 24cm+bordo 4cm= 48 e non 52 come indicate voi. Dove lavoro i 4 cm di differenza visto che per il collo avete indicato 16cm che ho lasciato a parte?
13.02.2024 - 13:42DROPS Design answered:
Buonasera Licia, i 4 cm fanno parte del collo come indicato nello schema delle misure in fondo alla pagina. Buon lavoro!
17.03.2024 - 18:11Helt otroligt dålig beskrivning Har stickat mycket men här stämmer inte antal maskor, var ska mönstret vara? Tråkigt men får skapa nåt egeg
03.02.2024 - 16:17Hello, making XL, I have 88 st after completeing the neck, I am increasing 20 st each increase round - 88st plus 20st = 108st. I am increasing for raglan every 2nd round a total of 25 times to get to 308 st. Does 25 times = the non increase row and the increase row? If I do this, by time I get to the 19th round I already have my 308 stiches, before getting to the 25th round? Even if I include the 2 rounds to get me from 88st to 108 it is still only the 21st round? thanks Rebecca
15.01.2024 - 16:01DROPS Design answered:
Dear Mrs Woods, you increase for raglan 8 sts on every increase round and repeat these increases on every other round a total of 25 times (= 50 rounds in total). Then increase 2 more times on body only (= 4 rounds with only 4 sts increased on each of these rounds = 8 more sts = 316 sts). Happy knitting!
15.01.2024 - 16:36Efter halsresåren får jag ej till första varvet. Har 80 maskor på stickan. Storlek S. Efter ökningarna på första varvet blir det 72 maskor. Har fortfarande 8 maskor kvar på varvet. Vad gör jag för fel? Tacksam för svar. Vänligen Amy Edlund
26.11.2023 - 12:56DROPS Design answered:
Hei Amy. Du har 80 masker og skal nå strikke 1. omgang slik: A.1 (6 masker) + 6 masker rett + 1 øke (= 1.erme) + A.1 (6 masker) + 22 masker + 7 økte (= forstykket) + A.1 (6 masker) + 6 masker rett + 1 øke (= 2.erme) + A.1 (6 masker) + 22 masker + 7 økte (=bakstykket) = 96 masker. Bare med tall og de maskene som er økt jevnt fordelt på ermene og for/bakstykket kan man skrive slik: 6+7+6+29+6+7+6+29 = 96 masker etter 1. omgang. mvh DROPS Design
27.11.2023 - 09:50Hi Lena, ich stricke den Pullover auch gerade und habe etwas gebraucht bis ich draufgekommen bin, dass bei den Zunahmen auch immer das Muster A1 mit rein muss (d.h. Ganz unten in der Beschreibung 2 li, 2 re, 2 li, also insgesamt jeweils 6 Maschen und das 4 x [quasi für jeden raglan-Teil). So solltest du auf die 96 Maschen für Gr S kommen.
01.11.2023 - 21:00Meine Frage bezieht sich auf die Zunahme nach dem Kragen. Ich habe 80 Maschen angeschlagen und (wie in der Anleitung beschrieben) nach 16cm in der Höhe wie folgt zugenommen: 6+1, 22+7, 6+1, 22+7. Jetzt bleiben jedoch 8 Maschen übrig, da 6+1+22+7+6+1+22+7= 72. 72≠80 was machen ich mit den übrigen 8 Maschen? Vielen Dank vorab für die Hilfe :)
29.10.2023 - 14:34DROPS Design answered:
Liebe Lena, in M stricken Sie die 80 Maschen so: 6 M A.1 + 6+1 M glatt rechts + 6 M A.1 + 22+7 M glatt rechts + 6 M A.1 + 6+1 M glatt rechts + 6 M A.1 + 22+7 M glatt rechts = 6+7+6+29+6+7+6+29=96 Maschen. Viel Spaß beim stricken!
30.10.2023 - 16:31Lavender
03.08.2023 - 14:44